
How to Secure Your Website with OpenSSL and SSL Certificates
The Internet has become the number one resources for news, information, events, and all things social. As most people know there are many ways to create a website of your own and capture your own piece of the internet to share your stories, ideas, or even things you like with others. When doing so it is important to make sure you stay protected on the internet the same way you would in the real world. There are many steps to take in the real world to stay safe, however, in this article we will be talking about staying secure on the web with an SSL certificate.
OpenSSL is a command line tool we can use as a type of "bodyguard" for our webservers and applications. It can be used for a variety of things related to HTTPS, generating private keys and CSRs (certificate signing requests), and other examples. This article will break down what OpenSSL is, what it does, and examples on how to use it to keep your website secure. Most online web/domain platforms provide SSL certificates for a fixed yearly price. This method, although it takes a bit of technical knowledge, can save you some money and keep you secure on the web.
* For example purposes we will use testmastersite.com for commands and examples
How this guide may help you:
- Using OpenSSL to generate and configure CSRs
- Understanding SSL certificates and their importance
- Learn about certificate signing requests (CSRs)
- Learn how to create your own CSR and private key
- Learn about OpenSSL and its common use cases
Requirements
- A Linux-based OS
- Comfort with command line tools
OpenSSL
The first thing to do would be to generate a 2048-bit RSA key pair on your machine. This pair i'm referring to is both your private and public key. You can use a list of tools online to do so, but for this example we will be working with OpenSSL.
What are SSL certificates and who cares?According to GlobalSign.com an SSL certificate is a small data file that digitally binds a cryptographic key to an organizations details. When installed on a webserver, it activates the padlock and the https protocol and allows secure connections from a web server to a browser. Let me break that down for you. An SSL certificate is like a bodyguard for your website. To confirm that a site is using an SSL you can typically check that the site has an https in the url rather than an http string in the name. the "s" stands for Secure.
-
Example SECURE Site: https://www.testmastersite.com/
- Example INSECURE Site: http://www.testmastersite.com/
SSL security is used to secure credit card transactions, data transfers and logs, and secure browsing in general. SSLs help secure all types of information being transferred over the internet. They provide a trust between users and your site or application. it ensures them that they are on a site that has a bodyguard and can protect their data when they are buying things online or creating an account in your app. The PCI industry requires it as a standard for anyone looking to create an application or site that processes credit card data. This certificate can help prevent hackers from penetrating your website and pulling login information or grabbing credit card data from your databases. In the same sense it keeps shady looking people who might have intentions of stealing information or corrupting your website from entering your business that you put money, time, and work into.
What are CSR's and why are they important?If you want to get an SSL certificate from a credible CA (certificate authority) you need to generate a CSR.
A CA, or certificate authority, is an entity that provides digital certificates for you. Let's Encrypt is a one of the most popular examples of a CA.
If you want to create an SSL certificate from a certificate authority (CA), you have to generate a certificate signing request (CSR). A CSR consists of the public key and additional information needed for the certificate. Both of these are merged into the certificate when it's signed.
Whenever you generate a CSR, you'll be prompted to setup information for the certificate. The prompts and information requested are the Distinguished Name(DN), Common Name (CN), and Fully Qualified Domain Name (FQDN) for the host (testmastersite.com) that's getting the certificate.
Creating a Self-Signed Certificate
Once installed we can generate both a public key and private key with one command.
To generate a public and private key with a certificate signing request (CSR), run the following OpenSSL command:
openssl req -out testmastersite.csr -new -newkey rsa:2048 -nodes -keyout testmastersite.key
This command creates the following from scratch:
- The
req -outcommand creates the required CSR an an output. - Creates a CSR named testmastersite.csr (you can change the name to whatever you'd like)
- Creates a 2048-bit private key named testmastersite.key (can also be changed)
Both keys are required for creating the SSL which I will talk about in the next step.
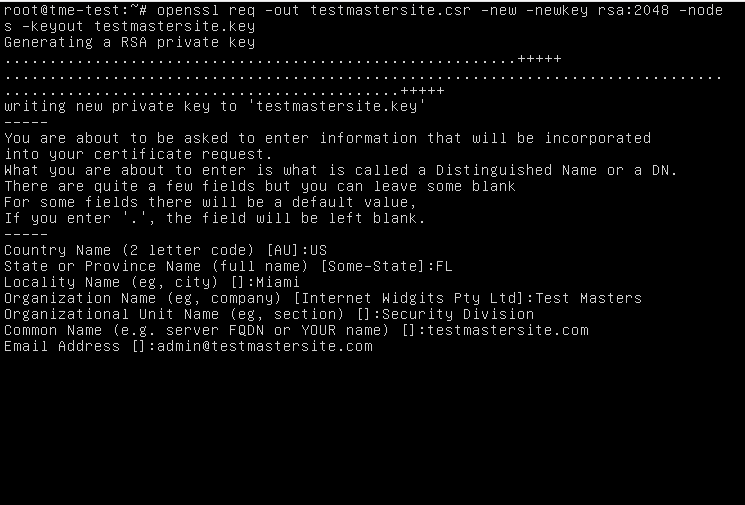
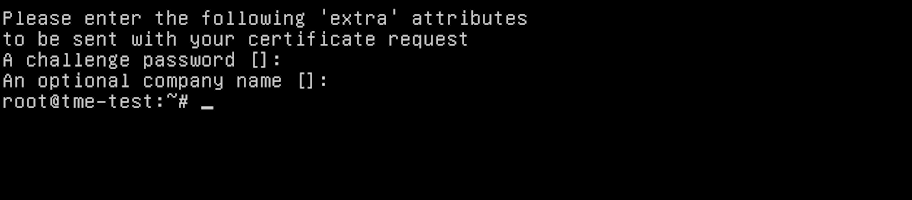
Note: An optional challenge password prompt will show up as well.
Creating A Self-Signed SSL Certificate vs. CA-signed Certificates
Now that the groundwork is completed you can create an SSL certificate. As stated before these certificates will help block bad actors from accessing private and critical data on your website or application so these next steps is where the fun begins. You can issues your own self-signed certificate, however, A self-signed certificate is a certificate that is signed with its own private key.
Self-signed certs can be used to encrypt data just as well as any CA-signed certificates, but your users will get warnings that says that the certificate is not trusted by their computer or browser, which might scare them away. With that being said you should only use self-signed certs if you do not need to prove your applications identity to its users. Examples would be things like blog sites, or non-production sites. CA-certificates are highly recommended for things like E-commerce sites that have people process payments or applications that save users days. Here are steps for obtaining a free CA-certified cert and creating your own self-signed certs.
Use this method if you want to use HTTPS (HTTP over TLS) to secure your personal site and don't require it to be signed by a CA:
openssl x509 -signkey testmastersite.key -in testmastersite.csr -req -days 365 -out testmastersite.crt
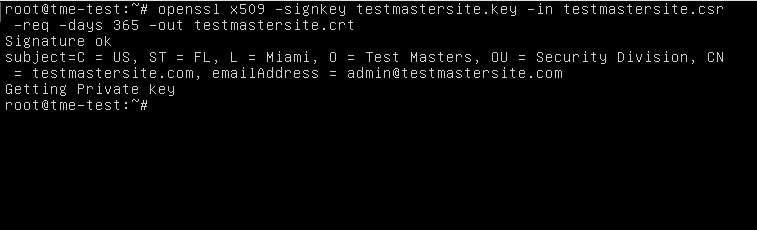
This command creates a certificate named testmastersite.com.crt from the previous key and CSR that we created earlier. The -signkey flag signs the key. The x509 flag is used to create an X509 certificate. The -days 365 flag sets the expiration for the certificate. You now have three files you've created.
- The testmastersite.com.key (key file used for creating an SSL cert)
- The testmastersite.com.csr (certificate signing request file used to create an SSL cert)
- The testmastersite.com.crt (the SSL certificate)

Obtain a Free TLS Certificate from Certbot
Let's Encrypt is a trusted platform that can issue signed certificates which are valid for 90 days. You can always renew them yourself and have them remain valid indefinitely. Lets Encrypt suggests a manual tool that can be used called certbot that we will use to obtain the CA-signed cert.
There are a few requirements needed for renewing the cert with certbot:
- A running website that is already online and hosting (our example again is testmastersite.com)
- An open port 80
- The DNS for the hostname you are requesting must resolve to the appliance
- The appliance must be able to reach Let's Encrypt on TCP 443
- Let's Encrypt must be able to reach the appliance on TCP 80.
To install and setup certbot to create the CA signed certificate you can follow the steps on the certbot website.
Apache SSL configuration example and use case
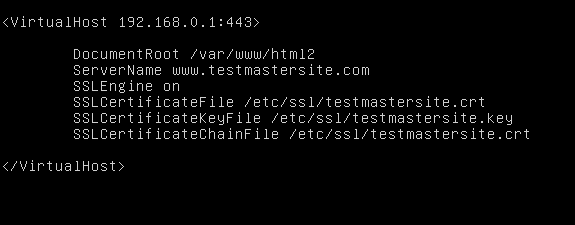
You can now take these certs and place it in your specified SSL cert directories. An example would be Apache's main configuration file is typically named httpd.conf or apache2.conf. Inside the config files you can find where apache has configured the SSL cert location.
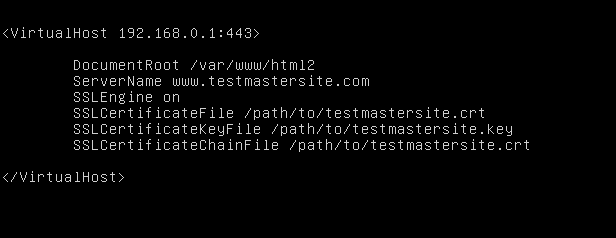
You can change these locations to wherever you'd like to.
- SSLCertificateFile is your testmastersite.com certificate file (named testmastersite.com.crt).
- SSLCertificateKeyFile is the .key file generated when you created the CSR (named testmastersite.com.key).
- SSLCertificateChainFile is the testmastersite.com certificate file (named testmastersite.com.crt)
- Common issue: If the SSLCertificateChainFile directive does not work, try using the SSLCACertificateFile directive instead.
The best place to put your SSL keys and certs that you've created that is recommended on a Linux machine is the /etc/ssl/certs/ directory.
If you move the 3 files, the CSR, key, and crt files into the /etc/ssl/certs directory your apache configuration should look like this:
To test that your SSL's are in the right place you can run this command:
apachectl configtest
If the test completes successfully you can restart apache with these commands:
apachectl stop
apachectl start
Verify your keys manually
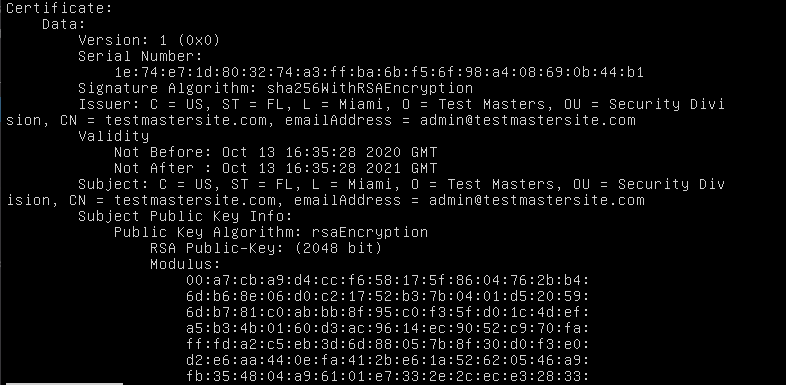
As we have already mentioned, it would be wise to check the information provided in the CSR before applying for a certificate. Use the following commands to verify your certificate signing request, SSL certificate, and key.
This command will verify the CSR and display the data in the CSR:
openssl req -text -noout -verify -in testmastersite.csr
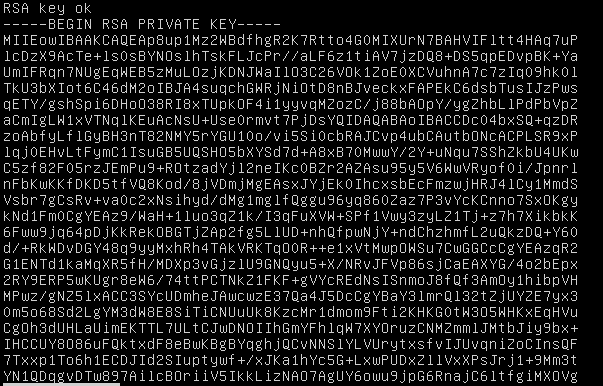
This command will verify the key and its validity:
openssl rsa -in testmastersite.key -check
These commands should show the certificate data including the serial number, email address, the signatures algorithm, and the private key which should look something like the snippet below.
Example output of openssl req -text -noout -verify -in testmastersite.csr:
Example output of openssl rsa -in testmastersite.key -check:
Testing New Cert with Digicert SSL Installation Diagnostic Tool
DigiCert has a free online tool called DigiCert® SSL Installation Diagnostics Tool that can help you confirm your SSL cert and its information once you have it applied and running.
Renewing CertificatesNow that you have your SSL and set it to expired in 365 days you can renew it before it gets expired. A rule of thumb (for security purposes) is to not use old CSRs when renewing certificates. You should always generate a new CSR and key when renewing a certificate.
Also, it is recommended to renew an SSL certificate before the expiration date. Otherwise, a new certificate purchase will be required.
ConclusionThese examples cover only a few ways to deal with SSL certificates and how people use them. There are many of instances of how SSLs are used. Feel free to suggest other use cases in the comments to share how you or your organization works with SSL certificates.

Tedley is a certified Linux Engineer who takes pride in advocating open source approaches to business. If he is not arguing with friends about switching to Linux, his time is mostly spent playing DnD, board games, fighting games, or contributing to open source by means of blogs, educational plans, and applications. You can find him on LinkedIn or Twitter.
Recent Articles


