
Linux Command Line Interface Introduction: A Guide to the Linux CLI
Let’s get to know the Linux Command Line Interface (CLI).
- Introduction
- A bit of history
- First look at the command line
- Command syntax
- Notes
- Basic commands
- pwd
- ls
- file
- cat
- cd
- clear
- history
- cp
- mv
- rm
Introduction
The Linux command line is a text interface to your computer.
Also known as shell, terminal, console, command prompts and many others, is a computer program intended to interpret commands.
Allows users to execute commands by manually typing at the terminal, or has the ability to automatically execute commands which were programmed in “Shell Scripts”.
A bit of history
The Bourne Shell (sh) was originally developed by Stephen Bourne while working at Bell Labs.
Released in 1979 in the Version 7 Unix release distributed to colleges and universities.
The Bourne Again Shell (bash) was written as a free and open source replacement for the Bourne Shell.
Given the open nature of Bash, over time it has been adopted as the default shell on most Linux systems.
First look at the command line
Now that we have covered some basics, let’s open a terminal window and see how it looks!
When a terminal is open, it presents you with a prompt.
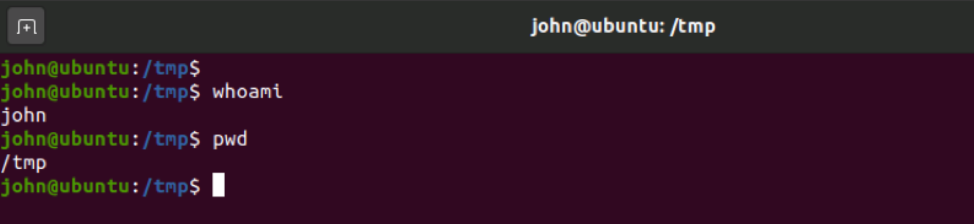
Let's analyze the screenshot above:
Line 1: The shell prompt, it is composed by username@hostname:location$
- Username: our username is called “john”
- Hostname: The name of the system we are logged on
- Location: the working directory we are in
- $: Delimits the end of prompt
After the $ sign, we can type a command and press Enter for this command to be executed.
Line 2: After the prompt, we have typed the command whoami which stands for “who am i“ and pressed [Enter] on the keyboard.
Line 3: Shows us the result of the whoami command we have previously issued, also known as command output. This command simply prints out the username of the current user.
Line 4: Shows an example of another basic command called pwd which stands for print working directory.
Line 5: As seen before, this line shows the result of the command previously issued. /tmp is our working directory.
Line 6: Presents us with a new prompt, and waits for us to type a new command.
Command syntax
Commands can be run by themselves, or can accept arguments to alter their behavior.
A typical syntax can look similar to this:
command [-argument] [--long-argument] file
Example:

At first, we entered the command ls which stands for list. By default this command will print the content of the current directory.
Secondly, we have added an argument to ls by typing a space and -l. This argument is changing the output format of ls and stands for “long listing format”.
Next, we have added another argument -h which stands for “human”, this argument instructs the ls command to print file size in a human readable format.
Later on, we have combined two arguments, -l and -h in -lh which gives us the same result and we have given a file name to “ls”. The result shows us only the file passed as the last argument.
As a final example, we have replaced the short argument -h with its equivalent long argument form --human-readable. As you can see, the command’s output didn’t change.
There are a few important things to keep in mind when using a Linux shell:
- It is case sensitive
In a Linux shell, commands, files and directory names are case sensitive meaning that typing pwd will print the current working directory and typing PWD will return an error similar to -bash: PWD: command not found
- The
/(forward-slash) is a special character used as directory separator
The Linux CLI is full of special characters, and we will go into more detail about this topic. For the moment, just keep this in mind.
- File extensions don’t matter
If you come from a windows background, a file with .exe extension means it is an executable file. In Linux CLI, the file kind is determined automatically. (By reading the file header).
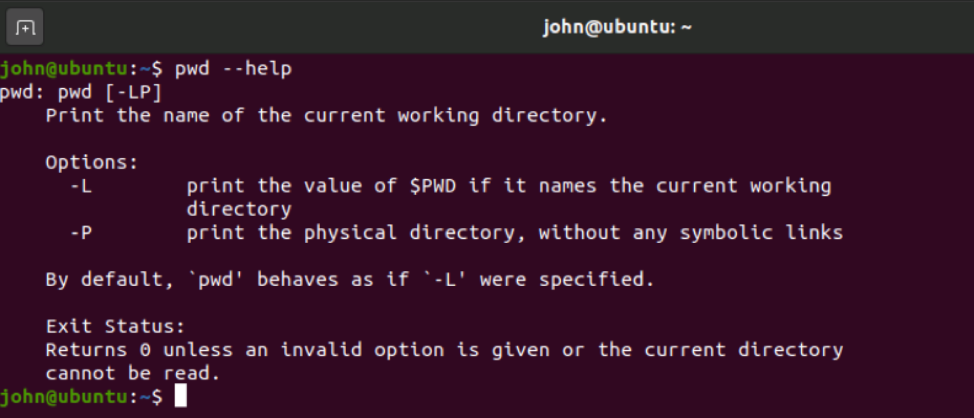
- Nearly every Linux command supports
--helpargument
During your journey with the CLI, you will often wonder “what argument do I need to do X?” The answer is just a --help away.
Basic commands
Fantastic, you have made it this far. You have proven your motivation!
When using the CLI there are some basic commands which are used constantly even by the most expert users.
Those commands enable us to perform basic operations such as moving around the folders structure, gather information, perform changes.
We have seen some of those already, for example we have used pwd to print the working directory and ls to list the content of a directory, but now let’s expand our list of commands!
pwd
As we have seen before, pwd will simply print out the current working directory.

ls
We have already used this command before, and we already know what it does. It lists the content of a given directory. The peculiarity of this command is that it supports a wide range of arguments.
file
If you read the notes earlier, we stated that linux does not rely on file extension to understand what kind of file it is dealing with.
This command will show the kind of a file passed as argument.
In the example below, we see john_file with a “.exe” extension, the file command outputs the real file kind, in this case a simple text file.

cat
The cat command will print out the content of a text file given as argument.

cd
The cd command, which stands for Change Directory, will change your working directory to the one passed as argument.
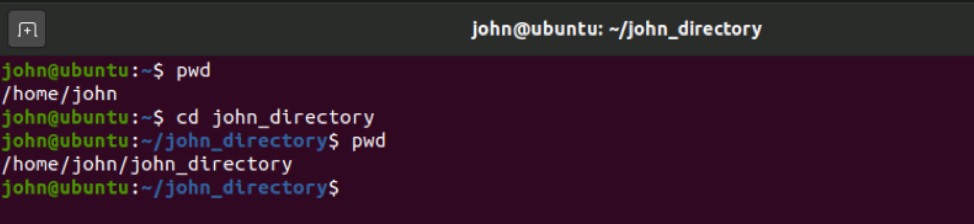
Note how the prompt has changed as well.
clear
After some time using the terminal, your screen will look messy and confusing.
To clear the screen and start all over, type the clear command.
history
The history command, will show an historical list of commands that were entered in the terminal session.

cp
The cp command, which stands for copy, is used to create a copy of a file/directory.
To create a copy of john_file and call our copy copy_of_john_file we will use the cp command.

The cp command will not produce any output, but our action was performed as expected.
mv
The mv command, which stands for move, moves a file/folder to a new location, or renames it.
To rename the file copy_of_john_file to john_file_renamed we will use the mv.
To move the file john_file_renamed inside john_directory we will still use mv.
Note: When specifying a file in the terminal, a trailing forward-slash “/” indicates it is a directory.
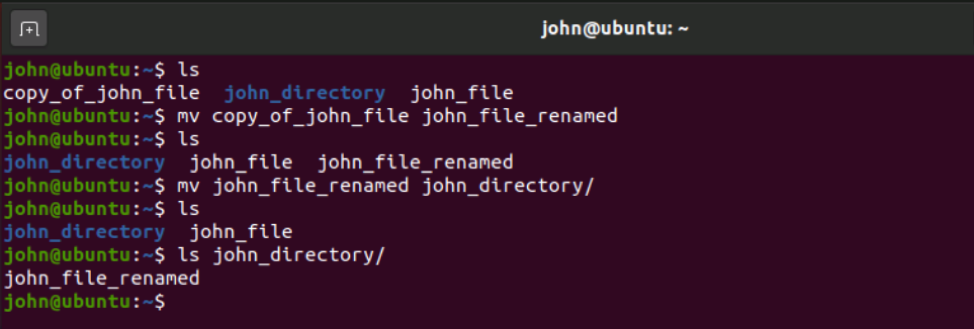
Like cp, the mv command will not produce any output even though our operation was performed successfully.
rm
Our last but not least command for today’s article is rm, which stands for remove.
It is used to delete files, but can delete directories as well if instructed to do so.
Let’s try now to delete all files and the folder we have created.
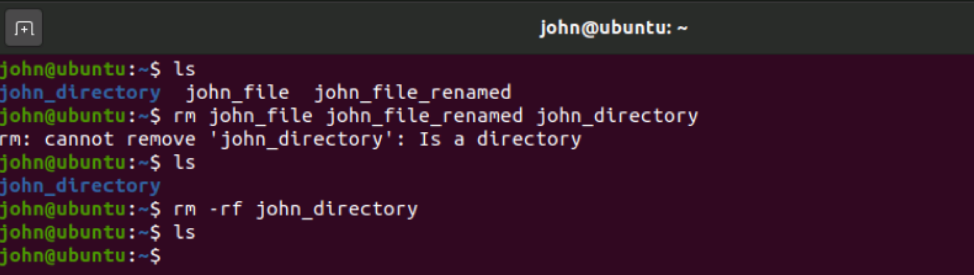
As you can see, at first we have tried to delete everything altogether. The rm command like the previous commands will normally not produce any output unless an error is generated.
Our command produced an error saying that john_directory is a directory and by default will not be removed. The two files (john_file and john_file_renamed) are removed, so the operation is executed partially, with the only exception regarding the errors shown on screen.
By adding two arguments to rm we can achieve the folder’s removal as well.
The arguments are -r (recursive) and -f (force). The first one induces the operation to work on every single file and folder contained recursively on the directory(ies) passed as argument(s), while the latter forces the operation ignoring errors and disabling any confirmation prompt.
Recent Articles


