
The org-mode LaTeX exporter: LaTeX for non-TEXers

By: Pedro A. Aranda Gutiérrez This article shows how to configure and use the org-mode provided by Emacs to produce pretty documents. org is a multi-purpose structured text file format and Emacs can translate it to LaTeX files which, in turn, can be translated into pretty PDF documents, taking advantage of all the typesetting facilities provided by LaTeX. This is a compendium of tricks evolved out of the experience of working with Emacs, org-mode and LaTeX.
1 Introduction
I got exposed to Emacs in the 1990’s when I used Unix mainframes and VT220 terminals for work. At the beginning, it was just my programmer’s editor and when I got used to it, I looked for ports to use at home. Initially a dream, it became a reality, first with a port[10] and them, when I installed my first Linux (from a floppy-disk set). Much later, I started to be exposed to LaTeX. It wasn’t until I was working on my PhD that I fully understood its potential when my Office suite collapsed on a last minute template change for a conference. It took me less time to install the full texlive distribution, export my paper to LaTeX, clean up the result and change the template than to fix the original document after changing the template. What I have always liked in LaTeXis that what you write is what you mean. The use of tags is a minor inconvenience for me.
The next step in what you write is what you mean path after LaTeXwas org-mode. Initially a hint from my PhD advisor as a nice way to produce slides, it took me some time to realize its full potential both for presentations and documents. org-mode is included in the stock Emacs code.
You can always be in the forefront and get the most recent public version of org-mode from the repositories, but a fairly recent version of Emacs guarantees a nice, up-to-date feature set in org-mode. In my case I use an Emacs 28.0.9x, a pre-release of the next stable Emacs which I compile myself once a week, both on Ubuntu 20.04 and macOS. If you want to produce a nice PDF file from org-mode, you rely on its LaTeXexporter and use a TEX distribution like texlive in Linux or MacTeX in macOS for typesetting and output generation.
To prove my case, I keep this article in an org file that I use to explore org mode features. It is a living demo of how nicely you can write things using org-mode and then generate PDFs using LaTeX. My main sources of inspiration are the org-mode documentation[8] and an oldish Cookbook[4] and all those moments where I’m working on a document and feel that something is missing.
2 Emacs tweaks
Think for a moment you are working on a document and can hide section contents and work on the document structure directly to shuffle sections, etc. This justifies the effort of learning org-mode1. Now add the LaTeX export feature to the equation that makes this article possible. I hope I’ve made my case. To experiment with org-mode, I recommend using Emacs27 (or newer). One of the beauties of Emacs is that we can customize it to our needs. You do this by adding Emacs Lisp code to your Emacs init file2 or to a file that will be loaded by it on startup. Let’s see what we have to add to it to activate org-mode.
2.1 Activating org-mode and LaTeX export
To make sure that org-mode is loaded, you will need to add the following:
code (require 'org)
It is advisable that you customize org-mode variables with the following code:
(setq org-src-preserve-indentation t

    org-src-fontify-natively t

    org-export-latex-listings t

    org-latex-listings 'listings

    org-latex-prefer-user-labels t

    org-confirm-babel-evaluate nil

    org-latex-pdf-process '("latexmk -bibtex -f %f")

    org-babel-python-command "/usr/bin/env python3")

(add-to-list 'org-latex-packages-alist '("" "listings"))
To activate LaTeX export, you will need to import ox-latex with a
(require 'ox-latex)

in your .emacs.d/init.el file.
2.2 Activating external language execution
To be able to execute Python code in org org files, you will need to activate it after the org mode has been loaded. The following code will do the job (note that we use a (progn) to allow for more code to follow the =org-babel-do-languages" call):
(eval-after-load "org"

    (progn

        (org-babel-do-load-languages

            'Org-babel-load-languages

            '((python . t)))

        )

    )
1And adding an export to LaTeX feature (no, just kidding).
2The Emacs init file is usually ~/.emacs.d/init.el
There are many other nice languages and programs that integrate well with org-mode. Examples are ditaa[9] for quick diagrams and PlantUML[7] for more complex sequence and class diagrams. They are not difficult to integrate and will give an additional punch to your documents and presentations.
2.3 Low-hanging fruits: local file variables
Emacs is not only customized with the Lisp code it loads on startup. As most editors, it can load customisations that are specific to the file it is editing through Local variables.
It is easy to use automatic paragraph filling in Emacs. Initially this can be done with # eval: (<elisp code>) and setting the fill-column variable to e.g. 80 in the Local variables block at the end of the file:
# fill-column: 80

# eval: (auto-fill-mode t)
An additional eval statement in the local variables should help you setting the language for flyspell. It is advisable to trust yourself and allow the eval: to proceed without asking whether it should be executed or not. To do so, add:
;; Define safe local variables

(setq enable-local-eval t)
to your Emacs initialisation code. Alternatively, include the (auto-fill-mode t) in your org-mode-hook. I prefer to do it on a file-per-file basis, since I also use org-mode to produce Beamer presentations and I’m not used to having auto-fill-mode enabled there.
2.4 Save and export directly
Emacs provides you with hooks to extend the way you do many things, including saving files. The way to proceed is to write a function to implement the additional functionality and add it to the corresponding hook.
If we want to automatically add the export to LaTeX functionality after the file has been saved, we need to create a function to invoke the exporter and add it to the after-save-hook in your Emacs init file. Since it makes sense to call the LaTeX exporter if the file being saved is an org file that is intended to be exported to LaTeX . This is not self-evident, because once you start to use org-mode you might want it in other tasks. A simple way to check that the current buffer is using org-mode and to look for a line specifying the LATEX_CLASS3is:
(defun org-mode-save-export ()

    "Export the current buffer to latex if we are in org-mode

    and the file contents hints LaTeX"

    (interactive)

    (when (check-mode (list 'org-mode))
3This function only works if you only want org-mode to export to LaTeX documents. It needs to be extended to cope with presentations.
(save-excursion

    (goto-char (point-min))

    (when (re-search-forward "^#\\+LATEX_CLASS: \\([^ ]+\\)$"

(point-max) t 1)

        (message "Exporting to LaTeX...")

        (org-latex-export-to-latex)))))
You need to add this function to the after-save-hook in the Emacs init file:
(add-hook 'after-save-hook #'org-mode-save-export
2.5 PDF preview
You can preview the generated PDF on Emacs directly with the key sequence C-c C-e l o or Org → Export-publish from the menu and then [l] Export to LaTeX and [o] As PDF file and open.
Alternatively use an external PDF previewer to see the result. When using an external pre viewer, you can rely on latexmk[3] and a small script to compile the exported output once it is available. latexmk can drive your PDF previewer directly.
#!/bin/bash

filename="${1%.*}"

while :; do

    [ -f ${filename}.tex ] && break

    sleep 1

done

latexmk -pvc ${filename}
Take this script as a starting point and expand it to your needs. You may want to launch Emacs from it to edit the org file and then automatically clean up your directory when you quit the script (or Emacs). Additionally, read the latexmk documentation to adapt it to your PDF previewer and other peculiarities in your system.
Alternatively, explore other ways of viewing PDF files inside Emacs. A starting point for you to explore could be the PDF tools[6].
3 org setup: the document prelude
Now that you have Emacs ready for org, you can start editing. When invoking emacs, make sure that the file you work on has an .org extension. This will activate org-mode in Emacs.
In order to activate the LaTeX exporter, the document needs to start with a prelude to set up the environment, which includes the LaTeX packages you use and, possibly, some tweaks to make them work as you like. The most version of a header looks like this.
#+TITLE: <title here>

#+SUBTITLE: <subtitle here>

#+LATEX_CLASS: article

#+LATEX_CLASS_OPTIONS: [a4paper,11pt,twoside]

#+OPTIONS: toc:nil H:3
Things to take into account here are:
-
Header limit: setting the header limit to H:3 makes all **** headers (4th$ level and beyond) in org to be translated as enumerate with the header and the text as an
\itemin LaTeX. I personally use org lists instead. It makes the document easier to edit. -
Table of contents: toc:t will add a table of contents at the beginning of the document, directly under the header.
-
LaTeX class to export to: article or report are good candidates. The choice will influence how the different header levels are translated to LaTeX. article will rely on
\section{}and friends for all levels, while report will generate \chapter{} for level 1 headings in org, which will generate page breaks before each chapter by default. -
Options for the document class: the
#+LATEX_CLASS_OPTIONS:line controls the way your document is typeset. Together with the#+LATEX_CLASS:line in the example, the exporter creates the following LaTeX code:
\documentclass[a4paper,11pt,twoside]{article}
3.1 Including a bibliography
I tend to use a single bibliography file with the same file name as the main org file and extension .bib. The bibliography package I use in biblatex and the back-end in my case is bibtex to profit from my bibliography files.
My bibliography setup in the document header is the following:
# Bibliography

#+LATEX_HEADER: \usepackage[backend=bibtex]{biblatex}

#+LATEX_HEADER: \bibliography{\jobname.bib}
To print the references, just include the following at the end of the file (or where you want to place them):
#LATEX: \printbibliography
If you need the bibliography section to appear in the table of contents (at least in the PDF information), you need to include:
#+LATEX_HEADER: \defbibheading{bibliography}[\refname]{\section{#1}}
in the header above4.
3.2 Formatting listings with fancyvrb
Use the fancyvrb package instead of the default listings. The best way is to trick org-mode into thinking that you are indeed using the listings package and then rewrite everything to use fancyvrb with:
#+LATEX_HEADER: \RequirePackage{fancyvrb}

#+LATEX_HEADER: \DefineVerbatimEnvironment{verbatim}{Verbatim}{fontsize=\scriptsize}

#+LATEX_HEADER: \DefineVerbatimEnvironment{lstlisting}{Verbatim}{fontsize=\scriptsize}
4The default definition for the bibliography header uses \section*{#1} and that excludes numbering and, thus, the addition to the table of contents. When using the report class, consider using \chapter{} instead.
or, if you want to get the results in a different color (e.g. blue):
#+LATEX_HEADER: \usepackage{color}

#+LATEX_HEADER: \RequirePackage{fancyvrb}

#+LATEX_HEADER: \DefineVerbatimEnvironment{verbatim}{Verbatim}{fontsize=\scriptsize,formatcom=\color{blue}}

#+LATEX_HEADER: \DefineVerbatimEnvironment{lstlisting}{Verbatim}{fontsize=\scriptsize}
Using the xcolor package instead of color will allow you to grade the colors like in blue!50. Additionally, it is highly recommended that you place:
#+LATEX_HEADER: \usepackage{upquote}
after configuring the listings in order to get the right characters for the single and double quote when copying and pasting from the resulting PDF file. NOTE: BEGIN_EXAMPLE=/=END_EXAMPLE blocks are handy if you want to include code and make sure it is never executed. These blocks will be exported using an lstlisting environment in LaTeX.
3.3 Using sans-serif fonts in the document
You can typeset your document in sans-serif fonts like Helvetica by including the following lines in your header:
#+LATEX_HEADER: \usepackage{helvet}

#+LATEX_HEADER: \renewcommand\familydefault{\sfdefault}
3.4 Changing the appearance of the document
You can also place the directives to change the appearance of the document in the header. In this example, we are using the following metrics in this document:
#+LATEX_HEADER: \setlength{\textheight}{230mm}

#+LATEX_HEADER: \setlength{\textwidth}{160mm}

#+LATEX_HEADER: \setlength{\voffset}{-10mm}

#+LATEX_HEADER: \setlength{\oddsidemargin}{0mm}

#+LATEX_HEADER: \setlength{\evensidemargin}{0mm}

#+LATEX_HEADER: \addtolength{\parskip}{0.33\baselineskip}

#+LATEX_HEADER: \setlength\parindent{0pt}
3.5 org listings
This line will allow you to include org-mode code as a listing in your document:
#+LATEX_HEADER: \lstdefinelanguage{org}{}
3.6 When the header grows too much
It is worth thinking about putting all the document customisation options directly in a LaTeX file and include it with:
#:LATEX_HEADER: \input{mycustom}
especially when it starts growing, although you lose the "one-file-for-all" feeling, which is also nice. But if you want to include lengthy customisations or more programming languages, this might pay off. There can also be a mix and match with some things in your mycustom.tex file and the document header.
3.7 The abstract
You can add an abstract to your articles, by including a #+BEGIN_abstract/#END_abstract block:
#+BEGIN_abstract

...The abstract text…

#+END_abstract
The first paragraph of the abstract will be indented. Use \noindent to remove the indentation.
3.8 Appendices
This is not exactly part of the header, but it controls the basic appearance of your document and, eventually, of the table of contents. If you need to distinguish between main matter and appendices, for example, for the bibliography discussed before, just include:
#+LATEX: \appendix
at the point in the document where you want the main matter to end. After this line, anything can be placed and numbered as an appendix.
3.9 Things to discard for the moment being
One of the things that does not work is to use the #+LANGUAGE: directive option to set the dictionary for fly/ispell-mode in Emacs. It only produces a directive in the PDF header.
#+LANGUAGE: es
just produces the following output in the TEX file:
\hypersetup{

    …

    pdfcreator={Emacs 28.0.91 (Org mode 9.5.2)},

    pdflang={Es}

}
4 org-mode goodies
An adequate mixture of org and LaTeX makes a document shine. Remember that since org-mode is somehow also LaTeX, we can use lots of LaTeX code in org documents, like, for example, \ldots, \LaTeX, inlined mathematical expressions. etc. A notable example is the \linebreak command. Sometimes line breaks are not correctly typeset by LaTeX and there you will need to insert it as you do in native documents to control that lines don’t overflow your margins. Another candidate is \clearpage. Use this at the end of the editing process if you need additional page breaks to make the final result look better.
If you need a larger block of LaTeX code, you can embed it with:
#+begin_export LaTeX

<your LaTeX code here>

#+end_export
Let’s dive into the exporter and examine how org-mode document structures are exported to LaTeX and how you can influence the way they are exported.
4.1 Tables
org tables are translated to LaTeX correctly:
Table 1:
The sample table
org LaTeX
test1 test2
test3 test4
This table is generated from the following code:
#+label: tab1

#+caption: The sample table

#+ATTR_LATEX: :environment longtable :align p{2cm}p{3cm} :placement [H] :center t | =org= |

\LaTeX |

|-------+--------|

| test1 | test2 |

| test3 | test4 |
If you don’t explicitly define the environment:, the exporter uses a tabular environment. To reference this table, you need to use the org way, i.e. Table\nbsp{}[[tab1]], which will produce Table 1 in the document. It is worthwhile examining the LaTeX code produced by the different environment settings. There is more about tables further down, when we explore how to create them with Python3.
4.2 Lists
Let’s test the environments produced by the different list types in org. The starting point is https://orgmode.org/manual/Plain-lists-in-LaTeX-export.html.
The basic list environments in LaTeX are not the best to produce pretty lists in your document. You get much better control with different packages that extend list creation. The enumitem package is very convenient because it provides for line-by-list and inlined lists. To use it, include the following lines in your document header:
# Compacted lists

#+LaTeX_HEADER: \usepackage[inline]{enumitem}

#+LaTeX_HEADER: \setlist{nosep}
If you don’t further customize the list, this is how a list with - markers is handled:
-
The first element
-
The second element
-
A sub element
-
And this is how a list with 1. with the subelement as 1) is handled:
-
The first element
-
The second element
-
A sub element
-
Elements with numeric order will always be 1., 2., etc. and numeric subelements will always be (a), (b) etc.
Now an experiment: Try to use itemize* to:
-
have lists in the same paragraph
-
make then look pretty
-
make this whole affair work
To produce this kind of enumerations, the prelude to the list has to be:
#+ATTR_LATEX: :environment itemize*

#+ATTR_LATEX: :options [itemjoin={,}, itemjoin*={, and }]
Not again with enumerate* to 1. see if we can have labels, 2. that look pretty, 3. make sense, and 4. make this whole affair work.
To get the last list, you need the following code:
#+ATTR_LATEX: :environment enumerate*

#+ATTR_LATEX: :options [itemjoin={{, }}, itemjoin*={{, and }}]
-
see if we can have labels
-
that look pretty
-
make sense
-
make this whole affair work.
As you can see, numbered inline lists produce a prettier output. Itemized inline lists need further customisation, so experiment with them to make them fit your needs.
4.3 Using Python3 to produce contents for the document
You can include Python code in your document to generate listings, tables, figures or even document contents on-the-fly. The generic org block structure is:
#+BEGIN_SRC python :results output :exports both

<your Python code here>

#+END_SRC

#+RESULTS:
This will typeset the Python code listing, followed by the output (to stdout) produced by the script in the #+RESULTS: line.
This is an example in Python3 for a simple Fibonacci series generator.
MAX_FIBO = 13

fibo = [ None ] * MAX_FIBO

golden = [ None ] * MAX_FIBO

fibo[0],golden[0] = 0,0

fibo[1],golden[1] = 1,1

for n in list(range(2,MAX_FIBO)):

    fibo[n] = fibo[n-1] + fibo [n-2]

    golden[n] = fibo[n-1] / fibo[n]

print (' '.join([f'{f:5d}' for f in fibo[1:]]))

print (' '.join([f'{g:.3f}' for g in golden[1:]]))


    1 1 2 3 5 8 13 21 34 55 89 144

1.000 1.000 0.500 0.667 0.600 0.625 0.615 0.619 0.618 0.618 0.618 0.618
In this second example, we use :results value instead of :results output, i.e.
#+BEGIN_SRC python :results value :exports both

<Python code>

return <something>

#+END_SRC

#+RESULTS:
to replace the #+RESULTS: with the value returned by the script:
MAX_FIBO = 13

fibo = [ None ] * MAX_FIBO

golden = [ None ] * MAX_FIBO

fibo[0],golden[0] = 0,0

fibo[1],golden[1] = 1,1

for n in list(range(2,MAX_FIBO)):

    fibo[n] = fibo[n-1] + fibo [n-2]

    golden[n] = fibo[n-1] / fibo[n]

return '\n'.join([' '.join([f'{f:<5d}' for f in fibo[1:]]),

        ' '.join([f'{g:.3f}' for g in golden[1:]])])


1 1 2 3 5 8 13 21 34 55 89 144

1.000 1.000 0.500 0.667 0.600 0.625 0.615 0.619 0.618 0.618 0.618 0.618
As you can see, you need to choose wisely between :results output and :results value because it influences the complexity of your code.
org-mode sets the code in a lstlisting and the results in a verbatim environment. Hence the need to redefine both environments in the document header, as shown in Section 3.2.
Remember that you need to activate Python execution in your org-mode customisation in Emacs. If you trust your code, you can declare Python code to be safe:
(eval-after-load "org"

    progn

;; enable python for in-buffer evaluation

    org-babel-do-load-languages

    'org-babel-load-languages

    '((python . t)))


;; all python code be safe

    setq org-confirm-babel-evaluate nil)

    setq org-babel-python-command "python3"))

)
4.4 Mixing and combining
Let’s try to generate a table with Python and export it. We can use most of the things we learned in Section 4.1.
The code below implies an extended version of tabulate.tabulate() that allows you to set the label, caption and the LaTeX attributes with attr_latex in the exported table. This version is a fork of the original code available at https://github.com/paaguti/python-tabulate.
The Python code should be set in a block with a :noweb header:
#+header: :noweb strip-export

#+BEGIN_SRC python :results value raw :exports both

<Python code>

#+END_SRC

#+RESULTS:
The following code, produces a nice table:
import math

import pandas as pd

import tabulate


xvals = [math.pi * i / 5 for i in range(10)]

df = pd.DataFrame({

    'x': xvals,

    'sin(x)' : [math.sin(xvals[i]) for i in range (10)],

    'cos(x)' : [math.cos(xvals[i]) for i in range (10)]

})


return tabulate.tabulate(df,

    headers=df.columns, tablefmt='orgtbl', floatfmt=".3f",

    caption='Table exported from Python with extended tabulate',

    label='labextend',

    attr_latex=':environment longtable :align p{2cm}p{3cm}p{3cm} :placement [h] :center t', showindex=False)
Table 2: Table exported from Python with extended tabulate
x sin(x) cos(x)
0.000 0.000 1.000
0.628 0.588 0.809
1.257 0.951 0.309
1.885 0.951 -0.309
2.513 0.588 -0.809
3.142 0.000 -1.000
3.770 -0.588 -0.809
4.398 -0.951 -0.309
5.027 -0.951 0.309
5.655 -0.588 0.809
4.5 Figures, placement, etc.
To ease figure placement, it is advisable to include the float package in the document header:
#+LATEX_HEADER: \usepackage{float}
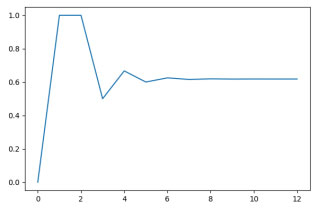
Let’s explore the ways of producing graphs. We will use Python3 to generate a graph that shows how to approximate the golden relation with the Fibonacci number:
import matplotlib, os

matplotlib.use('Agg')

import matplotlib.pyplot as plt

figure = './images/python-matplot-fig.png'

fig=plt.figure(figsize=(6,4))

MAX_FIBO = 13

index = [ n for n in range(MAX_FIBO) ]

fibo = [ None ] * MAX_FIBO

golden = [ None ] * MAX_FIBO

fibo[0],golden[0] = 0,0

fibo[1],golden[1] = 1,1

for n in list(range(2,MAX_FIBO)):

    fibo[n] = fibo[n-1] + fibo [n-2]

    golden[n] = fibo[n-1] / fibo[n]

plt.plot(index, golden)

fig.tight_layout()

plt.savefig(figure)

return '\n'.join(['#+ATTR_LATEX: :width .7\\textwidth :placement [H]',

'#+CAPTION: Approaching the golden relation with Fibonacci',

'#+NAME: plot2',

f' [[file:{figure}]]'])

If you execute the code directly by placing the cursor on the #+BEGIN_SRC line, you can see the org code produced and will get the figure duplicated in your PDF file. You need to remove this code to get the graph included only once.
As you can observe, the code block returns a multiline string with the prelude controlling the figure appearance and caption and an org style reference to the file created in it. You can use this strategy in your code. You will need to enclose your code in a SRC block like this:
#+header: :noweb strip-export

#+BEGIN_SRC python :results value raw :exports both

<your Python code>

#+END_SRC

#+RESULTS:
To make this code block work, you either need to create the directory ./images by hand before exporting to LaTeX. Alternatively, you need include the following source block at the beginning of your org file, to make sure that the directory exists:
#+BEGIN_SRC python :results raw :exports none

import os

try:

    os.mkdir('./images')

except Exception as e:

    return f'# Exception creating the image directory: {e}'

return '# OK'

#+END_SRC

#+RESULTS:
When executed, the block will add a comment to your org file and nothing will show up in the generated PDF file. after this block, you can also include the following lines:
#+LATEX_HEADER: \DeclareGraphicsExtensions{.png, .pdf}

#+LATEX_HEADER: \graphicspath{{./}{images/}}
to avoid having to write the directory and file name extension when you reference the figure in a LaTeX block:
\begin{figure}[H]

\centering

\includegraphics[width=.5\textwidth]{python-matplot-fig}

\caption{\label{fig:test1}The plot produced in the Python code}

\end{figure}

or using org directly:
#+ATTR_LATEX: :width .7\textwidth :placement [H]

#+CAPTION: The plot inlined

#+NAME: plot3

[[file:./images/python-matplot-fig.png]]
which will produce:
Referencing figures will be, of course, different. I can use the LaTeX way (\ref{fig:test1}) for figure 2 and the org way (i.e. [[plot2]]) for figure 1 or figure 3.
4.6 Acronyms
Include the acronym package in the header with
#+LATEX_HEADER: \usepackage[printonlyused,nohyperlinks]{acronym}
And then a LaTeX block at the end with the acronym definitions (and, optionally, a section/chapter header):
#+begin_export LaTeX

\section{Acronyms}

\begin{acronym}

\acro{pdf}[PDF]{Portable Document Format}

\end{acronym}

#+end_export
With this, you can use \ac{pdf} to uniformly spell out the PDF acronym and have it in your list of acronyms at the end of the document.
4.7 If the document grows. . .
If your document grows and starts to become difficult to manage, org-mode allows you to split it into sub-documents and include them into your main document using the #+INCLUDE: directive. This is explained in the org-mode manual[5]. For those with some experience with LaTeX, this is roughly equivalent to the \input{} directive. However, #+INCLUDE: allows you to control how the document is included.
5 Conclusion: and from here. . .
What you have seen here is just the beginning. Using org-mode is a nice way to introduce you to LaTeX. LaTeX offers a myriad of packages. In addition to generating tables and figures with Python3, you might also want to take a look at programming figures for your documents using the TiKZ package and including them with:
#+LATEX: \input{myfig}
LaTeX also features packages to write presentations. org-mode supports writing presentations with the beamer package[2]. The look-and-feel for basic presentations in org-mode is equivalent to the outline mode of most Office packages like LibreOffice. And since Beamer is just another LaTeX package, there is no limit to using all the things you have learnt here.
If you want to produce presentations with org and beamer, you will need to extend the org-mode-save-export function to detect when you want to export to LaTeX and when you are generating a presentation. You must use the org-beamer-export-to-latex function instead of the org-latex-export-to-latex function (see Section 2.4) when generating presentations.
But it is not only generating documents and presentations from experimental data using Python you can use org-mode for. I have started using Emacs to generate laboratory scripts on the fly. Inspired by[1], I document many experiments with and on Emacs using org-mode. I needed to include shell in my list of org-babel-load-languages and further explore the export options, because some text mode interfaces produce more output than useful or sensible for a document. But, in a certain sense, you kill two birds with one shot.
Acronyms
PDF Portable Document Format
References
[1] Howard Abrahams. Literate DevOps. Nov. 2014. http://howardism.org/Technical/Emacs/literate-devops.html.
[2] Eric S. Fraga. Writing Beamer presentations in org-mode. Feb. 2022. https://orgmode.org/worg/exporters/beamer/tutorial.html.
[3] Matthias Geier. Using Latexmk. https://mg.readthedocs.io/latexmk.html.
[4] Eric H. Nielsen. Emacs org-mode examples and cookbook. July 2015. http://ehneilsen.net/notebook/orgExamples/org-examples.html.
[5] Org mode manual: Include files. https://orgmode.org/manual/Include-Files.html.
[6] PDF Tools. May 2020. https://github.com/politza/pdf-tools.
[7] PlantUML. Drawing UML with PlantUML. https://plantuml.com/guide.15
[8] Python Source Code Blocks in Org Mode. Jan. 2021. https://orgmode.org/worg/org-contrib/babel/languages/ob-doc-python.html.
[9] Stathis Sideris. ditaa: DIagrams Through Ascii Art. Jan. 2021. https://github. com/stathissideris/ditaa.
[10] Delorie Software. Getting djgpp. Jan. 2007. http://www.delorie.com/djgpp/getting.html.
Recent Articles


