
Configuring TACACS+ Server With A Simple GUI

Managing authentication and authorization in a large-scale network is a challenge: the passwords need to be set and rotated every now and then, access to certain configuration settings needs to be controlled and, finally, users’ actions need to be logged somewhere. This poses a need for a centralized controller in the network that is responsible for such functions. Modern routers and switches, which typically run Linux operating systems, support TACACS+ protocol that enables system administrators to implement flexible rules for authentication and authorization. However, TACACS+ server implementation for Linux operating system, although neat, lacks a graphical user interface which makes daemon configuration a smooth and intuitive process. In the next few paragraphs, we will discuss how to configure the TACACS+ daemon on Linux operating system and demonstrate how to deploy a simple, yet intuitive, GUI used for the configuration of the TACACS+ instance.
TACACS+, which stands for Terminal Access Controller Access-Control System Plus, is a protocol mainly designed by Cisco and standardized in RFC8907. The primary goal of the protocol is to handle authentication and authorization of commands executed on remote telecommunication hardware on a centralized server. TACACS+ is a great protocol and can be compared to RADIUS. Its key advantages are the following: it allows scrambling or obfuscating (although, not really encrypting in a cryptographic sense) the entire payload with help of MD5 hash function and a secret shared between telecommunication hardware and a central server, it supports TCP protocol for transport, and it provides the possibility of carrying out AAA functions in a flexible way. More details on the protocol can be found in the corresponding RFC.
There exists a pretty neat implementation of the TACACS+ server for Linux. And here we will discuss how to configure this implementation on Linux and also touch aspects related to the deployment of the GUI-based tool used to configure an instance of the protocol.
In order to install TACACS+ run the following commands on the server which is reachable by your zoo of network devices:
$ sudo apt-get update && sudo apt-get upgrade -y

$ sudo apt-get install -y perl build-essential libnet-ldap-perl libnet-ssleay-perl libauthen-pam-perl libpam-runtime libio- pty-perl libbind-dev libssl-dev libpcre3-dev libpcre++-dev libfreeradius-dev zlib1g-dev libgcrypt20-dev libcurl4-openssl-dev libpam0g-dev libsctp-dev libevent-dev

$ cd  ̃

$ wget http://www.pro-bono-publico.de/projects/src/DEVEL.tar.bz2

$ bzip2 -dc DEVEL.tar.bz2 | tar xvfp -

$ cd PROJECTS

$ sudo make

$ sudo make install

$ sudo mkdir /var/log/tac_plus

$ sudo mkdir /var/log/tac_plus/access

$ sudo mkdir /var/log/tac_plus/accounting

$ sudo mkdir /var/log/tac_plus/authentication

$ cp tac_plus/extra/etc_init.d_tac_plus /etc/init.d/tac_plus

$ chmod +x /etc/init.d/tac_plus
Don’t worry about starting the server now. We will do it later with help of the GUI. Now everything is ready to install the GUI part. First things first, so download the repository that contains Python implementation of the TACACS+ GUI as follows:
$ sudo apt-get install git

$ cd  ̃

$ git clone https://github.com/dmitriykuptsov/tacacsgui.git

$ cd tacacsgui

The next step is to run the installation script:

$ cd deployment

$ sudo bash deploy.sh
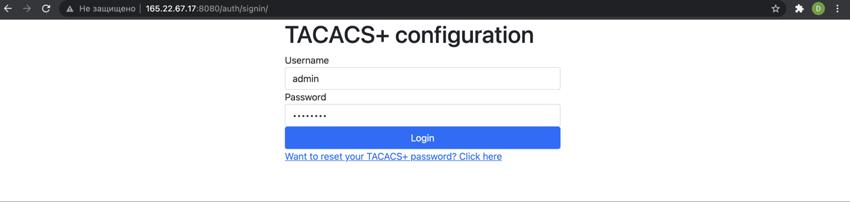
Now everything is ready to configure the TACACS+ instance. The default administrator username and password can be looked up and changed in the database/schema.sql file. Now open up the browser and point to the IP address of your freshly deployed TACACS+ GUI server (typically, you will type in the browser http://<IP address of TACACS+ server>:8080/ unless you modified the server to suit your needs).
Login to the server and navigate to the system tab. It is the right time to modify the default system configuration. But, typically, here you would need to only set the secret key for the TACACS+ server. I use apg utility with the following parameters to generate the key of size 192 bits which is a good enough key length:
$ apg -a 1 -x 32 -m 32

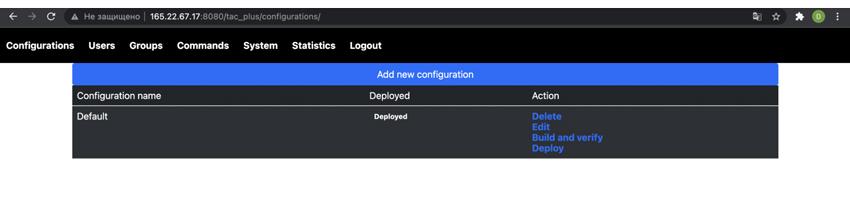
Fill in the value for the authentication key and save the form. Now we are ready to create our first configuration for the TACACS+ instance. Go to the configuration tab and press add new configuration button. Enter the name of the configuration, e.g. Default, and press the save button. Click build and verify to test that the configuration is valid. If everything is fine you can now deploy your first TACACS+ instance. To do so click the deploy button. Now you can check that the configuration was applied and the TACACS+ instance is running. There is a small Bash script that is running periodically in the background and checking whether /usr/local/etc/tac plus.cfg file was changed. If something goes wrong you can always check whether the cronjob defined in /etc/crontab does what it was designed for. If everything is working correctly, the output of the following command should indicate that the tac plus daemon is running (give yourself a minute before performing a check since the cronjob runs once a minute):
# ps aux | grep tac_plus
Now it is time to define commands, users and assign users to groups. Let's start with groups. Click the group tab and then add a new group button. Enter the name of a group, e.g., Experts, fill in the expiration date for the group, and set the default command policy to Permit (this group will have wide privileges). Let's create a group with more strict policies. Again click create group, enter the name for the group, e.g. Juniors, and set the default policy to Deny. And yeah, don’t forget to set the expiration date for the group. Now after saving the group, click edit next to Junior group. At this point, you can start adding the commands that are permitted to be executed by users in this group:
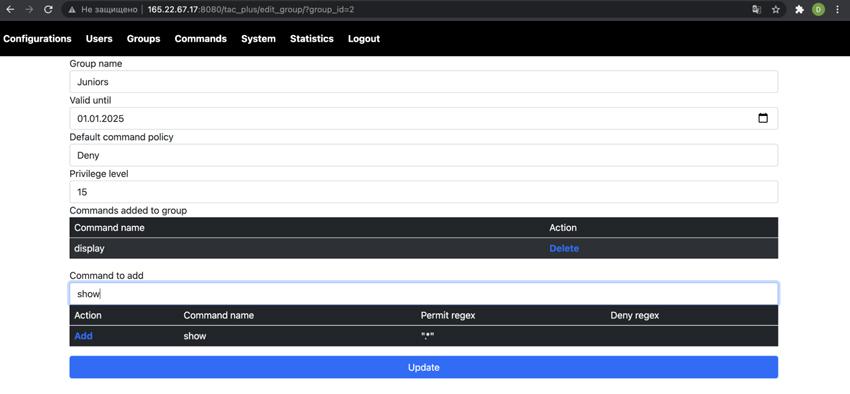
Just start typing the command name and all the matching commands will pop up in the dialog. Select the needed command and click the add button. You can add as many commands to the group as needed. Once this is done, don’t forget to update the group by clicking the update button. The next step is to add users to the system configuration. Click the users tab and then click the add user button. Enter the name of your user and encrypted password (the initial password can be simple since the user will have a possibility to reset its password via the reset form the link for which can be found on the front page). Now, the passwords in this form should be entered in an encrypted form. To encrypt a password you can always use openssl library as follows:
$ openssl passwd -1 resetme
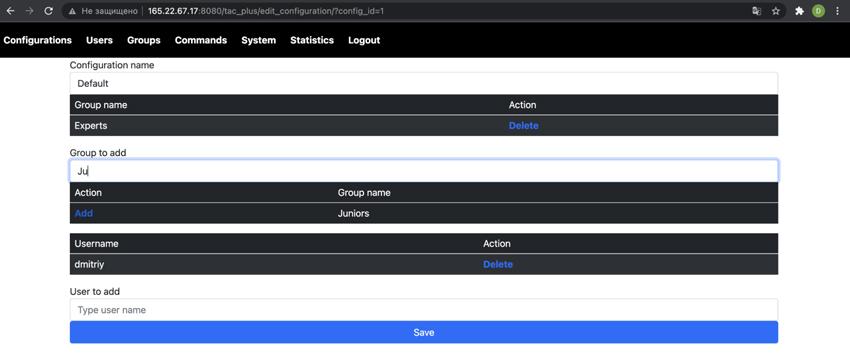
Copy the generated password into the appropriate field and save the user’s information. Now, once the user is saved, you should assign it to a group. For that matter, click the edit button next to the desired user and in the opened form start typing groups’ names and then adding them to the user. Once completed, we, finally, need to add our groups and users to the configuration. Click on the configuration tab, select your deployed configuration and click edit. In the opened page, add all your groups and all your users as shown in the following figure:
Once the configuration is populated, you can test and deploy the configuration. Congratulations, TACACS+ is ready to be used for authentication, authorization, and accounting. One more thing, just as an example, below is a simple configuration of TACACS+ for the Huawei switches:
system-view

hwtacacs enable

hwtacacs-server template ht

 hwtacacs-server authentication <IP address of TACACS+ server>

 hwtacacs-server authorization <IP address of TACACS+ server>

 hwtacacs-server accounting <IP address of TACACS+ server>

 hwtacacs-server shared-key cipher witOvibWotshEdPhutOgDiCrup3quod0

 quit

aaa

 authentication-scheme default

 authentication-mode local hwtacacs

 quit

 authorization-scheme default

 authorization-mode local hwtacacs

  authorization-cmd 1 hwtacacs local

  authorization-cmd 2 hwtacacs local

  authorization-cmd 3 hwtacacs local

  authorization-cmd 4 hwtacacs local

  authorization-cmd 5 hwtacacs local

  authorization-cmd 6 hwtacacs local

  authorization-cmd 7 hwtacacs local

  authorization-cmd 8 hwtacacs local

  authorization-cmd 9 hwtacacs local

  authorization-cmd 10 hwtacacs local

  authorization-cmd 11 hwtacacs local

  authorization-cmd 12 hwtacacs local

  authorization-cmd 13 hwtacacs local

  authorization-cmd 14 hwtacacs local

  authorization-cmd 15 hwtacacs local

  quit

accounting-scheme default

  accounting-mode hwtacacs

  accounting realtime 3

  accounting start-fail online

quit

 domain default_admin

 authentication-scheme default

  authorization-scheme default

  accounting-scheme default

  hwtacacs-server ht

quit quit

quit save
Now, whenever you SSH (remember not to use Telnet if your infrastructure uses insecure links, which can be the case if you rent the communication channels from third-party providers) to a switch, the authentication and authorization will be done on a centralized server. This way one can easily revoke the users, add more complex authorization schemes and rotate the users’ passwords.
Recent Articles


