
OpenLDAP Everywhere
The purpose of this article is to demonstrate the use of OpenLDAP as the core directory service for a heterogeneous environment. The LDAP server provides a shared e-mail directory, a unified login for Linux and Windows users, automount of home directories and file sharing for both Linux and Windows clients.
Midwest Tool & Die has been using OpenLDAP for three years, and the performance has been flawless. We have experienced 100% uptime for the directory. The company saw the first big benefit from sharing e-mail contacts in the directory. Now, we have unified logon from any networked computer. Our computer users can access the same file storage through Windows/Samba or through Linux/NFS/automount. The result is seamless access to network services.
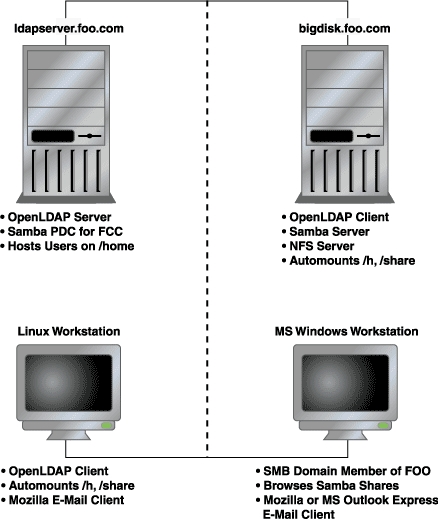
Figure 1. OpenLDAP Mixed Environment
A simple mixed environment used in the examples in this article is shown in Figure 1. The configuration discussed in this article does not document the use of SSL. The ldapsync.pl program it uses may expose your LDAP manager password. As a result, Windows clients may cache user passwords, thereby creating a new risk to Linux security. Review your security needs with caution and prudence, and attempt this configuration at your own risk. Neither the authors, nor our employer, Midwest Tool & Die, takes any responsibility for your security.
The LDAP server we discuss was installed using RPM binary packages and uses openldap-2.0.11-8 on Red Hat 7.1. You also need to have the auth_ldap and nss_ldap packages. This article assumes a domain name of foo.com.
To use the most recent source, follow the instructions at www.openldap.org/doc/admin/quickstart.html to download and install OpenLDAP. Edit the OpenLDAP server configuration file, /etc/openldap/slapd.conf as follows:
# Schemas to use
include  /etc/openldap/schema/core.schema
include  /etc/openldap/schema/cosine.schema
include  /etc/openldap/schema/inetorgperson.schema
include  /etc/openldap/schema/nis.schema
include  /etc/openldap/schema/redhat/
rfc822-MailMember.schema
include  /etc/openldap/schema/redhat/autofs.schema
include  /etc/openldap/schema/redhat/
kerberosobject.schema
database       ldbm
suffix         "dc=foo,dc=com"
rootdn         "cn=Manager, dc=foo,dc=com"
rootpw         {crypt}sadtCr0CILzv2
directory      /var/lib/ldap
index   default                             eq
index   objectClass,uid,uidNumber,gidNumber eq
index   cn,mail,surname,givenname           eq,sub
# Access Control (See openldap v.2.0 Admin Guide)
access to attr=userPassword
   by self         write
   by anonymous    auth
   by dn="cn=manager,dc=foo,dc=com"       write
   by *    compare
access to *
   by self write
   by dn="cn=manager,dc=foo,dc=com"       write
   by * read
The LDAP schemas define object classes and attributes that make up the directory entries. With the edits above, the hard work of defining schemas to fit our uses has been done. The schemas that we need, listed in the first section of slapd.conf, already have been defined and packaged with the RPM installation.
If you find that you need to add an objectClass or an attribute for your directory, see the OpenLDAP admin guide at www.openldap.org/doc/admin20/schema.html. We'll use the default database type ldbm, and our example uses the LDAP domain component. Therefore, foo.com becomes dc=foo,dc=com. In addition, the manager has full write access to LDAP entries.
The Red Hat 7.3 Reference Guide suggests using crypt to protect the manager's password:
perl -e "print crypt('passwd',
'salt_string',);"
In the previous Perl line, replace salt_string with a two-character salt, and passwd with the plain-text version of the password. Paste the resulting encrypted password into slapd.conf as shown above.
The index lines enhance performance for attributes that are often queried. Access control restricts access to the userPassword entry, but the user and manager may modify the entry. For all other entries, the manager has write access, and everyone else is granted read access.
LDAP can be seen as a tree, with foo.com at the trunk. Branches are created as organizational units (ou), as shown in Figure 2.
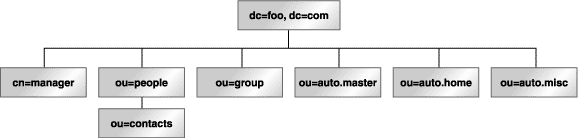
Figure 2. Organizational units are branches on the LDAP tree.
Each entry in the directory is uniquely identified with a distinguished name (dn). The dn for the LDAP manager looks like dn: cn=manager, dc=foo, dc=com.
The ou provides a method for grouping entries, as shown in Table 1.
Table 1. ou Method for Grouping Entries
We create the individual entries in LDIF (LDAP Interchange Format) and save them to top.ldif:
dn: dc=foo, dc=com
objectclass: dcObject
objectclass: organization
o: Foo Company
dc: foo
dn: cn=manager, dc=foo, dc=com
objectclass: organizationalRole
cn: manager
dn: ou=people, dc=foo, dc=com
ou: people
objectclass: organizationalUnit
objectclass: domainRelatedObject
associatedDomain: foo.com
dn: ou=contacts, ou=people, dc=foo, dc=com
ou: contacts
ou: people
objectclass: organizationalUnit
objectclass: domainRelatedObject
associatedDomain: foo.com
dn: ou=group, dc=foo, dc=com
ou: group
objectclass: organizationalUnit
objectclass: domainRelatedObject
Add the top-level entries to the directory with ldapadd:
ldapadd -x -D 'cn=manager,dc=foo,dc=com' -W \
-f top.ldif
Then, test your work with ldapsearch to retrieve all entries:
ldapsearch -x -b 'dc=foo,dc=com'
At this point, we have enough structure in LDAP to put it to real use. We'll start by sharing our e-mail contacts, which also should be in LDIF.
To simplify the process, you may be able to export your e-mail address book in LDIF. For example, in Mozilla 1.0, you can export in LDIF from the Tools menu on the address book window. Microsoft Outlook Express also allows exporting the address book in LDIF. You will need to process the resulting file so it looks like our contacts example below; I suggest using Perl for the task.
Contacts are uniquely identified by their e-mail addresses. Here is the dn for a sample contact:
dn: uid=someone@somewhere.com,ou=contacts,
    ou=people, dc=foo,dc=com
With all of the attributes, the full entry for a contact looks like:
dn: uid=someone@somewhere.com,ou=contacts,
    ou=people, dc=foo,dc=com
cn: Someone Youknow
mail:
uid:
givenname: Someone
sn: Youknow
objectclass: person
objectClass: top
objectClass: inetOrgPerson
Separate each contact entry with a blank line, and save it to a
file called contacts.ldif. Then you can add the contacts to the
directory with ldapadd:
ldapadd -x -D 'cn=manager,dc=foo,dc=com' -W \
-f contacts.ldif
Once again, test your work with an ldapsearch that retrieves all entries:
ldapsearch -x -b 'dc=foo,dc=com'
Now it's time to configure Mozilla to use the new LDAP server (see Figure 3).
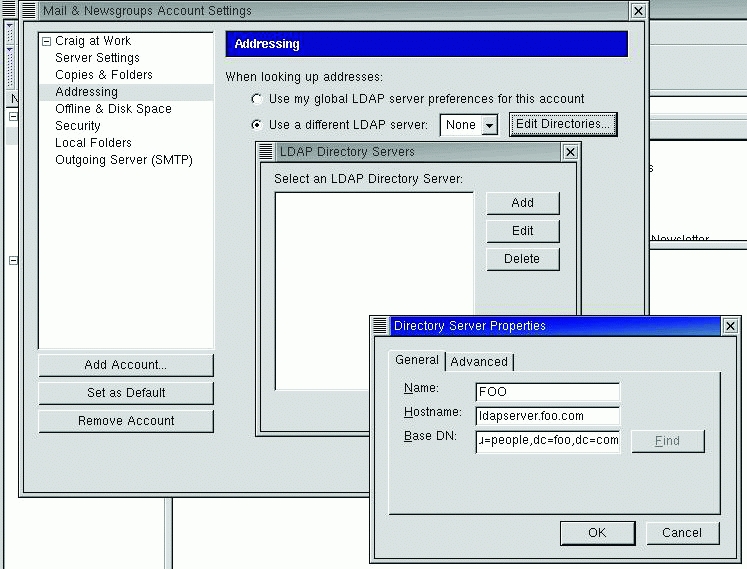
Figure 3. Directory Server Properties Dialog Box in Mozilla
From the Edit menu in the Mozilla Mail and News window, select Mail & Newsgroup Account Setting. In the Addressing tab, select Use a different LDAP server, then select Edit Directories and then Add. Fill in the Directory Server Properties dialog with:
Name: FOO
Server: ldapserver.foo.com
base DN: ou=people,dc=foo,dc=com
Next, tell Mozilla to look up addresses in your directory. Under Addressing in the Mail and Newsgroups preferences, select Address Autocompletion and fill in FOO for Directory Server.
Test your settings by composing a message to one of your contacts in your LDAP directory. The address should autocomplete as you type. Another test is to search the LDAP directory from within the Mozilla Mail Address Book. A search for Name or E-mail that contains * should return all of the contact entries. Similarly, you can also configure Microsoft Outlook Express to use the LDAP directory.
By storing user account information in LDAP, you can use the same user name and password at any Linux console. To start, you must decide which user names should be entered in LDAP. Here is our user scheme for UID/GIDs:
System accounts: UID < 500
Real people in LDAP: 499 < UID < 10,000
Local users, groups (not in LDAP) > 10,000
This user scheme allows for 9,500 LDAP user and group entries, while allowing local per-system users and groups that do not interfere with LDAP UID/GIDs.
An entry for a local computer user is identified by the login name as “uid”. Local computer users are members of ou=people: dn: uid=gomerp,ou=people,dc=foo,dc=com.
The full entry contains the attributes needed to control account access:
dn: uid=gomerp,ou=people,dc=foo,dc=com
uid: gomerp
cn: Gomer Pyle
givenname: Gomer
sn: Pyle
mail:
objectClass: person
objectClass: organizationalPerson
objectClass: inetOrgPerson
objectClass: account
objectClass: posixAccount
objectClass: top
objectClass: kerberosSecurityObject
objectClass: shadowAccount
userPassword: useradd_ldap_flag
shadowLastChange: 11547
shadowMax: 99999
shadowFlag: 0
krbname:
loginShell: /bin/bash
uidNumber: 531
gidNumber: 531
homeDirectory: /h/gomerp
gecos: Gomer Pyle
To make this easier, OpenLDAP ships with migration utilities that can extract the user account information; see /usr/share/openldap/migration. The first thing you need to do is edit migrate_common.ph:
# Default DNS domain
$DEFAULT_MAIL_DOMAIN = "foo.com";
# Default base
$DEFAULT_BASE = "dc=foo,dc=com";
# turn this on to support more general object classes
# such as person.
$EXTENDED_SCHEMA = 1;
Then, extract the user account information:
/usr/share/openldap/migration/migrate_passwd.pl \
/etc/passwod >people.ldif
Once this is done, review the resulting LDIF file. You should remove entries for system accounts such as root and for local system users that do not need to appear in LDAP. Finally, add the user entries to LDAP:
ldapadd -x -D 'cn=manager,dc=foo,dc=com' -W \
-f people.ldif
As always, test your work with an ldapsearch that retrieves all entries:
ldapsearch -x -b "dc=foo,dc=com"
"(objectclass=*)"
Because the computer users belong to ou=people, you may now look up their e-mail addresses within your mail client.
You need to make a group entry for each group that is shared between multiple Linux computers. Each user also needs a group entry for the user private group. A group entry is identified by “cn”, and each group belongs to ou=group, for example:
dn: cn=gomerp,ou=group,dc=foo,dc=com
A user private group would look like this:
dn: cn=gomerp,ou=group,dc=foo,dc=com
objectClass: posixGroup
objectClass: top
cn: gomerp
userPassword: {crypt}x
gidNumber: 531
While a shared group would look like:
dn: cn=web_dev,ou=group,dc=foo,dc=com
objectClass: posixGroup
objectClass: top
cn: web_dev
gidNumber: 502
memberUid: gomerp
memberUid: goober
memberUid: barneyf
After creating the group entry, extract the group information:
/usr/share/openldap/migration/migrate_passwd.pl \
/etc/group >group.ldif
Review the resulting LDIF file, removing entries for system groups and for local system users that do not need to appear in LDAP. Then, add the group entries to LDAP:
ldapadd -x -D 'cn=manager,dc=foo,dc=com' -W \
-f group.ldif
Test your work with an ldapsearch that retrieves all group entries:
ldapsearch -x -b 'dc=foo,cd=com'
With unified login, users have a single home directory shared via NFS. To keep things simple, we host our home directories from ldapserver.foo.com and share /home via NFS. NFS is outside the scope of this article, but here is a line from /etc/exports that works.
/home *.foo.com(rw)
Linux LDAP clients mount the user's home directory at login, using automount and NFS. The LDAP use of automount is a replacement for NIS (Network Information Service) automount maps. Replace the automount maps for auto.master, auto.home and auto.misc.
We also create a new organizational unit for auto.master:
dn: ou=auto.master,dc=foo,dc=com
objectClass: top
objectClass: automountMap
ou: auto.master
An auto.master entry is identified by “cn”. The automountInformation attribute instructs automount to look for the map in LDAP:
dn: cn=/h, ou=auto.master,dc=foo,dc=com
objectClass: automount
automountInformation: ldap:ou=auto.home,
    dc=foo,dc=com
cn: /h
While we're at it, let's create an auto.master entry for other NFS
shared directories:
dn: cn=/share, ou=auto.master,dc=foo,dc=com
objectClass: automount
automountInformation: ldap:ou=auto.misc,
    dc=foo,dc=com
cn: /share
Create the automount entries in LDIF format and save as
auto.master.ldif:
dn: ou=auto.master,dc=foo,dc=com
objectClass: top
objectClass: automountMap
ou: auto.master
dn: cn=/h, ou=auto.master,dc=foo,dc=com
objectClass: automount
automountInformation: ldap:ou=auto.home,
    dc=foo,dc=com
cn: /h
dn: cn=/share, ou=auto.master,dc=foo,dc=com
objectClass: automount
automountInformation: ldap:ou=auto.misc,
    dc=foo,dc=com
cn: /share
Add the auto.master entries to LDAP:
ldapadd -x -D 'cn=manager,dc=foo,dc=com' -W \
-f auto.master.ldif
Next, we create a new organizational unit for auto.home, ou=auto.home. A home directory entry is identified by “cn”:
dn: cn=gomerp,ou=auto.home,dc=foo,dc=comCreate auto.home entries for each user in LDIF format and save as auto.home.ldif:
dn: ou=auto.home,dc=foo,dc=com
objectClass: top
objectClass: automountMap
ou: auto.home
dn: cn=gomerp,ou=auto.home,dc=foo,dc=com
objectClass: automount
automountInformation:
    ldapserver.foo.com:/home/gomerp
cn: super3
Add the auto.home entries to LDAP:
ldapadd -x -D 'cn=manager,dc=foo,dc=com' -W \
-f auto.home.ldif
When automounted from a Linux LDAP client, your home directory (ldapserver.foo.com:/home/gomerp) is mounted on /h/gomerp. Other NFS shares may be entered in LDAP and automounted as they are needed. The auto.misc organizational unit holds these automount maps, which have the form ou=auto.misc.
We've already created an auto.master entry for /share, as indicated above. Now, create entries for NFS shares under auto.misc, and save them as auto.misc.ldif:
dn: ou=auto.misc,dc=foo,dc=com
objectClass: top
objectClass: automountMap
ou: auto.misc
dn: cn=redhat,ou=auto.misc,dc=foo,dc=com
objectClass: automount
automountInformation:
    bigdisk.foo.com:/pub/redhat
cn: redhat
dn: cn=engineering,ou=auto.misc,dc=foo,dc=com
objectClass: automount
automountInformation:
    bigdisk.foo.com:/data/engineering
cn: engineering
Add the auto.misc entries to LDAP:
ldapadd -x -D 'cn=manager,dc=foo,dc=com' -W \
-f auto.misc.ldif
When automounted from a Linux LDAP client, your shared directory bigdisk.foo.com:/data/engineering is mounted on /share/engineering.
You now need to install the authentication package, auth_ldap, and the name switch service package, nss_ldap. The Red Hat tool /usr/bin/authconfig is handy for configuring the client. Select Use LDAP®Server: ldapserver.foo.com, base DN: dc=foo,dc=com. Authconfig writes to these files: /etc/ldap.conf, /etc/openldap/ldap.conf and /etc/nsswitch.conf.
Verify that /etc/nsswitch.conf has the following entries:
passwd:    files ldap
shadow:    files
group:     files ldap
automount: files ldap
Verify that /etc/ldap.conf has these entries:
host ldapserver.foo.com
base dc=foo,dc=com
and that /etc/openldap/ldap.conf has these entries:
HOST ldapserver.foo.com
BASE dc=foo,dc=com
The LDAP server also is a client of LDAP. On the LDAP server, disable the automount of /home as /h. nsswitch is configured to check the files first, and then LDAP for automount information. So, we will make a dummy entry in ldapserver.foo.com:/etc/auto.master:
/h /etc/auto.null
The user's password and group entries must be removed from the password and group files on the home directory server. Create backups, then edit /etc/passwd, /etc/shadow, /etc/group and /etc/gshadow to remove the LDAP real-people entries.
To test, log in to a Linux LDAP client, using an LDAP user name. You should see the appropriate login shell and home directory for that user. To test auto.misc shares, you must access the share by name:
cd /share/redhat
Automount only mounts NFS shares as they are used, so the directory /share/redhat is not visible until it has been accessed.
To have a Windows and Linux unified login, first configure a Samba Primary Domain Controller (PDC). User home directories are shared with SMB clients. The details of Samba configuration are outside the scope of this article.
User passwords may be changed from MS Windows using Samba and the Perl program ldapsync.pl, which is available from www.mami.net/univr/tng-ldap/howto/#how_to_change_password.
The ldapsync.pl script is a replacement for the /bin/passwd program called by Samba to change users' passwords, and it keeps them in sync with the Samba passwords. The ldapsync.pl script is called from Samba when changing user passwords within Windows, and it is run as root just as /bin/passwd is normally run in an unmodified Samba. The ldapsync.pl script is needed for LDAP-enabled users to function. Because the user passwords are not stored locally in /etc/passwd but in LDAP, the ldapsync.pl script binds to the LDAP directory and modifies the user's password entry in LDAP.
In simpler terms, here's how this process works:
User calls password-changing program from Windows.
User clicks OK to change password and sends data to Samba server.
Samba looks at its config file and knows to call ldapsync.pl to change LDAP passwords.
ldapsync.pl is executed with -o %u options that specify the program to run without prompting for the old password. It passes the user's name to the script as it runs (important if you don't want to change root's password without knowing it).
Samba passes the user's new password to ldapsync.pl without caring about what the old one was.
ldapsync.pl chats with Samba, expecting the correct responses with the new password.
If it passes the chat correctly, the password is encrypted by ldapsync.pl.
ldapsync.pl then binds LDAP with the correct dn of the user and does an ldapmodify on the user's LDAP entry, replacing the userPassword field stored in LDAP. LDAP and Samba chat for a final time, listening for success from LDAP, at which point the process ends.
To configure Samba for this, you will need the following Smb.conf entries:
passwd program = /etc/samba/ldapsync.pl -o %u
passwd chat = *New*password* %n\n
*Retype*new*password* %n\n *modifying*
When users change their passwords in Windows they are prompted for the old password, a new one and then are asked to confirm the new one. Because ldapsync.pl is called without caring about the old password, only the two new entries are examined. First of all, the * instructs it to look for anything and then a specific match. So the *New*password*%n\n is saying match anything, then the word New, then anything and the word password, then anything and the new password the user entered (%n). The *modifying* is saying if LDAP returns that it modified the entry, then the process was successful.
You must edit ldapsync.pl to enter the LDAP bind information:
$binddn = "cn=manager,dc=foo,dc=com";
$passwd = "passwd";
Then, limit the access of ldapsync.pl to root only (0700).
Your NFS shares can be shared with Windows clients by running a Samba server on the NFS host. The Samba server must join your FOO SMB domain. Run the following command on the Samba server to join the SMB domain:
smbbpasswd -j [FOO] -r [PDC]
Congratulations! Your LDAP server is up and running with shared e-mail contacts, unified login and shared file storage that is accessible from any client. You probably want to write some administrative utilities to help maintain user and group accounts. Again, we recommend Perl for the task.


