
Tech Tips with Gnull and Voyd
Hey there sweeties, I'm Laverta Voyd, and my husband Chester picked some tips for y'all. Like I says last time, Chester ain't no talker, so I'm here to do the writin'. Now, I knows you ain't had much time to send in tips since last month, but we can't be doing this service for all you sweethearts out there without your help. So send in a tip, honey, so we can keep this steamboat rolling. Chester and me, we want this to keep afloat. We can use the money for hosting this here column, and you won't make out so bad yourself. This mag will send you $100 for every tip you give us. So get the lead out of them undies of yours and send in some tech stuff Chester can use. He'll pick 'em and I'll sort it all out for him. In the meantime, we got that dear editor to stick in another tip, and we got a goodie from ol' Paddy. So here's y'are.
Somebody dropped a MySQL table. Duh. Fire your DBA. If you can't fire the DBA, then this tip helps. —Chester
You are a MySQL database administrator. You take regular backups of your MySQL database. Somebody drops a table critical to the MySQL application (for example, the “accounts” table in a SugarCRM application). The MySQL application no longer works. How can you recover from the situation?
The answer is MySQL binary logs. Binary logs track all updates to the database with minimal impact on database performance. MySQL binary logs have to be enabled on the server. You can use the mysqlbinlog MySQL command to recover from the binary logs.
A better and more comprehensive solution is to use the Zmanda Recovery Manager (ZRM) for MySQL (MySQL backup and recovery manager). The mysql-zrm tool allows users to browse the binary logs and selectively restore the database from incremental backups:
# mysql-zrm --action parse-binlogs   --source-directory=/var/lib
/mysql/sugarcrm/20060915101613
Log filename                 | Log Position | Timestamp          | Event Type | Event

/var/lib/mysql/my-bin.000015 | 11013          | 06-09-12 06:20:03 | Xid = 4413 | COMMIT;
/var/lib/mysql/my-bin.000015 | 11159          | 06-09-12 06:20:03 | Query      | DROP TABLE IF EXISTS `accounts`;
Here we're doing selective recovery for incremental backups without the DROP customer table from the SugarCRM database. Do two selective restore commands to restore from the incremental backup done on Sept 15, 2006, without executing the database event DROP TABLE at log position 11159:
# mysql-zrm --action restore  --backup-set sugarcrm \
   --source-directory=/var/lib/mysql/ sugarcrm/20060915101613/ \
   --stop-position 11014

# mysql-zrm --action restore   --backup-set sugarcrm \
   --source-directory=/var/lib/mysql/ sugarcrm/20060915101613/ \
   --start-position 11160
See the Zmanda Recovery Manager for MySQL for more information: mysqlbackup.zmanda.com. —Paddy Sreenvasan
Sometimes it don't make sense to assume upgrades are a good thing. Run partimage to save an image of your old version first. If the new distro version don't work, you can run partimage to put the old one back. —Chester
I run multiple distros for various reasons. For example, I run 32-bit Kubuntu and 64-bit Kubuntu. I spend most of my time using 64-bit Kubuntu, but some packages are easier to set up and use on 32-bit Kubuntu, like Skype, for instance.
I recently decided to upgrade my 32-bit Kubuntu from Dapper to Edgy. Whenever you upgrade, you run the risk of breaking some existing programs. So I usually boot to another distribution and use partimage to save an image of the partition with the distribution I'm about to upgrade. If the upgrade doesn't go well, I always can use partimage to restore the partition to its previous state. There are many other reasons why you might want to save partition images, so you'll find this procedure useful even if you don't share my motivation.
Running Partimage on 64-bit Kubuntu AMD64
Partimage is finicky and refuses to run on a 64-bit system. For reasons beyond my knowledge, there is a partimage package you can install for Kubuntu AMD64, but it won't run. In my case, I want to boot to Kubuntu AMD64 and use partimage to save my 32-bit installation of Kubuntu, so the fact that partimage for Kubuntu AMD64 doesn't work is a major problem.
Or is it? It's actually quite easy to get partimage working on Kubuntu AMD64. Simply download the static binary form of partimage from www.partimage.org. Untar the binaries partimage and partimaged into /usr/sbin. These binaries should work fine even under AMD64. You should be able to type the command partimage at a root prompt to get it running. One would think it would be necessary to precede the command with linux32, but it works without it.
You should check to see if you have a /dev/dm inode before you use partimage. If you don't, you will be greeted with a screen like the one shown in Figure 1.
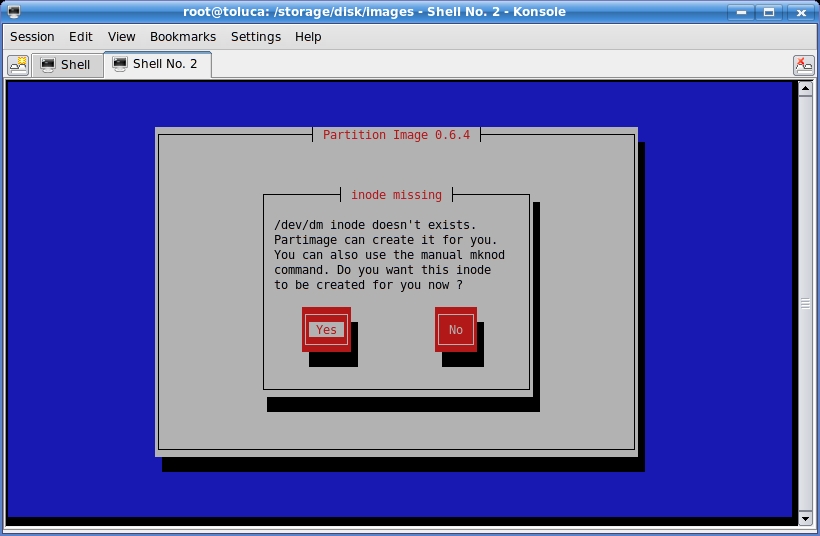
Figure 1. Partimage wants the /dev/dm inode created.
If nothing seems to happen when you press OK, partimage may not be able to create /dev/dm for you. Sometimes you can get past this screen by pressing OK several times, and partimage will work even if it doesn't create /dev/dm. Why take chances, though? Don't even start partimage until you create /dev/dm yourself with this command (assuming it's not already there):
# mknod -m 644 /dev/dm b 240 0
Now start partimage. Select the partition you want to save. In my case, this is partition /dev/sdb8. Then, enter a full path to the file where you want to store the image. I like to include the distro type, filesystem type and partition in the filename so I can remember why I created the partition image. The filename I used in this case is dapper32-ext3-sdb8.img. See Figure 2 for the example. The path /storage/disk/images points to a partition where I have lots of extra disk space for saving partition images.
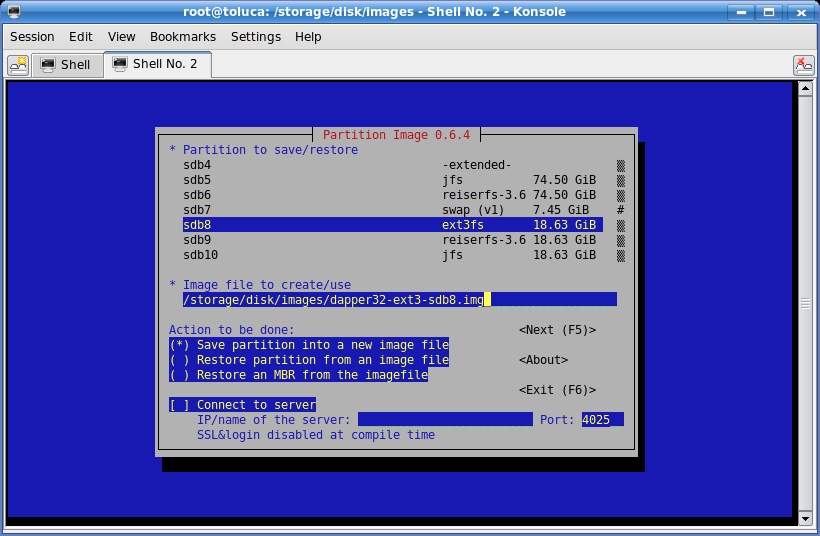
Figure 2. Save the image with a descriptive filename.
Press function key F5 to continue. I use the default compression method, gzip, as it is much faster. If you are tight on disk space and don't mind waiting, you can choose bzip2 for the compression method. Partimage will check the partition and let you enter a description by default. I usually uncheck the description feature because the description is in the filename, but you may want to use the feature. Uncheck the feature by using the arrow keys to highlight it, and then press the spacebar to toggle to unchecked. You can see the screen with my choices in Figure 3.
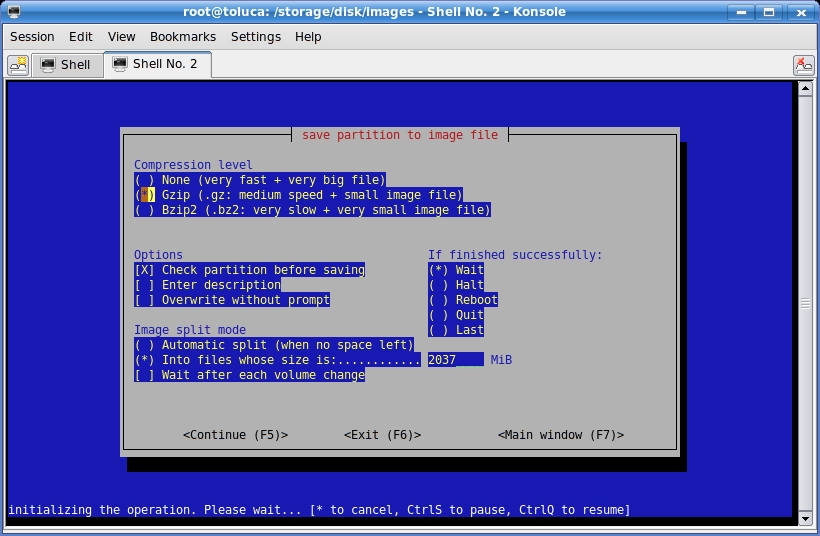
Figure 3. You can uncheck the description if you use a descriptive filename.
Press F5 to continue. Partimage should get busy checking the filesystem. Partimage can be flaky and sometimes reports errors that do not exist. If you have this problem, check the partition manually (with fsck.ext3, for example), and then uncheck the option to have partimage do it for you. If everything went well, you should see a screen something like the one shown in Figure 4.
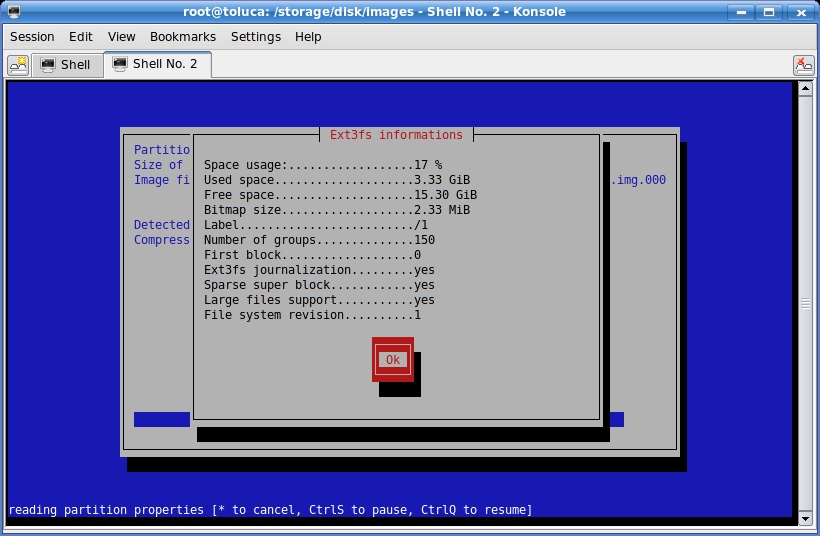
Figure 4. Partimage is ready to create an image for you.
Press Enter, and partimage will create one or more compressed image files of the partition. The rest of the process is self-explanatory.
Note that partimage adds numbers to your filename, because it prepares to split up the image into multiple files if necessary. Even if it needs only a single file, it will change the above filename to dapper32-ext3-sdb8.img.000.
It's now safe to boot into 32-bit Dapper and upgrade 32-bit Dapper to 32-bit Edgy. If everything works, you're in business.
If you run into problems and feel like you need to downgrade back to Dapper, all you have to do is boot back into 64-bit Kubuntu (or whatever other distro you were using) and run partimage again. This time, highlight the partition, type the same image filename (remember to add .000 to the name), but use the arrow keys to select Restore partition from an image file, and press the spacebar to select it. See Figure 5 for an example. Press F5 and the rest of the process should be self-explanatory. If partimage created multiple files ending in .000, .001 and so on, you don't have to worry about specifying them all. It will find the extra image files and restore them automatically.

Figure 5. Restore the image to the partition.
Partimage works with many filesystems, but some of them have only beta support. Use partimage with filesystems like JFS with caution. It has worked for me, but that doesn't mean it will work for you. If you want to save and restore XFS filesystems, you should bypass partimage and use the XFS utilities xfsdump and xfsrestore, designed for saving and restoring partitions. —Nicholas Petreley
Linux Journal pays $100 for any tech tips we publish. Send your tips with information on how you can be reached to techtips@linuxjournal.com.
