
OOo Off the Wall: Tabling the Notion, Part 1
In modern writing, tables are used to present long lists of highly structured information. Modern readers want information quickly, especially if they are reading technical or business information and even more so if they are reading on-line. Information arranged in a table can be absorbed in a glance.
Sometimes, bulleted lists are used instead of tables to present information quickly. However, if you have more than about five items, a table generally is more appropriate. A long bullet list encourages people to skip ahead and pay less attention to what's being presented. By contrast, because a long table is more structured, it is less demanding.
The beta version of OpenOffice.org 2.0 (OOo) brings some much-needed enhancements to the way that its Writer program handles tables. Adding, designing and manipulating tables is handled in much the same way, however, as it was in earlier versions.
In this column, we look at these basic tasks of adding, designing and manipulating tables. In upcoming columns, we'll look at how charts and calculations can be generated with Writer tables.
Of all the features in Writer and in OOo in general, few have been tweaked as much as tables. First of all, table options have been moved from the Insert menu to a first-level menu of their own. This change not only makes Writer resemble MS Word more closely, which eases the transition for users, it also makes tools more accessible that previously were available only from the tool bar or right-click menu.
Other changes are not as obvious but are even more welcome. Unlike previous versions, OOo 2.0 allows users to create nested tables, or tables within tables. This change is especially useful in HTML documents, although some designers insist that style sheets and not invisible tables should be used to build complex structures.
Equally as important, rows now can break over pages and columns. This change removes the effective limit of a page for the length of any table. It also avoids the problem of large expanses of blank space when a row contains a lot of information.
A final but less obvious change is number recognition and alignment is turned off by default. This change removes one of the torments new users experience when working with tables and Writer. Before, even users with knowledge of other word processors often were tormented by the numbers they entered fleeing to the lower-right corner, the place they would be in a spreadsheet. This old default was enough of a surprise to scare at least two users that I know of from using OOo, so its removal seems long overdue.
If you plan to use tables often, your first stop should be Tools -> Options -> OpenOffice.org Writer -> Tables. From this window, you can set the default behavior for tables in Writer. Most people safely can ignore the Keyboard handling section, which sets the size of cells when they are moved or added. However, you may want to pay attention to other parts of the window, even though the defaults settings are reasonable for most needs.

Figure 1. Setting the right default table options for your work preferences can make you more productive--and less frustrated.
For instance, in the Default section, you can set whether a header row is repeated on each page of a table, whether cells can split over a page and whether cells have any borders. Similarly, in the Number recognition section, you can set whether numbers automatically are recognized and aligned to the right, as they would be in a spreadsheet.
Probably the most important section, though, is the Behavior of Rows/Column section. This section determines how the addition or removal of rows or columns affects the table as a whole. The default Variable, in which the addition or removal of rows or columns changes the table size, probably is the easiest for beginners to keep in mind. Still, some users may choose Fixed, which determines the table size by the column sizes or Fixed Proportional, which determines column size by dividing the total width or height available by the number of columns or rows.
When you finish making your settings, select the OK button to continue. The new settings do not affect existing tables, only tables added after the changes were made. The settings also are in effect for any new documents.
Tables can be added in three ways: with keystrokes, from a diagram and from a dialog window. For those determined to keep their fingers on the keyboard at all costs, keystrokes are the way to add a basic table. Use a plus sign to mark the start of each column and minus signs to mark out the column width in characters. When you have completed the first row, press the Enter key, and the plus and minus signs are transformed into table cells. Then use the Tab key to create new rows.
A more exact way is to create a table from the diagram that appears when the Table button on the toolbar is pressed. Use the mouse to select the exact number of rows and columns; the diagram expands as necessary. The result is a basic table at the cursor position. This is the closest that Writer gets to MS Word's table drawing tool, but that's not a tool designed for precision, anyway.
The most common way to add a table is to use the dialog window. Follow these instructions:
Select Table -> Insert -> Table from the main menu. You also can press Ctrl+F12 on the keyboard. The Insert Table screen opens.
Name the table. If you give the table a name based on its format or function, you can find it more easily in the Navigator than if you accept the default naming scheme of Table followed by a number.
Choose the number of rows and columns to have in the table.
Choose the table format. These are the same options whose defaults you can set in Tools -> Options -> OpenOffice.org Writer. This time, though, you are setting them for the individual table. Whether or not you change the default options, remember that the Header row is included in the number of rows in the table.
If you want to use an autoformat, click the Autoformat button. Instructions for working with autoformats are presented below.
Writer does not have the concept of table styles. In its absence, autoformats are the next best thing.
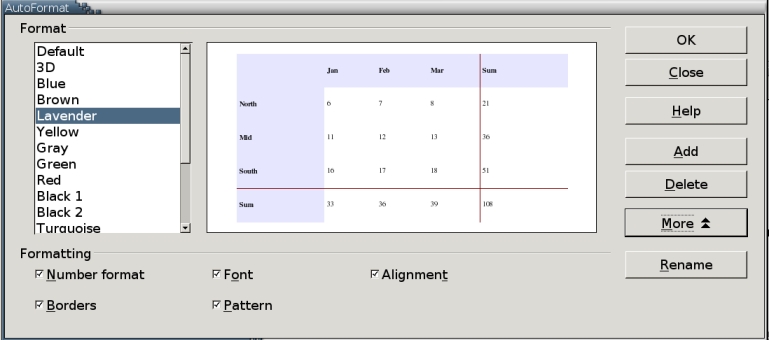
Figure 2. Autoformats aren't as flexible as styles would be, but they are a somewhat more limited substitute.
Autoformats can be added when a table is created (see above) or afterwards. They are by far the easiest way to format tables, especially if you are adding the same design to multiple tables.
To add an autoformat to an existing table:
Place the mouse cursor in the table.
Select Table -> Autoformat. Note that this command is a change from earlier versions of Writer, in which the command is Format -> Autoformat. The Autoformat window opens.
Select the Autoformat to apply from the list in the left-hand pane. A preview of the format appears in the right-hand pane.
If you want to select the characteristics of an autoformat and not simply the design, click the More button. Additional options appear on the bottom of the window.
Select or de-select any of the additional options. Then, press the OK button to continue.
Autoformats also can be added by placing the mouse cursor in an existing table, selecting Table -> Autoformat -> Add and then naming the new autoformat.
Be aware, however, that unlike styles, autoformats can be remorselessly literal about complex patterns. For example, if you create an autoformat from a table that has eight rows, in which alternate shadings are used in each row, that pattern breaks down if you use the new autoformat on a table with ten rows. The solution seems to be to make the model for the autoformat as small as possible, and then make sure that all tables have a multiple of the original's rows or columns. Otherwise, you may have to format parts of a table manually after using an autoformat.
Once you have added a table, you can format a selected part of it. Options are available when you select Table Properties from the Tables menu or Table from the right-click menu. Both contain the same formatting options, but the right-click menu generally is the easiest option, because it opens beside the cursor position. All selections apply to the currently selected cells, whether they are the entire table, a row, a column or a single cell.
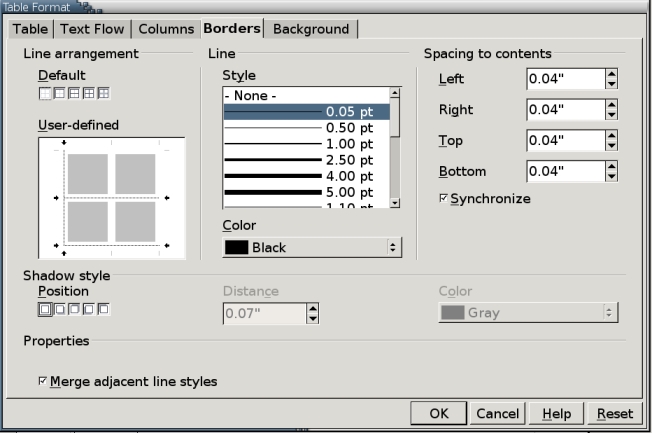
Figure 3. Table cells in Writer are designed to act as much like Calc spreadsheet cells as possible. Many of the formatting dialogs are identical.
You also can use the floating Tables toolbar, available from View -> Toolbars. However, the toolbar contains only the most common formatting options, so it seems the least useful choice.
Options are divided into five tabs:
Table: Sets the alignment for the tab and the blank space around the table. In addition to the usual left, right and center alignments, you also can choose Automatic to let Writer handle the alignment for you; From Left to off-set the table form the left margin; and Manual, which positions the table in relation to the blank space you set to the left and right of the table. Naturally, if the table fills the entire space between the left and right margins, changing the alignment produced no visible result.
Text Flow: Contains settings for how the table or individual cells break across a page, including what page style is used on the page before or after the break. It also includes settings for the number of rows that are repeated at the top of each page.
Columns: A visual representation of columns so that you can resize them. Columns can be resized by dragging on their borders, but this tab lets you set them exactly. You can choose whether changes affect the size of the table or make other columns proportionately bigger or smaller. One entry even tells you the remaining available space. If you've ever partitioned a hard drive with a graphical tool, this tab should seem familiar.
Borders: Sets the borders around cells. Which sides get border, the thickness, type and color of the line and any shadow all can be set. However, the most important feature is the Spacing to contents feature, which determines the distance between the borders and the cell contents. You also might choose to use no border at all, in which case you may want to select the Table Boundaries feature from the Table or the right-click menu so that you can see the borders as you work. The interface is one you soon will become familiar with if you use OOo regularly. It also appears on the tabs for headers and footers in page styles and is used for drawing objects.
Background: Another tab widely used in OOo, the Background tab sets the color or graphic used for the background. If you use this tab, you may need to edit the Table Heading and Table Content paragraph styles so that the fonts contrast with the background to make them readable.
Another design element you may want to use is Number format. This feature is not available in the Table Properties window and must be selected separately. As in a spreadsheet, this menu item sets how OOo displays and treats numbers. In fact, the window is identical to the one used in Cal, OOo's spreadsheet program.
If you find yourself editing these settings extensively, consider adding an autoformat so that you don't have to add the same settings to every table.
As with formatting, you can manipulate tables from the Tables menu, the right-click menu inside tables or the Table toolbar. Rows, columns and cells can be added or deleted from separate menu items. In addition, you can:
Split the table: the table divides at the current mouse position.
Merge tables: the second table needs to be directly below the first table, with no spaces between the two.
Table boundaries: displays cells border even when their thickness is set to O or to the same color as the background. This setting applies to the editing window only. When you print or display a page in a Web browser, the borders are not visible.
Split/Merge cell(s): divides one cell into two or joins two or more cells into one. These features generally cause the least problems if you use them before cells have contents.
Protect: prevents the cell's contents from being altered and the cell from being deleted.
Number recognition: sets Writer to recognize numbers and align them to the bottom right, as in a spreadsheet.
Caption: opens a window to design the caption and add its content. The same controls are used for anything else that can have a caption, such as a graphic or a formula.
Convert table to text: available only from the Tables menu and nowhere else.
Sort: available only from the Tools menu, this feature allows you to sort selected contents by up to three different columns or rows. Blank rows are placed at the top, blank columns to the left.
On the OpenOffice.org mailing list, the point has been made several times that OpenOffice.org is not an office suite so much as an office program. In other words, OpenOffice.org is not a collection of originally independent programs loosely combined into a whole, but a group of applications designed for compatibility from the ground up.
This difference is most obvious in the fact that OpenOffice.org is much smaller than comparable MS Office program. However, it is also apparent in the way that Writer handles tables. Basically, Writer's treatment of tables is designed to be as close as possible to the inner workings of Calc, OOo's spreadsheet program. Not only the tools but also many of the dialog windows for formatting and manipulating Writer tables closely resemble those for Calc spreadsheets. The resemblance is not perfect, though, as will become more obvious when we look at using Writer tables for calculations. All the same, it is broadly true that if you know how Writer tables or Calc cells function, you have a good start on learning the other.
Bruce Byfield is a freelance course designer and instructor. He also is a regular contributor to Newsforge and the Linux Journal Web site.
