
OOo Off the Wall: Getting in the Frame
Frame styles are the least understood style type in OpenOffice.org Writer. Many users get by without using them or even knowing what they are. Doing so it easy for users, because OpenOffice.org uses frame styles automatically. Users may position frames, but most do not format them. For simple documents, ignoring frames is a reasonable strategy. Frame styles have defaults that are reasonable, if not always ideal, for most purposes.
The more complex your documents, however, the more you should know about how to use frame styles. The number of options available are extensive enough that you can fine-tune a frame's look and behavior almost as much as you can in a desktop publishing program. You even can add blank frames (also called text frames) and arrange them so that text flows automatically from one frame to another. This feature allows the automation of complicated layouts, such as folded brochures or newsletters in which a story begins on one page and ends on the next. Beyond a doubt, knowing how to format text frames can give your document design an extra edge.
When an object is added to Writer, it automatically is enclosed in a frame of a pre-determined type. The frame sets how the object is placed on the page, as well as how it interacts with other elements in the document. You can edit the frame by modifying the frame style it uses or by using a manual override when a frame is added to the document.
Because frames and objects are used together, it sometimes is easy to forget they are separate elements. In some cases, such as charts, you can edit the frame and object separately, so the distinction is worth remembering.
Unlike other elements that use styles, frames can be defined only partly by their style because their use can vary so much. Several different elements of frames, such as the anchor and the protected elements, need to be defined manually for individual frames.
You can format a frame manually when you select Insert - > Frames. The screen that opens contains all the settings available when frame styles are set up, as well as those available only when the frame is inserted. As with other styles, the most efficient way to format frames is in the Stylist, available from Format -> Stylist or by pressing the F11 key.
Because OpenOffice.org does not allow you to define page styles with recurring frames, consider doing some quick sketches of the basic page layouts you need, indicating the approximate positions of different frames and their purposes. Try to keep the number of different page layouts as low as possible in order to avoid chaos in your design.
You also should decide whether to design with sections or frames. Sections and frames both can be used for inserting pieces in a document that are formatted differently from the rest. Frames have the advantages of offering more design options and being managed as styles, but sections are quicker to set up and can be hidden. If formatting and revision are important in the document, then frames probably are the better choice. Otherwise, you can use sections, which are available with Insert -> Sections.
If you are using a mix of graphics, you may want to define two related styles, one with a border line for graphics with white backgrounds that will be printed on a white page and one without for all other backgrounds. You also may want to design one or more frames for text only.
Otherwise, the default frame styles (listed in the table below) cover most user's needs. The only significant addition to the default styles that most users might need is one or more styles for text frames.
Pay special attention to the positioning of frames. Many of the pre-defined styles default to a center alignment. This is the lowest common denominator of design; centering all frames looks reasonably good in most cases, but is rarely the best choice. One of the most visually effective ways to position a frame is to have its left margin align with that of the paragraph above it. To achieve this effect, insert the frame in a blank paragraph of the same style as the paragraph above. Then, select Type -> Position -> Horizontal -> From Left to position the frame exactly where you want it.
You also should think about the type of wrap and the spacing between the frame and text. Instead of cramming a frame close to the text, use the Wrap tab to place some white space between them.
Table 1. Various Frame Styles and Their Uses
| Style | Comments and Use |
|---|---|
| Formula | The frame style used for formulas. The default includes Autosize, which adjusts the size of the frame to the formula. |
| Frame | The default frame style. |
| Graphics | The default style for graphics. The defaults include autosizing to fit the graph, no text wrap and a thin border around the frame. These are reasonable defaults, except for the border. Unless the background of the graphic is white and the document's background also is white, the border usually is unnecessary. |
| Labels | The default style for use with File > New > Labels. It seems to be used by OpenOffice.org automatically and is not intended for users at all. |
| Marginalia | A style for placing a frame beside the left margin. As the name suggests, the Marginalia style is intended for comments added in the margin of text. The style also is useful for creating sideheads, headings against the left margin, which often are used in technical documentation. To set up sideheads, create body text styles with two inches or more indentation from the left. Then, place the cursor at the start of a body text paragraph, add the frame and apply the Marginalia style. |
| OLE | The default style for OLE objects and floating frames. The default places the frame at the top and center of a body of text. |
| Watermark | The default style for a watermark, a graphic placed as the background to a body of text. The default is a Through wrap, with text passing over the frame and anything in it. The graphic should be faint enough that text still is readable over top of it. |
Frame settings can be accessed by selecting New or Modify in the Stylist or by selecting Insert -> Frame from the menu. Once a frame is added to a document, you can double-click the frame to open the Frame window or modify or change the style in the Stylist.
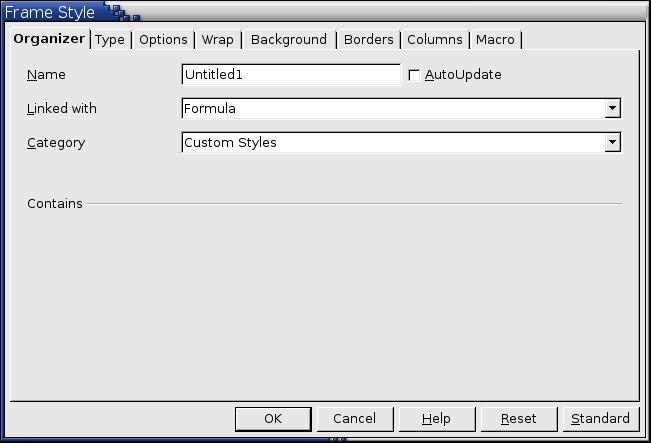
Figure 1. Frame style settings are similar to those of other style types in Writer.
Frame settings are available from the following tabs:
Type tab: sets the size and position of the frame. One of the most useful options here is Autosize, which automatically adjusts the frame to the object it contains. If the frame style is one used automatically, then this option always should be selected.
Options tab: sets whether the contents of the frame are printed and able to be edited in a read-only document. The tab also sets the text direction, which is useful if you are using the frame for contents in a language that does not use left-to-right text direction.
Wrap tab: sets how text is positioned in relation to the frame and how close text comes to a frame. If you want the frame contents to stand out from the paragraphs around it, set the wrap to None. This probably is the single most important tab for frames.
Background tab: sets the background color or graphic. This tab is useful mostly for text frames in complex page layouts, in which a text frame has an appearance different from the general background of the page.
Border tab: sets the line around the tab, if any. Many beginning designers make the mistake of adding a border to every frame. However, when a colored background distinctly marks the division between the frame's contents and the rest of the page, borders are unnecessary.
Columns tab: sets the number of columns used in the frame. This tab can be ignored unless the frame is being used for text.
Macro tab: sets a macro to use with the frame. Obviously, these options are useful only in an on-line Writer or HTML document.
Frames are added automatically when objects are inserted into a document. Although you may want to use only the default frame styles, you also may want to have some variations. For example, some designers might prefer to have two different frame styles for graphics: one that is centered for small graphics and another that is left-aligned for graphics that take up the entire width of the main frame. In such a case, at least one frame style may need to be added manually.

Figure 2. Each frame's right-click menu has positioning options for the frame.
Most of a frame's design can be set in the style. However, the following options are available only after the frame is added to the document:
Anchoring: how the frame is positioned in relation to the rest of the page's contents. (Format -> Anchor)
Arrangement: the frame's position in a stack of objects. (Format -> Arrange)
Adding a hyperlink: clicking on the frame opens a Web page or another document in an HTML file. (Insert -> Hyperlink)
The right-click menu also has items for anchoring and arrangement, as well as for wrap and alignment.
Writer has four pre-defined categories of captions: drawing, illustration, table and text. Each of these categories uses its own paragraph style. The styles do not have an equivalent numbering style. Instead, numbering for the categories seems to be managed directly by Writer.
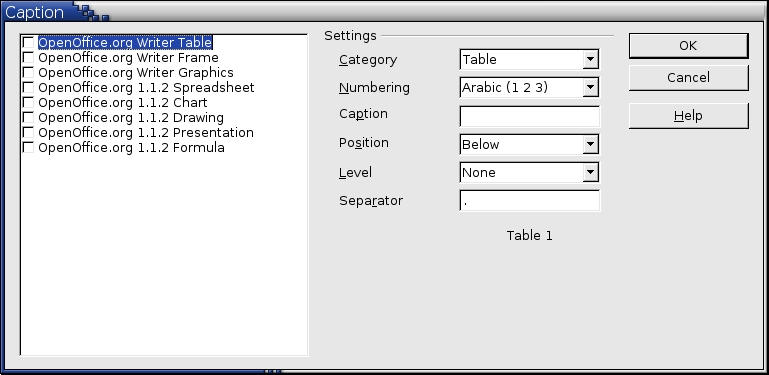
Figure 3. Automatic captions can be added for some framed objects.
These category captions can be added in three ways.
Automatically, when set up in Tools -> Options -> Text Document -> General.
Manually, from Insert -> Caption.
Manually, by selecting Caption from the right-click menu.
The options are the same in each case. The main difference is the two settings for adding chapter and heading numbers to a caption are reached by selecting the Options button when you add captions manually.
Alternatively, captions can be added by defining a paragraph style. This is the only option available if you are using frames not included in the automatic captions. The weakness of this approach is a caption added in this way cannot be added to the same frame as some objects, such as a graphic or a table. As a result, in some cases, the frame and the caption may be separated at a page break. To avoid this problem, add a text frame and then add both the graphic and the caption to the frame.
Frames can be linked so that the text begins in one frame and continues in another. Linked frames allow for complex page layouts. When several graphics are on a page, they sometimes can control the positioning of text more easily than setting the wrap properties. They also are useful in newsletter design, in which an article starts on one page and continues on the next.
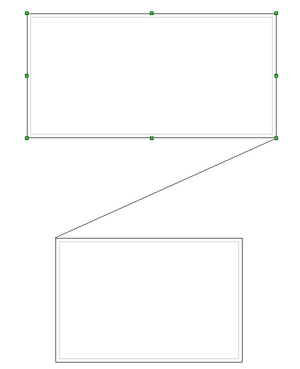
Figure 4. Two Newly Linked Frames
Linked frames are limited in how they can be used. The target frame:
must be empty.
must be in the same section as the source frame.
cannot already be the target of another frame.
cannot already be linked to another frame.
cannot be nested in the source frame.
is expanded automatically to fit its content only if it is the last frame in a series of linked frames.
To link two frames, first click the edges of the first frame in the series. At this point, the outline of the frame and the selection handles are visible. Second, select the link icon in the special Object Bar for frames and click the target frame. When one of the two linked frames is selected, a line connects the bottom right selection handle on the first frame and the top left selection handle of the target frame.
As with page and number styles, frame styles are one of Writer's innovations. In other word processors, if you want to use the same type of frame repeatedly, you usually have to copy and paste the frame, although FrameMaker does remember the last settings you used for frames. As for changing the frame design--forget it. By contrast, Writer's frame styles make design choices easy to repeat and to edit globally. Learning how to use them requires a change in thinking, but the result is greater ease and control and saved time.
This article concludes the discussion of styles in OpenOffice.org Writer. Next up: something completely different.
Bruce Byfield was product manager at Stormix Technologies and marketing and communications director at Progeny Linux System. He also was a contributing editor at Maximum Linux and the original writer of the Desktop Debian manual. Away from his computer, he listens to punk-folk music, raises parrots and runs long, painful distances of his own free will.
