
Tux Knows It's Nice to Share, Part 8
Actually, it's not that bad. In fact, the whole process highlights yet again the flexibility of Samba in a networked environment. I trust that you are all sitting comfortably--let's begin.
For this little demonstration, I am using the notebook computer sitting across from me; hooked up to it is a HP Laserjet 5L. The printer has already been configured as a shared printer on the Windows system. In other words, this PC has the Client for Microsoft Networks loaded and, using that PC, I have logged into my workgroup (of which my Samba server is a part). Then, I brought up my list of printers (click Start, Settings, then Printers), right-clicked on the printer I wanted to share and chose Sharing from that menu. What you should see now is a menu like the one below.
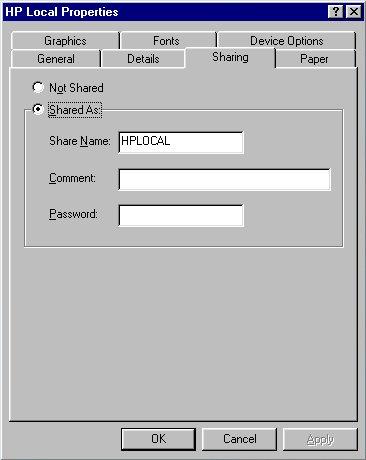
Notice at this point that you do have the opportunity to set a password for the resource in question, a printer shared as HPLOCAL (as in local to the PC but the name could be many things). Now, click OK and a little hand should appear under the printer icon letting you know that it is available on the network. To check this out, you can use your old friend, the smbclient program.
     smbclient -L speedy
     added interface ip=192.168.22.7 bcast=192.168.22.255 nmask=255.255.255.0
     Password:
Since we didn't set a password for accessing the printer, we can just hit return at the password prompt. This is what we get.
        Sharename      Type      Comment
        ---------      ----      -------
        PRINTER$       Disk
        HPLOCAL        Printer
        CDRIVE         Disk
        IPC$           IPC       Remote Inter Process Communication
So, how the heck do you print to this thing from your Linux system? Well, as you might expect, there is more than one way to do it. One rather simplistic way to print is to use the very flexible smbclient program to connect to the shared printer.
     $ smbclient "//speedy/hplocal"
     added interface ip=192.168.22.100 bcast=192.168.22.255 nmask=255.255.255.0
     Password:
     smb: >
Let's say I had a file called "a_file" with three lines in it. Like this:
     This is line 1
     This is line 2
     This is line 3
Simply type print a_file at the smbclient prompt and your print job should come out. This is fine for a text file, but even that has some problems. In my case, the printout looked more like this.
     This is line 1
                   This is line 2
                                 This is line 3
Those of you who read my series on "Taming the Horrors of Printers and Printing" (parts 1, 2, 3, and 4) will know this as the staircase effect.
We could solve this by adding a control-M character at the end of each of those lines but that is far from practical. Instead, type translate at the smb:> prompt. The system responds with this:
CR/LF<->LF and print text translation now on
We send our file again with the same print a_file command as before and Voilà! That fixes the staircase effect without having to edit our files, but it is still a clunky way to print. After all, we have applications that define printers, and when we print from the command line, we generally use the lpr command. To take care of this, Samba comes with a little program (a Bourne shell script actually) called smbprint. For those of you who built Samba from scratch, the smbprint script is sitting in the source tree under examples/printing. If your version of Samba was pre-installed, you might find it already sitting under /usr/bin.
To use smbprint, we need to create an entry in the /etc/printcap file. Here is the entry I created for the above configuration:
     ## Samba printer
     hplocal:
             :sd=/var/spool/samba/hplocal:
             :af=/var/spool/samba/hplocal/hplocalacct:
             :if=/usr/bin/smbprint:
             :lp=/dev/null:
sd is the spool directory where print jobs will be spooled before being fired out to the shared printer. Then we have the af parameter that specifies an accounting file (you don't have to create the file, but have it go to the same directory as you just defined for sd). The next entry, if, is your print filter, the smbprint script. Finally, we have a dummy print device which we set to /dev/null.
By the way, you can copy the smbprint script to another location (perhaps /usr/local/bin) and call it whatever you like. I mention this now because you may want custom filters for different printers. More on that shortly.
Finally, you need a .config file in the spool directory that defines certain things about the PC connected printer we want to use (note the dot in front of config). Again, using my own example, this is what I setup:
     server=speedy
     service=hplocal
     password=""
You could also setup a "user=user_name" parameter, as well, if you are using user name and password security on the shared printer. Once you are done here, try printing something.
/usr/games/fortune -l | lpr -P hplocal
If (like me) you found yourself with a printout that had the same staircase effect problem as earlier, then it's time to modify your smbprint filter. Look for the line that says TRANS=0 and change that 0 to a 1. Now try the print job again, and all should be well. Also, some versions of the script don't have the TRANS variable set up. Instead, look to the bottom of the script for a line that says # echo translate and remove the comment mark.
Ah, yes! The person in the back is right. This is all fine and good for a text-only printer, but what about Postscript? What about PCL3? What about all those other printer formats that we may need? What do we do about them? It's time for a little bit more on filters. If you look at the end of the smbprint script, you'll see the heart of the filter itself.
     (
     # NOTE You may wish to add the line `echo translate' if you want automatic
     # CR/LF translation when printing.
     #       echo translate
             echo "print -"
             cat
     ) | /usr/bin/smbclient "\\\\$server\\$service" $password -U $server -N -P >> $logfile
I won't go into a big discussion on filters here since I have discussed this in detail in the past (see "Taming the Horrors of Printers and Printing" parts 1 and 2 for a refresher). What I will tell you is since this is a script that acts as a filter, you can create your own. What I do is this: I get rid of all the lines you see above (my actual filter), and I substitute my own, one based on the ljet4 filter from the second part of that printer series. Here is the new filter now with the old filter commented out.
     #(
     # NOTE You may wish to add the line `echo translate' if you want automatic
     # CR/LF translation when printing.
     #        echo translate
     #       echo "print -"
             cat |  /usr/bin/gs -q -dNOPAUSE -sDEVICE=ljet4
             -r300 -sPAPERSIZE=letter -sOutputFile=- -
             | /usr/bin/smbclient "\\\\$server\\$service" $password -U $server -N -P
             -c "printmode graphics ; print -" >> $logfile
The backslashes at the end of each line are continuation characters in the script added for readability. On your script, you could easily make it one continuous line. So, let's examine this, shall we? The big thing to note here is that we are constructing a Ghostscript filter and specifying an appropriate driver for our printer. The most important thing, however, is near the end on the last line. We set printmode graphics because smbclient needs to know that we are sending graphical information rather than text. The final part of the string (the ; print - ) makes sure the whole things is then treated as a print job.
I want to emphasize this is a copy of the smbprint script. As such, it must be made executable in whatever location you put it. I called my script ljetfilter and I put it in /usr/local/bin. Then I made it executable with chmod +x /usr/local/bin/ljetfilter. Finally, I modified my /etc/printcap so that the "if" line looked like this.
:if=/usr/local/bin/ljetfilter:
At this point, I can print just about anything, including a Postscript file.
lpr -Phplocal /path_to/printfile.ps
Now that I have kept my promise, it's time I wrapped it up for another day. Thanks to everyone who responded so enthusiastically to this series, and thanks for keeping me on my toes <insert appropriate smiley here>. Until next we meet here at the SysAdmin's Corner, remember what your Momma said, "It's nice to share". And remember that Tux knows it too.
Looking for past articles to this series? Click here for a list.
email: ljeditors@ssc.com

