
Building a Bridging Firewall with Linux
Upon examining several proprietary and open-source solutions, we found a major drawback to many of them was the requirement that our internal networks would need to be renumbered into a private address range, as per RFC 1918. With over 200 systems on three different subnets, some of which are embedded microprocessors that would require burning new EEPROMs, this was a daunting task. So we began searching for a way to implement a transparent firewall that would allow us to retain all of our current addresses, yet still offer good protection.
The Linux kernels v2.2 and higher have support for Ethernet bridging. In a bridge, all packets received by one interface are passed to the other, without regard to source or destination IP address, by examining the Ethernet MAC destination address of the packet. AC2I, a French company, distributes a kernel patch that allows the ipchains packet filter to work on the bridged interfaces. This configuration allows you to set up a firewall system that is invisible to the Internet, yet provides a high level of protection and access control for your private network. The remainder of this article explains the steps necessary to get a bridging firewall up and running.
To perform as an effective firewall and network monitor, a CPU must be sufficiently fast. The prototype system was built on a 500MHz Celeron processor with 256MB of memory. Tests show the bridge can keep up with a fully-saturated 10MB/s Ethernet, with no lost packets. Install two additional Network Interface Cards (NICs), because you will need two for the bridge and a third for administering the firewall.
Disk capacity is not particularly important, as all logging should be to a secure syslog server. If you want to maintain some local logging (useful for some of the configuration and monitoring tools), ensure an abundance of free space--firewall and intrusion detection system (IDS) logs can get very large, very quickly.
The following sections are based on the Linux 2.2.16 kernel (Red Hat 7.0 distribution). When the 2.4 kernel is released, instead of ipchains, the iptables package will be used for firewalling as the kernel firewall code changes.
Perform a standard Linux installation, but deselect almost everything. Do not even install inetd/xinetd--you are not going to run any services on this system. Do not install any compilers/development tools. If, however unlikely, someone does manage to gain access to the firewall, you do not want them to be (easily) able to rebuild any binaries. Do install Perl (for some of the reporting tools) and OpenSSH (for remote administration). Make sure you install the ipchains package--this is needed for the firewall setup. A web browser can be useful, and NTP can't hurt as long as you only accept time updates from inside the protected net. You will probably want your favorite editor(s), and maybe some X11 applications (xterm, gtop, etc.). Install network monitoring packages (whois, finger, tcpdump, traceroute, nc) and tcpwrappers. Create a non-root administrator user and use this account for all logins. Perform the installation with either no network connection at all or with the primary NIC connected to an otherwise empty hub or switch.
At installation, only configure the primary Ethernet interface--the one that will be a part of the protected network--and give it a fixed IP address. When the system reboots after installation, type linux 1 at the LILO boot: prompt to boot into single-user mode, and then put a line into /etc/hosts.allow for sshd to allow access only from a specified internal-network workstation. Then reboot into runlevel 3. It is now safe to connect the primary Ethernet interface to the internal network.
This step must be performed on some other system with the same kernel version as is installed on the firewall. You will do a standard Linux kernel configuration, disabling most features and enabling the bridging code.
Change directory to /usr/src. Copy the kernel source tree to another directory:
   # mkdir linux-fw;cd linux-2.2.16;tar cf - . |
   # (cd ../linux-fw;tar xpf -);<\\>
   cd ..; rm linux;ln -s ./linux-fw linux
Apply the linux_brfw2 patch. This patch adds a new built-in bridgein chain to ipchains. This is the chain you will use for the bridging firewall. This patch can be obtained from http://ac2i.tzo.com/bridge_filter/linux_brfw2.diff:
# patch -p0 <linux_brfw2.diff
Change directory to /usr/src/linux and configure the kernel. You should definitely read the kernel how-to document at http://www.redhat.com/mirrors/LDP/HOWTO/Kernel-HOWTO.html before performing this step. The relevant configuration options are:
<il>CONFIG_MODVERSIONS=N<il>CONFIG_FIREWALL=Y<il>CONFIG_FILTER=Y<il>CONFIG_IP_FIREWALL=Y<il>CONFIG_IP_FIREWALL_NETLINK=Y<il>CONFIG_IP_ROUTE_FWMARK=Y<il>CONFIG_BRIDGE=Y
Create a temporary directory somewhere to hold the new kernel and system map, and uncomment the INSTALL_PATH= line in /usr/src/linux/Makefile to reflect this location (you don't want to overwrite your running kernel!). Also, edit /sbin/installkernel in the same way.
# make dep;make clean;make bzImage install
Copy vmlinuz-2.2.xx-yy and System.map-2.2.xx-yy from your temporary directory to /boot on the firewall, being sure to first move any existing files by the same name. Login to the firewall, change directory to /boot, and link vmlinuz and System.map to the new files.
Edit /etc/lilo.conf adding a new image section:
      image=/boot/vmlinuz
      label=firewall
      read-only
      root=/dev/hda1
Run LILO and lilo -D firewall make the new kernel the default, and reboot the firewall system.
Log in to the firewall system. Assuming you used eth0 as your primary interface, ifconfig -a should show what you see in Listing 1 (of course, the MAC addresses will be different).
Listing 1. Results of ifconfig -a
To get bridging to work, you need the brcfg application. The source code for this application is available from Matthew Grant of the Linux Router Project at http://lrp.plain.co.nz/tarballs/bridgex_0.30.tar.gz. Compile the binary on a system with the same kernel version as the firewall, and copy it to /usr/sbin/brcfg on the firewall system. The following commands should then get the bridge up and running:
# ifconfig eth1 promisc up
# ifconfig eth2 promisc up
# brcfg start
# brcfg device eth1 enable
# brcfg device eth2 enable
After the few minutes it takes for the bridge to learn what addresses are on either side, you should be able to pass packets across the eth1<-&rt;eth2 bridge transparently.
The firewall itself is implemented using the ipchains package. The kernel patch above adds a new built-in chain (bridgein) to the standard chains, which examines any packets seen on either of the bridge interfaces. Since this is an input chain, each rule must specify the interface--packets are matched according to which interface they see first. The default policy for each chain is set to ACCEPT, rules are added to the bridgein chain to implement the access policy, and a final DENY rule is added to catch anything not explicitly allowed.
The access policy for the firewall is designed around network topology (see Figure 1).
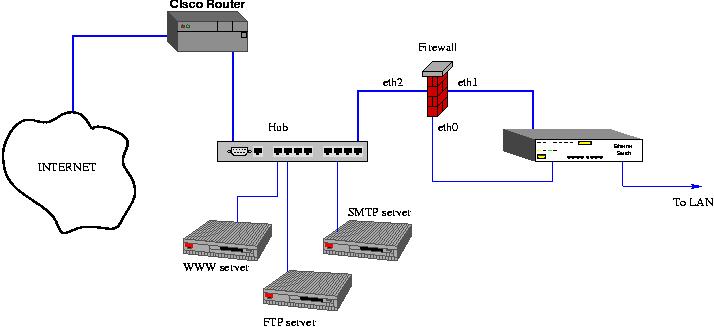
The salient features of this design are:
<il>All public servers (HTTPD, FTP, SMTP, SSH) are located outside the firewall.
<il>All traffic from the Internet destined for internal machines must pass through the firewall.
<il>In general, traffic originating on the protected LAN and destined for the public servers is unrestricted.
<il>Traffic originating on the protected LAN and destined for the Internet is generally allowed.
<il>Traffic originating on the public servers and destined for the protected LAN is restricted to those services which are actually needed by the public servers (NFS exports to the LAN, SMTP from the public SMTP server to an internal mail hub, SSH from the SSH server to internal hosts).
<il>Traffic originating from the Internet and destined for internal systems is generally blocked. Packets are allowed if they are (a) destined for an unprivileged port or a well-known server and (b) not initiating a connection (TCP SYN flag not set).
Listing 2 is an annotated script to set up the bridging firewall in accordance with these policies.
Listing 2. Annotated Script for Bridging Firewall Setup
For more information on ipchains and writing rules, see the man page and/or the IPCHAINS HOWTO at http://www.redhat.com/mirrors/LDP/HOWTO/IPCHAINS-HOWTO.html.
A useful addition to the firewall system is the snort intrusion detection system (IDS) suite of programs. Snort is a set of packet filtering rules designed to detect the majority of network intrusion methods which are commonly seen. A large community of developers and analysts is continually updating the rulesets as new attack methods are discovered. Snort can be configured to send its alerts to a logfile, syslog or via e-mail or pager to administrators. It can even be configured to add ipchains blocking rules in response to a detected intrusion attempt--although this feature should only be used if you are sure you can weed out false-positive hits. Snort, along with various contributed scripts for presenting the log output in readable form, is available at http://www.snort.org.
Gfcc is a nice Gtk+-based GUI for viewing and modifying your firewall rules. It can be found at http://icarus.autostock.co.kr/.
The bridge and firewall should be started immediately after networking. The script in Listing 3 starts the firewall, sets up and starts the bridge, then starts snort. It assumes the firewall script is in /etc/firewall, and should be installed in /etc/rc.d/init.d/bridge. After installing the script, run chkconfig bridge on to install the proper runlevel links.
A filtering bridge is useful in a number of situations. It is a quick and easy way to add a firewall to an existing LAN without having to change any IP addresses or use NAT. It can also be used to create protected or restricted subnets on a LAN. For example, if you have frequent visitors who need Internet access, you can put them behind a bridging firewall configured to allow them access to the Internet, but not to any hosts on your LAN. It can be used to protect a DSL or cable modem connection. Since the bridge interfaces do not run an IP protocol stack, they are immune from many of the common intrusion and denial-of-service attacks.
Henry Stilmack has been a UNIX system administrator for over 10 years. He lives in Hawaii with a spouse, two dogs, four cats and uncountable geckos. He can be contacted at hps@shangri-la.cx.
email: ljeditors@ssc.com
