
Hack and / - Your Own Personal Server: Blog
This column is the third in a series about how to manage your own services on your own server. In the first column, I discussed how to make sure your home network is ready to host your own services. In the second, I covered DNS, and in this column, I talk about one of the services people commonly put in the cloud but is simple to host yourself: a blog.
At first, I planned to focus this series strictly on how to set up your own Web server, but I realized that these days, most people don't simply set up Apache and upload some static HTML. Instead, most modern sites are built so that their content is generated dynamically, often with data stored on a database. Instead of just a basic static page, today if you want to set up your own Web server at home, you probably want to host a forum, post some information about yourself, share some pictures or, quite likely, manage your own blog.
Many different types of blogs exist—from sites that attempt to replicate the function of a physical magazine on the Web to sites that act as a person's public diary to sites that just link to other interesting content. And, just as many different types of blogging software are available under Linux. Each type of blogging software has its advantages and disadvantages, but for the purposes of this article, I had to pick one. I chose WordPress because it's relatively simple to set up and has a large user base, which means it should be easier for you to get support from the community.
I not only had to choose what blogging software to cover, I also had to decide on a base distribution. When it comes to Apache and WordPress, although the software itself is basically the same across major Linux distributions, the organization of that software can be quite different. Because I'm aiming this column at someone who has never set up a Web server before, I'm going to use Ubuntu Server here (specifically 10.04 LTS), as I think the way it has organized Apache configuration and WordPress is the most friendly for the new system administrator.
The first step in the process is to install WordPress, Apache and all of the dependencies this software needs. On a modern Linux distribution, this is relatively simple. In the case of Ubuntu, simply type the following into a terminal:
$ sudo apt-get install apache2 mysql-server wordpress
Those packages will pull down the Web server software, the MySQL server that WordPress will access on this same machine and WordPress itself, along with all of its dependencies. During the install, you will be prompted to choose a password for the MySQL root user. Although you optionally can leave this blank, I advise you to choose a password and document it somewhere. If you decide to leave it blank, you always can add a password to the root user later, but it's much simpler to set it here.
Apache2 under Ubuntu (and Debian-based distributions in general) has a somewhat unique way to organize Apache configuration. If you ever have managed multiple Web sites on a single Apache instance (often referred to as virtual hosts), you know how challenging it sometimes can be to organize each site's configuration along with all the modules you need Apache to load. Under Ubuntu, all of the currently available virtual hosts and modules store their files under /etc/apache2/sites-available and /etc/apache2/mods-available, respectively. Any virtual hosts or modules that are enabled are set up as symbolic links under /etc/apache2/sites-enabled and /etc/apache2/mods-enabled. Along with this new organization, the apache2 package includes a set of new tools to enable and disable sites and modules. For instance, if you added a new virtual host configuration at /etc/apache2/sites-available/foo and wanted to enable it, you would type:
$ sudo a2ensite foo
That command creates the necessary symlinks for you in /etc/apache2/sites-enabled. Likewise, if you wanted to load a module named cgi that you see under /etc/apache2/mods-available, you would type:
$ sudo a2enmod cgi
To undo the above two commands, you would type:
$ sudo a2dissite foo
$ sudo a2dismod foo
Although it's true that you could set up these symlinks manually, the included commands certainly make it more clear and easier to script.
Now that you are familiar with how Apache organizes files under Ubuntu, the next step is to configure a new virtual host. It turns out there are a number of different ways you can configure the WordPress virtual host under Apache, and included in the wordpress package are examples of the different methods under /usr/share/doc/wordpress/example/apache.conf. For this article, I'm choosing a configuration that makes it simple to manage multiple WordPress sites on the same host, so create a file called /etc/apache2/sites-available/wordpress that contains the following data:
NameVirtualHost *:80

<VirtualHost *:80>
    UseCanonicalName Off
    VirtualDocumentRoot /var/www/%0
    Options All
</VirtualHost>
Now, enable this new site and disable any default virtual hosts Apache may have included:
$ sudo a2ensite wordpress
$ sudo a2dissite default
In my example, I have used the Apache option VirtualDocumentRoot, so I can more easily manage multiple WordPress sites. Unfortunately, the module to allow that feature isn't enabled by default, so I also need to enable the vhost_alias module so that feature works:
$ sudo a2enmod vhost_alias
The way I have set up WordPress, each WordPress site you host from this server will have its own document root under /var/www/<domainname>. When you add a new site, you need to create a symlink under /var/www/ named after your domain name that points to the installed WordPress software. In my case, I want to create a site called www.example.org, so I would type:
$ sudo ln -s /usr/share/wordpress /var/www/www.example.org
Instead of www.example.org, put the fully qualified domain name you are going to use for your site. While you're at it, if you haven't already set up an A record on your DNS server that points to your new site, now would be a good time. If you followed the steps in my previous column to set up a DNS server of your own, you already should have an entry in place for www. Simply change the IP address to point to the external, public IP address you will use for your Web server and reload the bind9 service.
After the symlink is created, I use the apache2ctl Apache management tool to reload Apache:
$ sudo apache2ctl graceful
Note: the apache2ctl program is the main command-line program you will use to manage the Apache service on your machine. In addition to the graceful argument, which tells Apache to reload any new configuration you have changed safely (such as when you add new sites), you also can use the following commands.
To restart Apache by forcibly stopping existing processes and starting them again:
$ sudo apache2ctl restart
To start Apache if it is completely stopped:
$ sudo apache2ctl start
To stop Apache hard (kill all of the current processes even if they are still processing a user request):
$ sudo apache2ctl stop
To stop Apache gracefully (it will kill processes only after they are finished with their current request):
$ sudo apache2ctl graceful-stop
Like with many dynamic sites these days, WordPress gets its data from a database back end: in this case, MySQL. The wordpress package includes a nice little shell script you can use to set up your MySQL database automatically for your site at /usr/share/doc/wordpress/examples/setup-mysql. All you have to do is pass it the -n option and tell it the name of the MySQL user you want to use and the name of the database. In my case, I use the user name “wordpress” and name the database after my site, www.example.org:
$ sudo bash /usr/share/doc/wordpress/examples/setup-mysql
 ↪-n wordpress www.example.org
Note: this command attempts to ping the domain name that you list, so if you haven't set up the domain in DNS yet, you will want to do it before you run the above command. Again, make sure your domain points to the public IP address you will use for your site.
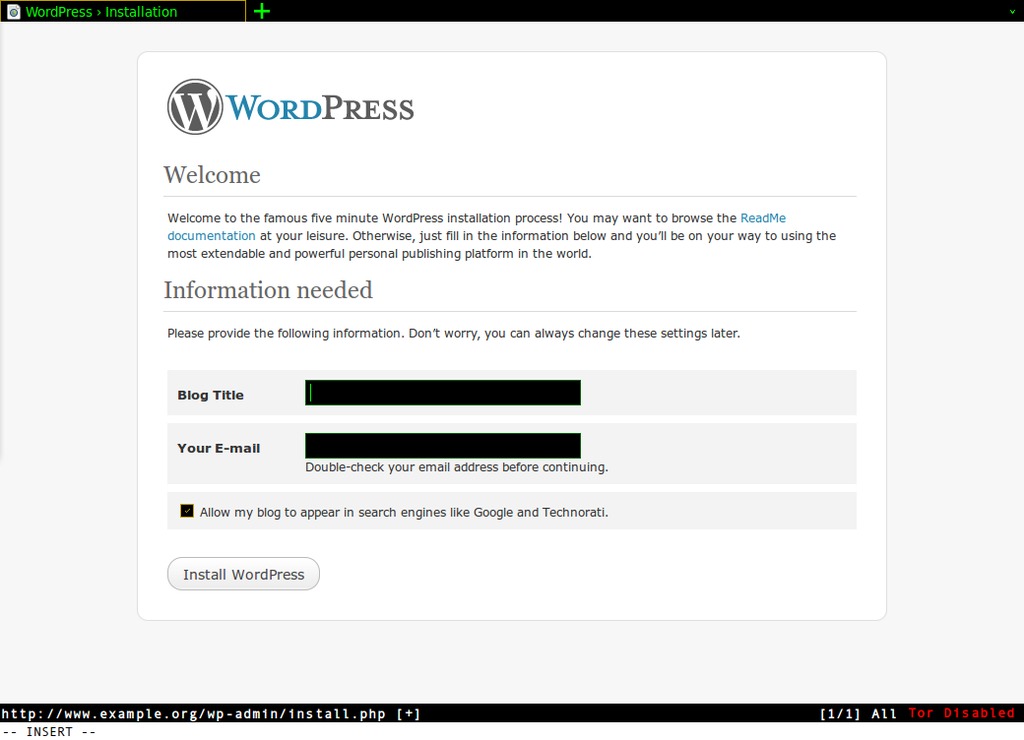
Figure 1. The Default WordPress Configuration Page
Once you get to this point, your blog actually should be ready to use. All you need to do is visit http://www.example.org (in your case, you would visit the URL you set up for your blog), and you should be greeted with the initial WordPress configuration page as shown in Figure 1. From that point, all you have to do is enter the title for your blog and the contact e-mail you'd like to use. WordPress will present you with the admin user name and a temporary password. From there, you can log in and start tweaking, creating posts and changing your theme.
Kyle Rankin is a Systems Architect in the San Francisco Bay Area and the author of a number of books, including The Official Ubuntu Server Book, Knoppix Hacks and Ubuntu Hacks. He is currently the president of the North Bay Linux Users' Group.
