
Getting Started with the Trolltech Greenphone SDK
Trolltech recently released many smartphone developers' dream combination—the Linux-based Greenphone and its open-source Qtopia Phone SDK.
The Trolltech Greenphone is a full-featured tri-band GSM (900/1800/1900MHz) mobile phone with a built-in 1.3 megapixel camera. Like many other modern smartphones, it features a QVGA touchscreen, Bluetooth, client USB, mini-SD Flash and stereo audio connectors.
Under the hood, it is built around a Marvell 312MHz PXA270(ARM) processor, runs with 64M of RAM, and has 128M of built-in Flash storage. It also uses the same field-proven Broadcom BCM2121 GSM/GPRS baseband processor module as the Palm Treo.
The Greenphone almost could be described as a sporty, Linux version of the Palm Treo. It is much lighter, more compact and comes in any color you want—as long as it's green!
The Greenphone SDK is a distribution of Qtopia Phone Edition, specially configured for use on the Greenphone. Qtopia (formerly Qt Embedded) inherits its API from Trolltech's flagship product Qt, a mature C++ application framework available for Linux/X11, Windows and Mac OS X. Qtopia is specifically enhanced for embedded Linux devices, such as phones, PDAs and appliances.
Qtopia is remarkably self-sufficient—sitting immediately on top of the base operating system, it provides its own font and image rendering, window management and input processing. Along with this sort of behind-the-scenes stuff, Qtopia avails itself of all the rich features of Qt's standardized access to files, networking, multithreading, internationalization, graphics processing and, of course, GUI widgets.
Like its big brother, Qtopia is readily available either as a free download to those wanting to do GPL-style open-source development or by commercial license purchased from Trolltech.
Qtopia also bundles a suite of personal information management tools as would be expected on any PDA or smartphone.
When you open the Greenphone's box, you find everything needed to start developing: mobile handset, power supply, USB cable, stereo headset and a Greenphone SDK CD-ROM. This last item contains a copy of the VMware player and a virtual machine preloaded with Debian Linux, Qt, Qtopia, KDevelop, native development tools and a complete ARM cross-compiling toolchain.

Figure 1. Greenphone Package Contents
The only other item needed actually to go on air with your newly created applications is a GSM subscriber identity module (SIM) card with a currently active account.
The two most widely used standards for cellular communications are GSM and CDMA, with GSM outnumbering CDMA worldwide by a ratio of about 1 billion to 270 million users. Although they are as completely incompatible on each other's networks as AM and FM radio, a normal user typically would notice only that phone accounts on GSM phones are usually tied to the SIM card, so changing handsets is really easy.
GSM currently stands for Global System for Mobile communications. It is an open standard governed by the nonprofit European Telecommunications Standards Institute (ETSI). GSM allows great interoperability permitting easier international roaming. GSM's other claims to fame are higher digital voice quality; a cheap short messaging service (SMS); multimedia messaging service (MMS) for exchanging images, audio, video and rich-text data; and finally, a general packet radio service (GPRS), often used as an Internet gateway, with billing based on megabytes of data transferred, as opposed to time spent on-line.
The Greenphone actually is based on two ARM RISC processors: a beefy Marvell 312MHz PXA270 acts as the PDA part and communicates to the ARM7-based GSM/GPRS communications controller. This controller is effectively the heart and brain of the phone component. It also acts like a modem and accepts GSM AT-style commands to dial, answer calls, send or receive messages, and other activities typical of a GSM/GPRS communications device.
Standard GSM modem AT commands can be sent to the phone, which execute and then return a response code. These AT commands are analogous to the decades-old Hayes modem commands, but instead of user using or programming a string like “+++ATDT16505511676” to dial Trolltech's number 1-(650) 551-1676, we do the same sort of thing with the GSM version of the command set, and the string looks more like “ATD16505511676”.
There are myriad other AT commands for handling everything that the GSM/GPRS phone unit can do. These include setting up the phone and establishing various types of communication, such as voice calls, SMS and MMS, and they can be used for getting information on signal strength, network status and so forth.
For a comprehensive description of these standardized commands, you can download the following documents from the ETSI site:
ETSI TS 127 007 V3.13.0 (2003-03), AT Command Set for 3G User Equipment (UE): webapp.etsi.org/exchangefolder/ts_127007v031300p.pdf
ETSI TS 127 005 V7.0.0 (2007-03), Data Circuit Terminating Equipment (DTE-DCE) Interface for Short Message Service (SMS) and Cell Broadcast Service (CBS): webapp.etsi.org/exchangefolder/ts_127005v070000p.pdf
Qtopia embeds the most commonly used of these commands into C++ class wrappers. The on-line documentation in Qt Assistant describes how to use and enhance these classes in the sections titled “GSM Modem Integration” and “Modem Emulator”.
For testing applications off-line, the Greenphone SDK provides a modem emulator that allows testing software without having actually to join a network and go on air.
Gnokii
For an excellent example of a Linux program using GSM AT command codes, check out Gnokii—it's a great tool for learning about GSM modems, as you actually can watch each transaction with the data sent and received to execute commands to dial the phone, send SMS messages and so on. It works well with most modern phones that have a serial or USB data connector. By the time this article is printed, it might already be running natively on the Greenphone. For complete details, visit www.gnokii.org.
Loading the development environment is simple—run the installation program on Windows or Linux, respond affirmatively to the prompts, and within a minute you will have VMware and the SDK tools, application sources, documentation and binaries installed with an icon on your desktop to start things up.
This makes life really easy for reluctant developers using MS Windows to get into both embedded and desktop Linux and Qt application development.
At the time of this writing, developers using the x86 version of Macintosh OS X can use the Greenphone SDK under VMware Fusion, but they need to copy over the virtual machine's files from another installation; however, this may change by the time this article is published.
Tip:
One technique for VM-based cross-platform development is to export your display from the Linux VM to your host machine running an X11 server. This might be the built-in X11 server running locally on your Linux host, Apple's optional add-on to OS X or even Cygwin on a Windows machine. I use screens rotated 90° to allow reading many more lines of code without scrolling, so this trick helps to leave the VM configurations as generic as possible. GUI performance typically is enhanced when the X server is run on the host machine due to the lowest level rendering being shoved off as far down the pipeline as possible—often at the display adapter's GPU. Using this method, it can almost make Windows and OS X feel like a Linux box.
Trolltech always ships its products with copious documentation and example code demonstrating all common features, and the Greenphone SDK is no exception. For starters, the “Developer Quickstart Guide” shows what needs to be done to build an application with a few one-liners.
First, we start the Qtopia emulator using the Qt Virtual Frame Buffer and a Greenphone skin by clicking on the runqvfb icon on our desktop. This is analogous to an X server for Qtopia, and it provides an exact pixel-for-pixel representation of the program running on the phone.
Then, we start the Qtopia phone environment by clicking the runqpe icon, which then connects to the qvfb process and displays its contents in its virtual screen.
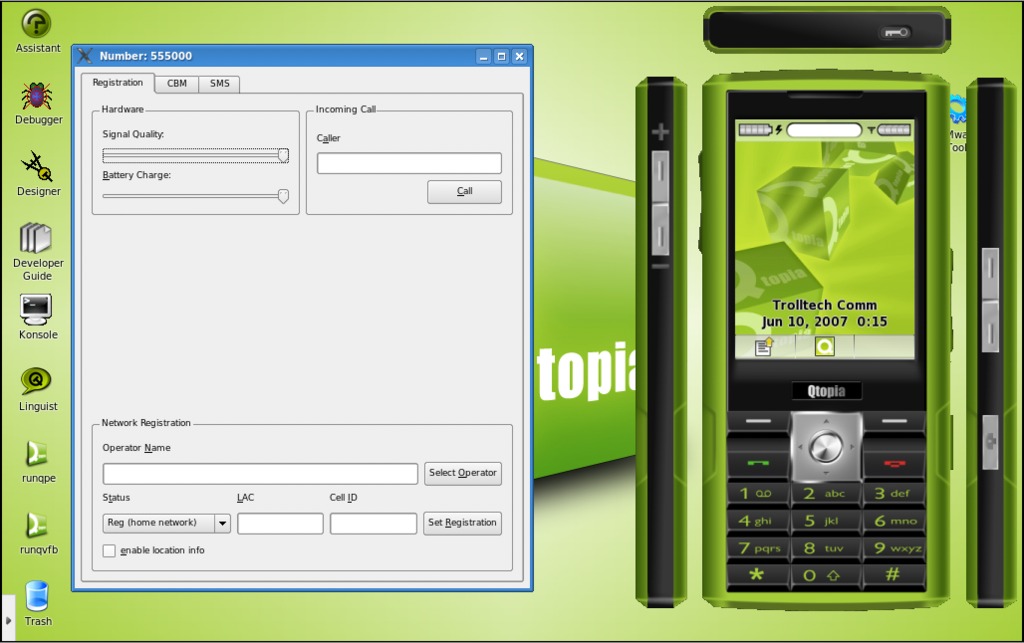
Figure 2. qvfb Running with qpe Running in It
We need to run a script to set our QPEVER and PATH environment variables and to define some functions for communicating to the phone. If building for the x86 version of Qtopia, we would use:
. /opt/Qtopia/SDK/scripts/devel-x86.sh
Otherwise, if building for the actual Greenphone itself, we would choose the cross-compile environment with:
. /opt/Qtopia/SDK/scripts/devel-greenphone.sh
Then, we change to our directories and build:
cd ~/projects/application
qtopiamake -project && qtopiamake && make && gph -p -i
The qtopiamake program is Qtopia's version of the Qt qmake utility. It can generate a .PRO project file based on the contents of the current directory if given the -project parameter, but its most important job is to use the project file as the starting point to generate a Makefile based on the installed configuration of Qtopia and the type of build we want.
Note:
It might be worthwhile to point out that the commands depicted here are separated by a double ampersand (&&) to cause execution of the command string to stop at the first point where it meets an error. In this case, it would stop the shell from trying to execute or install a program that had failed to build.
Typically, we generate a new .PRO and Makefile only when we have new files to add to our project, but qtopiamake takes so little time to execute that it is common to see it run from a standard shell script every time.
gph Utility
The gph utility is a useful awk script that provides convenience functions for doing things like building, packaging, installing and running applications in the Qtopia environment, either emulated or actually on the phone. It can be invoked instead of make, and it is powerful enough that we can use it to convert from raw source code to running applications installed from a package onto a real or emulated device.
For example, to rebuild the code, package it and install and run on qvfb, we would try the following command:
gph -C x86 -debug -c -all
If that were to go well, and we were happy with enough to want to run it on an actual phone, we could build ourselves a package to install with the following:
gph -C greenphone -p
This would give us a file in our pkg directory with a name like qpe-application_1.0.0-1_arm.qpk.
To have a more complete idea of the gph capabilities, we can look at its help message:
$gph --help
FORMAT: /opt/Qtopia/SDK/scripts/gph <options>

Options:
 -h          display command help
 -q          quiet mode
 -c          clean
 -C <opt>    reconfig <x86> or <greenphone>, default greenphone
 -b          make
 -p          make package
 -i          install package to greenphone
 -r          run application on greenphone
 -all        reconfig, make, make package, install, run
 -debug      force configure for debug build, override default
 -release    force configure for release build, override default

 -options "<opts>" pass extra options to build system
          eg. /opt/Qtopia/SDK/scripts/gph -C x86 -all -options
"CONFIG+=debug"

 -net        bring up network to greenphone
 -console    console on greenphone
 -qpk <file> install qpk to SDK http server for installation
 -rescan     Tell Qtopia to rescan for new documents and applications
When applications are packaged for distribution to Qtopia devices, they reside in .qpk files that are specially made gzip'd tar files. In addition to the executable file itself, there also are the help files, multilingual translation files and the desktop entry. This desktop entry file contains elements to describe the name of the executable, the icon, what type of application it is and, finally, the MIME type to indicate what sort of data it can process.
Debugging our application on the Greenphone itself is fairly easy to set up.
First, we need to configure our build environment to cross-compile for the ARM architecture on the Greenphone:
. /opt/Qtopia/SDK/scripts/devel-greenphone.sh
Next, we need to rebuild our Makefile and executables, package them up and install them onto the phone:
qtopiamake -debug && make clean && make && gph -p -i -r -debug
At this point, we can click the arm-linux debugger icon on the desktop, open the example program on the phone and click run to execute it in the remote debugger.
A number of application deployment methodologies are available when developing with the Greenphone SDK.
First, we can build and run our applications so that they execute within the virtual machine's ersatz phone-like environment complete with a JPEG skin that looks like a phone sitting on your desktop. It is great for working out the GUI parts of an application, and it saves us the step of having to compile, flash on to the unit and debug remotely.
Second, applications can be compiled and packaged for the Greenphone, then run and tested on the device itself. As mentioned previously, the VM installs with a gdb debugger that can run inside the virtual machine and debug applications remotely on the phone.
Finally, we have “Phone bounce” mode, using the phone as a standard GSM/GPRS modem connected to the development machine via a USB cable. Our applications would run inside the emulator on the local machine, but would be joined logically to the real phone by whatever network link you have to it, such as a USB connection.
We do not have to customize the Greenphone in a piecemeal fashion. The Flash image representing the whole Greenphone Linux distribution on the phone can be updated using either the mini-SD Flash reader or the USB cable to re-install a complete new Linux distribution along with all the applications and configuration files. This makes it easier for enterprise use where items such as standard configuration options are set to enable things like corporate branding with visual themes, VPN settings, default address-book entries and localization settings, among others.
Qtopia development will make any Qt or KDE developer feel right at home, as it is quite compatible with the desktop version of Qt. There are a few minor differences, as we will see in the example application in the Greenphone SDK found at ~/projects/application.
The style lately, with C++ in general and Qt v4.x in particular, is to include a header named after the class we want declared. This saves ever having to guess which header contains a class' declaration. In the following example, we have the old way commented out and the easier-to-remember method following it:
// main.cpp
#include "example.h"
// #include <qtopia/qtopiaapplication.h>
#include <QtopiaApplication>

QTOPIA_ADD_APPLICATION("example", Example)
QTOPIA_MAIN

// end of main.cpp
The function formerly known as main() has been deprecated in Qtopia in favor of two macros.
In the above example, the QTOPIA_ADD_APPLICATION macro is used to create an instance of the main application window. The first parameter is the executable name, and the second parameter is the base class of the application window class.
The QTOPIA_MAIN macro expands out either to the traditional main() function if building a traditional application or to the entry point needed if building a quick launcher plugin.
Inside our example.h, we find the class declaration for our main window, which we have sub-classed from a generic QWidget:
#ifndef EXAMPLE_H
#define EXAMPLE_H
#include "ui_examplebase.h"

class ExampleBase : public QWidget, public Ui_ExampleBase
{
public:
    ExampleBase( QWidget *parent = 0, Qt::WFlags f = 0 );
    virtual ~ExampleBase();
};

class Example : public ExampleBase
{
    Q_OBJECT
public:
    Example( QWidget *parent = 0, Qt::WFlags f = 0 );
    virtual ~Example();

private slots:
    void goodBye();
};

#endif // EXAMPLE_H
This class uses a form created using the Qt Designer GUI building tool, so we see an include file called ui_examplebase.h that brings in its declaration. In Qt, headers with names starting with ui_ typically are Designer-generated. This is followed by our class' immediate ancestor called ExampleBase. This base class inherits from both QWidget and the class defined by the GUI builder called Ui_ExampleBase.
Note:
As a brief reminder to newer users of Qt, classes generated by Designer do not have a base widget that contains all the other widgets inside it. The code in the generated class instantiates child widgets of only whatever parent widget instance is passed into its constructor. This is a reason why we see multiple inheritance used with classes derived from Qt Designer-generated code—it provides a single widget from which to hang other widgets.
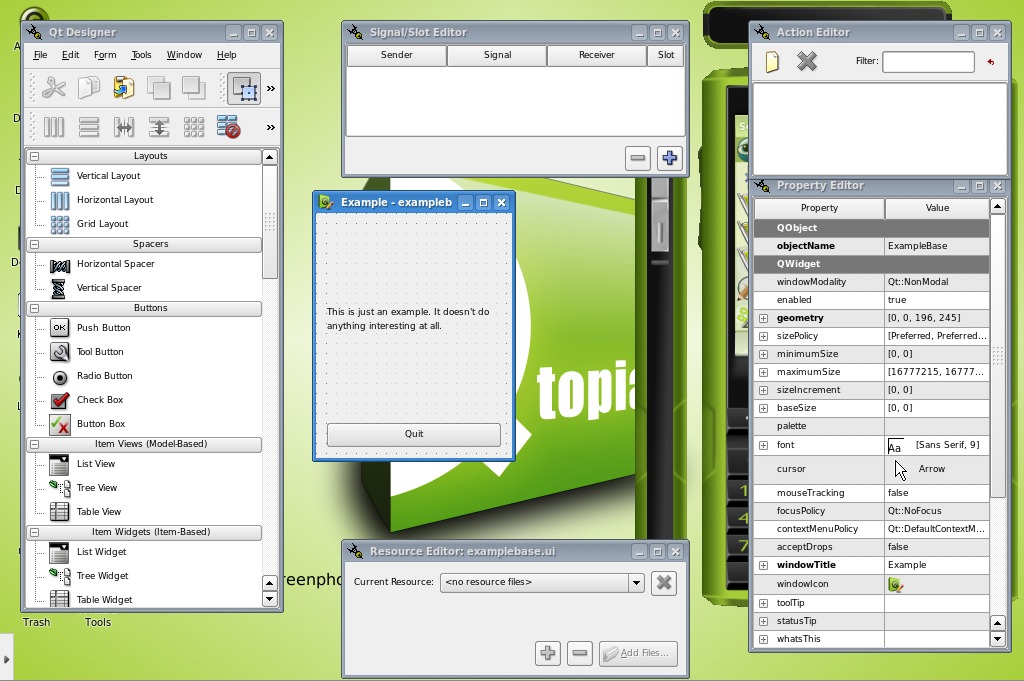
Figure 3. Designer Running in VM
Our main window is an instance of the Example class derived from ExampleBase. It makes use of a technique called signals and slots—a method used by Trolltech that allows great flexibility for defining how a function is invoked. The invoking side of the connection is called a SIGNAL(), and the invokee side is called a SLOT(). They are joined together using a method called connect() that allows a many-to-many connection relationship. Qt uses a preprocessor to add metadata processing to add to C++ dynamic invocation and object introspection effectively and elegantly—elements available in other OOP languages.
Our final code example shows the implementation of our classes:
#include "example.h"
#include <QPushButton>

ExampleBase::ExampleBase( QWidget *parent, Qt::WFlags f )
    : QWidget( parent, f )
{
    setupUi( this );
}

ExampleBase::~ExampleBase() { }

Example::Example( QWidget *parent, Qt::WFlags f )
    : ExampleBase( parent, f )
{
    connect(quit, SIGNAL(clicked()), this, SLOT(goodBye()));
}

Example::~Example() { }

void Example::goodBye()
{
    close();
}
Our ExampleBase class' constructor calls the Designer-generated setupUi() method to have the form-defined child widgets created and their layout and other properties set. Without that step, it would be a generic QWidget.
The next interesting thing we see is the constructor for the Example class. It calls the connect() method to join the clicked() signal on the Qt Designer-generated QPushButton called quit with our goodBye() slot. This allows us to exit the example program by clicking the QPushButton labeled Quit.
It would be great to explore many other Qtopia-specific features in more detail, such as the QCop IPC mechanism for communication across processes, the XML-based theming engine, the secure execution environment (SXE), plus all the phone-specific features, for starters.
Qtopia provides a lot of advantages for the embedded developer designing applications for mobile phones.
Besides the emulation environment, the code compatibility with desktop applications and the natural intuitive application framework, I find that Qtopia does something better than other embedded environments do—it helps put the fun back into programming.
Resources
An introductory comparison between CDMA and GSM for the North American market: www.wisegeek.com/what-is-the-difference-between-gsm-and-cdma.htm
European Telecommunications Standards Institute (ETSI): www.etsi.org
GSM: en.wikipedia.org/wiki/GSM
“Using Qt to Develop for Embedded Linux” by Natalie Watson (LJ, May 2001): www.linuxjournal.com/article/4660
“Choosing a GUI Library for Your Embedded Device” by Martin Hansen (LJ, January 2007): www.linuxjournal.com/article/9403
Short Message Service: en.wikipedia.org/wiki/Short_message_service
Multimedia Messaging Service: en.wikipedia.org/wiki/Multimedia_Messaging_Service
General Packet Radio Service: en.wikipedia.org/wiki/General_Packet_Radio_Service
Robert E. Hartley is happily married and the father of four wonderful children. He is a dual-national Australian/Canadian living in Ottawa, Canada. Robert started his working life as a programmer writing assembly language on IBM mainframes before getting hooked on UNIX and C in the mid-1980s. He started using Linux as his principal desktop environment ten years ago, and has until recently been busy consulting and training customers around North America and Europe as a Trolltech certified Qt Trainer for its North American training partner, ICS (www.ics.com).


