
OOo Off the Wall: Fielding Questions, Part 4 - Mail Merges
Mail merges are a means of using fields to create multiple copies of a document. They got their name because one of the most common uses for the tool is to address letters to different destinations. However, the same process can be used for other purposes as well, such as personalizing a form letter. If you choose, you even could use mail merges as a form of conditional text. Of all the uses fields have in OpenOffice.org Writer, mail merges is one of the most useful--and the most complicated.
In the version 2.0 beta, merges theoretically became simpler with the addition of the Mail Merge Wizard to the Tools menu. In practice, however, the wizard's usefulness is limited. It's designed specifically for merges that address letters or, assuming that you have Java Mail installed on your system, e-mails. Other merges still have to be done manually or with the older wizards for faxes, labels or business cards.
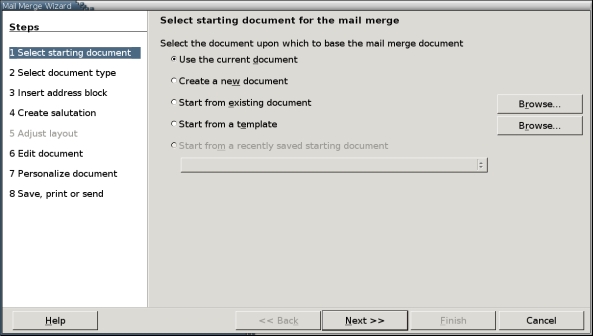
Figure 1. The Mail Merge Wizard is a new feature in version 2.0
Moreover, although you can puzzle through any of these wizards without fully understanding merges, you can use them more efficiently if you first try to do a few without a wizard. Working without the wizard helps you understand the three parts needed for a mail merge and how they work together.
Mail merges require three separate documents:
The data source: a database, a spreadsheet or a Mozilla or Thunderbird address book that contains various information. In version 2.0, OOo refers to all these types of documents as databases, but keeping the distinction between data sources in general and true databases seems less confusing.
The source document: a Writer document with mail merge fields added from Insert > Fields > Other > Database. The mail merge fields are placeholders that indicate what fields from the data source are used. You can use other fields to signal how information from the source document should replace the mail merge fields.
The target document(s): a Writer document(s) produced when the mail merge is used. The target document(s) replaces the mail merge fields with information from the data source. Target documents are sent to the printer or saved as files.
Before you begin a merge, all three of these items need to be set up.
Before you can use a data source, you must register it with OpenOffice.org. Prior to version 2.0, data sources were registered from Tools > Data Sources. However, as of version 2.0, they are registered using File > Tool > Database and a different interface.
In addition, in previous versions, the original data source file appears to have been registered with OOo. In version 2.0, information from the data source seems to be extracted from the source file to create a new database using the new Base format (.odb) in your home directory.
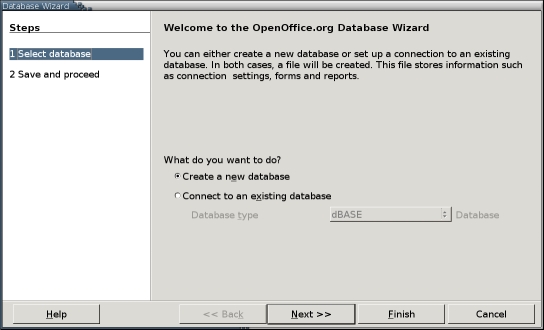
Figure 2. In version 2.0, the Database Wizard replaces the Tool > Database function.
To register a data source in version 2.0:
Select File > New > Database. The Database wizard opens.
Select the Connect to a New Database button. The Database Type drop-down field becomes available.
Select the type of data source from the Database Type field. Almost any sort of proprietary or open-source database can be used, providing that it has either ODBC or JDBC connectivity. You also can use Thunderbird or Mozilla address books, spreadsheets and text files. Both spreadsheet and text files can be formatted in any manner supported by Writer, including MS Office files. A text file, however, requires a consistently used de-limiter to designate rows and columns. It is worth using only if you don't have another way to record data.
If you are unfamiliar with databases and have under 1,000 records, a Calc spreadsheet probably is the most useful type of data source. You can use a spreadsheet with more records, but be prepared for delays in opening and saving the file.
Click the Next button to continue.
Enter the path to the data source. If it has a password, click the Password required box. Then click the Next button to continue.
Click the Yes, register the database for me button, followed by the Finish button.
Enter a name for the new database and then click the Save button.
The new database has been created and now is available for use.
Writer includes separate tools for designing business cards, labels and envelopes. These tools include functions that make doing a mail merge easier and offer a specialized set of options. However, Writer also includes a generic mail merge tool that can be used for other purposes. In fact, many users prefer to use it instead of the envelope tool. Because the generic tool can be set to use different envelope sizes, it is at least an adequate substitute and many feel it is far less confusing to use.
Whatever your purpose, to design a generic mail merge source document:
1. Format and write the source document.
2. When ready to add the fields, do one of the following:
Select View > Data sources or press the F4 key. The data source window opens. If the window blocks part of the source document that you need to see, select the Stick icon to dock it to the upper portion of the editing window.
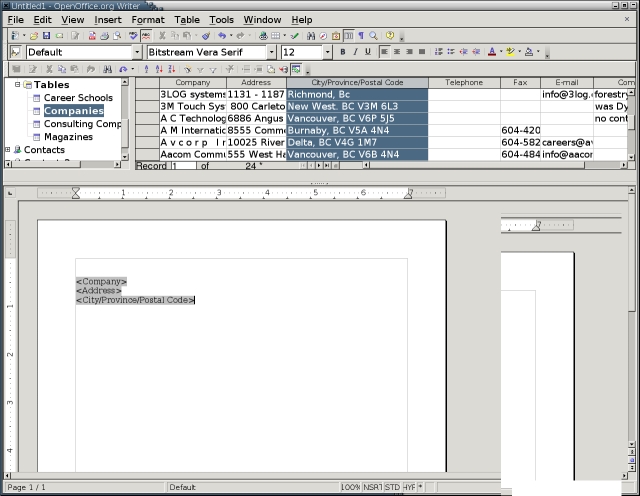
Figure 3. The Data Source window displays a registered data source in Writer's editing window.
Select Insert > Fields > Other > Database > Mail merge fields.

Figure 4. The Mail Merge fields is another way of showing a registered data source.
3. Place the mouse cursor where you want the first field to go.
4. In the data source window or on the Database tab of the Fields screen, select the database and the table to use. Remember that for spreadsheets the table is the sheet. Similarly, for Mozilla address books, the table is the Named address book [x-ref].
5. Expand the tree view of the data source so that the individual fields are visible.
6. Select the field you want to add to the source document. A field is a column, regardless of what type of data source.
7. Drag the field into the source document with the mouse. A placeholder field is created with the name of the field inside it.
8. After the last field in a consecutive set--for example, after the last line of an address--add a field from the Database tab of Insert > Fields > Others to set the record in the database to be used next. In most cases, you probably want Next Record. (See below for more details.)
No matter which Database field you choose, notice that it is visible only as a gray background. In most cases, it contains no information, because it is simply an indicator and holds no specific data.

Figure 5. Placeholder fields in a mail merge source document.
9. Continue steps 6-8 until all the placeholder fields are entered. At this point, you either can save the source document for future use or apply records and print it. If you save, remember that the source document needs the data source or one with the same fields in order to be used. If you are going to be using the source document frequently, you may want to save it as a template using File > Templates > Save.
Database is a tab available from Insert > Fields > Others. The fields on this tab all are related to mail merges. With the possible exception of the Database name field, they are not designed for any other use.
If you are designing labels or business cards, you can add the markers to the first label or card and then select the Synchronize button to have the fields added to all the other labels or cards. In any other mail merge, you can use the database fields to control which records are used in which order.
The Database tab fields are instructions about which record to use next. They are easy to miss on the screen, because they show up as only the gray background that indicates a field. Without them, however, a mail merge fails.
The following table describes the mail merge fields that are available:
| Field (Insert > Fields > Others > Database) | Purpose | Comments/Instructions |
|---|---|---|
| Any record | Adds the record specified to the next group of mail merge fields. | Place the marker before the group of mail merge fields it applies to. Records are numbered from the top of a data source table. If all items on the table are selected, the header row is counted, so the first record with data is 2. Use this field to control the order in which records are used in the target document. If the condition is not true, then the previous record is used instead. |
| Database name | Adds the name of a data source. | |
| Mail merge fields | Adds mail merge placeholders to set up a mail merge's source document. During the merge, the placeholders are replaced by the record's entry in each field. | Fields are added at the current cursor position either by selecting the Insert button or by dragging and dropping them from the Database Selection pane into the document. When the Data Sources floating window is open, you also can drag and drop column headers into a document to create mail merge placeholders. |
| Next records | Adds a marker that signals the mail merge should add the next record to the next group of mail merge fields. | Place the marker at the end of each group of mail merge. If the marker is not added or if the condition for the field is false, then the contents of a group of mail merge fields is the same as the previous one. |
| Record number | Adds a marker that inserts the record number after each record in the target document. | Place the marker before any group of mail merge fields. |
The field is blank until the mail merge is done.
Version 2.0 assumes that most users don't need anything other than the wizard. If you want to do anything except the merges included in the wizard, you need to add the tool to the menu. You can make this addition from Tools > Customize > Menu. Select the Tool menu from the drop-down list at the top of the page and then select the Add > Documents > Mail Merge > Add.
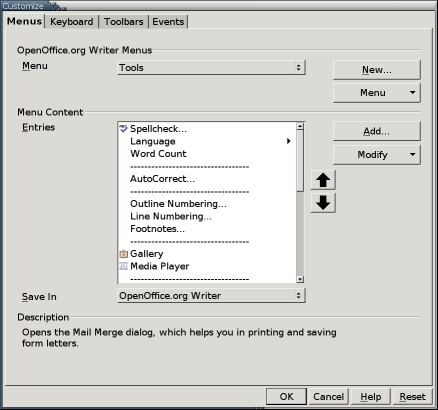
Figure 6. You need to place the Mail Merge tool into a menu before you can use it.
If you want to position the tool, use the up and down arrows on the Tools > Customize > Menu. Placing it above the Mail Merge Wizard is a useful place for it.

Figure 7. Select Mail Merge from the list of available tools to add it to a menu.
When you are ready to run the mail merge, follow these steps:
1. If you are going to print to files, place the source document in a separate folder. All the target documents go into the same folder, making them easier to find later.
2. Select Tools > Mail Merge. The Mail Merge screen opens.

Figure 8. The first step in a mail merge: selecting the source document.
3. Choose the source document from which to create the output documents. You can choose the current document or a template, that is, another source document.
After you choose, select the OK button to continue. The Mail Merge screen opens. Essentially, this screen shows the data source window on the top and printing options on the bottom.
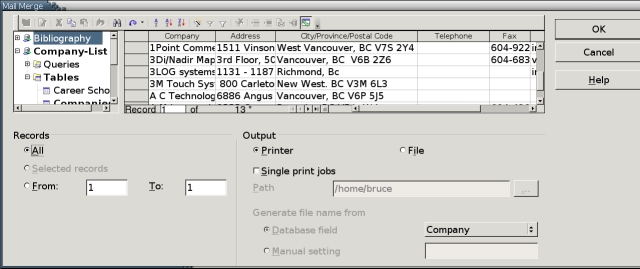
Figure 9. The Main Window for the Mail Merge Tool
4. In the data source window, select the database, the table and the database fields to use. Remember that for spreadsheets, the table is the sheet and the database fields are the columns. Similarly, for Mozilla address books, the table is the Named address book and the database fields are the columns.
You can open a different data source from the one you used to design the source documents. However, in order for you to use all the fields, the data source must have all the fields that you added to the labels.
5. Select the records to print. Do one of the following:
Select Records > All to print an envelope for each record.
From the data source screen, select the records to add to the labels. For each record, select its row header. Press the Shift key to select all records between two that you select or the Ctrl key to select multiple records. Selected records have a checkmark in their row header. When you have selected at least one record, Record > Selected Records becomes available. Select it.
Select Records > From to end a range of records that you want to print. To see what number each record has, look at the bottom of the data source table.
6. Select the output. You can choose either Printer or File. Note that the File option produces a Writer file, not a postscript file. One file is produced for each record.
7. If you want the output to be printed as series of single print jobs, select the Single print jobs box. This option is useful when printing to a shared printer. Merge documents are likely to be large, and single print jobs give others a chance to print between your jobs.
8. If you are printing to a file, either enter the directory for the file in the Path field or use the browsing button at the end of the field to locate the directory in a file manager.
9. If you are printing to file, choose how files should be named. Choices are:
Database setting: files take their name from a database field. If one of the fields is a company or individual's name, this might be the best option.
Manual setting: files begin with a base name that you enter, followed by a number corresponding to the record's position in the data source.
10. Select the OK button to print the individual copies of the merge document. If you print to a file, you can print each individual file later.
The basic Mail Merge tool is easy to use once you understand its pre-prerequisites. Once you are comfortable with it, you may feel no need to use the Mail Merge Wizard. In fact, you might want to follow the steps given in this article to remove the Wizard from the Tool menu.
However, you also might decide that the Wizard is more convenient. The Wizard's main advantage is that it centralizes the creation of form letters, setting up the placeholder fields for addresses and salutations and formatting the source document from a centralized window.
But no matter what interface you prefer, Writer's mail merge tool is worth knowing. It's especially useful in office settings, although job hunters and Christmas card writers might find it equally useful for home use. In the past, the fact that mail merges were documented poorly in the on-line help and differed from MS Word's arrangements seem to have prevented many people from using them in Writer. However, between improvements in the on-line help and the addition of the Wizard, Writer's mail merge now has a chance to become a part of users' everyday tool kit.
