
Advanced Message Queuing Protocol (AMQP)
What if, using a single service call, you easily could ask a computing cloud to give you the readings from thermometers in 100 different locations? Or, perhaps you'd like to know the status of the 89 servers under your control. In the past, you might have accomplished those things by writing a server dæmon. Your dæmon might have managed each of hundreds of connections, conducting specific operations on each connection. However, with the advent of AMQP and the Apache Qpid Project, it's possible to concentrate on the data processing and let another program handle the messaging.
AMQP is an innovative open messaging protocol. Created by John O'Hara and others at JPMorgan to replace proprietary products, the AMQ protocol defines both the wire-level formats and the behavior of messaging server and client software. Using the above example, you could send a single message to the AMQP server with a topic such as server_stats or thermometer_readings. The AMQP server listens for messages with those topics and routes the messages to the applications connected to the AMQP server.
AMQP began in 2003 with John O'Hara at JPMorgan-Chase. O'Hara was looking for a messaging solution that provided high durability, extremely high volume and a high degree of interoperability. In the types of environments addressed with AMQP, there is an economic impact if a message is lost, arrives late or is processed improperly. With volumes greater than 500,000 messages per second, the requirements were high. The commercial products that were available at the time could not deliver the level of service required, and banks were known to develop their own enterprise middleware to fill in the gaps. However, developing enterprise middleware is complex and difficult, and bank middleware would come and go.
As he reflected on other highly successful protocols, such as Ethernet, TCP/IP and HTTP, O'Hara noted several similarities. Namely, each protocol was royalty-free and not encumbered by patents. Furthermore, the protocols had a strong specification created by an independent body. Freely available implementations of the protocol specifications allowed developers to pick them up and find interesting uses for them quickly. Strong governance and user-driven design made these protocols a technical and economic success.
With AMQP, O'Hara wanted to have a freely available implementation of the AMQ protocol in use in a mission-critical place at JPMorgan. With this goal in mind, he contracted with the iMatix Corporation to create the first implementation, OpenAMQ. This implementation then was put into production in a trading application with more than 2,000 users.
Today, many companies collaborate on AMQ. Several brokers are available, including RabbitMQ, OpenAMQ and Apache Qpid (also known as Red Hat MRG Messaging). In this article, I describe the Apache Qpid server. Up for discussion is the Qpid M4 release, and you can download it via the link in the Resources for this article. I also demonstrate how to compile and install the C++ version of the server and write example applications in Python.
Figure 1 depicts the anatomy of a Qpid server. It is important to know about three components of an AMQP server: local queues, server queues and exchanges.
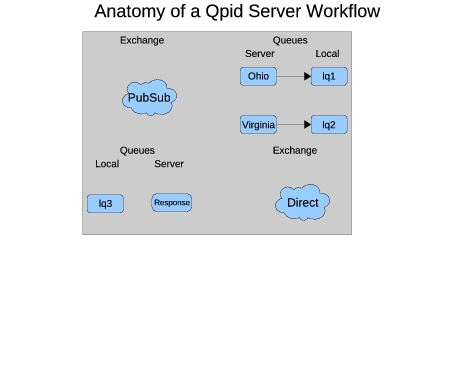
Figure 1. Anatomy of a Qpid Server Work Flow
The exchange determines message delivery based on the message header. Exchanges can provide different delivery schemes, such as direct (deliver this message to queue XYZ), publish-subscribe (deliver this message to all queues subscribed to topic spring.flowers) and XML (all messages that match XPath query Z go to Queue Y). A server queue is a queue that resides on the server and receives messages from the exchange. A local queue is a queue associated with an instance of an application. Local queues are bound to server queues, so any message delivered to the server queue appears on the local queue. More than one local queue can be bound to a server queue. This is handy when you have a farm of machines (or processes) responding to requests. In this case, messages will be delivered from the server queue to the local queue on a round-robin basis.
In addition to the server terms, note that programs reading from queues are called consumers, and those writing to exchanges are producers. This can become confusing when you have applications that act as both consumers and producers. Therefore, it makes sense to use standard terminology for clients and servers, where a client sends a request and expects a response on a reply queue, and a server listens for messages and responds as requested.
The Qpid broker discussed here comes with XML files describing the AMQP specification. These files define the formats used by the server and clients. The server and libraries use these specifications to formalize parameters, such as wire format, server commands and error messages. Managing these specifications outside the server allows you to maintain compatibility across different server vendors and different server versions. In theory, you should be able to replace a Qpid server with OpenAMQ, RabbitMQ or any other AMQP-compliant server and have it work out of the box. In practice, different servers support different versions of the specification or require different options. For example, the Qpid Java Client supports three versions of the protocol: 0-8, 0-9 and 0-10. However, the C++ client supports only 0-10 in its latest release. RabbitMQ, a competing AMQP broker, supports only 0-8 and 0-9 of the specification. Because of this, the best results are when using clients and brokers from the same product line.
Apache Qpid and its commercial counterpart, Red Hat MRG Messaging, are versatile products. They offer many features not covered here. For example, you can use SSL and InfiniBand fabric as interconnects, and you can control how clients connect to your server via ACLs and authentication. I highly recommend the Red Hat MRG documentation for further reference on these features.
First, a word about prerequisites. These examples were created on CentOS 5.2 with the standard development packages as well as Ruby. Also, note that certain versions of PyXML present conflicts that will break the tests run after installation.
To install the server, simply download the full M4 release from the URL noted in the Resources section of this article to your preferred development directory and un-archive the package. Once you have a directory structure, go to the server's directory by typing:
cd qpid-M4/cpp
Initially, there is no configure script; create it by running the bootstrap command. Once bootstrap completes, do the standard configure, make and make install.
One step the installation process does not perform is installing the AMQP specification files. These specification files are contained in the specs directory under qpid-M4. Copy the files found there to /usr/local/share/qpid/specs.
After installation, it's a good idea to run tests to ensure that all prerequisites have been satisfied. Start a new shell, change directories to /usr/local and su to root. Then, run the Qpid dæmon with the command:
sbin/qpidd -t --auth no
Once the broker is running, return to the original shell. Move from the cpp directory to the python directory contained within qpid-M4. Run the Python tests using:
run-tests -s 0-10-errata -I cpp_failing_0-10.txt
If the tests run and return no errors, proceed to install the Python modules by running this command as root:
python setup.py install
This example demonstrates a simple application used to query server status. The server script runs rpm to query the packages stored on the system and returns the list, with its PID, to the client. The program generating the requests is the client, and the server is a dæmon running on a “remote server”. It has an event loop that waits for requests.
In this example, the scripts use a combination of two message-routing methods: publish-subscribe (pubsub) to deliver the requests to all listening servers and direct to route the replies directly to the calling client.
Listing 1 describes the client, which is fairly straightforward. First, the client reads the spec file and then creates the Qpid connection. The connection is made by creating a standard Python socket object and passing that object to the connection's constructor. The connection, in turn, provides a session object when the session() method is called.
Listing 1. Client-Side Python Program
#!/usr/bin/python

from qpid.util import connect, ssl
from qpid.connection import Connection, sslwrap
from qpid.datatypes import Message, RangedSet, uuid4
from qpid.queue import Empty
from qpid.spec import load

# First, load the correct specification file.
amqSpec = load('/usr/local/share/qpid/specs/amqp.0-10.xml')

# Now, connect to the server.
socket = connect("localhost", 5672)
connection = Connection (sock=socket,
                         spec=amqSpec,
                         username = "guest",
                         password = "guest")
connection.start()
session = connection.session(str(uuid4()))

# Declare the reply queue:
replyQueueName = "producerReply_" + session.name
replyQueue = session.queue_declare(queue=replyQueueName,
                                   exclusive=True,
                                   auto_delete=True)
session.exchange_bind(exchange="amq.direct",
                      queue=replyQueueName,
                      binding_key=replyQueueName)

# Declare a local queue to which we subscribe the reply-to queue
localQueueName = "producerLocalQueue_" + session.name
localQueue = session.incoming(localQueueName)
session.message_subscribe(queue=replyQueueName,
                          destination=localQueueName)
localQueue.start()

# Now, create a message with a request.
message_properties = session.message_properties()
message_properties.reply_to = session.reply_to("amq.direct",
                                               replyQueueName)
delivery_properties =
    session.delivery_properties(routing_key="SERVER_STATUS")
requestMsgText = "RPM_STATUS"

# Send the message and wait for a response.
session.message_transfer(destination="amq.topic",
                         message=Message(message_properties,
                                         delivery_properties,
                                         requestMsgText))

while True:
    try:
        message = localQueue.get(timeout=60)
        content = message.body
        session.message_accept(RangedSet(message.id))
        print content
    except Empty:
        print "No more messages!"
        break
Next, the client creates the reply-to server queue. Note that the reply-to server queue name contains the session ID. This gives each client a unique server queue. The queue then is bound to the amq.direct exchange, which uses queue names as its routing keys. Using the queue name for the server queue and delivering replies to the amq-direct exchange ensures that multiple copies of the server receive only their own replies.
After the server queue is declared, the program creates a local queue and subscribes it to the server queue. Once the local queue is subscribed, the program is ready to transmit a message.
The client then creates the request message. Because the program is using publish-subscribe, the routing key is set to the topic. In this case, the topic is SERVER_STATUS. Any server that is subscribed to the topic SERVER_STATUS will receive this particular message. The client also supplies the exchange type and the routing key for the reply-to fields. For this message, it is the amq-direct exchange and the name of the server queue that was created previously.
Finally, the client creates the message itself (the text “RPM_STATUS”) and delivers it to the exchange. After the message is delivered, the client waits for a reply and prints the contents of the reply to the screen.
Listing 2 defines the server. This application will listen for messages with the topic SERVER_STATUS, run rpm to query the package contents of the system and send a reply. The first steps are similar to Listing 1 in that the server starts a connection and uses the connection to get a session and create a server queue. The server then subscribes the local queue, starts the queue, and the program is ready to respond to requests.
Listing 2. Server-Side Python Program
#!/usr/bin/python

import subprocess
import os
from qpid.util import connect, ssl
from qpid.connection import Connection, sslwrap
from qpid.datatypes import Message, RangedSet, uuid4
from qpid.queue import Empty
from qpid.spec import load
from qpid.queue import Empty
from qpid.session import SessionException

# processRequest: this is what actually does the work.
def processRequest(requestMessage):

    print "Servicing Request"
    proc = subprocess.Popen('rpm -qa',
                       shell=True,
                       stdout=subprocess.PIPE,
                       )
    stdout_value = proc.communicate()[0]
    myPid = os.getpid()
    ret_value = "From Server PID " \
                + str(myPid) + ":\n" + stdout_value \
                + "---------------------------------\n"
    return ret_value

# First, load the correct specification file.
locSpec = load('/usr/local/share/qpid/specs/amqp.0-10.xml')

# Now, connect to the server.
socket = connect("localhost", 5672)
connection = Connection (sock=socket,
                         spec=locSpec,
                         username = "guest",
                         password = "guest")
connection.start()
session = connection.session(str(uuid4()))

# Declare the listening server queue and connect to server queue.
# Create server queue if it does not exist.

myPid = os.getpid()
serverQueueName = "serverListenQueue" + str(myPid)

localQueueName = "serverListenLocal_" + session.name
session.queue_declare(queue=serverQueueName,
                      exclusive=True)
session.exchange_bind(exchange="amq.topic",
                      queue=serverQueueName,
                      binding_key="SERVER_STATUS")
session.message_subscribe(queue=serverQueueName,
                          destination=localQueueName)
localQueue = session.incoming(localQueueName)
localQueue.start()

# Now, start an event loop.
while True:
    try:
        requestObj = localQueue.get(timeout=60)
        session.message_accept(RangedSet(requestObj.id))
        requestStr = requestObj.body
        requestProperties = requestObj.get("message_properties")
        replyTo = requestProperties.reply_to
        if replyTo == None:
            raise Exception("This message is missing " \
                            + "the 'reply_to'"  property, " \
                            + "which is required")
        responseMessage = processRequest(requestStr)
        props = session.delivery_properties(
                                 routing_key=replyTo["routing_key"])
        session.message_transfer(destination=replyTo["exchange"],
                                 message=Message(props,
                                                 responseMessage))
    except Empty:
        continue
In the event loop, the server first receives a request from the local queue. If there is no request within the timeout value (60 seconds), the get() method will raise an Empty exception. Because the server needs to serve requests continually, the program catches the Empty exception and simply continues. When a message arrives, the server runs the processRequest method and constructs data with the method's return values. The reply message takes exchange and routing key information from the original message's reply-to field and then is delivered to the exchange.
With AMQP, it is possible to construct a queuing system that allows a server farm to respond to multiple different kinds of requests. This example considers weather prediction models. Here, there are different server clusters, with one cluster serving each state. In such a case, it would be extremely handy to be able to send requests to each farm from an arbitrary location.
This example requires three processes. The first process (the client) delivers requests, and it is fundamentally the same as the client in the previous example. It is different only in that it loops over a list to deliver ten weather requests for Ohio and ten requests for Virginia. On the receiving end, there are two servers: one for Ohio and one for Virginia. Each server subscribes to the amq.topic exchange with the routing key #.ohio or #.virginia. Furthermore, each server has the ability to subscribe to existing server queues or create those that do not exist.
These routing keys contain wild cards. When the routing key contains a hash mark in place of text, the exchange will match any text where the hash mark resides. In this way, the weather predicting dæmons using #.ohio also would respond to requests for topic news.ohio and sports.ohio. Likewise, if a sports reporting dæmon had invaded the cluster and was listening for sports.#, the subscriptions for both the sports dæmon and the weather reporting dæmon for Ohio would match sports.ohio.
Listing 3 contains the client, and Listing 4 contains the server for Ohio. Create the server for Virginia by duplicating the server for Ohio and replacing all occurrences of Ohio with Virginia. (When you do so, make sure all routing keys have all lowercase characters.)
Listing 3. Multiserver Weather Client
#!/usr/bin/python

from qpid.util import connect, ssl
from qpid.connection import Connection, sslwrap
from qpid.datatypes import Message
from qpid.datatypes import RangedSet
from qpid.datatypes import uuid4
from qpid.queue import Empty
from qpid.spec import load

# First, load the correct specification file.
amqSpec = load('/usr/local/share/qpid/specs/amqp.0-10.xml')

# Now, connect to the server.
socket = connect("localhost", 5672)
connection = Connection (sock=socket,
                         spec=amqSpec,
                         username = "guest",
                         password = "guest")
connection.start()
session = connection.session(str(uuid4()))

# Declare the reply queue:
replyQueueName = "weatherReply_" + session.name
replyQueue = session.queue_declare(queue=replyQueueName,
                                   exclusive=True,
                                   auto_delete=True)
session.exchange_bind(exchange="amq.direct",
                      queue=replyQueueName,
                      binding_key=replyQueueName)

# Declare a local queue to which we subscribe the reply-to queue
localQueueName = "weatherLocalQueue_" + session.name
localQueue = session.incoming(localQueueName)
session.message_subscribe(queue=replyQueueName,
                          destination=localQueueName)
localQueue.start()

# Now, create messages with requests.

weatherStates = ['ohio', 'virginia']

for state in weatherStates:
    for i in range(1, 11):
        message_properties = session.message_properties()
        message_properties.reply_to = session.reply_to("amq.direct",
                                                       replyQueueName)
        routingKey = "weather." + state
        delivery_properties = session.delivery_properties(
                                 routing_key=routingKey)
        requestMsgText = "weather_report"
        session.message_transfer(destination="amq.topic",
                                 message=Message(message_properties,
                                                 delivery_properties,
                                                 requestMsgText))
        print "Sent message " + str(i) + " with key " + routingKey

while True:
    try:
        message = localQueue.get(timeout=60)
        content = message.body
        session.message_accept(RangedSet(message.id))
        print content
    except Empty:
        print "No more messages!"
        break
Listing 4. Multiserver Server Side (Ohio)
#!/usr/bin/python

import subprocess
import os
from qpid.util import connect, ssl
from qpid.connection import Connection, sslwrap
from qpid.datatypes import Message, RangedSet, uuid4
from qpid.queue import Empty
from qpid.spec import load
from qpid.queue import Empty
from qpid.session import SessionException

# ProcessRequest: this is what actually does the work.
def processRequest(requestMessage):
    print "Predicting the weather for Ohio"
    myPid = os.getpid()
    ret_value = "From Server PID " \
                + str(myPid) + ": Ohio is sunny and 70!"
    return ret_value

# First, load the correct specification file.
locSpec = load('/usr/local/share/qpid/specs/amqp.0-10.xml')

# Now, connect to the server.
socket = connect("localhost", 5672)
connection = Connection(sock=socket, spec=locSpec,
                        username="guest", password="guest")
connection.start()
session = connection.session(str(uuid4()))

# Declare the listening server queue and connect to server queue.
# Create server queue if it does not exist.

myPid = os.getpid()
listenTopic = "#.ohio"
serverQueueName = "serverListenQueueOhio"
localQueueName = "localQueue_" + str(myPid)
try:
    session.message_subscribe(queue=serverQueueName,
                              destination=localQueueName)
    localQueue = session.incoming(localQueueName)
    localQueue.start()
    print "Successfully attached to existing server queue."
except SessionException, e:
    print "Could not find server queue, so I am creating it."
    session = connection.session(name=str(uuid4()), timeout=0)
    session.queue_declare(queue=serverQueueName, exclusive=False)
    session.exchange_bind(exchange="amq.topic",
                          queue=serverQueueName,
                          binding_key=listenTopic)
    session.message_subscribe(queue=serverQueueName,
                              destination=localQueueName)
    localQueue = session.incoming(localQueueName)
    localQueue.start()
except Exception, e:
    print "Something broke unexpectedly."
    os.exit()

# Now, start a message loop.
while True:
    try:
        requestObj = localQueue.get(timeout=60)
        session.message_accept(RangedSet(requestObj.id))
        requestStr = requestObj.body
        print "Received message."
        requestProperties = requestObj.get("message_properties")
        replyTo = requestProperties.reply_to
        if replyTo == None:
            raise Exception("This message is missing the "
                            + "'reply_to' property, "
                            + "which is required")
        responseMessage = processRequest(requestStr)
        props = session.delivery_properties(
                            routing_key=replyTo["routing_key"])
        print "Responding to request."
        session.message_transfer(destination=replyTo["exchange"],
                            message=Message(props, responseMessage))
    except Empty:
        continue
When you run this demonstration, run several copies each of the Ohio and Virginia servers. The messages for each state will be picked up in a round-robin manner by the respective instances of the server script. In turn, the client will print a listing of the weather forecasts with the server PIDs.
The AMQ protocol and its open-source implementations provide a solution for anyone requiring high-performance, versatile message communications. As I demonstrate here, using the Apache Qpid message broker is an easy way to achieve these goals. See my blog at www.globalherald.net/jb01 for further discussion regarding this article.
Resources
“Is AMQP on the way to providing real business interoperability?” by Steven Robbins: www.infoq.com/news/2008/08/amqp-progress
“Toward a Commodity Enterprise Middleware: Can AMQP Enable a New Era in Messaging Middleware? A Look Inside Standards-Based Messaging with AMQP” by John O'Hara: queue.acm.org/detail.cfm?id=1255424
Source: qpid.apache.org/download.html
By day, Joshua Kramer is an integration specialist with Belron US, the autoglass company. By night, he creates unique social-networking presences using technologies such as Linux, Django and AMQP. Josh has a Bachelor's degree in Philosophy from Capital University and lives in rural Ohio.


