
Compression Tools Compared
Data compression works so well that popular backup and networking tools have some built in. Linux offers more than a dozen compression tools to choose from, and most of them let you pick a compression level too. To find out which perform best, I benchmarked 87 combinations of tools and levels. Read this article to learn which compressor is a hundred times faster than the others and which ones compress the most.
The most popular data compression tool for Linux is gzip, which lets you choose a compression level from one to nine. One is fast, and nine compresses well. Choosing a good trade-off between speed and compression ratio becomes important when it takes hours to handle gigabytes of data. You can get a sense of what your choices are from the graph shown in Figure 1. The fastest choices are on the left, and the highest compressing ones are on the top. The best all-around performers are presented in the graph's upper left-hand corner.
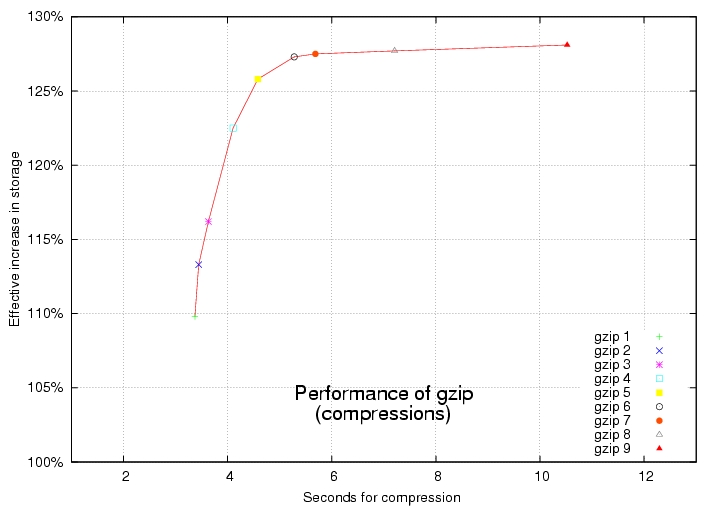
Figure 1. Increasing the compression level in gzip increases both compression ratio and time required to complete.
But many other data compression tools are available to choose from in Linux. See the comprehensive compression and decompression benchmarks in Figures 2 and 3. As with gzip, the best performers are in the upper left-hand corner, but these charts' time axes are scaled logarithmically to accommodate huge differences in how fast they work.
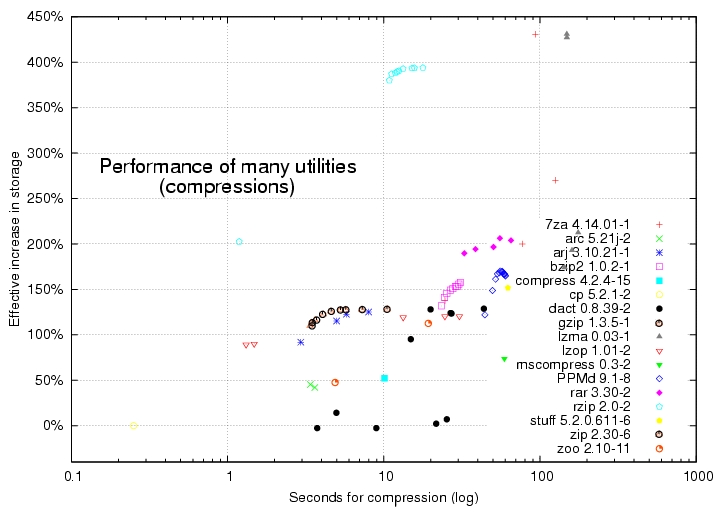
Figure 2. Performance of Many Utilities, Compression
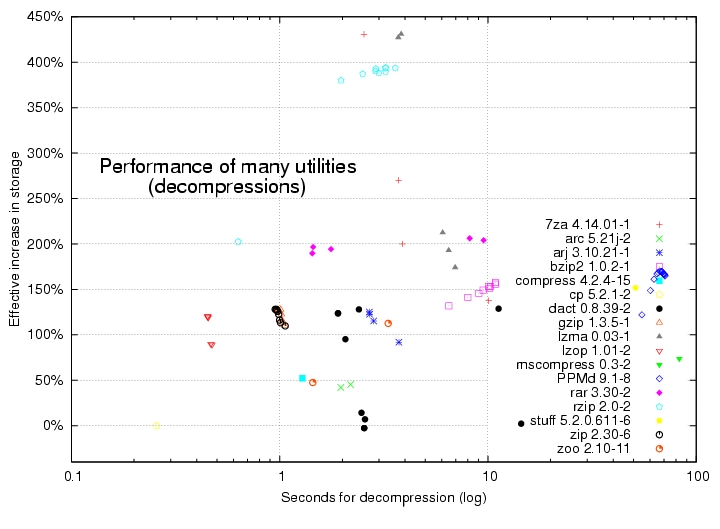
Figure 3. Performance of Many Utilities, Decompression
The Benchmarks
How compactly data can be compressed depends on what type of data it is. Don't expect big performance increases from data that's already compressed, such as files in Ogg Vorbis, MP3 or JPEG format. On the other hand, I've seen data that allows performance increases of 1,000%!
All benchmarks in this article used the same 45MB of typical Linux data, containing:
24% ELF 32-bit LSB
15% ASCII C program
11% gzip compressed data
8% ASCII English text
7% binary package
4% directory
2% current ar archive
2% Texinfo source text
2% PostScript document text
2% Bourne shell script
2% ASCII text
21% various other data types
This data set was chosen because it is more representative of the demands made on today's Linux systems than the data used in the traditional Canterbury and Calgary test data, because this data set is bigger and contains Linux binaries.
I used the same lightly loaded AMD Athlon XP 1700+ CPU with 1GB of RAM and version 2.4.27-1-k7 of the Linux kernel for all tests. Unpredictable disk drive delays were minimized by pre-loading data into RAM. Elapsed times were measured in thousandths of a second. I'm not affiliated with any of the tools, and I strove to be objective and accurate.
The tools that tend to compress more and faster are singled out in the graphs shown in Figures 4 and 5. Use these for backups to disk drives. Remember, their time axes are scaled logarithmically. The red lines show the top-performing ones, and the green lines show the top performers that also can act as filters.
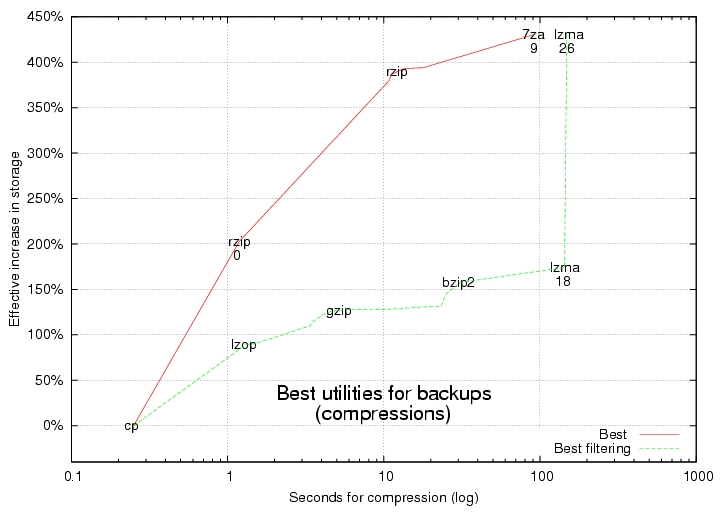
Figure 4. Best Utilities for Backups, Compression
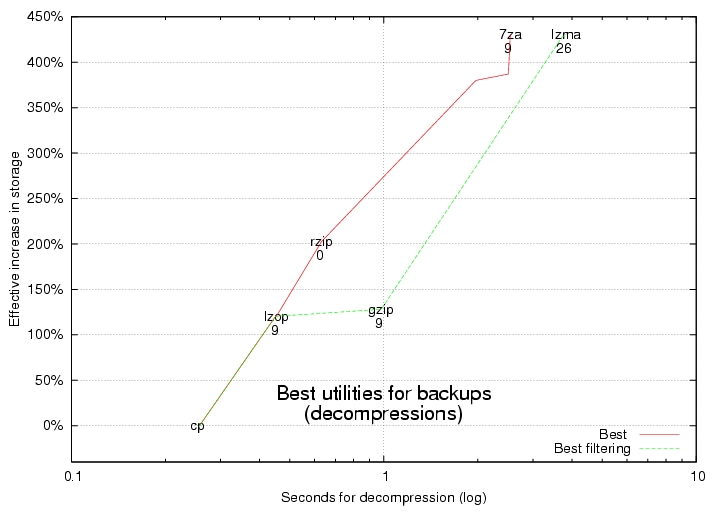
Figure 5. Best Utilities for Backups, Decompression
Filters
Filters are tools that can be chained together at the command line so that the output of one is piped elegantly into the input of the next. A common example is:
$ ls | more
Filtering is crucial for speeding up network transfers. Without it, you have to wait for all the data to be compressed before transferring any of it, and you need to wait for the whole transfer to complete before starting to decompress. Filters speed up network transfers by allowing data to be simultaneously compressed, transferred and decompressed. This happens with negligible latency if you're sending enough data. Filters also eliminate the need for an intermediate archive of your files.
Check whether the data compression tool that you want is installed on both computers. If it's not, you can see where to get it in the on-line Resources for this article. Remember to replace a/dir in the following examples with the real path of the data to back up.
Unless your data already is in one big file, be smart and consolidate it with a tool such as tar. Aggregated data has more redundancy to winnow out, so it's ultimately more compressible.
But be aware that the redundancy that saps your performance also may make it easier to recover from corruption. If you're worried about corruption, you might consider testing for it with the cksum command or adding a limited amount of redundancy back into your compressed data with a tool such as parchive or ras.
lzop often is the fastest tool. It finishes about three times faster than gzip but still compresses data almost as much. It finishes about a hundred times faster than lzma and 7za. Furthermore, lzop occasionally decompresses data even faster than simply copying it! Use lzop on the command line as a filter with the backup tool named tar:
$ tar c a/dir | lzop - > backup.tar.lzo
tar's c option tells it to create one big archive from the files in a/dir. The | is a shell command that automatically pipes tar's output into lzop's input. The - tells lzop to read from its standard input, and the > is a shell command that redirects lzop's output to a file named backup.tar.lzo.
You can restore with:
$ lzop -dc backup.tar.lzo | tar x
The d and c options tell lzop to decompress and write to standard output, respectively. tar's x option tells it to extract the original files from the archive.
Although lzop is impressive, you can get even higher compression ratios—much higher! Here's how. Combine a little-known data compression tool named lzma with tar to increase storage space effectively by 400%. Here's how you would use it to back up:
$ tar c a/dir | lzma -x -s26 > backup.tar.lzma
lzma's -x option tells it to compress more, and its -s option tells it how big of a dictionary to use.
You can restore with:
$ cat backup.tar.lzma | lzma -d | tar x
The -d option tells lzma to decompress. You need patience to increase storage by 400%; lzma takes about 40 times as long as gzip. In other words, that one-hour gzip backup might take all day with lzma.
This version of lzma is the hardest compressor to find. Make sure you get the one that acts as a filter. See Resources for its two locations.
The data compression tool with the best trade-off between speed and compression ratio is rzip. With compression level 0, rzip finishes about 400% faster than gzip and compacts data 70% more. rzip accomplishes this feat by using more working memory. Whereas gzip uses only 32 kilobytes of working memory during compression, rzip can use up to 900 megabytes, but that's okay because memory is getting cheaper and cheaper.
Here's the big but: rzip doesn't work as a filter—yet. Unless your data already is in one file, you temporarily need some extra disk space for a tar archive. If you want a good project to work on that would shake up the Linux world, enhance rzip to work as a filter. Until then, rzip is a particularly good option for squeezing a lot of data onto CDs or DVDs, because it performs well and you can use your hard drive for the temporary tar file.
Here's how to back up with rzip:
$ tar cf dir.tar a/dir
$ rzip -0 dir.tar
The -0 option says to use compression level 0. Unless you use rzip's -k option, it automatically deletes the input file, which in this case is the tar archive. Make sure you use -k if you want to keep the original file.
rzipped tar archives can be restored with:
$ rzip -d dir.tar.rz
$ tar xf dir.tar
rzip's default compression level is another top performer. It can increase your effective disk space by 375% but in only about a fifth of the time lzma can take. Using it is almost exactly the same as the example above; simply omit compression level -0.
Data compression also can speed up network transfers. How much depends on how fast your CPU and network are. Slow networks with fast CPUs can be sped up the most by thoroughly compressing the data. Alternatively, slow CPUs with fast connections do best with no compression.
Find the best compressor and compression level for your hardware in the graph shown in Figure 6. This graph's CPU and network speed axes are scaled logarithmically too. Look where your CPU and network speeds intersect in the graph, and try the data compression tool and compression level at that point. It also should give you a sense of how much your bandwidth may increase.

Figure 6. Best Compressors for Improving the Bandwidth of Various Hardware
Network Transfer Estimates
To find the best compressors for various CPU and network speeds, I considered how long it takes to compress data, send it and decompress it. I projected how long compression and decompression should take on computers of various speeds by simply scaling actual test results from my 1.7GHz CPU. For example, a 3.4GHz CPU should compress data about twice as fast. Likewise, I estimated transfer times by dividing the size of the compressed data by the network's real speed.
The overall transfer time for non-filtering data compression tools, such as rzip, simply should be about the sum of the estimated times to compress, send and decompress the data.
However, compressors that can act as filters, such as gzip, have an advantage. They simultaneously can compress, transfer and decompress. I assumed their overall transfer times are dominated by the slowest of the three steps. I verified some estimates by timing real transfers.
For example, if you have a 56Kbps dial-up modem and a 3GHz CPU, their speeds intersect in the light-yellow region labeled lzma 26 at the top of the graph. This corresponds to using lzma with a 226 size dictionary. The graph predicts a 430% increase in effective bandwidth.
On the other hand, if you have a 1GHz network, but only a 100MHz CPU, it should be faster simply to send the raw uncompressed data. This is depicted in the flat black region at the bottom of the graph.
Don't assume that you always should increase performance the most by using lzma, however. The best compression tool for data transfers depends on the ratio of your particular CPU's speed to your particular network's speed.
If the sending and receiving computers have different CPU speeds, try looking up the sending computer's speed in the graph. Compression can be much more CPU-intensive. Check whether the data compression tool and scp are installed on both computers. Remember to replace user@box.com and file with the real names.
For the fastest CPUs and/or slowest network connections that fall in the graph's light-yellow region, speed up your network transfers like this:
$ cat file \
| lzma -x -s26 \
| ssh user@box.com "lzma -d > file"
ssh stands for secure shell. It's a safe way to execute commands on remote computers. This may speed up your network transfer by more than 400%.
For fast CPUs and/or slow networks that fall into the graph's dark-yellow zone, use rzip with a compression level of one. Because rzip doesn't work as a filter, you need temporary space for the compressed file on the originating box:
$ rzip -1 -k file
$ scp file.rz user@box.com:
$ ssh user@box.com "rzip -d file.rz"
The -1 tells rzip to use compression level 1, and the -k tells it to keep its input file. Remember to use a : at the end of the scp command.
rzipped network transfers can be 375% faster. That one-hour transfer might finish in only 16 minutes!
For slightly slower CPUs and/or faster networks that fall in the graph's orange region, try using gzip with compression level 1. Here's how:
$ gzip -1c file | ssh user@box.com "gzip -d > file"
It might double your effective bandwidth. -1c tells gzip to use compression level 1 and write to standard output, and -d tells it to decompress.
For fast network connections and slow CPUs falling in the graph's blue region, quickly compress a little with lzop at compression level 1:
$ lzop -1c file | ssh user@box.com "lzop -d > file"
The -1c tells lzop to use compression level 1 and to write to standard output. -d tells it to decompress. Even with this minimal compression, you still might increase your hardware's effective bandwidth by 75%.
For network connections and CPUs falling in the graph's black region, don't compress at all. Simply send it.
C Libraries
If you want even more performance, you may want to try calling a C compression library from your own program.
Resources for this article: /article/8403.
Kingsley G. Morse Jr. has been using computers for 29 years, and Debian GNU/Linux has been on his desktop for nine. He worked at Hewlett-Packard and advocates for men's reproductive rights. He can be reached at change@nas.com.
