
Building Your Own Live CD
You've probably heard of Knoppix, the Debian-based distribution that squeezes 2GB of applications on a single standalone CD. It's been used as a Linux demonstration tool, a rescue disk and even as a Debian installer. It's inspired a small raft of related projects, ranging from CDs containing Knoppix, plus or minus a few extra packages, to complete re-architectures of the system.
I recently set out to produce a live CD for a product demonstration. I started by taking the Knoppix CD apart to see how it ticked, and I ended up with a Makefile and a few ancillary files that are clearly Knoppix-inspired but have little derived code. This is what I learned.
If you put the Knoppix CD in a CD-ROM drive and mount it, you soon notice that it doesn't look much like an ordinary Linux installation. There are a few graphic files and a free music track, but no init, no /dev and no /bin. The magic is in the big file called /KNOPPIX/KNOPPIX, an ISO9660 filesystem image compressed for the cloop device.
The standard loop device in the kernel allows you to access a file in some filesystem as if it were a device; requests for blocks of the device are mapped to requests for blocks in the underlying file. Because you can mount the device, this effectively means you can create images of filesystems and access them as if they were real hardware disks. If you downloaded Knoppix from the Net, you have an ISO9660 image that can be loop mounted to look at its contents:
# mkdir /tmp/knoppix-cd
# mount -o loop -r \
$HOME/KNOPPIX_V3.3-2003-09-24-EN.iso /tmp/knoppix-cd
The cloop compressed loop device takes this a step further. In this adaptation of the loop device, each block is compressed with gzip and transparently decompressed when it's accessed. /KNOPPIX/KNOPPIX is an image for this device that is mounted during startup—this is how Knoppix gets 2GB onto a 650MB CD.
You don't need to install cloop in your usual kernel if you simply want to look around the inner filesystem. Install the cloop-utils package and use extract_compressed_fs, as shown below. You need about 2GB of free space in /var/tmp or wherever you decide to put the image:
# mkdir /tmp/knoppix-cloop
# extract_compressed_fs \
   /tmp/knoppix-cd/KNOPPIX/KNOPPIX \
    >/var/tmp/KNOPPIX-cloop
# mount -o loop /var/tmp/KNOPPIX-cloop \
   /tmp/knoppix-cloop
# find /tmp/knoppix-cloop -print
You can look, but you can't touch—the ISO9660 filesystem is read-only. To modify the distribution, you first need to copy both filesystem images to ordinary directories:
# mkdir $HOME/my-knoppix-tree  \
    $HOME/my-knoppix-cd-tree
# tar -C /tmp/knoppix-cloop -cf - . | \
    tar -C $HOME/my-knoppix-tree -xvpf -
# tar -C /tmp/knoppix-cd -cf - . | \
    tar -C $HOME/my-knoppix-cd-tree -xvpf -
# umount /tmp/knoppix-cd /tmp/knoppix-cloop
Now, you can hack away to your heart's content. The most convenient way to do this is to change root into the Knoppix inner tree using the chroot command:
# mount -t proc none $HOME/my-knoppix-tree/proc
# cp /etc/resolv.conf \
$HOME/my-knoppix-tree/etc/resolv.conf
# chroot $HOME/my-knoppix-tree /bin/sh
From here, you can use all the usual Debian package management commands (dpkg, apt-get and so on) to install or delete whatever you like. When you're done, exit the chroot and unmount proc, unless you want your development system's process list immortalised on CD. Then, use create_compressed_tree and mkisofs to create the inner and outer images:
# mkisofs -L -R -l -V "KNOPPIX ISO9660" -v \
-allow-multidot $HOME/my-knoppix-tree | \
create_compressed_fs - 65536 > \
$HOME/my-knoppix-cd/KNOPPIX/KNOPPIX

# mkisofs -l -r -J -V "KNOPPIX with local stuff" \
-hide-rr-moved -v -b KNOPPIX/boot-en.img \
-c KNOPPIX/boot.cat -o knoppix.iso \
$HOME/my-knoppix-cd
Finally, burn knoppix.iso to a CD-ROM and boot it. If you prefer, you can test without burning by using Bochs or VMware.
This simple approach starts to break down, however, when you want more extensive customizations. For example, if you want X to start a particular window manager but don't want to use all of GNOME or KDE, you have to edit the script yourself. This isn't hard to do, but it means that you've essentially forked Knoppix. When a new Knoppix version comes out, you'll have to do it again. In addition, if you intend to sell your Knoppix-based CD commercially, you need to remain compliant with the licenses of all the software you distribute, which means knowing exactly what's on it. The Knoppix version I looked at contained some files that weren't from Debian packages, and sometimes they weren't even free software.
So, is there some other place we could start? Happily, yes. Between the efforts of Progeny, which donated its installer to the Debian Project; Klaus Knopper, the author of Knoppix and the creator of the cloop device; and other Debian developers who are working on adding his custom code into the main Debian repository—today we can put together a passable live CD system from scratch using only Debian packages. The rest of this article describes how.
A tarball containing all the scripts and files referred to here can be found at ftp.linux.org.uk/~dan/livecd. Due to space limits, here, most of the code is not reproduced in the article itself. It's mostly Makefile-driven, with some shell scripts and some simple Perl, and it should be pretty easy to follow. You may hit a few snags if you're not using Debian. If you make it work with some other host distribution, be sure to send patches.
The debootstrap program provides the Debian base system from which you start. Given a Debian release name and a package mirror URL, debootstrap downloads and installs the base system into a subdirectory of your choice. This is pretty flexible; you can chroot into it, use it as a UML root or, if the subdirectory you chose was on its own filesystem, reboot your computer and use it directly. You even can burn it onto a CD, which is what we are going to do. We have some work to do first, though.
Expect to do quite a lot of debootstrap and package installation as you test your scripts. Before going much further, save yourself some time and bandwidth by installing a proxy package archive (such as apt-proxy) on a convenient machine.
The fix_inner target in the Makefile adds packages to the base system. The first thing we do is replace start-stop-daemon with /bin/true to prevent post-installation scripts from running services in our chroot. With that done, we chroot into the system repeatedly and run such commands as apt-get and dpkg.
For testing and experimentation, we also have a Perl script, run-chroot.pl, that simulates a system boot in the chroot area. It doesn't start most of the services, because they're already running on the host and would conflict, but it does run an SSH server and the X startup script. This is a lot more convenient than writing a CD and rebooting whenever we want to test something.
There's no point in making people log in on a single-user demonstration system. You have to tell them the password anyway, and the CD is read-only so they can't change it beyond the current session. GDM has an autologin feature, but to keep the image size down we want to avoid dragging in all the GNOME dependencies. Instead, we simply use su to start X as a non-root user and run the .xsession script, which opens an xterm and Emacs and starts our application. The autologin-x script is installed as /etc/init.d.autologin-x, with appropriate symlinks to make it run at boot.
The script chooses which X server to run based on whether DISPLAY is set already; if so, it starts up Xvnc instead of XFree86. This is done to help with testing: when autologin-x is run by run-chroot.pl inside an xterm, we can connect to it with a VNC client to make sure all the usual X applications come up correctly. Of course, for X to work on the real CD-ROM, we need to know what video hardware the user has.
Hardware detection in Linux has improved a lot in the last ten years, helped by the improvements in hardware technologies. It's a lot easier to detect today's PCI and USB hardware reliably and safely than it was with the ISA devices we used to have.
Most Linux distributors have something that grovels through the PCI and USB devices in the system and loads appropriate modules. Knoppix uses Kudzu, originally written for Red Hat, but vanilla Debian uses the discover command. The two are pretty similar in coverage; as it's all open source, they can copy from each other's hardware databases. The Debian X server packages already use discover to provide defaults for X configuration questions, so we'll stick with it.
What do we do with the hardware we detect? Debian packages have human-editable configuration files, but they typically also come with post-installation scripts that create the initial versions of said files interactively. Where applicable, such as for X and network configuration, these scripts run the hardware detection tools.
The problem is we're installing the packages in a chroot on the host system, and detecting the host system's hardware is not going to help on the target. What we need to do is put the debconf database somewhere writable, so at boot time we can use debconf-communicate to unconfigure the package and run its .config script to make it think it's being configured for the first time. This is a more thorough approach than using dpkg-reconfigure, which sometimes asks questions such as, “Are you sure you want to reconfigure this package?” This can be confusing to the end user who hasn't even configured it once yet. See the debconf-communicate manual page and target/etc/init.d/configure-xserver in the tarball for details.
The CD-ROM is read-only, and a ramdisk goes away when the power is turned off. People want to save their files, though, or even have access to the files they've created already on existing hard disks or on removable devices, including USB keychains and Zip drives. Again, most of the hard work has been done for us; this time hotplug and autofs are our saviours.
Hotplug listens for new devices being added or removed. When it sees a new USB storage device, it loads any necessary modules and creates an emulated SCSI host. We still need to know what devices are available and mount them, and that's where autofs comes in.
autofs mounts and unmounts filesystems on demand. Using a program map, we can have a Perl script run whenever the user asks for /media/list; it creates a directory with links named after the attached devices. These links point to more autofs mount points to access the filesystems. In the tarball, look at target/etc/auto.master and target/usr/local/sbin/autofs-device-list.
We use basically the same kernel configuration as Knoppix (look at /usr/src/linux/.config in a running Knoppix system, or kernel-config in our tarball), but we remove support for a few obviously unused things, such as ZISOFS. The standard Debian make-kpkg tool patches, builds and installs the kernel. This is a Debian dependency on the host system (you need the cloop-src package), and as it's probably the only nontrivial such dependency, it might be worth moving into the chroot in a later version.
Most of a UNIX filesystem is happy mounted read-only, but we do need to write files in some places. For example, the X server configuration file needs to be written at boot time according to the hardware in use, the debconf database must be updated and there are various log and lock files too.
We use the tmpfs filesystem to create a RAM-based filesystem. The system is arranged to use this ramdisk for root and expect the cloop image on /ro. Then for read-only directories, we create symlinks, for example, from /usr to /ro/usr.
We keep a list of read-only directories, and we check it twice. First, we create a tarball of the system that excludes all these directories, replacing them with appropriate symlinks. This tarball then is copied into the root filesystem of the running system. Second, when we're writing out the ISO9660 image to be cloop-compressed, this is the list of directories to include.
Before the system proper starts up, there are two important things we must do. First, we need to mount the cloop image, load whatever modules the CD-ROM needs, then find and mount the CD. Next, we install the cloop device and mount the inner filesystem on it. Second, we create a ramdisk for the root filesystem and copy the root_fs.tgz image from the CD into it.
We use the initrd (initial ramdisk) support to create a mini root filesystem that the kernel mounts and runs before the real init starts. This is a gzipped filesystem. When a kernel with initrd support is booted with the command line initrd=filename, it loads the contents of that filename and creates a ramdisk out of it. It then starts running the /linuxrc file in that ramdisk.
When linuxrc has finished, it uses the pivot_root call to change onto the real root directory, which was /ramdisk, and executes the real init.
The initrd and the kernel together need to be small enough to fit in 1.44MB of RAM with all the other files on the boot image. This is not a lot of space, as GNU libc alone is about 1,200K, we're going to have to be pretty creative.
Even if you've never wanted a Linux PDA or an in-car MP3 jukebox, you now have a reason to be grateful to embedded Linux hackers. We're going to use Busybox and dietlibc to get our quart into the proverbial pint pot. Busybox is a small shell that can be configured at build time to include many common utilities as built-ins, and dietlibc is an alternative C library optimized for small size. By happy coincidence there turns out to be a Busybox applet for everything we need on the initrd, and by statically linking with dietlibc we can get all this into about 100K. For comparison, the same Busybox options statically linked against glibc get a 500K executable.
Applets for Busybox are enabled using #defines in its Config.h file (in the tarball). Some of the disabled options may seem rather arbitrary, but when you already have a choice of echo * and tar cvf /dev/null to list the current directory, ls really is a luxury.
We create the initrd using genext2fs, avoiding the need for a loopback mount. This generates an ext2 filesystem from a directory tree, which we gzip and copy into the boot floppy image (Figure 1).
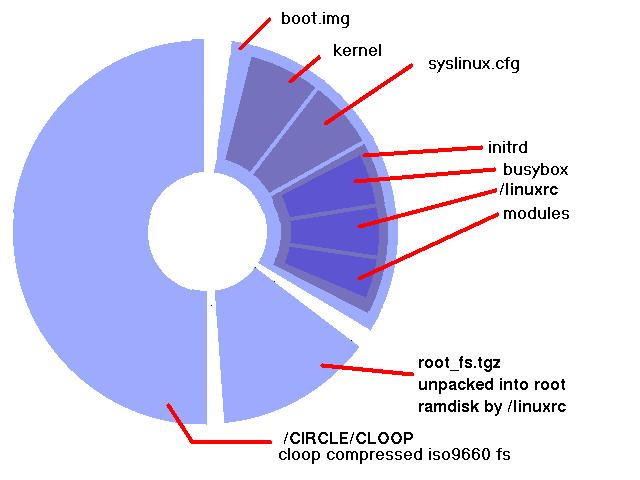
Figure 1. Wheels within wheels: the finished CD nests filesystem images inside filesystem images inside filesystem images.
The standard for booting from CD-ROM is known as El Torito and was originally produced by the Phoenix BIOS writers. El Torito allows the creation of one or more disk images on the CD-ROM. At boot time, the BIOS locates these and creates an emulated disk from which it then boots. Images may be of floppies (1.44MB or 2.88MB) or of hard disks. There's also a no-emulation mode, in which the BIOS loads sectors from the specified file and executes them without setting up an emulated disk.
There's a catch, of course: El Torito is implemented by BIOS writers. Linux users with laptops or other interesting hardware already know that BIOSes are not always the least-buggy code on the planet. It's been suggested that some manufacturers happily ignore the actual specification as long as whatever they concoct manages to load the current version of Windows. So, painful though the space restriction is, to ensure maximum portability, we follow Knoppix's lead and stick to a single 1.44MB floppy image.
What do we put in this 1.44MB? We could boot a raw Linux kernel, or we could use a normal Linux bootloader such as LILO or Grub. H Peter Anvin's SYSLINUX tool beats both of these options for ease of use, though. SYSLINUX creates boot disks that use an MS-DOS filesystem, so we can create the floppy disk image using the userland mtools. The disk needs the kernel vmlinuz file, syslinux.cfg, any ancillary help files and the initrd image. When done, we run SYSLINUX on it.
All that remains now is to create our filesystems and burn them, much as we did earlier. The inner filesystem is in $(SCRATCH)/CLOOP. We create an outer filesystem containing this, boot.img and root_fs.tgz. We then write that to CD (a CD-RW or two would be useful) and reboot with it. And, with any luck, it works.
As a longtime Linux user who hasn't done a normal install in years, it's impressive to see how much work has been done recently on hardware detection and autoconfiguration. As time goes by, I'm sure it'll get even better.
Where does this project go next? The automount support needs work; we might try something like Volumatic instead. Other than that, it depends on the product based on it. But all the scripts are free software, and I'm looking forward to feedback.
Resources for this article: /article/8060.
Daniel Barlow is an independent consultant in Oxford, UK, where he hacks Linux and Common Lisp compilers. In his spare time, he likes to play the electric guitar badly, which is fortunate as it's the only way he knows how to play it. Comments are welcome to dan@metacircles.com.

