
Building Custom Firmware with OpenWrt
OpenWrt provides an environment for building custom, Linux kernel-based firmware for a variety of embedded devices. Originally targeting the Linksys WRT54G series of routers, OpenWrt now provides support for a wide range of devices, including Openmoko mobile phones and routers from Linksys, NETGEAR and D-Link. This article focuses on the Linksys WRT160NL router, which I chose because of its support for 802.11n wireless networking, its USB connectivity and its reasonable price. Within this device's 8MB of Flash and 32MB of RAM, I explain how to fit a Kerberos authentication server, LDAP directory server, NFS file server, print server and iTunes-compatible media server.
In addition to the Linksys WRT160NL router, you'll need an external USB hard drive, a USB printer, a USB hub, a build workstation and a custom-built console cable. To help build the console cable, You'll also need a continuity tester (often available as a function of a multimeter). The first two items are available for a total of less than $200. Any USB printer should suffice, as long as your network clients support it. The build workstation should be running an up-to-date Linux distribution. Finally, the console cable is a modified Nokia DKU-5 connectivity cable; this type of cable has a USB connection and embedded USB-to-serial adapter. In this article, I use the example.com domain, someuser user account and server.local router hostname. You should replace these three items with your own names.
This project has seven steps: preparing the build workstation, downloading the OpenWrt build environment, configuring and building a firmware image, installing a firmware image onto the WRT160NL, configuring the external USB disk, performing a post-installation configuration of the WRT160NL and configuring a network client. In addition, this article describes how to rescue a misconfigured WRT160NL using the console cable. If you find your router will not boot at any time while following these steps, skip ahead to that final section.
The first step to building a firmware image using OpenWrt is preparing your build workstation. OpenWrt requires that gcc, g++, binutils, patch, bzip2, flex, bison, make, gettext, pkg-config, unzip, the glibc headers, the libz headers, the ncurses headers and the perl-XML-parser are installed on the build workstation. All major distributions provide packages for these items, although the package names may be slightly different from the upstream titles.
Once you have installed all of the requisite packages on your build workstation, download OpenWrt using the command:
svn co -r 20526 svn://svn.openwrt.org/openwrt/trunk
(Before downloading OpenWrt, you may want to check if a newer version is available and substitute its revision number in the -r option.) This creates a directory named trunk in the current working directory. Enter this directory with cd trunk. Inside, you'll see the core OpenWrt build system. Additional packages are provided by what OpenWrt calls feeds. Pull in the feeds provided by the default configuration by executing:
./scripts/feeds update
Finally, complete the installation of the files required to build your optional packages with the command:
./scripts/feeds install krb5-server \
                        openldap-server \
                        nfs-kernel-server \
                        p910nd \
                        mt-daapd \
                        ntpd
The third step is to configure your firmware and build an image containing it. The OpenWrt build environment is similar to many BSD ports systems, MacPorts or Gentoo Linux in that it allows users to define a list of packages that the system will download and compile. Unlike these systems' general use, OpenWrt often must cross-compile its packages. For example, although my build workstation has an Intel Core 2 Duo processor, the WRT160NL router has an MIPS32 processor. As a result, before downloading and compiling general-purpose packages from source, OpenWrt downloads and builds a cross compiler and other build tools from source.
OpenWrt provides a configuration system that is very similar to the Linux kernel's and can be invoked with the command make menuconfig. You can navigate the menu-based configuration tool using the arrow keys and select submenus by pressing Enter. Activate an item with the Y key, or in the case of a series of choices, with Enter. Conversely, pressing N deactivates an item. Press the Esc key to return to a previous menu screen.
Within the configuration menu provided by the make menuconfig command, first select Target System and choose the Atheros AR71xx/AR7240/AR913x option. Set the Target Profile to Linksys WRT160NL. In the Target Images submenu, ensure that only squashfs is activated.
Activate Advanced configuration options (for developers), and press Enter while this option is highlighted. Select Toolchain options, and press Enter again. Deactivate Build/install c++ compiler and libstdc++, because none of the packages for this example build require a C++ environment.
Return to the main menu using the Esc key. Select Base System, and then block-mount and block-hotplug.
Return to the main menu and select Network. Activate Filesystem, nfs-kernel-server; Time Synchronization, ntpd; Printing, p910nd; howl-mdnsresponder and openldap-server.
Return to the main menu and select Kernel Modules. Activate Filesystems, kmod-fs-ext3 and USB Support, kmod-usb-printer and kmod-usb-storage.
Return to the main menu, select Extra Packages, and activate krb5-server.
Return to the main menu, select Sound, and activate mt-daapd. Finally, Esc out of the configuration tool, ensuring that you save your configuration when prompted.
Now that your OpenWrt build is configured, execute the command make V=99 to build the firmware image. This process takes a long time to complete because OpenWrt is compiling the build environment itself, followed by a Linux kernel and all of the firmware's programs. More than likely, this will take several hours.
The result of the build process is a firmware image stored at bin/ar71xx/openwrt-ar71xx-wrt160nl-squashfs.bin. You may install the OpenWrt firmware onto your router using Linksys' firmware upgrade tool, assuming you have not already replaced Linksys' default firmware. The Linksys firmware provides a Web-based configuration (Figure 1). The Linksys firmware has a default IP address of 192.168.1.1, a default user name of “admin” and a default password of “admin”. After configuring your build workstation by adding it to the 192.168.1.0 network, point your browser to 192.168.1.1. Click Administration and then Firmware Upgrade. Finally, click Choose File, and select the firmware image you just built, namely openwrt-ar71xx-wrt160nl-squashfs.bin. Follow the directions on the screen to replace Linksys' firmware with the OpenWrt firmware. Restart the router once the upgrade process is complete.
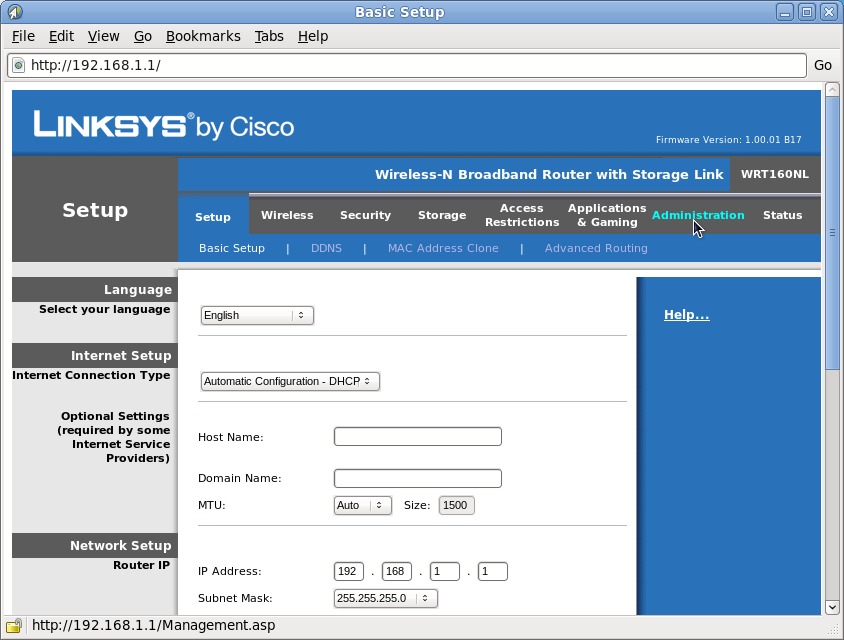
Figure 1. Firmware Upgrade Utility
Now that you have installed your firmware on the router, it's an appropriate time to focus your attention on the USB disk that will serve as the router's data store. Connect the disk to your build workstation. You're going to create two partitions on the disk, one 64MB swap partition and one filesystem partition spanning the rest of the disk. You can do this with the following parted commands:
$ parted /dev/sdX
 (parted) mklabel msdos
 (parted) mkpart primary 0 64
 (parted) mkpart primary ext3 64 -0
 (parted) quit
$ mkswap /dev/sdX1
$ mkfs.ext3 /dev/sdX2
Remember to replace the X in /dev/sdX with the correct letter for the newly connected drive on your system. Finally, create a directory skeleton as follows (assuming /mnt is an unused mountpoint):
$ mount /dev/sdX2 /mnt
$ mkdir -p /mnt/Storage/Music /mnt/home /mnt/mt-daapd
Now, copy your music library to /mnt/Storage/Music.
One final step remains before you turn your attention to your clients. The final step on the router is the post-install configuration. Connect the newly initialized disk, the hub and the printer to your router, and restart the router with the router connected to your build workstation but not yet connected to a public network. Ensure that your workstation is configured to obtain an IP address using DHCP. Once the router has finished starting, connect to it using telnet 192.168.1.1. Change the root password using passwd. Once this is complete, the router will no longer accept telnet connections. Instead, you will connect using secure shell: ssh root@192.168.1.1.
Now that you've logged in to the router, let's pause and address an issue you may be wondering about: the next firmware upgrade. Once the OpenWrt firmware has been installed, you can no longer use the Linksys firmware upgrade tool that you used previously. You will perform future firmware installations using an OpenWrt-provided command-line tool. First, use the scp command to copy a firmware image to the router's /tmp directory. Then, log in to the router, and execute mtd -r write <path-to-image> firmware.
Continuing work at the router's command prompt, now let's create nine configuration files. The first file configures the router's hostname and timezone, /etc/config/system:
config system
    option hostname server.local
    option timezone  UTC
The next three files configure the router's network parameters. First, you'll configure the router's Ethernet devices. The following configuration will cause all five Ethernet interfaces to be bridged to perform switching on one network, 192.168.1.0. The configuration sets the router's IP address to 192.168.1.2 (this is a change from the default, 192.168.1.1). This configuration assumes that routing between the 192.168.1.0 and upstream networks and Internet DNS resolution will be performed by another device (for example, a DSL device) with an IP address of 192.168.1.1:
/etc/config/network:

config interface loopback
    option ifname  lo
    option proto   static
    option ipaddr  127.0.0.1
    option netmask 255.0.0.0

config interface lan
    option ifname "eth0 eth1"
    option type    bridge
    option proto   static
    option ipaddr  192.168.1.2
    option netmask 255.255.255.0
    option dns     192.168.1.1
    option gateway 192.168.1.1
The WRT160NL has a total of five Ethernet ports, but the configuration option above shows two:
option ifname "eth0 eth1"
This is correct. The WRT160NL's four LAN ports perform switching functions and are collectively referred to by the Linux kernel as eth0. The kernel refers to the single WAN port as eth1. This configuration bridges all five Ethernet ports together to perform switching functions on one subnet. It also configures the switch to act as a host, assigned the IP address 192.168.1.2. After applying this configuration, all five Ethernet ports are equivalent switch ports.
Next, configure the router's wireless interface:
/etc/config/wireless:

config wifi-device radio0
    option type     mac80211
    option channel  5
    option macaddr  <MAC-ADDRESS>
    option hwmode   11ng
    list ht_capab   HT40-
    list ht_capab   SHORT-GI-40
    list ht_capab   DSSS_CCK-40

config wifi-iface
    option device   radio0
    option network  lan
    option mode     ap
    option ssid     <SSID>
    option encryption psk2
    option key      <WPA2 KEY>
Configure the DHCP service by writing /etc/config/dhcp:
config dhcp lan
    option interface    lan
    option start        100
    option limit        150
    option leasetime    24h
    # GW, DNS:
    option dhcp_option "3,192.168.1.1 6,192.168.1.1"

config dhcp wan
    option interface    wan
    option ignore       1

config dnsmasq
    option leasefile   '/tmp/dhcp.leases'
    option resolvfile  '/tmp/resolv.conf.auto'
Next, remove the default fstab using rm /etc/config/fstab, because all mounts and swap space will be set up dynamically by the hotplug system.
Configure the disk's two shared directories using /etc/exports:
/mnt/sda2/Storage *(fsid=0,rw,insecure,no_subtree_check,sync)
/mnt/sda2/home *(rw,insecure,no_subtree_check,sync)
Configure Kerberos by creating /etc/krb5.conf:
[libdefaults]
    default_realm = EXAMPLE.COM
    dns_lookup_realm = false
    dns_lookup_kdc = false
    ticket_lifetime = 24h
    forwardable = yes

[realms]
    EXAMPLE.COM = {
        kdc = localhost:88
        admin_server = localhost:749
        default_domain = local
    }

[domain_realm]
    .local = EXAMPLE.COM
    local = EXAMPLE.COM
OpenLDAP's configuration file is /etc/openldap/slapd.conf:
include    /etc/openldap/schema/core.schema
include    /etc/openldap/schema/cosine.schema
include    /etc/openldap/schema/inetorgperson.schema
include    /etc/openldap/schema/nis.schema
include    /etc/openldap/schema/autofs.schema

allow bind_v2

pidfile    /var/run/openldap/slapd.pid
argsfile   /var/run/openldap/slapd.args

database   ldif
directory "/etc/openldap/ldif"
suffix    "dc=example,dc=com"
rootdn    "cn=Manager,dc=example,dc=com"
rootpw    "<PASSWORD>"
Configure the media server, mt-daapd, by writing to /etc/mt-daapd.conf:
web_root        /usr/share/mt-daapd/admin-root
port            3689
admin_pw        <PASSWORD>
db_dir          /mnt/sda2/mt-daapd
mp3_dir         /mnt/sda2/Storage/Music
servername      server.local
runas           nobody
playlist        /etc/mt-daapd.playlist
extensions      .mp3,.m4a,.m4p
Finally, use /etc/config/p910nd to configure printer sharing:
config p910nd
    option device        /dev/lp0
    option port          0
    option bidirectional 1
    option enabled       1
Because OpenWRT sometimes starts services before the kernel initializes the USB subsystem, you need to make one last modification. Edit /etc/rc.d/S50mt-daapd and add sleep 5 as the first line in the start() function. This ensures that mt-daapd does not start until the kernel is aware of the USB disk containing your media files.
Reboot the router to ensure all configuration changes take effect.
The next step is to initialize the router's Kerberos database. Log back in to the router using ssh root@192.168.1.2. Initialize the account database using the command kadmin.local, which provides an interactive interface:
$ kadmin.local
  > add_principal someuser
  > exit
Returning to the build workstation, let's initialize the LDAP database. First, create a file named example.com.ldif with the following contents, a database defining a user account and automount configuration in LDIF format:
dn: dc=example,dc=com
objectClass: organization
objectClass: dcObject
o: Example Organization
dc: example

dn: ou=people,dc=example,dc=com
objectClass: organizationalUnit
ou: people

dn: ou=group,dc=example,dc=com
objectClass: organizationalUnit
ou: group

dn: cn=ldapusers,ou=group,dc=example,dc=com
objectClass: posixGroup
objectClass: top
cn: ldapusers
userPassword:: WFhYWA==
gidNumber: 1002

dn: uid=someuser,ou=people,dc=example,dc=com
uid: someuser
cn: Some User
objectClass: account
objectClass: posixAccount
objectClass: top
userPassword:: WFhYWA==
loginShell: /bin/bash
uidNumber: 1100
gidNumber: 1002
homeDirectory: /home/someuser
gecos: Some User

dn: automountMapName=auto_master,dc=example,dc=com
objectClass: top
objectClass: automountMap
automountMapName: auto_master

dn: automountKey=/home,automountMapName=auto_master,dc=example,dc=com
objectClass: top
objectClass: automount
automountKey: /home
automountInformation: auto.home

dn: automountMapName=auto.home,dc=example,dc=com
objectClass: top
objectClass: automountMap
automountMapName: auto.home

dn: automountKey=*,automountMapName=auto.home,dc=example,dc=com
objectClass: top
objectClass: automount
automountKey: *
automountInformation: server.local:/mnt/sda2/home/&
Next, load the file into the LDAP database on the router using:
ldapadd -x -D "cn=Manager,dc=example,dc=com" -W -f example.com.ldif
Finally, return to the router and create someuser's home directory, mkdir /var/sda2/home/someuser, and then do chown 1100:1002. Notice that the UID:GID arguments to the chown command match those assigned to someuser in the LDIF file above. Now you can connect the router to your real network.
To add additional users, review the fifth block in the LDIF file above, tailor it for each user and add them using ldapadd. Also, create each user's home directory as before.
Your router now should be fully functional, so it is time to configure the clients. Several existing articles document how to configure a client to operate in LDAP and Kerberos environments (see Resources). You may configure your clients by editing configuration files, or you can investigate your distribution's administrative tools.
One difficult point I've encountered has to do with the LDAP schema used by the automounter. Different UNIX flavors use different schemas. My instructions use the schema employed by Mac OS X, because it also is supported on Fedora. In order to instruct the Fedora automounter to use this schema, write the following to /etc/sysconfig/autofs:
MASTER_MAP_NAME="auto_master"
TIMEOUT=300
BROWSE_MODE="no"
USE_MISC_DEVICE="yes"

# Mac OS X 10.5-compatible schema:
MAP_OBJECT_CLASS="automountMap"
ENTRY_OBJECT_CLASS="automount"
MAP_ATTRIBUTE="automountMapName"
ENTRY_ATTRIBUTE="automountKey"
VALUE_ATTRIBUTE="automountInformation"
Other distributions may configure the automounter differently. If the automounter is configured to use the appropriate schema, it will learn of the NFS-provided home share from the LDAP entry you created earlier and mount users' home directories on-demand.
Refer to your client system's documentation for instructions covering how to connect to the network printer. Your OpenWrt firmware will share an attached USB printer using the HP Jetdirect protocol. This protocol is supported by Linux, Mac OS X, Windows and many other operating systems.
Your OpenWrt device's music share is accessible by iTunes, Rhythmbox and any other media player that supports the DAAP protocol. Compatible players usually will display the share as an option alongside their local music library list.
What if you install a defective firmware, and the router is left in a state that will not boot? This is where your console cable comes in. Figure 2 shows a completed console cable next to an unmodified DKU-5. There are three points on the WRT160NL to which you can connect a console cable. The first are two identical sets of leads within the WAN and LAN 4 RJ45 sockets, opposite the Ethernet leads. The second is a five-post connector on the WRT160NL's motherboard. In order to use the latter interface, you have to open the WRT160NL's case, which voids the device's warranty.
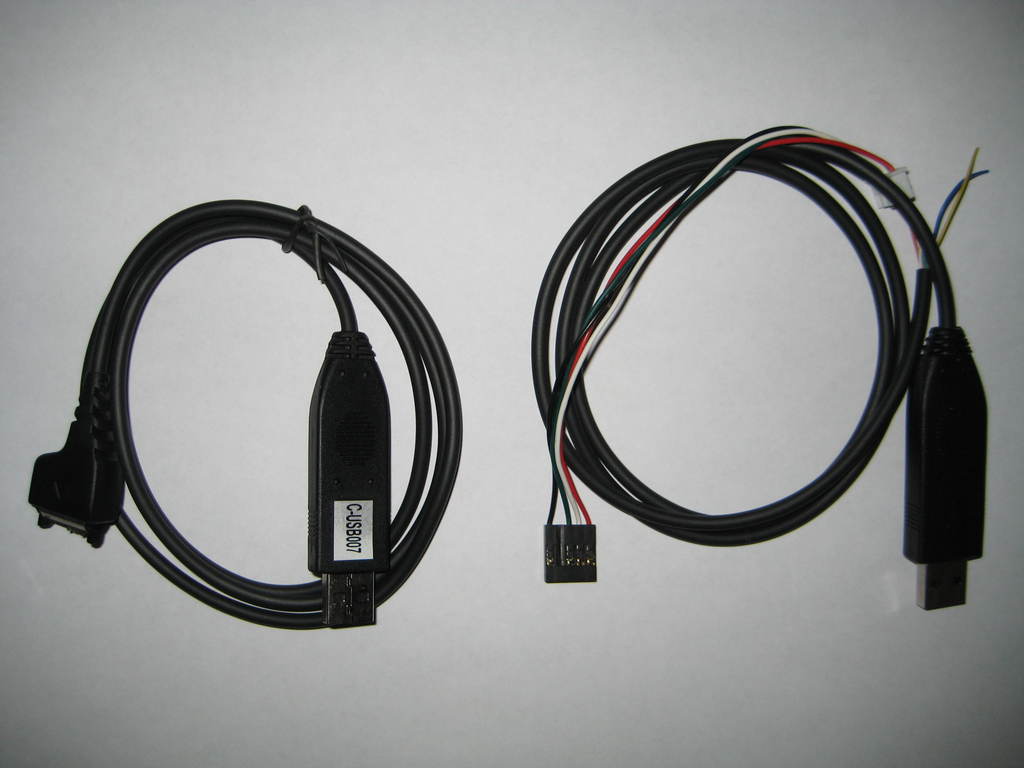
Figure 2. Console Cable
Figure 3 provides a picture of a Nokia DKU-5 cable connector. The other side of the cable has a USB connector. Cut the cable in half so that most of its length is on the USB connector side. Now, expose the six leads on the Nokia connector side. Use a continuity tester to identify which four of the six leads correspond to the functional pins noted in Figure 3. Note the insulator color of the lead connected to each pin. Now focus your attention to the other half of the cable, the one with the USB connector. Expose the four leads matching the colors noted earlier. Connect each of these leads to the four of five binding posts labeled in Figure 4, ensuring that the lead and post functions match. You may connect them using a PCB connector, hook to pico hook jumpers or a more primitive technique.
Figure 3. DKU-5 Connector
Figure 4. Router's Console Interface
Connect the USB connector of the console cable to your build workstation. Install a serial terminal emulator, such as minicom, on your build workstation and run the program. Configure the emulator to use eight data bits, no parity bit and one stop bit. Select 115200 baud. Boot the router and observe the emulator console. You should see the router print diagnostic information through the console interface. Pay close attention to the messages being printed through the console, and press a key when the U-Boot bootloader prompts you to “Hit any key to stop autoboot.” You should see the U-Boot command prompt, ar7100>. Enter the command upgrade code.bin to instruct U-Boot to initiate a tftp server. Return to the build workstation command line, enter the command tftp 192.168.1.1, and then:
tftp> binary
tftp> put <firmware filename>
Observe the data transfer being displayed over the console interface. Return to the terminal emulator, and enter go at the U-Boot prompt.
The firmware you load using this technique may be an official firmware obtained from Linksys or an OpenWrt firmware that you built.
This article demonstrates a technique for providing Kerberos, LDAP, network filesystem, print and media services using a Linksys WRT160NL wireless router. The result is a low-cost network server for the home or small office. OpenWrt has a wide range of packages available, so there is potential for many other solutions to be developed around this capable platform. For example, Samba could allow tight integration with Windows clients. Another option is Netatalk, which provides native Mac OS X file sharing, including integration with Apple's Time Machine backup software. Linux, open-source applications and popular network hardware like the Linksys WRT160NL provide a solid basis for developing innovative devices.
Resources
“OpenLDAP Everywhere” by Craig Swanson and Matt Lung, LJ, December 2002 (see the section titled “Configure the Linux LDAP Client”): www.linuxjournal.com/article/6266
“Centralized Authentication with Kerberos 5, Part I” by Alf Wachsmann, LJ, January 2005 (see the section titled “Configuring the Clients”): www.linuxjournal.com/article/7336
“Serving Apples: Integrating Mac OS X clients into a Fedora network” by Mike Petullo, Red Hat Magazine, January 2008 (demonstrates how to configure Mac OS X clients): magazine.redhat.com/2008/01/17/serving-apples-integrating-mac-os-x-clients-into-a-fedora-network
Mike Petullo serves in the US Army and enjoys solving problems with innovative open-source software. He has been working with Linux since 1997 and welcomes your comments at mike@flyn.org.


