
Yubikey One-Time Password Authentication
A number of factors inspired me to take a closer look at the Yubikey. For starters, it is such a simple and elegant solution to two of the major problems the security industry is facing these days: authentication and identity management. Furthermore, I really like how Yubico, the manufacturer of Yubikey, is trying to integrate the Open Source movement into its business strategy. In this article, I cover three topics related to this little device. First, I explain what the Yubikey does and how to use it. Second, I examine how it works. Third, I show how to integrate the Yubikey authentication service into your own infrastructure without too much trouble.
A Yubikey is a small plastic rectangle that basically consists of a USB connector and a button. It resembles a tiny USB Flash drive, and as it measures only 18x45x2mm and weighs only 2 grams, it easily can be carried on a keychain or in a wallet (Figures 1 and 2). When you plug it in to your machine's USB port, it identifies itself as a keyboard, implying that the Yubikey is platform-independent as long as the host device supports data entry via the USB Human Interface Device (HID) specifications. It draws power from the host device and, thus, does not have to depend on an internal battery. The whole device is quite compact and can be attached to an actual key ring using the small hole near the top of the device. The gold surface connectors are quite robust and are expected to last the lifetime of the device. According to a Yubico representative, Yubikeys still were usable after running them through a washing machine's cycle.
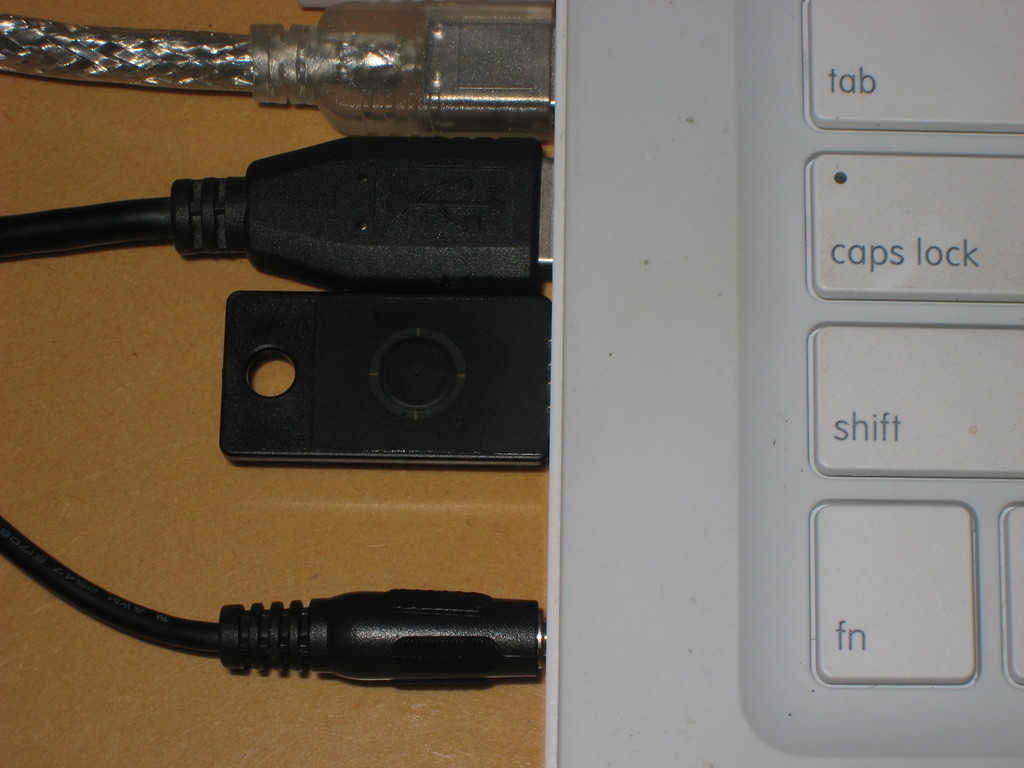
Figure 1. Yubikey Plugged In

Figure 2. Yubikey Size
Each time you press the button on the device, it generates a one-time password and sends it to the host machine as if you had entered it on a keyboard. This password then can be used by the service to authenticate you as a user.
I use RoundCube to read my e-mail when I don't have access to my own system. RoundCube is an AJAX-centric Web-based e-mail client. You use it via your Web browser just as you might use Gmail or most other major on-line e-mail providers. Fortunately, RoundCube is open source and based on PHP, so it didn't take too much work to add Yubikey authentication.
Normally, RoundCube asks you to enter your e-mail address and password to log in. However, following a few modifications, the login screen now features a third field: Yubikey OTP (one-time password). Now, all you have to do is enter your e-mail and password as usual, position the cursor in the newly added text field, and put your finger on the Yubikey's button. After a second or so, the Yubikey magically spits out a 44-character sequence followed by a newline character. The newline character causes the form to be submitted. And, assuming that your Yubikey is indeed associated with your account, you will be logged in. Take a look at Figure 3, which shows the slightly modified login screen.
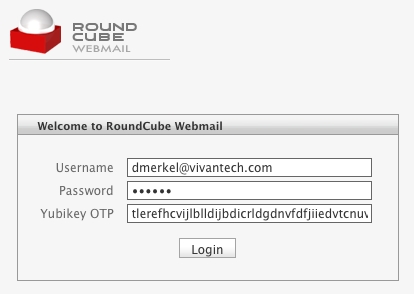
Figure 3. Modified RoundCube Login Form UI
For obvious reasons, the Yubikey should not be used as the only method of authentication. If that were the case, someone getting a hold of your Yubikey then would be able to access your Yubikey-enabled accounts provided that person also knows your corresponding login. However, if you use the Yubikey to add another attribute to a multi-attribute authentication scheme, it can increase security significantly. Imagine if you will, people monitoring your network traffic without your consent. They may be able to glean your password by examining captured TCP packets, but the Yubikey password they capture will be of no use to them, because it can be used only once! After you use a Yubikey password to log in somewhere, it becomes useless. In the next section, I explain exactly how this one-time password scheme works.
Let's take a closer look at the character sequence the Yubikey transmits to the host machine. Here's an example of a sequence generated by my Yubikey:
tlerefhcvijlngibueiiuhkeibbcbecehvjiklltnbbl
The above is actually a one-time password that is secured using AES-128 encryption and ModHex encoding. Let's take a look at how the Yubikey constructs this string. For the purpose of this discussion, refer to Figure 4.
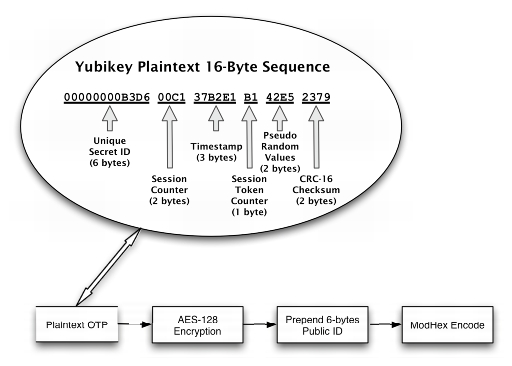
Figure 4. Yubikey Token Construction
The device starts by creating a 16-byte sequence (Figure 4) where the individual bytes are allocated as follows:
The first six bytes hold the key's secret unique ID, which is assigned when a Yubikey is programmed. This ID is known only to the entity that assigned it and cannot be retrieved from the Yubikey. Six bytes translates into 2(6*8) = 281,474,976,710,656 unique combinations of bits, which is the number of Yubikey IDs that can be issued before Yubico has to think of a new scheme. Considering that this number exceeds the current world population by a factor of more than 42,000, Yubico is not likely to run out of unique IDs for some time, unless its business model is more successful than anyone could anticipate.
The next two bytes in our sequence, bytes 7 and 8, are used to store a session counter in nonvolatile memory. The counter starts at zero and is incremented each time the device is plugged in. Two bytes for the session counter allows for 2(2*8) = 65,536 sessions. In other words, you can plug in the Yubikey three times a day for almost 60 years before running out of session counters. Note that you can generate a significant number of OTPs during each session (see below).
The following three bytes, bytes 9 through 11, are used as a timestamp, which is stored in volatile memory during each session. That means each time the device is plugged in, the timestamp starts at zero and continuously increases. Because it is incremented by an internal 8Hz clock, timestamp values will be exhausted after about 24 days. At that time, you need to unplug the Yubikey and plug it back in.
Byte 12 in the sequence is a session counter that starts at zero and is incremented by one each time a token is generated. When it reaches that maximum value of 255, it wraps back to zero.
Bytes 13 and 14 in the sequence are pseudo-random numbers provided by a free-running oscillator. These bytes are used to add additional entropy to the plain text before subjecting it to the cypher.
The last two bytes, numbers 15 and 16, contain a checksum using the CRC-16 algorithm over all values of the token with the two checksum bytes set to zero. This checksum is used for data-integrity checking.
Each time the Yubikey is invoked, it generates the 16-byte sequence described above. However, if you look at the sample Yubikey output previously listed in this article, you will notice that it actually consists of 44 characters. That is because we still are missing three crucial steps before the Yubikey is ready to spit out the final token. First, the 16-byte token is encrypted using an AES-128 key that is unique to each Yubikey. Second, the Yubikey prepends the encrypted 16-byte token with a six-byte plain-text public ID. This public ID is completely different from the secret ID used to construct the 16-byte sequence. The public key does not change and can be used to associate a Yubikey token with an account. Finally, the whole 22-byte sequence (16 bytes encrypted plus six bytes public ID) will be encoded using the not-so-well-known ModHex algorithm.
Yubico chose this algorithm simply because it is limited to characters that are common to many different keyboard layouts. Because the Yubikey impersonates a keyboard, it tries to use characters that work with the various keyboard settings it might encounter in the wild. The disadvantage is that ModHex encoding is somewhat inefficient in that it requires two characters for each byte it encodes, which is why a 22-byte sequence turns into a 44-character sequence. However, as the Yubikey does all the typing, this does not translate into an inconvenience for users.
Let's take a closer look at the encryption step of generating the token. In contrast to asymmetric algorithms used in public-key encryption schemes, such as PGP, AES is a symmetric algorithm. This means both the party encrypting the token and the party decrypting and validating it will need access to the AES-128 key! This sharing of the AES key happens when the device is programmed. Similar to the device's unique ID, the unique AES-128 key is generated and stored on the device by Yubico before it is shipped out. The company maintains a database where the unique public as well as secret IDs are associated with their corresponding AES keys. This way, Yubico is able to offer an authentication Web service.
Using a symmetric algorithm has the advantage that it is typically very fast. Also, you don't need to rely on third parties for key management or to vouch for identities.
If you want to be in charge of your own AES key, you have two options. First, you can request your AES key from Yubico. At the time of this writing, Yubico will send you a CD containing the AES key, but the company also is working on a more convenient solution of retrieving the key on-line. Second, you can use Yubico's development kit to program the key yourself. This way, you can assign AES-128 keys, as well as public and secret IDs, according to your own naming conventions. If you supplement this approach by running your own authentication Web service, you eliminate any dependence on Yubico as a third party in your authentication procedure.
It's not surprising that the process of validating an OTP resembles reversing the steps necessary for constructing an OTP. A basic validation routine might look something like this. First, you ModHex decode the string. Next, you split the string into public ID and 16-byte token. Then, you use the public ID to look up the corresponding AES key. After using the AES key to decrypt, you have the original 16-byte token in plain text. Next, you would verify the CRC-16 checksum (the last two bytes). Then, you would compare the secret ID to the one you retrieved from the database using the public ID. Using the session counter and the session token counter, make sure that the current token was generated after the last successfully authenticated token. Although you don't know exactly when any two tokens were generated, you always can tell in which order they were generated. If the token passes all these tests, you can send a response signaling successful validation to the client. Otherwise, the token is rejected.
Optionally, you can harden the validation algorithm further. For example, you can try to calculate how many sessions or tokens have been skipped since the last successful validation and consider that information in your decision to validate or reject the token. You can use the session timestamp in a similar manner.
One thing I find really attractive about Yubico's business model is that it tries to provide all software in the form of open source. According to Yubico's statements, it plans to profit from the manufacture and sale of the devices, but intends to keep all software open source. For example, the source code for the aforementioned Web service is freely available as a reference implementation. Furthermore, Yubico offers client libraries needed for implementing Yubikey authentication in various applications and platforms. Currently, there are client libraries available in Java, C, C#/.NET, PAM, PHP, Ruby, Perl and Python. All these libraries and programs are set up as Google Code projects. Additionally, there are projects for libraries to decrypt OTPs in C and Java, as well as an Open ID server and a personalization tool to allow you to program your own Yubikey. Although all these software projects were initiated by Yubico, you already can see others contributing. Moreover, a number of independent open-source projects using the Yubikey technology have surfaced. Yubico's discussion forum is a good place to keep tabs on such projects and get support.
When you order a Yubikey, it comes ready to take advantage of Yubico's authentication Web service. Because Yubico maintains a database of all API keys, as well as public and secret IDs with which the Yubikeys have been programmed before shipment, Yubico has decided to offer an authentication Web service against those credentials. Developers then can use the Yubico authentication Web service to validate OTPs captured from the device. Yubico has a Web page where you can request an API key. Anyone can get an API key. The only requirement is that you have to submit a valid Yubikey OTP. This is merely a measure to avoid database bloat from too many bogus requests. The API key also comes with an ID number.
The purpose of the API key is to sign/verify requests to/from the Yubico authentication Web service using the HMAC-SHA1 hashing algorithm. This is done because support for SSL is often spurious in the various environments in which the Web service client libraries have to function. Note that it is not strictly necessary to use SSL, because the token already is encrypted! However, as an added precaution, SSL should be used as a transport layer whenever it is available. In the PHP client library, for example, all you have to do is add an s to http where the authentication server URL is specified.
Now that we have a solid understanding of the underlying technology, let's add Yubikey authentication to an existing application. I use Typo to blog. Typo is developed using Ruby on Rails, and you can check out its latest codebase via the project's public Subversion repository. Whether or not you like the structure RoR imposes on the developer, it works to our advantage in this case, because it makes it easy to locate the files we need to modify. Take a look at Figure 5 for a basic outline of the validation routine we will be implementing.
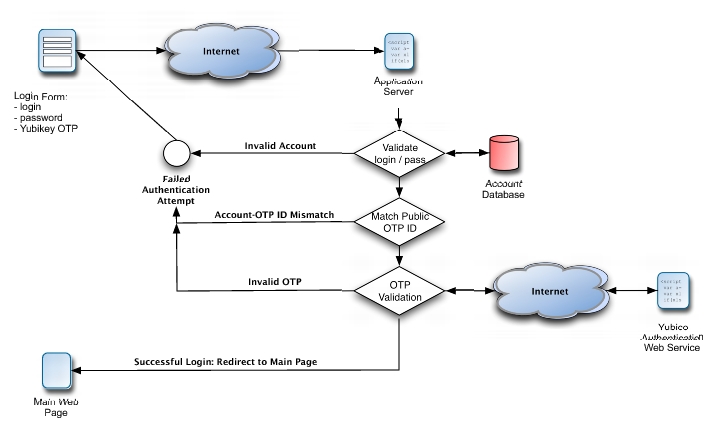
Figure 5. Yubikey OTP Validation Flow
To start, let's drop the Ruby Web services client library, yubico.rb, into the project's lib directory. After adding the corresponding require command to the config/environments.rb file, we can be assured that the library will be available throughout the application.
Two groups of settings are necessary to configure Yubikey authentication. First, there are the site-wide settings, namely the API key and corresponding ID necessary to submit authentication requests to the Web service. There also is a switch for enabling or disabling Yubikey authentication on a blog-wide level. Typo stores these blog-specific settings by serializing them and persisting them to the blogs.settings column. Lucky for us, that means we don't have to make any changes to the database. However, we do need to amend the UI and data model used to store these settings within the application. Listing 1 shows how to add these three Yubikey configuration options to the respective HTML template in the admin user interface. Similarly, Listing 2 shows how to add those same settings to the model. That's all it takes for Rails to render a form to input those settings and store them in the database for each blog. Figure 6 shows the final result.
Listing 1. Typo: Blog-Wide Yubikey Settings HTML
filename: app/views/admin/settings/index.html.erb

...
<!-- Yubikey authentication - start -->
<fieldset id="authentication" class="set" style="margin-top:10px;">
  <legend><%= _("Authentication")%></legend>
  <ul>
    <li>
      <label class="float"><%= _("Require Yubikey OTP")%>:</label>
      <input name="setting[yubikey_required]"
          id="yubikey_required" type="checkbox" value="1"
          <%= 'checked="checked"' if this_blog.yubikey_required%> />
      <input name="setting[yubikey_required]" type="hidden"
          value="0" />
    </li>
    <li>
      <label for="yubikey_api_id"
          class="float"><%= _("Yubico API ID")%>:</label>
      <input name="setting[yubikey_api_id]" id="yubikey_api_id"
          type="text" value="<%=h this_blog.yubikey_api_id %>"
          size="6" />
    </li>
    <li>
      <label for="yubikey_api_key"
          class="float"><%= _("Yubico API Key")%>:</label>
      <input name="setting[yubikey_api_key]"
          id="yubikey_api_key" type="text"
          value="<%=h this_blog.yubikey_api_key %>" size="50" />
    </li>
  </ul>
</fieldset>
<!-- Yubikey authentication - end -->
...
Listing 2. Typo: Adding Blog-Wide Yubikey Settings to Model
filename: app/model/blog.rb

...
  # Authentication
  setting :yubikey_required,       :boolean, false
  setting :yubikey_api_id,         :string, ''
  setting :yubikey_api_key,        :string, ''
...
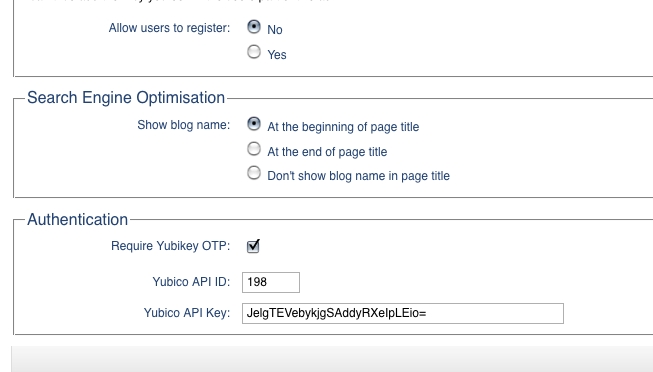
Figure 6. Typo: Blog-Wide Yubikey Settings UI
Second, there are two user-specific settings: Yubikey ID and Yubikey Required. The former is necessary to associate a Typo account with a user's unique public Yubikey ID; whereas the latter allows users to enable Yubikey authentication selectively for their accounts only. Now, let's make both options available from the user's preference settings within the application's admin interface. To make the new options appear in the UI, I added a new section to the partial HTML template that renders the form for editing user options (Listing 3). Thanks to RoR's ActiveRecord support, we don't need to write any code to save these new options to the database; however, we do need to make sure that we add the correspondingly named fields to the user table to which all values on this screen are being persisted. In Rails, this is done by adding a database migration, which is nothing more than an abstract way of describing an incremental modification to the database. In our case, we are adding the fields yubikey_id and yubikey_required to the user table by creating the migration shown in Listing 4. Now, all you need to do is run the rake utility from the command line and tell it to upgrade the database: rake db:migrate. The nice thing about Rails' migrations is that they are database-provider independent. The migration we created in Listing 4 can be used with any of the underlying databases that Typo supports. At the time of this writing, this includes MySQL, PostgreSQL and SQLite. Finally, you can admire the new settings in the account-specific options in Figure 7.
Listing 3. Typo: Account-Specific Yubikey Configuration Options HTML
filename: app/views/admin/users/_form.html.erb:

...
<li>
  <label class="float" for="user_notify_on_new_articles"><%=
      _("Send notification messages when new articles are posted")%>?
  </label>
  <%= check_box 'user', 'notify_on_new_articles' %>
</li>
<!-- new options for Yubikey authentication - start -->
<li>
  <label class="float" for="user_yubikey_required"><%=
      _("Yubikey Required")%>?
  </label>
  <%= check_box 'user', 'yubikey_required' %>
</li>
<li>
  <label class="float" for="user_yubikey_id"><%=
      _("Yubikey ID")%>:
  </label>
  <%= text_field 'user', 'yubikey_id' %>
</li>
<!-- new options for Yubikey authentication - end -->
</ul>
</fieldset>
<!--[eoform:user]-->
Listing 4. Typo: Yubikey Settings Database Migration
filename: db/migrate/071_add_yubikey_columns_to_user.rb:

class AddYubikeyColumnsToUser < ActiveRecord::Migration
  def self.up
    add_column :users, :yubikey_id, :string,
               :null => false, :default => ''
    add_column :users, :yubikey_required,
               :boolean, :null => false, :default => false
  end

  def self.down
    remove_column :users, :yubikey_id
    remove_column :users, :yubikey_required
  end
end

Figure 7. Typo: Account-Specific Yubikey Configuration Options UI
Now that we have the setup all taken care of, we can focus on the actual authentication during login. First, let's add a Yubikey OTP input field to the login screen provided that Yubikey authentication is enabled for the whole blog. I have done this by modifying the partial template that renders the login form in Listing 5. Notice that we always have to show the Yubikey OTP field during login, because until users supply their user names, we don't know whether Yubikey authentication is required for a particular user. Figure 8 shows the modified login screen.
When the login form is submitted, Rails routes it to the login method of the AccountsController class (Listing 6). This is where we add the logic to check whether we need to handle Yubikey authentication. After the existing code has verified the regular login and password, we now have an instantiated user object that can tell us whether Yubikey authentication is required for this user. If so, we invoke the static method authenticate_yubikey of the user object. Looking at Listing 7, we check that neither the Yubikey OTP from the login form nor the user's public Yubikey ID are blank. Moreover, by definition, the first 12 characters of the OTP have to match the public ID associated with the account. If everything is in order, we instantiate a Yubico object, which will handle the Web service authentication request for us. The method simply returns a boolean. True means the user was authenticated successfully. Conversely, false implies an invalid OTP or an attempt by an unauthorized user—possibly an attempt to hack into the account.
Listing 5. Typo: Modified Login Form HTML
filename: app/views/shared/_loginform.html.erb:
<% form_tag :action=> "login" do %>
<ul>
<li>
<label for="user_login"><%= _('Username')%>:</label>
<input type="text" name="user_login" id="user_login" value=""/>
</li>
<li>
<label for="user_password"><%= _('Password') %>:</label>
<input type="password" name="user_password" id="user_password" />
</li>
<!-- Yubikey authentication - start -->
<% if this_blog.yubikey_required %>
<li>
<label for="yubikey_otp"><%= _('Yubikey OTP') %>:</label>
<input type="text" name="yubikey_otp" id="yubikey_otp" />
</li>
<% end %>
<!-- Yubikey authentication - end -->
<li class="r"><input type="submit" name="login"
value= "<%= _('Login') %> »"
class="primary" id="submit" />
</li>
</ul>
<p><%= link_to
"« " + _('Back to ') + this_blog.blog_name,
this_blog.base_url %></p>
<% end %>
Listing 6. Typo: Yubikey Authentication Part 1
filename: app/controllers/accounts_controller.rb:

...
def login
  case request.method
    when :post
    self.current_user =
      User.authenticate(params[:user_login], params[:user_password])

    # check whether Yubikey authentication is required and perform
    # authentication
    if logged_in? &&
           (!this_blog.yubikey_required ||
            !self.current_user.yubikey_required ||
            self.current_user.authenticate_yubikey(
                this_blog,
                self.current_user.yubikey_id,
                params[:yubikey_otp]))
      session[:user_id] = self.current_user.id

      flash[:notice]  = _("Login successful")
      redirect_back_or_default :controller => "admin/dashboard",
                               :action => "index"
    else
      flash.now[:notice]  = _("Login unsuccessful")
      @login = params[:user_login]
    end
  end
end
...
Listing 7. Typo: Yubikey Authentication Part 2
filename: app/model/user.rb

...
  # Authenticate a user's Yubikey ID.
  #
  # Example:
  #   @user.authenticate_yubikey(this_blog, 'thcrefhcvijl',
  #   'thcrefhcvijldvlfugbhrghkibjigdbunhjlfnbtvfbc')
  #
  def authenticate_yubikey(this_blog,
                           yubikey_id = '', yubikey_otp = '')
    if (yubikey_id.empty? ||
        yubikey_otp.empty? ||
        !yubikey_otp[0, 12].eql?(yubikey_id))
      return false
    else
      begin
        yk = Yubico.new(this_blog.yubikey_api_id,
                        this_blog.yubikey_api_key)
        return yk.verify(yubikey_otp).eql?('OK')
      rescue
        return false
      end
    end
  end
...
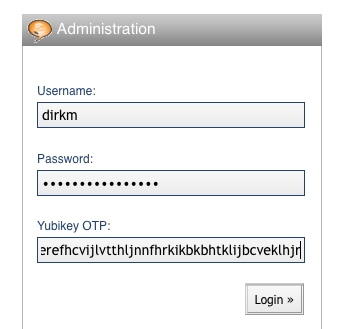
Figure 8. Typo: Modified Login Form UI
That's it! My Typo blog is now Yubikey-enabled. I will be submitting a patch to make these changes permanent by integrating them into the Typo codebase.
You might want to consider a few variations when implementing Yubikey authentication. First, you can choose to omit the user name, because the Yubikey token already includes a public ID that can be used to link to the user's account. This scheme works as long as you are not allowing users to associate a single Yubikey with multiple accounts.
Second, you can minimize modifications required to the UI of existing systems by including the Yubikey token in the password field. Because the OTP is of fixed length, it stands to reason that the remaining characters belong to the password. Also, as the Yubikey appends a newline character to the token, users would have to type their password first, followed by the OTP—rather than the other way around.
Third, you might want to consider making login a two-step process. First, prompt the user for the OTP and validate it. If the validation request is approved, prompt the user for the regular login and password. To see the advantage of this approach, consider the scenario in which user name, password and OTP are submitted simultaneously. If malicious parties are able to intercept the submission and prevent the OTP from being submitted to the validation server, they effectively have all three pieces of information they need to penetrate the system to which you are trying to authenticate. However, if you submit the OTP only during the first stop of the login process, malicious parties can intercept the token without gaining access to the system because they do not have the corresponding user name and password. To make you supply the user name and password, they need to let the OTP pass through and be validated, which also makes the OTP useless for subsequent uses. Thus, the attackers' task will be complicated significantly.
On its Web site, Yubico maintains a growing list of applications and services that take advantage of the Yubikey. There is a plugin for WordPress, SSH integration, phpBB forum access and Windows login (commercial beta). As the above example of integrating the Yubikey into the Typo blog software's authentication routine shows, the process is fairly straightforward. Hopefully, this article inspires you to use this as a starting point to make your favorite piece of open-source software more secure by adding Yubikey authentication.
Resources
Yubico's Yubikey Page: www.yubico.com/products/yubikey
Applications Supporting Yubikey: yubico.com/products/apps
RoundCube Web-Based E-Mail Client: www.roundcube.net
Typo Blogging Software: www.typosphere.org
Dirk Merkel is the CTO of Vivantech Inc. In his spare time, he likes to ruin perfectly good open-source projects by submitting unsolicited patches. He also writes about Web development. He lives in San Diego with his lovely wife and two wonderful daughters. Dirk can be reached at dmerkel@vivantech.com.

