
Thin Clients Booting over a Wireless Bridge
In the 1970s and 1980s, the ubiquitous model of corporate and academic computing was that of many users logging in remotely to a single server to use a sliver of its precious processing time. With the cost of semiconductors holding fast to Moore's Law in the subsequent decades, however, the next advances in computing saw desktop computing become the standard as it became more affordable.
Although the technology behind thin clients is not revolutionary, their popularity has been on the increase recently. For many institutions that rely on older, donated hardware, thin-client networks are the only feasible way to provide users with access to relatively new software. Their use also has flourished in the corporate context. Thin-client networks provide cost-savings, ease network administration and pose fewer security implications when the time comes to dispose of them. Several computer manufacturers have leaped to stake their claim on this expanding market: Dell and HP Compaq, among others, now offer thin-client solutions to business clients.
And, of course, thin clients have a large following of hobbyists and enthusiasts, who have used their size and flexibility to great effect in countless home-brew projects. Software projects, such as the Etherboot Project and the Linux Terminal Server Project, have large and active communities and provide excellent support to those looking to experiment with diskless workstations.
Connecting the thin clients to a server always has been done using Ethernet; however, things are changing. Wireless technologies, such as Wi-Fi (IEEE 802.11), have evolved tremendously and now can start to provide an alternative means of connecting clients to servers. Furthermore, wireless equipment enjoys world-wide acceptance, and compatible products are readily available and very cheap.
In this article, we give a short description of the setup of a thin-client network, as well as some of the tools we found to be useful in its operation and administration. We also describe a test scenario we set up, involving a thin-client network that spanned a wireless bridge.
A thin client is a computer with no local hard drive, which loads its operating system at boot time from a boot server. It is designed to process data independently, but relies solely on its server for administration, applications and non-volatile storage.
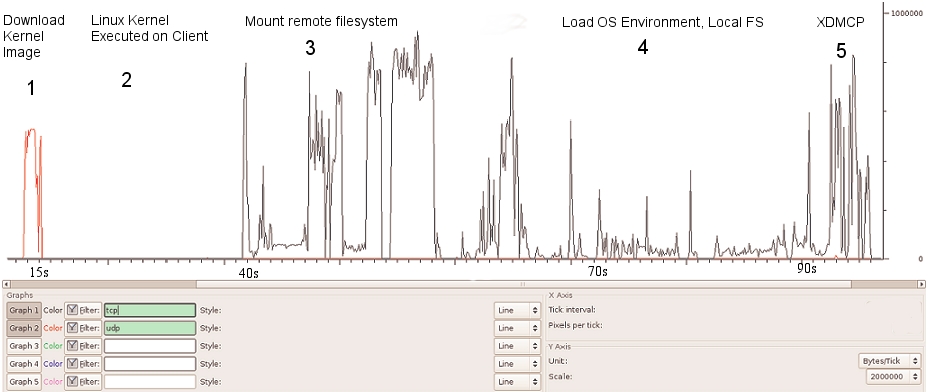
Figure 1. LTSP Traffic Profile and Boot Sequence
Following the client's BIOS sequence, most machines with network-boot capability will initiate a Preboot EXecution Environment (PXE), which will pass system control to the local network adapter. Figure 1 illustrates the traffic profile of the boot process and the various different stages, which are numbered 1 to 5. The network card broadcasts a DHCPDISCOVER packet with special flags set, indicating that the sender is trying to locate a valid boot server. A local PXE server will reply with a list of valid boot servers. The client then chooses a server, requests the name of the Linux kernel file from the server and initiates its transfer using Trivial File Transfer Protocol (TFTP; stage 1). The client then loads and executes the Linux kernel as normal (stage 2). A custom init program is then run, which searches for a network card and uses DHCP to identify itself on the network. Using Sun Microsystems' Network File System (NFS), the thin client then mounts a directory tree located on the PXE server as its own root filesystem (stage 3). Once the client has a non-volatile root filesystem, it continues to load the rest of its operating system environment (stage 4)—for example, it can mount a local filesystem and create a ramdisk to store local copies of temporary files. The fifth stage in the boot process is the initiation of the X Window System. This transfers the keystrokes from the thin client to the server to be processed. The server in return sends the graphical output to be displayed by the user interface system (usually KDE or GNOME) on the thin client.
The X Display Manager Control Protocol (XDMCP) provides a layer of abstraction between the hardware in a system and the output shown to the user. This allows the user to be physically removed from the hardware by, in this case, a Local Area Network. When the X Window System is run on the thin client, it contacts the PXE server. This means the user logs in to the thin client to get a session on the server.
In conventional fat-client environments, if a client opens a large file from a network server, it must be transferred to the client over the network. If the client saves the file, the file must be again transmitted over the network. In the case of wireless networks, where bandwidth is limited, fat client networks are highly inefficient. On the other hand, with a thin-client network, if the user modifies the large file, only mouse movement, keystrokes and screen updates are transmitted to and from the thin client. This is a highly efficient means, and other examples, such as ICA or NX, can consume as little as 5kbps bandwidth. This level of traffic is suitable for transmitting over wireless links.
One of the requirements for a thin client is that it has a PXE-bootable system. Normally, PXE is part of your network card BIOS, but if your card doesn't support it, you can get an ISO image of Etherboot with PXE support from ROM-o-matic (see Resources). Looking at the server with, for example, ten clients, it should have plenty of hard disk space (100GB), plenty of RAM (at least 1GB) and a modern CPU (such as an AMD64 3200).
The following is a five-step how-to guide on setting up an Edubuntu thin-client network over a fixed network.
1. Prepare the server.
In our network, we used the standard standalone configuration. From the command line:
sudo apt-get install ltsp-server-standalone
You may need to edit /etc/ltsp/dhcpd.conf if you change the default IP range for the clients. By default, it's configured for a server at 192.168.0.1 serving PXE clients.
Our network wasn't behind a firewall, but if yours is, you need to open TFTP, NFS and DHCP. To do this, edit /etc/hosts.allow, and limit access for portmap, rpc.mountd, rpc.statd and in.tftpd to the local network:
portmap: 192.168.0.0/24
rpc.mountd: 192.168.0.0/24
rpc.statd:  192.168.0.0/24
in.tftpd:  192.168.0.0/24
Restart all the services by executing the following commands:
sudo invoke-rc.d nfs-kernel-server restart
sudo invoke-rc.d nfs-common restart
sudo invoke-rc.d portmap restart
2. Build the client's runtime environment.
While connected to the Internet, issue the command:
sudo ltsp-build-client
If you're not connected to the Internet and have Edubuntu on CD, use:
sudo ltsp-build-client --mirror file:///cdrom
Remember to copy sources.list from the server into the chroot.
3. Configure your SSH keys.
To configure your SSH server and keys, do the following:
sudo apt-get install openssh-server
sudo ltsp-update-sshkeys
4. Start DHCP.
You should now be ready to start your DHCP server:
sudo invoke-rc.d dhcp3-server start
If all is going well, you should be ready to start your thin client.
5. Boot the thin client.
Make sure the client is connected to the same network as your server.
Power on the client, and if all goes well, you should see a nice XDMCP graphical login dialog.
Once the thin-client network was up and running correctly, we added a wireless bridge into our network. In our network, a number of thin clients are located on a single hub, which is separated from the boot server by an IEEE 802.11 wireless bridge. It's not an unrealistic scenario; a situation such as this may arise in a corporate setting or university. For example, if a group of thin clients is located in a different or temporary building that does not have access to the main network, a simple and elegant solution would be to have a wireless link between the clients and the server. Here is a mini-guide in getting the bridge running so that the clients can boot over the bridge:
Connect the server to the LAN port of the access point. Using this LAN connection, access the Web configuration interface of the access point, and configure it to broadcast an SSID on a unique channel. Ensure that it is in Infrastructure mode (not ad hoc mode). Save these settings and disconnect the server from the access point, leaving it powered on.
Now, connect the server to the wireless node. Using its Web interface, connect to the wireless network advertised by the access point. Again, make sure the node connects to the access point in Infrastructure mode.
Finally, connect the thin client to the access point. If there are several thin clients connected to a single hub, connect the access point to this hub.
We found ad hoc mode unsuitable for two reasons. First, most wireless devices limit ad hoc connection speeds to 11Mbps, which would put the network under severe strain to boot even one client. Second, while in ad hoc mode, the wireless nodes we were using would assume the Media Access Control (MAC) address of the computer that last accessed its Web interface (using Ethernet) as its own Wireless LAN MAC. This made the nodes suitable for connecting a single computer to a wireless network, but not for bridging traffic destined to more than one machine. This detail was found only after much sleuthing and led to a range of sporadic and often unreproducible errors in our system.
The wireless devices will form an Open Systems Interconnection (OSI) layer 2 bridge between the server and the thin clients. In other words, all packets received by the wireless devices on their Ethernet interfaces will be forwarded over the wireless network and retransmitted on the Ethernet adapter of the other wireless device. The bridge is transparent to both the clients and the server; neither has any knowledge that the bridge is in place.
For administration of the thin clients and network, we used the Webmin program. Webmin comprises a Web front end and a number of CGI scripts, which directly update system configuration files. As it is Web-based, administration can be performed from any part of the network by simply using a Web browser to log in to the server. The graphical interface greatly simplifies tasks, such as adding and removing thin clients from the network or changing the location of the image file to be transferred at boot time. The alternative is to edit several configuration files by hand and restart all dæmon programs manually.
The boot process of a thin client is network-intensive, but once the operating system has been transferred, there is little traffic between the client and the server. As the time required to boot a thin client is a good indicator of the overall usability of the network, this is the metric we used in all our tests.
Our testbed consisted of a 3GHz Pentium 4 with 1GB of RAM as the PXE server. We chose Edubuntu 5.10 for our server, as this (and all newer versions of Edubuntu) come with LTSP included. We used six identical thin clients: 500MHz Pentium III machines with 512MB of RAM—plenty of processing power for our purposes.
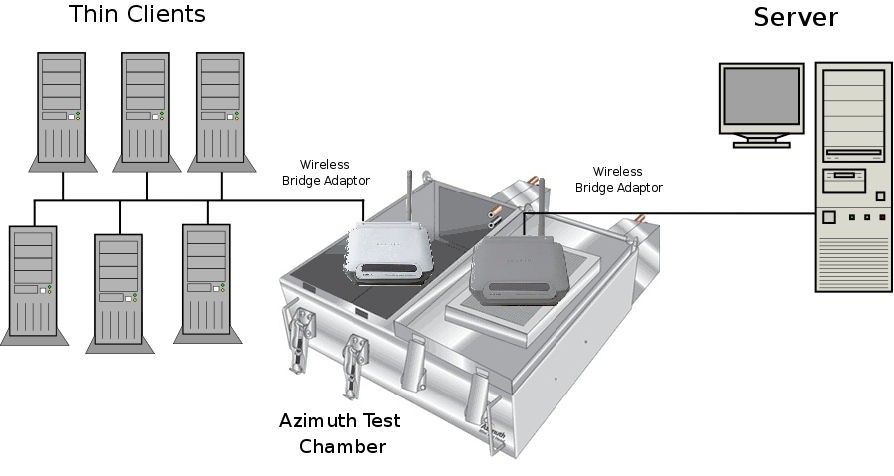
Figure 2. Six thin clients are connected to a hub, and in turn, this is connected to wireless bridge device. On the other side of the bridge is the server. Both wireless devices are placed in the Azimuth chamber.
When performing our tests, it was important that the results obtained were free from any external influence. A large part of this was making sure that the wireless bridge was not affected by any other wireless networks, cordless phones operating at 2.4GHz, microwaves or any other sources of Radio Frequency (RF) interference. To this end, we used the Azimuth 301w Test Chamber to house the wireless devices (see Resources). This ensures that any variations in boot times are caused by random variables within the system itself.
The Azimuth is a test platform for system-level testing of 802.11 wireless networks. It holds two wireless devices (in our case, the devices making up our bridge) in separate chambers and provides an artificial medium between them, creating complete isolation from the external RF environment. The Azimuth can attenuate the medium between the wireless devices and can convert the attenuation in decibels to an approximate distance between them. This gives us the repeatability, which is a rare thing in wireless LAN evaluation. A graphic representation of our testbed is shown in Figure 2.
We tested the thin-client network extensively in three different scenarios: first, when multiple clients are booting simultaneously over the network; second, booting a single thin client over the network at varying distances, which are simulated by altering the attenuation introduced by the chamber; and third, booting a single client when there is heavy background network traffic between the server and the other clients on the network.
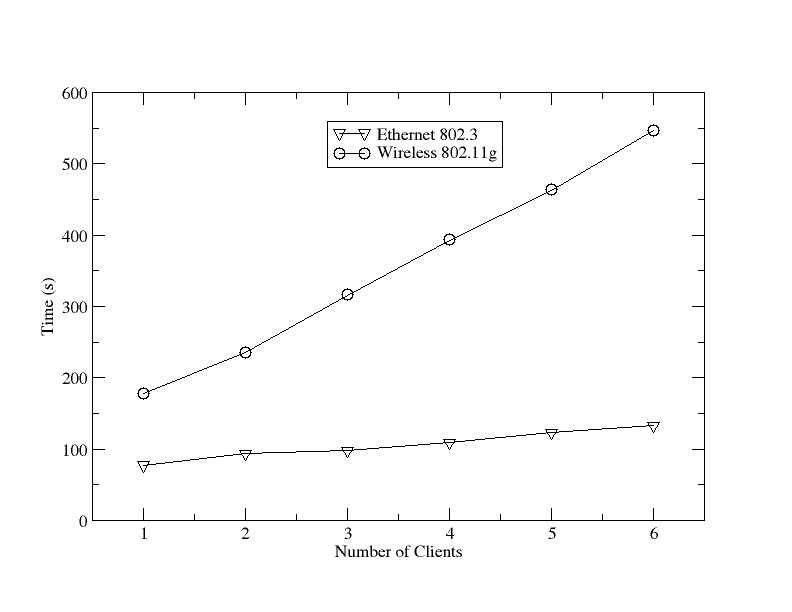
Figure 3. A Boot Time Comparison of Fixed and Wireless Networks with an Increasing Number of Thin Clients
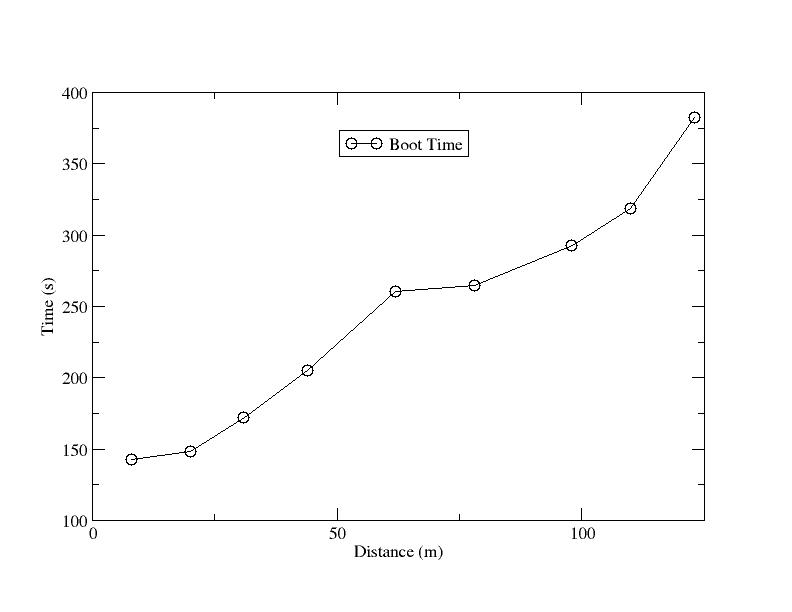
Figure 4. The Effect of the Bridge Length on Thin-Client Boot Time
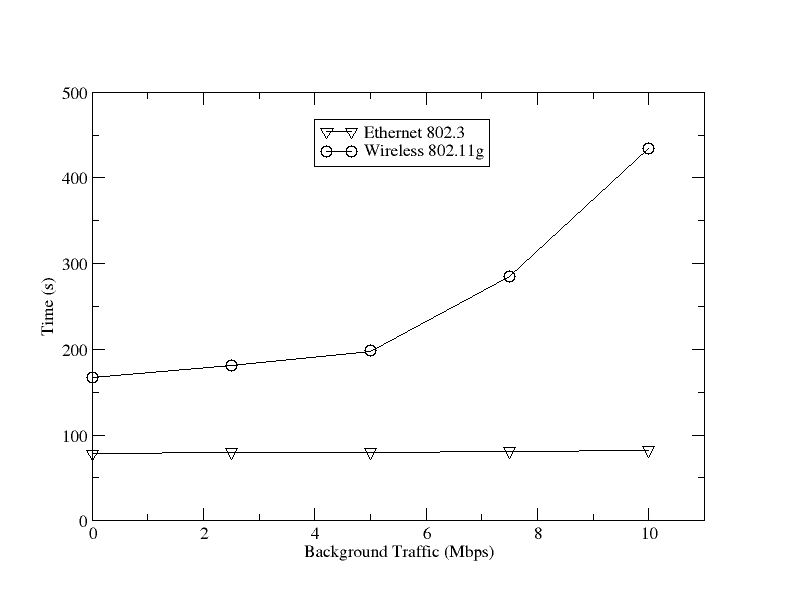
Figure 5. Boot Time in the Presence of Background Traffic
As shown in Figure 3, a wired network is much more suitable for a thin-client network. The main limiting factor in using an 802.11g network is its lack of available bandwidth. Offering a maximum data rate of 54Mbps (and actual transfer speeds at less than half that), even an aging 100Mbps Ethernet easily outstrips 802.11g. When using an 802.11g bridge in a network such as this one, it is best to bear in mind its limitations. If your network contains multiple clients, try to stagger their boot procedures if possible.
Second, as shown in Figure 4, keep the bridge length to a minimum. With 802.11g technology, after a length of 25 meters, the boot time for a single client increases sharply, soon hitting the three-minute mark. Finally, our test shows, as illustrated in Figure 5, heavy background traffic (generated either by other clients booting or by external sources) also has a major influence on the clients' boot processes in a wireless environment. As the background traffic reaches 25% of our maximum throughput, the boot times begin to soar. Having pointed out the limitations with 802.11g, 802.11n is on the horizon, and it can offer data rates of 540Mbps, which means these limitations could soon cease to be an issue.
In the meantime, we can recommend a couple ways to speed up the boot process. First, strip out the unneeded services from the thin clients. Second, fix the delay of NFS mounting in klibc, and also try to start LDM as early as possible in the boot process, which means running it as the first service in rc2.d. If you do not need system logs, you can remove syslogd completely from the thin-client startup. Finally, it's worth remembering that after a client has fully booted, it requires very little bandwidth, and current wireless technology is more than capable of supporting a network of thin clients.
This work was supported by the National Communications Network Research Centre, a Science Foundation Ireland Project, under Grant 03/IN3/1396.
Resources
Linux Terminal Server Project (LTSP): ltsp.sourceforge.net
Ubuntu ThinClient How-To: https://help.ubuntu.com/community/ThinClientHowto
Azimuth WLAN Chamber: www.azimuth.net
ROM-o-matic: rom-o-matic.net
Etherboot: www.etherboot.org
Wireshark: www.wireshark.org
Webmin: www.webmin.com
Edubuntu: www.edubuntu.org
Ronan Skehill works for the Wireless Access Research Centre at the University of Limerick, Ireland, as a Senior Researcher. The Centre focuses on everything wireless-related and has been growing steadily since its inception in 1999.
Alan Dunne conducted his final-year project with the Centre under the supervision of John Nelson. He graduated in 2007 with a degree in Computer Engineering and now works with Ericsson Ireland as a Network Integration Engineer.
John Nelson is a senior lecturer in the Department of Electronic and Computer Engineering at the University of Limerick. His interests include mobile and wireless communications, software engineering and ambient assisted living.

