
Reducing Boot Time in Embedded Linux Systems
It is no secret that Linux has won the race in the embedded device marketplace. Tremendous advantages in Linux have broken almost every barrier to entry for using Linux on embedded systems across a wide variety of processor architectures. Today's developers are not asking, “Should I use Linux for my embedded system?”, but instead are asking questions like, “How can I get more performance out of my embedded Linux design?” Reducing boot time has become one of the more interesting discussions taking place in the embedded Linux community.
As it turns out, it is relatively easy to save substantial time on system boot. Without a significant expenditure of engineering resources, savings of more than 80% are possible with certain system configurations. Of course, there is a point of diminishing returns. The graph of engineering effort against boot time would rapidly approach infinite effort as time reduced into the milliseconds and lower.
Before you can measure boot time, you must define what it means. (I introduce measurement techniques later in this article.) Most often, your customers or end users provide, or at least influence, the definition. The type of product you design certainly impacts your definition. Most systems that appear to boot very quickly actually are just providing early feedback to users in the form of graphical banners, audible feedback, animation or some combination thereof. You as the system designer must specify what it means for your embedded device to be booted and exactly what the user experience will be during power-on.
Do you define boot time as the time from power-on to playing your favorite music? Or, maybe you design big iron, and boot time eats into your annual “five-nines” reliability budget. A cellular radio node controller that takes two minutes to boot eats up almost half your annual downtime budget! Yet, many systems we perceive as fast boot systems are not actually booting from power-on. Consider a popular cell-phone design, such as the BlackBerry Curve. The only time these systems perform a full boot is when the battery is removed and replaced. Power “on” is actually a resume from a low-power system state that largely preserves its current operational status.
Although it may seem trivial to mention, sound hardware design is a fundamental component of a fast boot system. Many aspects of hardware design can have a marked influence on 1) how quickly your first bits of code get to execute and 2) how quickly that code can be read out of a nonvolatile storage device during initial boot. Pay particular attention to power-on reset circuitry and initial hardware strapping, which provides default timings for external buses and chip selects on certain processors. It is not uncommon to find “conservative” values being employed here that often can be improved upon.
Your overall hardware architecture will set the stage for what performance you will be able to achieve. Choice of processor, clock speed, choice of nonvolatile storage used for boot images and many other factors will influence how fast your design can fetch and execute its startup image (usually a bootloader) and then go on to load and execute an operating system. Your hardware choices at design time must be carefully considered if single-digit boot times are part of your product requirements.
To understand where time is being spent, it helps to visualize the boot sequence of a typical embedded Linux system. Figure 1 shows the basic sequence.
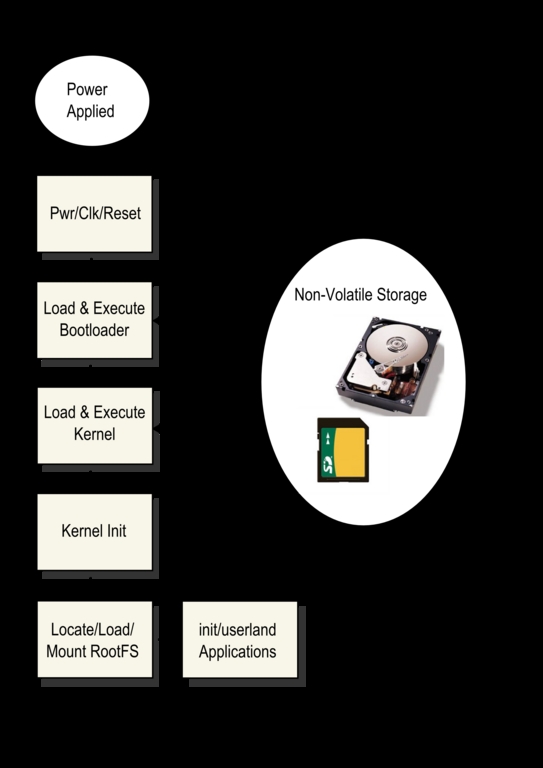
Figure 1. Typical Boot Sequence of Events
Upon power-on, the hardware needs time for voltages (and often clocks) to stabilize and for reset to be released. The first code executed upon release of reset depends on the hardware architecture and processor, but often it is your bootloader running from nonvolatile memory, such as NOR Flash. A small section of code performs some low-level initialization that includes the memory controller and typically copies itself into DRAM for further execution. This copy operation can consume a significant portion of boot time. It is easy to see that keeping the bootloader small and simple (the KISS principle) will help keep boot time to a minimum. The bootloader's primary responsibility after hardware initialization is to locate, load and pass control to your Linux kernel. Once the kernel has completed its own initialization, it must locate and mount a root filesystem. Your root filesystem will contain a set of initialization scripts as well as your own applications. There are numerous opportunities for optimization in all of these steps, as I explain below.
Virtually every embedded system has some type of bootloader, and there are many bootloaders from which to choose. Some of the more popular include U-Boot for PowerPC, MIPS and ARM processors, and RedBoot, which is frequently found on ARM processors. Most popular bootloaders today contain far more functionality than actually is required for the task of initializing a system. Indeed, they have become valuable tools used by developers during initial board bring-up and system development.
Modern bootloaders are packed with features, such as Flash erase and program utilities, memory management utilities, network capabilities for loading images and for self-configuring (DHCP and BOOTP for example), drivers for PCI, IDE, USB and support for various partition types and filesystems. Some even have scripting language support useful for development, manufacturing (production test, image load and so on) and system upgrade.
These features make bootloaders an indispensable tool during product development. However, the size of bootloader images has significant impact on boot time. Bootloaders are stored in nonvolatile storage media, most commonly NOR Flash. However, embedded systems rarely execute code directly from Flash, mostly because it is far too slow. Read times of DRAM are orders of magnitude faster than read times from Flash.
The first job of the bootloader is to load itself into DRAM and continue execution from there. Consider the operating environment of early boot code. There is no stack, no C context (meaning all this code is written in the processor's native assembly language), and quite often, the processor's instruction and data caches are not yet enabled. This means the size of the bootloader image, which needs to be copied into RAM, will have a major impact on startup time.
The quickest path to performance improvement in your bootloader is to keep it small. Remove features that are unnecessary in a production environment. Some bootloaders, such as U-Boot, make it easy to do this. Its features are driven by a board-specific configuration file that contains directives to enable or disable features. Your requirements will ultimately rule, but prudent trimming of all but the most essential features will yield significant savings in boot time.
When you build a Linux kernel image, it is virtually always compressed as one of the final build steps. It is the responsibility of your bootloader (or a small bootstrap decompression loader that is appended to your kernel image) to decompress the kernel image and place it into system memory. One of the single largest easy gains you can achieve is to remove the decompression stage. Some architecture/bootloader combinations don't bother to enable caches, making decompression take much longer. It is not uncommon to find systems that take several seconds to perform the decompression and relocation stage. Using an uncompressed kernel can significantly reduce your system boot time.
Linux distributions use initrd/initramfs (hereinafter referred to as simply initramfs) primarily as a tool to enable a generic kernel to be used across a huge variety of system configurations. It is the job of the initramfs to provide the necessary device drivers to enable the devices that are required to complete system boot. Because embedded systems often are restricted to limited well-known configurations, they usually can eliminate initramfs with a corresponding reduction in boot time. Furthermore, removing support for initramfs in the kernel results in a smaller kernel (and, thus, faster boot.)
If you compile a kernel with a “default” configuration, it often contains a vast number of features your system may not need. You may be surprised to discover how many features are enabled by default that your embedded system does not need. Spend some quality time with your favorite kernel configuration editor (menuconfig, gconfig and so on), and go through each and every kernel configuration parameter. Evaluate whether your system requirements can do without it. Yes, it may take you the better part of a day (or even more if you add in some research time), but your savings in boot time reduction can be substantial. Some examples of features found in many default kernel configs include IPv6, RAID, support for many filesystems you may not need, extended partition support and many more. There also may be numerous device drivers compiled into the kernel for devices that are not present in your system. They are harmless, but each driver runs initialization code, including registration functions, and some spend lengthy milliseconds (or more) in device probe routines for devices that are not present—precious boot time can be spent probing for non-existent devices.
You may have seen the interesting “BogoMIPS” message plastered on your screen or terminal during boot. Linux calibrates its internal software timing loops to your processor system clock on each boot, arriving at a constant value used by the loops_per_jiffy variable (lpj). Although the technique varies across different architectures, this can be a time-consuming routine. It is easy to bypass this dynamic calibration routine by “hard-coding” the time constant calculated by this routine. This is quite easily passed to the kernel through the kernel command line. Simply add lpj=xxxxx to your kernel command line, where xxxxx is the lpj value printed to your boot log during boot. This is what the boot message looks like on the Intel Atom-based Netbook on which this article is being drafted:
Calibrating delay using timer specific routine..
    3194.85 BogoMIPS (lpj=6389712)
From this information, simply add the string lpj=6389712to your kernel command line. This will bypass the often lengthy calibration routine and instead use the fixed value for loops_per_jiffy.
One of the keys to achieving single-digit boot times is your choice of root filesystems. Some filesystems designed for Flash use, for example the ubiquitous JFFS2, can get into a state that requires a significant and noticeable time delay while the kernel reads the sequential journal entries and reconstructs the files and directories on the filesystem. Consider using a small, compact and fast root filesystem for your initial system boot, and then mount a more general-purpose filesystem later in the initialization sequence.
CRAMFS is a read-only, compressed filesystem that is perfectly suited for this purpose. Configure a preliminary root filesystem using CRAMFS, which contains all the executables and libraries you need to get your system into a preliminary operational state. Later, while other less critical tasks are being executed, you can mount a writable JFFS2 partition when time is not so critical. Also consider the liberal use of tmpfs for volatile data such as /tmp, /var and others. Tmpfs is fast and efficient, and dynamically resizes itself to meet storage requirements. Remember, the contents of all tmpfs filesystems are lost on power-down, so if there are any files (log files, configuration data and so on) that must be saved, it will be up to your application to save this data periodically to nonvolatile storage.
Udev has become an efficient and powerful system configuration tool. Its primary role is to create device nodes for devices that the kernel discovers. Virtually every modern Linux distribution uses udev coupled with a set of rules for device naming. Udev also has the capability to run external programs in response to device detection. The most common example of this is to run modprobe to install a device driver upon device detection. For example, if you plug an SD card into an appropriate socket, a properly configured udev-based Linux system will perform all the actions required to enable the device. This includes loading device drivers and creating the device nodes associated with the device and driver.
This powerful and flexible scheme has one drawback. Although udev itself is fast and efficient, some of the external programs it runs may require significant time to complete.
When a Linux system is booted and reaches userland, udev basically “plays back” all the device notification events generated by the kernel and performs the required actions (primarily device node creation and module loading). This can take a significant amount of time. One solution to this problem is to configure your Linux system with statically generated device nodes for critical system devices (those that you need to be operational immediately) and defer the running of udev until your fast-path boot chores are complete. For each device you need to have immediately available at boot time, create a static device node in /dev as part of your root filesystem. Later, when udev takes over, your udev startup script can merge these static devices with those devices that udev creates dynamically.
Several tools are available to help you identify the long paths in your system boot. They vary in complexity and ease of use, but most can be mastered quickly. The simplest tool (and perhaps a good starting point) is to configure your kernel to add timestamps to the kernel messages that are displayed on boot. Select CONFIG_PRINTK_TIME in the Kernel Hacking section of your kernel configuration to enable this feature. This lets you see at a glance where significant time is being spent during the actual kernel boot sequence.
Another easy tool to use is to enable printout of each kernel initcall. An initcall is a special type of kernel function call specifically related to subsystem initialization. This is accomplished by adding the single parameter initcall_debug to your kernel command line. When enabled, the kernel will display a line that lists the kernel virtual address of each initcall together with return data and call duration. While you must “decode” the kernel virtual address into its symbolic function name, this data is readily available in the System.map file in your Linux kernel source tree. If you have CONFIG_KALLSYMS enabled (found under General setup→Configure standard kernel features for small systems), the initcall line will be decoded for you. A sample of the output from the system boot log with initcall_debug enabled is displayed in Listing 1.
Listing 1. initcalls Taking More than Nine Milliseconds to Complete
root@8548cds:~# dmesg | grep initcall | egrep '[0-9][0-9] msecs'
initcall pty_init+0x0/0x43c returned 0 after 57 msecs
initcall serial8250_init+0x0/0x138 returned 0 after 20 msecs
initcall gfar_init+0x0/0x58 returned 0 after 60 msecs
initcall cp_init+0x0/0x34 returned 0 after 16 msecs
initcall ide_scan_pcibus+0x0/0x14c returned 0 after 4246 msecs
initcall of_flash_init+0x0/0x34 returned 0 after 43 msecs
initcall uhci_hcd_init+0x0/0x104 returned 0 after 445 msecs
initcall ip_auto_config+0x0/0xefc returned 0 after 4597 msecs
Using initcall_debug in this scenario reveals that almost nine seconds could be saved by eliminating or deferring ide and IP auto configuration!
One of the more powerful tools for boot time measurement is Kernel Function Trace. KFT instructs the compiler to generate instrumentation for virtually all kernel function calls. When enabled and triggered, data is logged for each function call entry and exit, which allows you to identify functions that consume large amounts of time. To use this tool, you will need to apply the KFT patch to your kernel. Detailed instructions and links to KFT kernel patches can be found at elinux.org/Kernel_Function_Trace.
For each function call not specifically filtered out by your trace configuration, a line is generated that contains a timestamp at function entry, the function address, the address of the caller, process ID and a delta. The raw data is accessed by reading /proc/kft_data after the run has completed.
Several tools are available to post-process the raw data. The addr2sym converts the kernel virtual address in the raw data to symbolic addresses. It is simple to use:
# addr2sym <kft_data.raw -m System.map >kft_data.sym
Above, kft_data.raw is the raw data copied from /proc. System.map is produced by the kernel build and can be found in the top-level kernel directory, and of course, kft_data.sym is the output file.
The KFT dump (kd) utility can be found in the Linux kernel scripts directory after the KFT patch has been applied. Running kd on the raw data produces a statistical summary of the functions called. You can use kd to display the most time-consuming functions or functions with time greater than that specified in your configuration and several other useful filters. Listing 2 contains a partial listing (top ten) of the most time-consuming functions on a typical high-performance Power Architecture processor. The negative number associated with the schedule call is due to the fact that schedule changes context to another process—that is, it never exits in the traditional manner that a function call usually does.
Listing 2. Using kd
$ ./linux/scripts/kd -n 10 kft_data.sym
Function                      Count Time     Average   Local
----------------------------- ----- -------- --------  --------
__schedule                     5208 22050824     4234  22046510
schedule                       1921 10828704     5637 -10478620
setup_arch                        1  6021110  6021110        29
tsc_init                          1  6021081  6021081        79
set_cyc2ns_scale                  1  6021002  6021002   6021002
kobject_uevent                  389  1659254     4265    813013
mem_init                          2  1223745   611872    111906
wait_for_completion             395  1192559     3019     14685
free_all_bootmem                  1  1109561  1109561        53
free_all_bootmem_core             1  1109508  1109508     74651
Improving Linux boot time is moving from the obscure corners of R&D labs to mainstream product development. Driven by competitive pressures in a wide variety of markets, system developers are devoting an increasing amount of effort to making sure their systems are ready to use when users want them. Always a hot topic, we are sure to see many more developments in the near future aimed at further reducing Linux system boot time.
Resources
Other tools are available to help reduce your system's boot time. Bootchart is a powerful tool useful for visualizing the post-kernel initialization processes. Details can be found at www.bootchart.org.
Readahead is designed to pre-fetch required boot files from disk so that when they are needed, they can be read from the buffer cache for faster boot. Readahead can be customized to read specific files in a given order. You can find more about readahead at https://fedorahosted.org/readahead.
For the ambitious, the Moblin distribution contains a host of optimizations, which taken together, aim to produce a five-second boot on a typical Netbook: moblin.org/projects/fast-boot.
Elinux.org (elinux.org/Boot_Time) maintains a very useful collection of data related to fast boot optimizations, including more analysis and profiling tools, links to other articles and much more.
Christopher Hallinan is the author of Embedded Linux Primer and a Field Applications Engineer for MontaVista Software, Inc. He has been engaged in Linux-related work and play since 2000. He currently resides in sunny southwest Florida.


