
Orca--Take the Killer Whale for a Ride
Orca is a free, open-source, extensible screen reader that provides access to the graphical desktop via user-customizable combinations of speech, Braille and/or magnification. In this article, I briefly discuss how to set up and use Orca on the GNOME desktop. This article's intended audience includes not only users with visual impairments, but also developers interested in improving the accessibility of their applications.
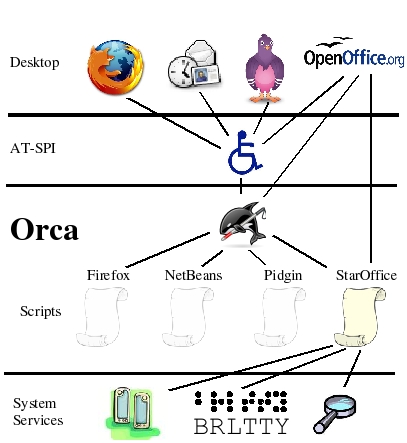
Figure 1. Orca Swimming in the AT-SPI Sea
Orca works with applications and toolkits that support the assistive technology service provider interface (AT-SPI), which is the primary assistive technology infrastructure for Linux and the Solaris operating environment. Applications and toolkits supporting the AT-SPI include the GNOME GTK+ toolkit, the Java platform's Swing toolkit, OpenOffice.org and Mozilla (KDE/Qt support for AT-SPI remains under investigation). As a result, Orca can provide access to applications, such as Firefox 3, Thunderbird 3, OpenOffice.org, most GNOME applications and a wide variety of multimedia applications.
Via the AT-SPI, Orca connects to applications and communicates with their graphical components, such as push buttons, text areas, menus and so forth. As you interact with an application, the AT-SPI notifies Orca. In response, Orca presents appropriate information to the user via speech synthesis (the machine talks to you), refreshable Braille (an external hardware device) and/or magnification (an enlarged view of the graphical display). Orca also provides mechanisms for you to explore the entire contents of windows presented by the application.
Orca is known as a scriptable screen reader, meaning it can provide customized behavior based on the application with which it is working. With Orca, custom scripts written in the Python programming language can be used to provide more compelling access to the unique interaction models of applications. For example, Orca provides a script for the Pidgin instant-messaging application to give you additional features, such as quickly reviewing the last few messages that have arrived.
Note to application developers: Orca provides a default script that gives access to the majority of applications. As a result, a custom script is not required for each application. The Orca team encourages you to test your applications using Orca, however, and to create a custom Orca script if it is needed. The Orca team is happy to help you!
In order to use Orca, you need a desktop environment that supports the AT-SPI, such as GNOME. Fortunately, GNOME is widely available on many operating system distributions, including Ubuntu, Fedora, Debian, OpenSUSE, Solaris Express and so on. Although Orca works on GNOME 2.18 and better, GNOME 2.20 or better are the versions in which Orca works best. Because Orca also is under constant development, the brave are encouraged to use the latest sources. See the “Downloading and Installing Orca” page of the Orca Wiki for more information on working with Orca sources.
To use speech, Orca currently uses gnome-speech to communicate with speech synthesis engines on the machine. On Linux systems, there are a variety of free, open-source engines available, including eSpeak and Festival. Most operating system distributions typically provide gnome-speech and at least one speech synthesis engine. To determine whether Orca can use speech on your machine, run the test-speech application provided by gnome-speech. If you can get your machine to speak using test-speech, it should work with Orca. See the “Speech” page on the Orca Wiki for more information on setting up speech on your system.
A typical Braille user will have purchased an external hardware device called a refreshable Braille display. These devices provide a number of Braille cells—typically 40 or so—where each cell comprises eight dots that a software application can pop up or down to create a Braille character. Orca uses a separate software application, called BrlTTY, to communicate with refreshable Braille displays. Like gnome-speech, many operating system distributions install BrlTTY by default. The configuration of BrlTTY is outside the scope of this article, but more information can be found at the BrlTTY site and on the “Braille” page of the Orca Wiki.
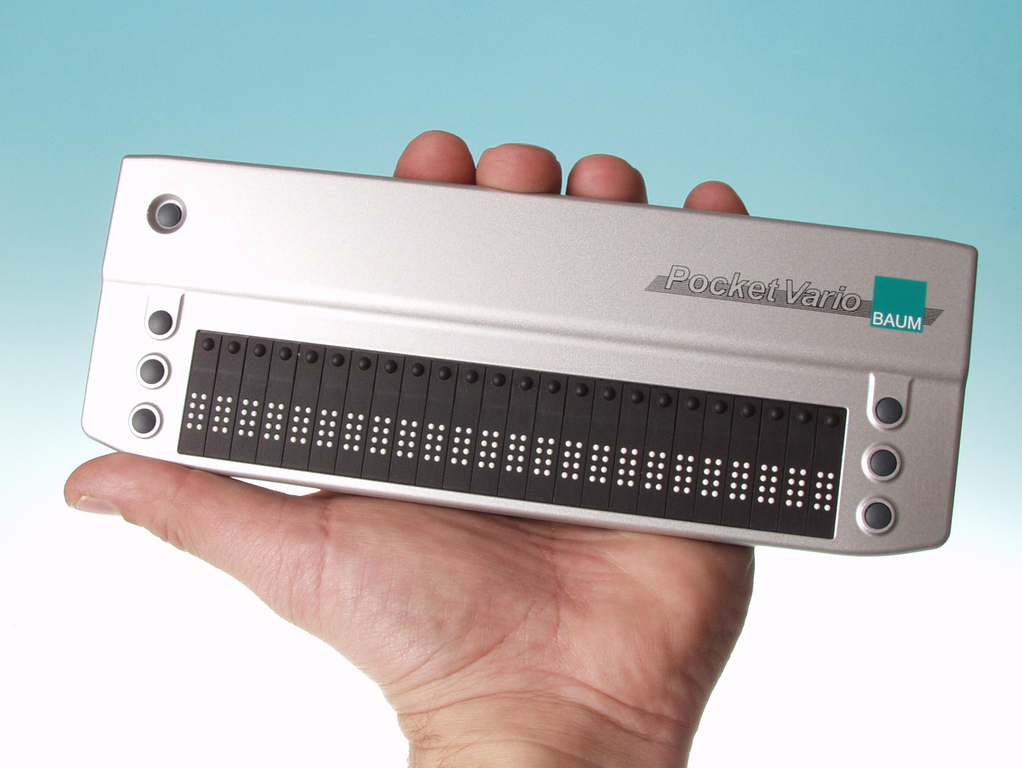
Figure 2. Refreshable Braille Display
For application developers without a refreshable Braille display, Orca provides a graphical Braille monitor to present what would be sent to the Braille display. The Braille monitor is independent of BrlTTY and also is useful for demonstrating Orca to other people.

Figure 3. Orca's Braille Monitor
Orca currently uses gnome-mag for magnification. As with gnome-speech and BrlTTY, the operating system distribution includes gnome-mag by default. You can tell whether your machine has gnome-mag installed if the gnome-mag magnifier application is on your machine.
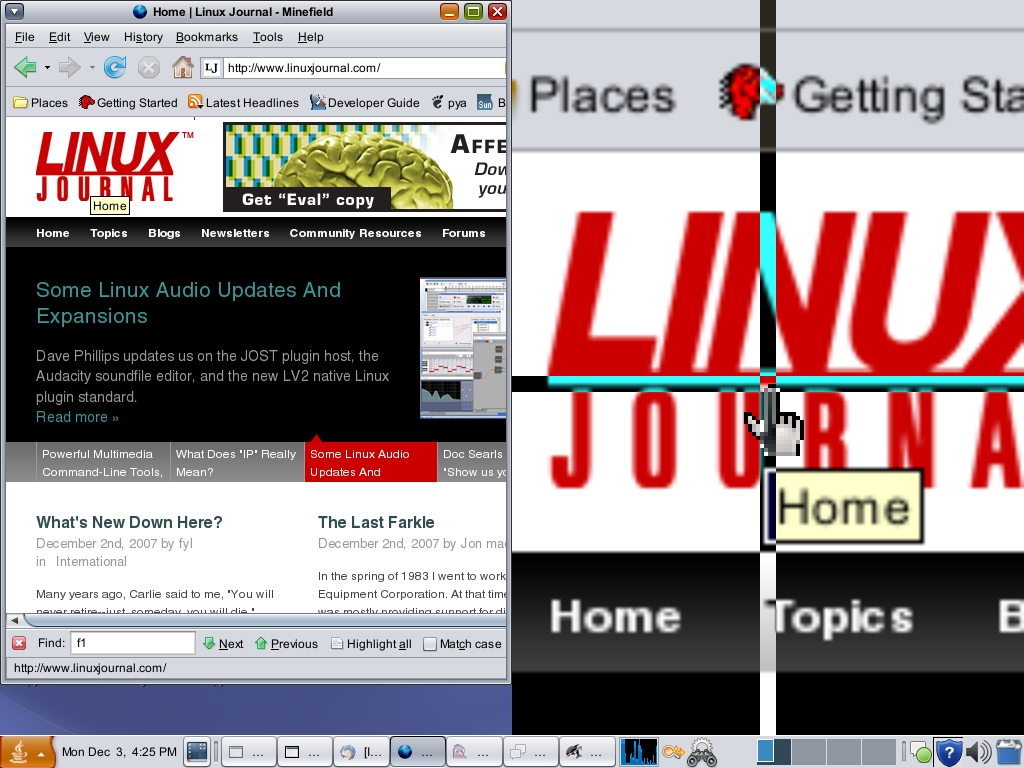
Figure 4. Magnifier in Action
When you log in to your GNOME desktop for the first time, the AT-SPI infrastructure typically is not enabled. As a result, Orca isn't able to provide access to your desktop. You can enable accessibility in a number of ways, one being the Assistive Technology Preferences dialog available from the GNOME Preferences menu. Assuming you can't see the display, however, this dialog is useless to you if accessibility has not yet been enabled.
To get started quickly with Orca, you can use the talking text-based setup utility: orca --text-setup. BrlTTY users typically will run this from a virtual console. Below is an example of using orca --text-setup to set up Orca for use with speech and the Braille monitor:
bash-3.2$ orca --text-setup
Welcome to Orca setup.
Select desired voice:
1. kevin (en_US)
2. kevin16 (en_US)
Enter choice: 2
Enable echo by word?  Enter y or n: n
Enable key echo?  Enter y or n: n
Select desired keyboard layout.
1. Desktop
2. Laptop
Enter choice: 1
Enable Braille?  Enter y or n: n
Enable Braille Monitor?  Enter y or n: y
Setup complete.  Press Return to continue.
If you have never done anything with accessibility on your desktop before, you typically will need to log out of your desktop session after running orca --text-setup. The desktop needs to be restarted with accessibility enabled. Once you have run orca --text-setup, accessibility is enabled for future logins to your desktop.
After you have logged out and logged back in, you can perform finer-grained customization of Orca's features using the Orca configuration GUI. The Orca configuration GUI is available any time Orca is running by pressing Insert-spacebar (desktop keyboard layout) or Caps Lock-spacebar (laptop keyboard layout) at the same time. You also can start Orca with the Preferences dialog by running orca --setup. More information on the Orca's configurable options can be found on the “Configuring and Using Orca” page of the Orca Wiki.
If you want Orca to start automatically when you log in, use the Assistive Technology Preferences dialog available from the GNOME Preferences menu. Press the Preferred Applications button in this dialog and navigate to the Accessibility tab. On the Accessibility tab, you can select Orca and also check the Run at start check box. Many users, however, merely run the orca command by using the Run Application dialog available via the Alt-F2 key binding on many distributions.
The Orca team refers to Orca's default operating mode as focus tracking mode. In focus tracking mode, you interact with any application (as any user would) using the built-in keyboard navigation mechanisms of GNOME. As you tab around the interface or interact with objects, such as pressing the spacebar to toggle check boxes or typing text into text areas, Orca presents the information to you via the combinations of speech, Braille and/or magnification that you have specified. That is, you merely interact with applications without needing to know any extra Orca keyboard commands.
Note to application developers: a quick sanity check for testing your application is to run Orca with speech and the Braille monitor enabled. Then, interact with your application using the keyboard alone. If speech and the Braille monitor seem to be updating with appropriate output as you interact with your application, you are doing a great job so far. If speech and/or the braille monitor are doing unexpected things, such as talking too much or not presenting anything at all, you have some work to do. Fear not, the Orca team is willing to help you!
When you use an application for the first time, or if you just want to get a better idea of what is on the screen, you often may want to explore a window without changing anything inside it. This includes not even tabbing around the interface. As such, focus tracking mode may not always be useful, and you will need to use other features of Orca, such as flat review and where am I, that are controlled by key bindings specific to Orca. When you press these key bindings, nothing happens in the application. Instead, Orca just presents the information you have requested.
For example, you might want to read the contents of a window line by line, word by word, character by character and so on. The flat review feature takes over the desktop keypad keys to perform these functions. For example, keypad 7 reads the previous line and keypad 9 reads the next line. The remaining numerical keys on the keypad perform similar functions for reviewing by word and character.
You also may want to know more detail about the object that currently has focus, the title of the current window, the contents of the status bar (if it exists) and so on. The where am I feature provides key bindings to obtain this information. For example, use the keypad Enter key to obtain information about the current object. When you press Insert at the same time as the Enter key, Orca presents information about the window title and status bar, if one exists.
Note on Orca key bindings: although the keypad keys are an exception, most of Orca's key bindings require you to press the Orca key at the same time as another key. This is much like how the Ctrl, Alt and Shift modifiers are used. The Orca key is a made-up modifier that can be bound to any key on the keyboard. By default, the Insert key is used as the Orca key for the desktop layout, and the Caps Lock key is used as the Orca key for the laptop layout. When Orca is used, the Orca key is owned by Orca and no longer behaves as a normal key.
The flat review and where am I features are only a few of the operations you can access via Orca's key bindings. For a complete list of Orca's key bindings, browse the Key Bindings tab of the Orca configuration GUI. In this page tab, you also can redefine the Orca key bindings to suit your specific needs.
Let's take Orca for a test ride and try a dialog containing components you might encounter in a traditional window: gedit's Open Files dialog. First, run the gedit application, which typically is found as the Text Editor menu item under the Accessories menu. Then, press Ctrl-O to open the Open Files dialog.
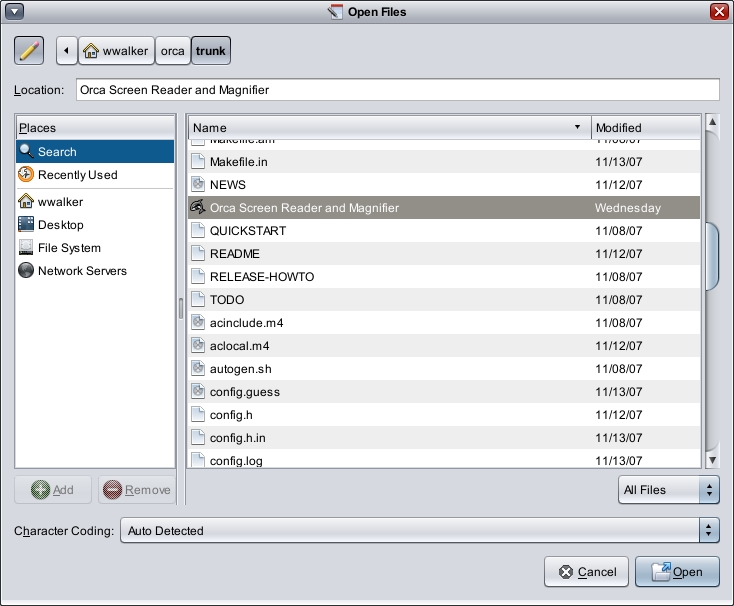
Figure 5. gedit's Open Files Dialog
When the Open Files dialog first appears, focus is on the text area labeled Location:. Orca automatically should present this information to you. With speech, you will hear “Location: text”, which is Orca telling you the name, contents and role of the text area. As you type in this area, speech and Braille automatically should update.
Note to application developers: one of the main trouble areas for accessibility is forgetting to bind labels to the things they are labeling. The reason Orca knew to present the Location: label for the text area is that the gedit developers took care to set the L of Location as a mnemonic to get to the text area via Alt-L. Using mnemonics is not just useful for keyboard-only users, it also lets the accessibility infrastructure know there is a binding between the label and the text area. In the event a mnemonic is not something you can use, you can set the Label For and Labeled By properties on associated components using the accessibility properties tab in Glade.
As you arrow down through the file list, Orca presents each line to you. To get out of the file list, press Tab to navigate to the other objects on the page. As you do so, Orca presents information about where you are. Notice how the Character Coding label is presented when you tab to that combo box. Mnemonics and quality keyboard traversal are good friends to a screen reader.
Now, let's try accessing the relatively rich Web page at linuxjournal.com. This will not only provide you with an example of accessing rich content with Orca, but it also will give you an idea of the power of scripting with Orca. The Orca team has worked closely with the Mozilla team to provide much better accessibility for Firefox 3. Orca's script for Firefox 3 also provides a number of custom mechanisms for accessing Web content. In this example, we'll demonstrate how a typical user might browse Web content.
Note: you must use the latest Firefox 3 nightly builds. See the “Firefox” page of the Orca Wiki for more information on obtaining the latest Firefox 3 nightly builds.
When you run Firefox 3, go to linuxjournal.com by pressing Ctrl-L and then typing the URL. Once Firefox loads the page, Orca should start reading it automatically. You can stop the automatic reading at any time by pressing any key on the keyboard.
At this point, you can tab around to focusable items on the page, such as links. There is much more important information on the page than links, however, and Orca's script for Firefox provides convenience mechanisms to get to the information.
Pressing the arrow keys gives you traditional caret navigation, but the Orca script for Firefox also provides more sophisticated structural navigation. Press O and Shift-O to jump to the next and previous “large objects” on the page. On linuxjournal.com, these happen to be the article summaries. You also can press H and Shift-H to move by header and L and Shift-L to move by list. The “Firefox” page of the Orca Wiki has more complete documentation on accessing Web content via Firefox and Orca.
This introduction should give you enough information to begin experimenting with the Orca screen reader, both as an end user or as a developer wishing to make your application more accessible. The Orca help facility, available via the Help button on the Orca main window, and the Orca Wiki provide much more information than can be covered here.
We also encourage users and application developers to join the Orca users' list. It is a list with a culture geared toward constructive and helpful comments. Much of the Orca user community hangs out and participates on this list.
Resources
Orca Wiki: live.gnome.org/Orca
Downloading and Installing Orca: live.gnome.org/Orca/DownloadInstall
eSpeak Speech Synthesizer: espeak.sourceforge.net
Festival Speech Synthesis System: www.cstr.ed.ac.uk/projects/festival
BrlTTY: mielke.cc/brltty
Configuring and Using Orca: live.gnome.org/Orca/ConfigurationGui
GNOME Keyboard Navigation: www.gnome.org/learn/access-guide/latest/keynav-1.html
GLADE: glade.gnome.org
Orca and Firefox 3: live.gnome.org/Orca/Firefox
Orca Users' List: mail.gnome.org/mailman/listinfo/orca-list
Willie Walker is the lead of the Orca screen-reader Project and has been working in the X Window System accessibility space for nearly two decades. He is grateful to his employer, Sun Microsystems, Inc., for taking a leadership role in accessibility, and he also is grateful to the Mozilla Foundation for its continued support. Oh yeah, he loves his team and the Orca community too. Orca wouldn't be what it is today without all the people and organizations involved.

