
Multisession Workstations
The Linux Terminal Server Project (LTSP) has been around for years now, and it gets better with each new release. In the beginning, it was targeted at providing schools with a means to use low-cost computers as Linux terminal clients. It was a huge success; so much so, that LTSP now is included in several Linux distros, such as Edubuntu, as a regular package.
LTSP lets you tailor it to deliver multiple OS desktops to every workstation on the LAN, using just PXE-bootable desktops or thin clients. With this type of setup, users simply have to press Ctrl-Alt-Fn to access different desktops. The following shows an example menu you could present to LTSP users:
Ctrl-Alt-F1: Linux shell.
Ctrl-Alt-F2: Windows desktop for Internet browsing and e-mail.
Ctrl-Alt-F3: Ubuntu with development tools.
Ctrl-Alt-F4: Mac OS for graphics work.
Ctrl-Alt-F5: Remote Citrix access for corporate ERP and CRM.
To set up an environment that supports the above options, the following steps are required:
Set up an LTSP environment.
Install the required client connection tools.
Create scripts to use the client connections.
Configure LTSP files to enable one or several screens to use the new client connection.
The first step is installing the LTSP packages on the Linux distro of your choice. Many recent distro releases have ready-to-install LTSP packages available in their repositories, so you probably can use your favorite package manager out of the box. This way, you should have your LTSP server up and running in a matter of minutes. On Ubuntu use:
$ sudo apt-get install ltsp-server-standalone
$ sudo ltsp-build-client
For detailed install instructions for other distros, check the LTSP Web site (see Resources).
For an easy out-of-the-box experience, download and boot from an Ubuntu Alternate CD, press F4, and choose Install an LTSP server (Figure 1).
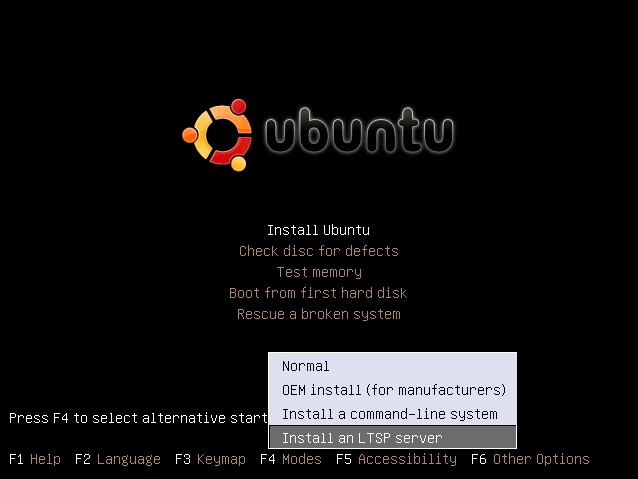
Figure 1. Ubuntu Alternate Install (Install an LTSP Server)
From there, you install Ubuntu as usual. The only difference is that near the end of the install, you will see a warning about a second Ethernet card (Figure 2).
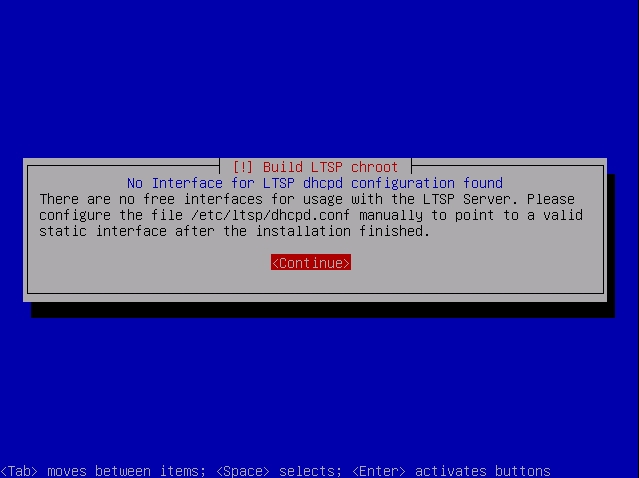
Figure 2. Ubuntu PXE Boot Client LTSP Session
The error occurs because the installer defaults to using a second Ethernet card dedicated to boot terminals. You may use this setting if you like, but if you already have a DHCP server in your environment, you can use it.
Once you finish the LTSP install, log on to your server and build the LTSP image with the following command:
$ sudo ltsp-build-client
This takes a couple minutes. While it builds, you will see a text progress bar—get used to it, because you will need to rebuild this image several times.
If you are lucky and your DHCP server is a nice Linux box, edit your /etc/dhcpd.conf file to point your network boot options to the LTSP box. Add the following lines, and restart the DHCP service afterward:
option tftp-server-name "mynew.ltsp.server";
option bootfile-name    "/ltsp/i386/pxelinux.0";
If you're unlucky and you have to set this up with a Windows server, as an administrator, open the DHCP configuration screen and add the configuration options below:
017 Root Path:             /opt/ltsp/i386
066 Boot Server Host Name: <LTSP Server ip address>
067 Bootfile Name:         ltsp/i386/pxelinux.0
In addition, most Linux/BSD-based firewall software appliances, such as pfsense and endianFW, have options for this on their DHCP configuration screens.
If everything goes well, your LTSP environment is ready to boot network clients. Reboot one of your desktops and select network boot. You should see your desktop receive an IP address from your DHCP server, a large stream of dots when the boot image downloads from the TFTP server and then a regular boot splash screen from your distro. Then finally, your LTSP session will start (Figure 3).

Figure 3. Ubuntu PXE Boot Client LTSP Session (note the lower right-hand corner of the screen)
You're now about a third of the way there. Next, let's go to the core of multisession setup and start installing the connection tools you'll need to connect to other types of sessions.
You need to set up your workstations to allow multiple remote sessions, connected to different servers and different OSes, each using the required specific connection protocol. LTSP includes only three types of connect scripts: shell, graphical Linux and Windows remote desktop. This is great, because out of the box, you are able to set up a shell session, a full diskless Linux client and a Windows remote desktop session.
LTSP lacks other interesting protocols, like VNC, NX and Citrix. For those, you'll need to install some tools and client applications.
One of the features I like most about LTSP is that each time you update your ltsp-image, you actually “build” a small footprint distro. This means you can install packages, startup scripts or anything you want, into the LTSP image “distro”, and then simply update the image as needed. Don't confuse your “server” distro, with the LTSP image distro; they are completely different. Your server is mainly a building environment for the LTSP image, which is why images built from Ubuntu, look like Ubuntu. Images built on OpenSUSE, look and taste like OpenSUSE, and so on.
This hasn't always been the case though. In earlier releases, LTSP produced images that weren't related to the server distro. Earlier LTSP images were more like a distro of their own. Now, you can choose your server flavor and produce images of the same flavor. This allows you to keep using the distro you are familiar with on the server and on your thin clients.
Remember: things you install on your server are not installed onto your LTSP images. Within your server lives a mini-distro that is used to build the LTSP images. To access your building distro, you must chroot into it from your server. Simply type the following:
$ sudo chroot /opt/ltsp/i386
You are now working on your LTSP image distro root directory. This environment is what images will be built from. From here on, all you need to do to install software is type your standard distro shell commands. Let's try a small shell picture viewer as an example (this will be useful later):
$ apt-get install zgv
To exit from the chroot session and build the new image that now will contain the zgv command, do the following:
$ exit                    # to exit the chroot session
$ sudo ltsp-update-image  # to build the update image
After the image is built, reset your PXE boot client, press Ctrl-Alt-F1 to go to the shell session and check that zgv is available. In my setups, Ctrl-Alt-F1 always is a shell session, regardless of the settings in the lts.conf file.
Building the image is a time-consuming task, so you probably will want to wait until all needed packages are installed and built, and test once rather than multiple times.
For the objectives in this article, you will need to install a VNC client so you can connect to a Mac OS X session and the Citrix XenApp client.
First, set your MAC to allow incoming connections. Go to your Mac OS X server and open System Preferences. Under Internet and Network, click Sharing, then select the Screen Sharing check box. Next, click the Computer Settings button, check Anyone may request permission to control screen, and click VNCs viewer may control screen with password, and set a password. If you don't set this option, you will receive a “No matching security types” error each time you try to connect to your Mac OS X system (Figure 4).
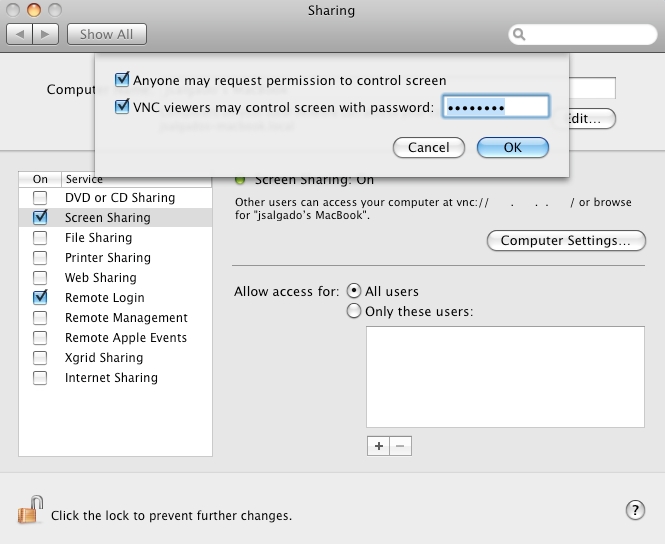
Figure 4. Mac OS X Enable Remote Access
Now, back to the LTSP server. Install the VNC client and VNC server (I used xvnc4viewer, because it was available in the Ubuntu 9 repositories, but you may use any VNC client that is available for your distro):
$ sudo chroot /opt/ltsp/i386
$ apt-get install xvnc4viewer vnc4server
I know it doesn't make much sense to install a VNC server on your “client” image; however, you will need the vncpasswd command from it later.
Because your LTSP image and your main LTSP server are siblings, you are free to test software behavior on your server first. Bear in mind that they are closely related, but not identical twins. Just because the server is able to do something, doesn't ensure that the LTSP image also will be able to do it. However, if something doesn't work on your server, don't waste your time trying to make it work on the LTSP image either.
To test from your server, install xvnc4viewer directly on your server, and start a connection to your Mac. You must use the -FullColor option; if you don't, your MAC will not allow the connection:
$ xvnc4viewer -FullColor -FullScreen your.mac.ip.address
You will get a VNC authentication window asking for the password you set earlier on your Mac. Next, you should see a beautiful Aqua Mac OS desktop on top of your Linux screen!
This is great, but the password window doesn't work correctly on the LTSP image. Because you didn't load a window manager before the VNC viewer, the authentication window pops up with no mouse pointer visible, and you need to click on the box to start writing. So, let's avoid that problem. Go back to the chroot session for your LTSP image, and type vncpasswd. This will create the .vnc/passwd file, which you will use as a parameter to your xvnc4viewer command. Move the newly created file to /usr/share/ltsp/vnc-passwd.
Now, you need to create a screen script for this VNC session. Those scripts are in the /usr/share/ltsp/screen.d folder. Change directories to that folder, copy the rdesktop screen script and modify it to be a VNC script. Call this new script vnc1, and make it look like this:
#!/bin/sh

PATH=/bin:$PATH; export PATH
. /usr/share/ltsp/screen-x-common

VNC_OPTIONS=${VNC_OPTIONS:-"-FullScreen"}
VNCVIEWER_OPTIONS="${VNC_OPTIONS} -FullScreen $* ${VNC_SERVER}"

if [ -x /usr/share/ltsp/xinitrc ]; then
    xinitrc=/usr/share/ltsp/xinitrc
fi

xinit $xinitrc /usr/bin/xvnc4viewer ${VNCVIEWER_OPTIONS} \
               -- ${DISPLAY} vt${TTY} ${X_ARGS} -br >/dev/null
Now, exit your chroot session, and edit the /var/lib/tftpboot/ltsp/i386/lts.conf file. You should add two new parameters, and set your screen_04 to use your new script. It now should look something like this:
[default]
    VNC_OPTIONS  = "-FullColor -passwd /usr/share/ltsp/vnc-passwd"
    VNC_SERVER   = your.mac.ip.address
    ...
    SCREEN_04    = vnc1
Next, rebuild your LTSP image with the ltsp-update-image command, wait for the process to end and test it on your PXE boot client. Press Ctrl-Alt-F4, and you should see a Mac remote session.
Because the objective is thin-client corporate infrastructure, you most likely will want to have multiple connections to your Mac OS “server”. For this, there is Aqua Connect Terminal Server. Using it, you can connect several remote users to a single Mac OS X server (remember to double-check Apple's licensing terms).
Go to the Citrix Web site, look for the XenApp Linux client and download it. Copy the downloaded file into your chroot system. In your chrooted session, untar the Citrix client file. After decompression, you should have a new folder named linuxx86 and a few extra files, including the install script called setupwfc. To install, as root, execute ./setupwfc, and answer the text wizard questions. You may have to fill in some dependencies for your distro, but after a few moments, your LTSP image will be Citrix-enabled.
The Citrix server configuration is beyond the scope of this article. You should start with a working Citrix XenApp Server. The good news is that you don't even need to be one of the Citrix server administrators at your company, you just need to have the user name and password for an account with published applications on the server. In other words, if you already have access to a desktop or an application via Citrix, you can set up that connection as one of the screens on your multisession terminal server. Simply log in to your Citrix session as a regular user and download the session definition ICA file (Figure 5). ICA files are actually text files that contain the information and settings to establish a connection to a XenApp server. The easiest way to download this file is to right-click on one of the icons displayed on your Citrix server Web interface and select Save link as.
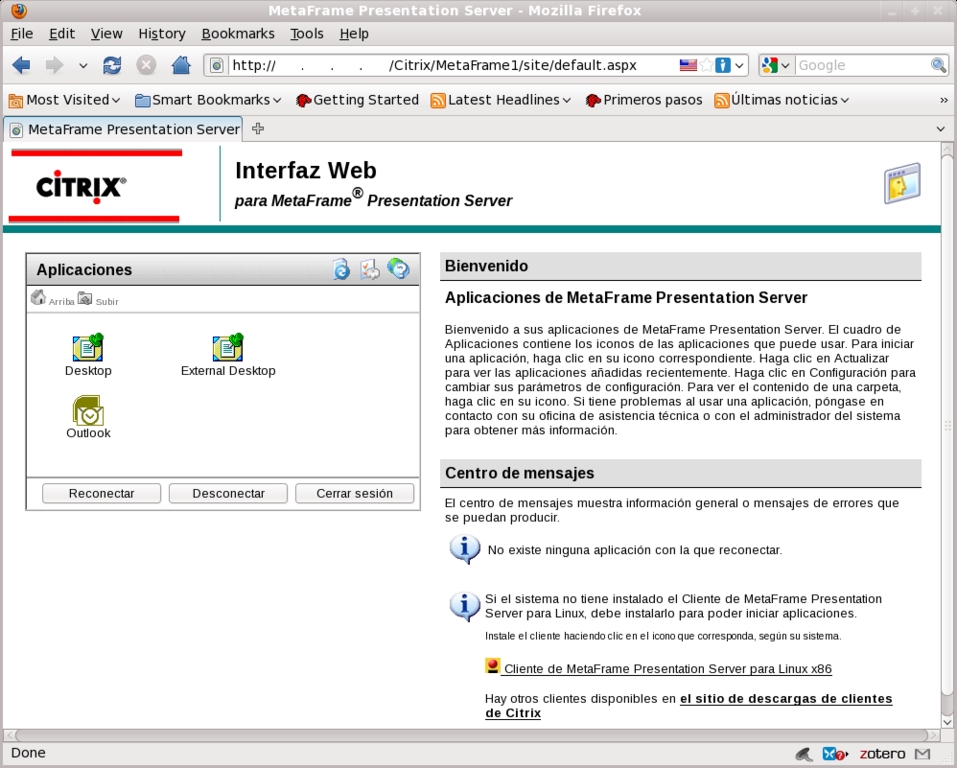
Figure 5. Citrix ICA File Download from Web Interface Icon
Once you have your ICA file, copy it to the Citrix client install directory on your chroot session:
$ cp my-ica-file.ica /usr/lib/ICAClient/desktop.ica
Now, let's create the screen script for the Citrix session in /usr/share/ltsp/screen.d. We'll call this script citrix1:
#!/bin/sh
# Copy the ica file to a temp file because
# wfica deletes the file on execution.

cp /usr/lib/ICAClient/desktop.ica \
   /usr/lib/ICAClient/temp-file-desktop.ica

sudo xinit /usr/lib/ICAClient/wfica \
           /usr/lib/ICAClient/temp-file-desktop.ica
Notice that XenApp is the new name for the Citrix presentation server, so any Citrix server XenApp or presentation server will work.
Finally, exit your chroot session and add the new screen parameter for the citrix1 script in your lts.conf file. It should look like this:
[default]
    ...
    SCREEN_05          = citrix1
Now you can rebuild your LTSP image with the ltsp-update-image command, and test the Citrix session on your PXE boot client when you press Ctrl-Alt-F5.
The rdesktop client and script are included in the LTSP install package, so you won't have to create scripts or install new packages. All you need to do is include their screen parameters in the lts.conf file. Your final file should look like this:
[default]
    VNC_OPTIONS  = "-FullColor -passwd /usr/share/ltsp/vnc-passwd"
    VNC_SERVER   = your.mac.ip.address
    RDP_OPTIONS  = "-a 16"
    RDP_SERVER   = your.windowsTS.ip.address
    SCREEN_01    = shell
    SCREEN_02    = rdesktop
    SCREEN_03    = ldm
    SCREEN_04    = vnc1
    SCREEN_05    = citrix
This time, you don't need to run ltsp-update-image. When you use the /var/lib/tftpboot/ltsp/i386/lts.conf file, it's read directly from the server and not from the ltsp-image. Be aware that there is another lts.conf file inside the chroot directory; avoid using that one.
If you've tested each step of your progress, you surely know by now that sometimes different “screens” suddenly take over the monitor output. They seem to be fighting each other to be top dog. This is not a bug. It happens when a remote session login screen timeouts. Windows and Citrix wait patiently for your login credentials, but after some inactivity time, they drop your connection. When this happens, X dies. Then your LTSP terminal restarts X and restarts the connection. This pulls the visible screen to the newly started X screen, taking over the monitor output.
To avoid this effect, you need to log in to all of your available sessions. Logged-in sessions also have timeouts, but they are much longer.
The simplest solution is based on an idea I found in an older version (from LTSP 3.0) of the rdesktop script. The script included a “read” statement just before the xinit call. That way, users had to press a key to start their rdesktop session. You can use that same approach. It's not fancy, but it works.
A more stylish solution is to use zgv to show a picture just before the session start line. zgv closes when users press the Enter or Esc key. Remember to add a “Press Enter to start” banner to your image.
LTSP also lets you provide settings for groups or workstations or for individual workstations, identified by IP address, MAC address or hostname. This allows you to set which sessions are seen on which workstations and even to configure specific hardware for that workstation. The following lts.conf file shows an example of how this can be done:
[default]
    SCREEN_01       = shell

[LINUXER]
    SCREEN_03       = ldm

[12:34:56:78:9a:bc]
    XSERVER         = ati
    X_MOUSE_DEVICE  = /dev/ttyS0
    SCREEN_03       = ldm
    SCREEN_05       = citrix

[192.168.0.4]
    SCREEN_04       = vnc1
You could fill a book with examples of uses and configurations for LTSP. I've been working with it since version 1.0, going on ten years now, and with each new version, there are useful new features. For further technical information on the project, go to the LTSP Wiki, and if you get a chance, please support the project with a small donation.
Resources
LTSP: www.ltsp.org
LTSP Downloads and Install Guides: wiki.ltsp.org/twiki/bin/view/Ltsp/DownLoads
Citrix Client Download: www.citrix.com
Mac OS Terminal Server: www.aquaconnect.net
Jorge Salgado is a Senior Infrastructure Consultant. He holds MCTS, NCLP9 and LPIC1 certifications and spends most of his time pushing companies to get the best from Citrix, VMware and Linux technologies. He lives in the Queretaro area and can be contacted at jsalgado@smart4lan.com.
