
Coreboot at Your Service!
As people started to build large computing clusters from ordinary PCs, the shortcomings of existing PC BIOSes for certain tasks became more obvious. Like any other computer, on occasion, a cluster's nodes need to be rebooted; however, most of the original PC BIOSes halted on boot if no keyboard was attached. Obviously, adding a keyboard and monitor to every node in a large cluster is not feasible. These days, this particular problem has been fixed by most PC BIOSes. They contain an option that tells the system to continue booting even if there is no keyboard. Other problems persist, of course, such as how to reboot and adjust the BIOS settings remotely.
One of the first people to try to fix these problems was Ron Minnich from Advanced Computing Lab, LANL, who in 1999 started the open-source BIOS project named LinuxBIOS. In 2008, the project's name was changed to coreboot.
The project has had three different phases: LinuxBIOS v1, LinuxBIOS v2 (or coreboot v2) and coreboot v3.
The first phase, LinuxBIOS v1, began in 1998–1999, and it became a “finished” product in 2000. At this point in the project, the BIOS consisted of some simple hardware initialization code, and the rest was a stripped-down version of the Linux kernel to do the real initialization. Because the Linux kernel does a lot of hardware initialization during its boot process (tests memory, sets up interrupts and so forth), it seemed like a reasonable choice to use the existing Linux kernel—hence the name LinuxBIOS.
The main problem in LinuxBIOS v1 was writing correct code so that the multitude of available motherboards were initialized properly. The code was far from “universal”. Among other things, each motherboard had its own unique memory initialization sequence, and most of the motherboard initialization code was written in assembly.
In the second phase, the developers took a new approach. They left the assembly code to enter protected mode untouched, but they rewrote everything else in C. There was a bit of a problem though. Normally, code generated by a C compiler assumes a stack is available, but because memory has not yet been initialized, there is no stack available. To get around this problem, Eric Biederman created a new C compiler called ROMCC. As you may have guessed, ROMCC generates machine code from C that uses only CPU registers—meaning machine code that needs no stack and, therefore, no initialized RAM! Plus, the CPU's cache is used as RAM. This technique is now known as CAR (Cache-As-RAM).
Although, LinuxBIOS v2 fixed some of the original design's problems, others remained. For instance, in order to add or remove a “payload”—the code that is actually responsible for loading the operating system—you had to recompile LinuxBIOS.
Around 2006, the developers refined their approach again. This, the current phase, is coreboot v3. Coreboot v3 uses the Kconfig facility to set all configuration settings—the same way you recompile a “normal” Linux kernel. The coreboot image is now an archive file that allows modules to be added to and/or removed from an image more easily. Also of note in coreboot v3 is the dropping of ROMCC—all code is compiled with gcc. Due to marketing reasons, the project's name was changed from LinuxBIOS to coreboot.
LinuxBIOS v1 supported 64 motherboards, and LinuxBIOS v2 supported about 120. The current version, coreboot v3, is still young, and at the time of this writing, it supports only 16 different motherboards.
My lab contains a VIA EPIA-M II for test purposes. It was manufactured a few years ago, but it's supported by coreboot. Let's take a look at how it is easy to replace its closed-source, proprietary BIOS with the open-sourced coreboot.
Because the EPIA-M II is not yet supported by coreboot v3, I'm going to cover installing v2 for this example. First, make sure you have GCC, binutils, Python, bash, pciutils-devel and subversion installed. Now, check out coreboot v2 code from the repository:
$ svn co svn://coreboot.org/repos/trunk/coreboot-v2
Next, fetch a payload:
$ svn co svn://coreboot.org/filo
I decided to use FILO, which is almost the same as LILO, but it uses no BIOS calls. You also may use GRUB2 if you like; it's completely compatible with coreboot.
You also need a special library named libpayload, because FILO depends on it. Check it out, and then run make, which first will run through the configuration:
$ svn co svn://coreboot.org/repos/trunk/payloads/libpayload
$ cd libpayload
$ make
Listing 1 shows the output from the configuration process. Simply press Enter for all options. The value chosen is the default, which is the capitalized value in square brackets [...] if it's a yes/no option; otherwise, it's the value in brackets.
Listing 1. Configuration Process for libpayload
*
* Libpayload Configuration
*
* Architecture Options
*
Multiboot header support (MULTIBOOT) [Y / n]
*
* Standard Libraries
*
Enable C library support (LIBC) [Y / n]
Enable tinycurses support (TINYCURSES) [Y / n]
*
* Console Options
*
See output on the serial port console (SERIAL_CONSOLE) [Y / n]
  I/O base for the serial port (SERIAL_IOBASE) [0x3f8]
  Override the serial console baud rate (SERIAL_SET_SPEED) [N / y]
  Use plain ASCII characters for ACS (SERIAL_ACS_FALLBACK) [N / y /?]
See output on a video console (VIDEO_CONSOLE) [Y / n]
  VGA video console driver (VGA_VIDEO_CONSOLE) [Y / n]
  Geode LX video console driver (GEODELX_VIDEO_CONSOLE) [N / y]
Allow input from a PC keyboard (PC_KEYBOARD) [Y / n]
  English (US) keyboard layout (PC_KEYBOARD_LAYOUT_US) [Y / n]
  German keyboard layout (PC_KEYBOARD_LAYOUT_DE) [N / y]
*
* Drivers
*
Support for PCI devices (PCI) [Y / n]
Support for reading / writing NVRAM bytes (NVRAM) [Y / n]
Extended RTC ports are 0x74/0x75 (RTC_PORT_EXTENDED_VIA) [N / y /?]
Support for PC speaker (SPEAKER) [Y / n]
USB Support (USB) [N / y]
Once the configuration parameters are set, run make again to compile the library:
$ cd ../filo
$ make
Now you can set the options for FILO. Again, simply press Enter for all the prompts and accept the defaults.
Listing 2. Configuration Process for FILO
*
* FILO Configuration
*
* Interface Options
*
Use GRUB like interface (USE_GRUB) [Y / n /?]
  Command line prompt (PROMPT) [filo]
  GRUB menu.lst filename (MENULST_FILE) [hda3:/boot/grub/menu.lst]
  Timeout for loading menu.lst (MENULST_TIMEOUT) [0]
  Use MD5 passwords in menu.lst? (USE_MD5_PASSWORDS) [Y / n /?]
*
* Drivers
*
IDE DISK support (IDE_DISK) [Y / n /?]
  IDE disk poll delay (IDE_DISK_POLL_DELAY) [0]
  Extra delay for SATA (SLOW_SATA) [N / y /?]
  PCMCIA CF (Epia) support (PCMCIA_CF) [N / y /?]
new USB Stack (USB_NEW_DISK) [Y / n /?]
USB Stack (obsolete?) (USB_DISK) [N / y /?]
NAND Flash support (FLASH_DISK) [N / y /?]
PCI support (SUPPORT_PCI) [Y / n]
  Scan all PCI busses (PCI_BRUTE_SCAN) [N / y /?]
  Sound Support (SUPPORT_SOUND) [N / y]
*
* Filesystems
*
EXT2 filesystem (FSYS_EXT2FS) [Y / n]
FAT (MSDOS) filesystem (FSYS_FAT) [Y / n]
JFS (FSYS_JFS) [N / y]
Minix filesystem (FSYS_MINIX) [N / y]
ReiserFS (FSYS_REISERFS) [Y / n]
XFS (FSYS_XFS) [N / y]
ISO9660 filesystem (FSYS_ISO9660) [Y / n]
  El Torito bootable CDROMs (ELTORITO) [Y / n /?]
Compressed RAM filesystem (CRAMFS) (FSYS_CRAMFS) [N / y]
Squash filesystem (FSYS_SQUASHFS) [N / y]
*
* Loaders
*
Standard Linux Loader (LINUX_LOADER) [Y / n /?]
Windows CE Loader (WINCE_LOADER) [N / y /?]
Artec Loader (ARTEC_BOOT) [N / y /?]
*
* Debugging & Experimental
*
Enable experimental features (EXPERIMENTAL) [N / y /?]
DEBUG_ALL (DEBUG_ALL) [N / y]
DEBUG_ELFBOOT (DEBUG_ELFBOOT) [N / y]
DEBUG_ELFNOTE (DEBUG_ELFNOTE) [N / y]
DEBUG_SEGMENT (DEBUG_SEGMENT) [N / y]
DEBUG_SYS_INFO (DEBUG_SYS_INFO) [N / y]
DEBUG_BLOCKDEV (DEBUG_BLOCKDEV) [N / y]
DEBUG_VFS (DEBUG_VFS) [N / y]
DEBUG_FSYS_EXT2FS (DEBUG_FSYS_EXT2FS) [N / y]
DEBUG_PCI (DEBUG_PCI) [N / y]
DEBUG_LINUXLOAD (DEBUG_LINUXLOAD) [N / y]
DEBUG_IDE (DEBUG_IDE) [N / y]
DEBUG_ELTORITO (DEBUG_ELTORITO) [N / y]
Developer Tools (DEVELOPER_TOOLS) [Y / n /?]
Obviously, not all of the above options actually are needed. For instance, you don't need XFS, JFS or Minix support if your system boots off an ext2/ext3 partition. Once you've gotten everything running, you can come back and switch off the options you don't need, which will reduce the size of the coreboot image.
Notice the following line near the top of Listing 2:
GRUB menu.lst filename (MENULST_FILE) [hda3:/boot/grub/menu.lst]
My test EPIA-M II system has OpenSUSE 11.0 installed and uses the GRUB bootloader. I chose to include GRUB's interface support inside FILO, and this is the place to specify the location of GRUB's menu file. If you don't plan to use the GRUB interface (for instance, if your Linux distribution uses LILO for booting), you need to specify the correct line to load the kernel and initrd, as shown in Listing 3.
Listing 3. If your distribution works with LILO, you can switch off the GRUB interface in FILO.
*
* FILO Configuration
*
* Interface Options
*
Use GRUB like interface (USE_GRUB) [Y / n /?]  n
  Autoboot a command line after timeout? (USE_AUTOBOOT) [Y / n]
    Kernel filename and parameters (AUTOBOOT_FILE)
        ↪[hda1:/boot/vmlinuz root=/dev/hda3 console=tty0
         ↪console=ttyS0, 115200]
    Time in seconds before booting (AUTOBOOT_DELAY) [2]
After setting the FILO's configuration parameters, compile FILO by running make again. The compiled loader is placed here: filo/build/filo.elf.
At this point, you've prepared the payload. Now, you need to generate a coreboot image. First, let's take a look at the config file that is used during the coreboot build (Listing 4):
$ cd coreboot-v2/targets/via/epia-m
$ vi Config.lb
Listing 4. Configuration Parameters for Coreboot v2
 1 target epia-m
 2 mainboard via/epia-m

 3 option MAXIMUM_CONSOLE_LOGLEVEL=8
 4 option DEFAULT_CONSOLE_LOGLEVEL=8
 5 option CONFIG_CONSOLE_SERIAL8250=1

 6 option ROM_SIZE=256*1024

 7 option HAVE_OPTION_TABLE=1
 8 option CONFIG_ROM_PAYLOAD=1
 9 option HAVE_FALLBACK_BOOT=1
10 option CONFIG_COMPRESSED_PAYLOAD_NRV2B=1

11 option FALLBACK_SIZE=131072

12 option _RAMBASE=0x00004000

13 romimage "normal"
14 option USE_FALLBACK_IMAGE=0
15 option ROM_IMAGE_SIZE=64*1024
16 option COREBOOT_EXTRA_VERSION=".0-Normal"
17 payload $ (HOME)/filo/build/filo.elf
18 end

19 romimage "fallback"
20 option USE_FALLBACK_IMAGE=1
21 option ROM_IMAGE_SIZE=60*1024
22 option COREBOOT_EXTRA_VERSION=".0-Fallback"
23 payload $ (HOME)/filo/build/filo.elf
24 end

25 buildrom ./coreboot.rom ROM_SIZE "normal" "fallback"
Lines 1 and 2 define the board and board manufacturer that makes the board we're targeting. Lines 3–5 set the logging level. Higher values give you more information, and logging information comes out on a serial (RS-232) port.
Line 6 specifies the size of the Flash (ROM) memory chip on your board.
Line 7 indicates that coreboot may access CMOS memory for getting any parameters—in particular, the boot sequence.
Line 8 specifies that the boot image (payload) is located in ROM. In some situations you will want to load the payload via a serial port. For those cases, use this:
CONFIG_SERIAL_PAYLOAD=1
Line 9 sets the strategy used to start coreboot. For example, if the checksum from CMOS-memory is not valid, instead of loading the “normal” part, coreboot must start the backup part—that is, “fallback”.
Line 10 specifies the compression method (NRV2B). Because Flash chip sizes are somewhat limited, you can (or may have to) use a compressed payload. Instead of NRV2B, you can use LZMA—a more-advanced method:
CONFIG_COMPRESSED_PAYLOAD_LZMA=1
Line 11 specifies the size of the backup (fallback) part: 128kB, half the size of the Flash chip.
Line 12 indicates where exactly in RAM the compressed coreboot will be placed upon power-up.
Lines 13–18 and 19–24 are almost identical except for name and ID. Here you define the “normal” and “fallback” parts. If coreboot can't start the “normal” part for some reason, it will start the reserved, “fallback” part instead.
The last line specifies how the build tool must combine both parts into a single file. See Resources for more information on all of these options.
That's all for the configuration; now compile coreboot for the EPIA-M:
$ cd coreboot-v2/
$ ./buildtarget via/epia-m
$ cd via/epia-m/epia-m/
$ make
The coreboot image is ready. The next step is writing it into the Flash chip. To do this, you need a special tool, flashrom, which comes with the coreboot sources:
$ cd coreboot-v2/util/flashrom/
$ make
Before proceeding, take note, if problems occur when writing to the Flash or if you've configured coreboot improperly (such as forgetting to include a payload), you can brick your hardware. Therefore, it's highly recommended that you have a way to restore your BIOS, such as by using BIOS Savior from IOSS (Figure 1).
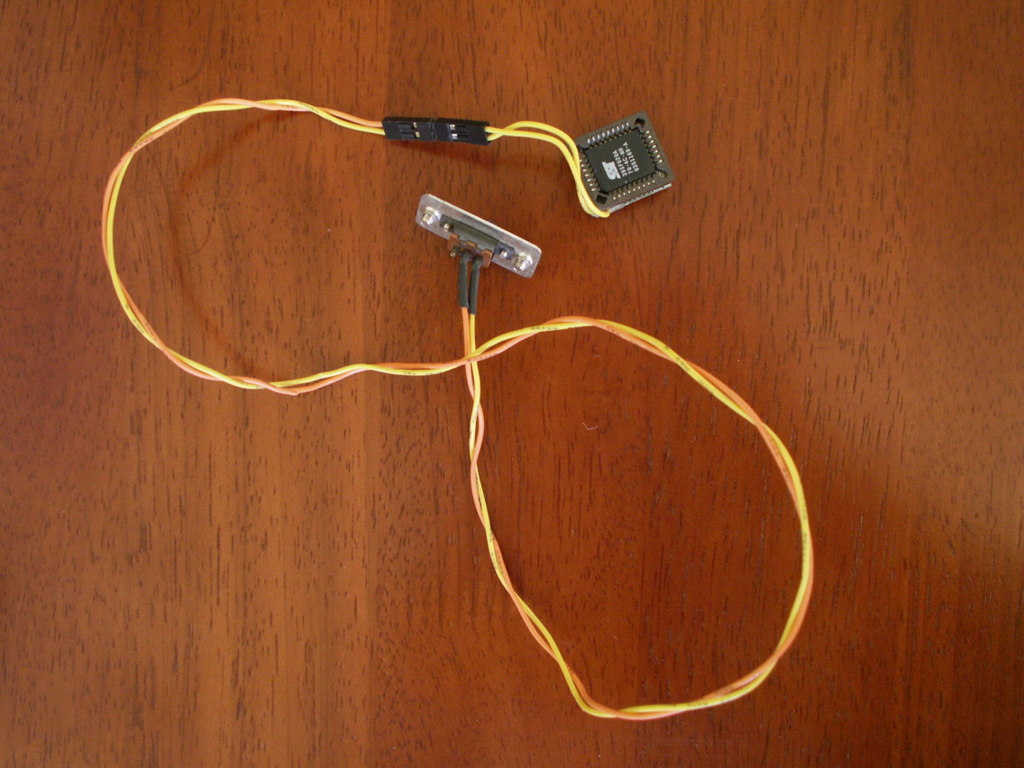
Figure 1. BIOS Savior is a must-have tool.
To write to the Flash chip, execute the following command:
# ./flashrom -w ~/coreboot-v2/targets/via/epia-m/epia-m/coreboot.rom
Then, verify that Flash has been written correctly:
# ./flashrom -v ~/coreboot-v2/targets/via/epia-m/epia-m/coreboot.rom
In order to see boot messages with OpenSUSE 11.0, I first need to modify my GRUB configuration to set the serial line to a speed of 115200 (Listing 5). Now, when I start my EPIA-M, I will be able to see coreboot's output in minicom.
Listing 5. Modifications added to GRUB's menu.lst in order to redirect output to serial port COM1.
serial --unit=0 --speed=115200
terminal serial

default 0
timeout 8
gfxmenu (hd0,2)/boot/message

title openSUSE 11.0 - 2.6.25.5-1.1
    root (hd0,2)
    kernel /boot/vmlinuz-2.6.25.5-1.1-default
               ↪root=/dev/sda3 resume=/dev/sda5
               ↪splash=silent showopts vga=0x317
               ↪console=ttyS0,115200n8
    initrd /boot/initrd-2.6.25.5-1.1-default
You now should be ready to reboot, so shut down the EPIA-M, connect a null-modem serial cable, and run minicom:
# minicom -o -8 ttyUSB
Next, restart the EPIA-M, and minicom should show you a GRUB-like boot menu (Figure 2). As the system boots, the operating systems' boot messages also appear in minicom (Figure 3).
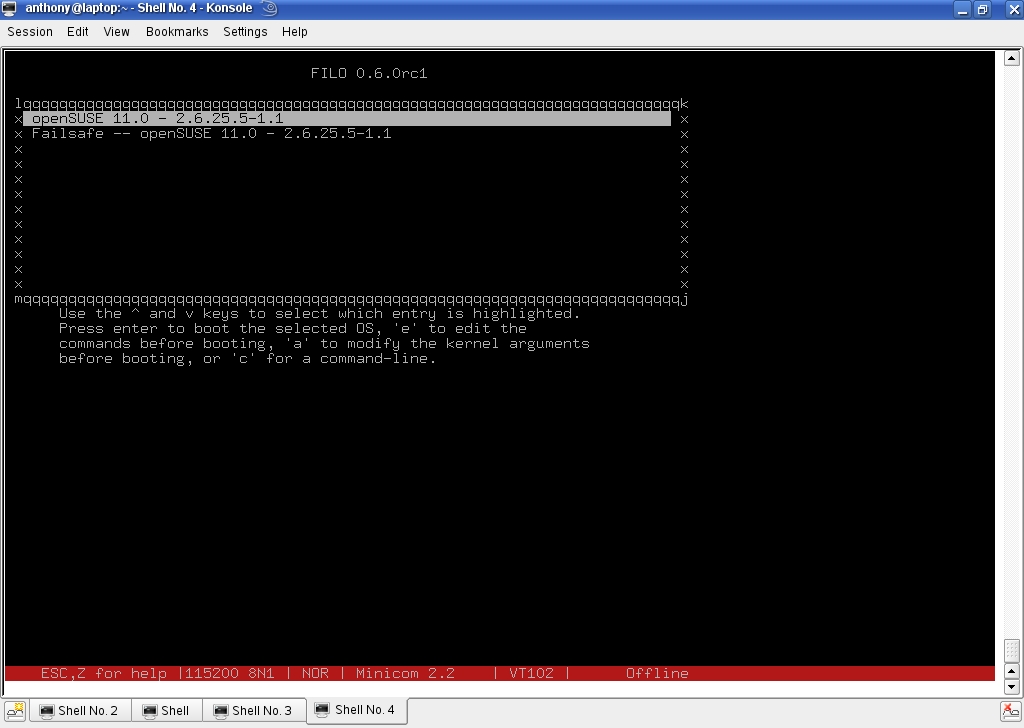
Figure 2. You can control the booting process via minicom.
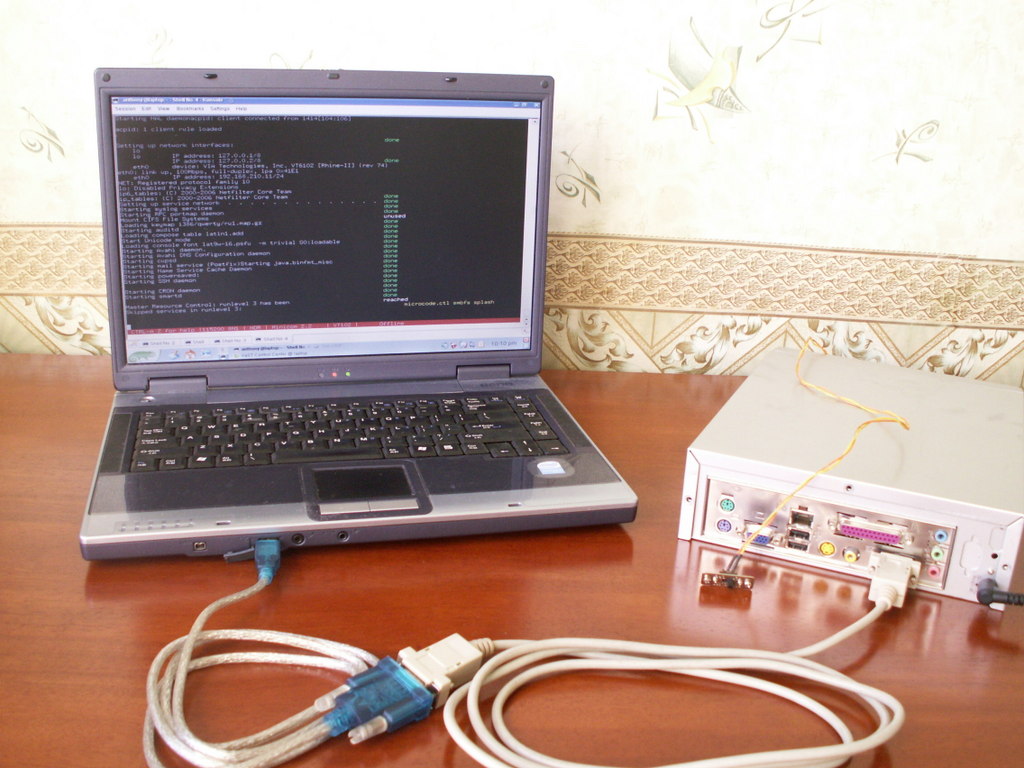
Figure 3. The operating system writes to serial port.
Both coreboot v2 and v3 allow you to use the QEMU emulator for doing all the above steps without worrying about bricking your hardware. Using an emulator also is handy when you want to develop a new payload or re-implement some feature of coreboot.
The steps for configuring and compiling coreboot for an emulated system are similar to those for the EPIA-M:
$ cd coreboot-v2/
$ ./buildtarget emulation/qemu-x86
$ cd emulation/qemu-x86/qemu-x86/
$ make
Before you can run the emulator, you need to to have a copy of a Video ROM/BIOS patched for use with QEMU, such as the one for Cirrus Logic card (www.coreboot.org/images/0/0d/Vgabios-cirrus.zip). Download the file, unzip it in the current directory and then run QEMU:
$ qemu -L . -hda /dev/zero
The latest version of coreboot (v3) doesn't include support for many motherboards yet, but anyone can evaluate coreboot v3 with an emulated system (Figure 4).
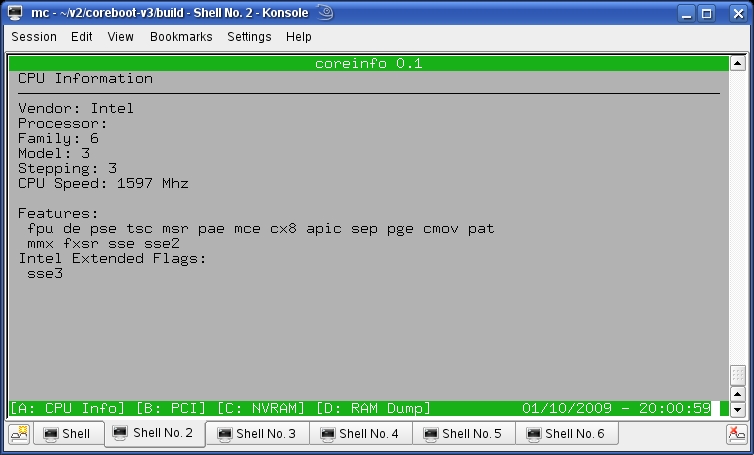
Figure 4. QEMU is a powerful tool that greatly helps to develop coreboot.
So, what are the major differences that distinguish coreboot v3 from the previous releases? First, the configuration mechanism is greatly revised. In previous releases, you had to edit configuration files manually. Now, you configure coreboot just as you configure the Linux kernel—using make menuconfig or make xconfig. Second, the coreboot image itself is nothing but a LAR archive. LAR is a coreboot-specific archiver. It allows you to add, edit and delete payloads in a single step; there's no need to recompile the entire image. Third, the process for producing the code has been simplified and is much more elegant than before. Fourth, the use of ROMCC has been dropped, and all C code now is compiled with gcc. Fifth, there is a growing community and improved documentation on the Web site, as well as feedback from some silicon companies.
So, let's take a look at coreboot v3. Get the source code from the repository and configure it:
$ svn co svn://coreboot.org/repos/trunk/coreboot-v3
$ make menuconfig
...
$ make
Once this completes, the coreboot image is ready and can be found in build/coreboot.rom. To view the contents of coreboot.rom, you can use the LAR archiver (Listing 6):
$ build/util/lar/lar -l build/coreboot.rom
Listing 6. Output of LAR Archiver (Coreboot Image Contents)
normal/option_table     (932 bytes @ 0x50);
                        loadaddress 0x0 entry 0x0
normal/initram/segment0 (420 bytes @ 0x450);
                        loadaddress 0x0 entry 0x0x40
normal/stage2/segment0  (194,780 bytes,
                             zeroes compressed to 1 bytes @ 0x650);
                        loadaddress 0x0xd7b0 entry 0x0x2000
normal/stage2/segment1  (34560 bytes,
                             lzma compressed to 18320 bytes @ 0x6b0);
                        loadaddress 0x0x2000 entry 0x0x2000
normal/stage2/segment2  (6076 bytes,
                             lzma compressed to 356 bytes @ 0x4e90);
                        loadaddress 0x0xbff4 entry 0x0x2000
normal/payload/segment0 (183,984 bytes,
                             zeroes compressed to 1 bytes @ 0x5050);
                        loadaddress 0x0x318e0 entry 0x0x19000
normal/payload/segment1 (100,552 bytes,
                             lzma compressed to 78196 bytes @ 0x50b0);
                        loadaddress 0x0x19000 entry 0x0x19000
bootblock               (20480 bytes @ 0x3b000)

Total size = 119314B 116KB (0x1d212)
As you can see, coreboot.rom is really just an archive file, so it can be “disassembled” and “reassembled”. Compiling from scratch is not required.
Most contemporary, proprietary BIOSes contain a BIOS setup program, where you can configure different settings, ranging from RAM parameters to the boot strategy. Currently, there is no such thing available for coreboot, but to illustrate the flexibility of coreboot, let's examine bayou.
Bayou was developed by AMD and contributed to the coreboot project last year. Bayou is a payload that itself is a container for further payloads, thereby allowing coreboot to choose among payloads at boot time via a menu. For instance, you could include a memtest payload, a FILO payload and even a tint payload (tint is a Tetris clone). As an example, let's build bayou with a tint payload.
To build tint, get the source and patch it:
$ wget http://ftp.debian.org/debian/pool/main/t/tint/
↪tint_0.03b.tar.gz
$ tar xfvz tint_0.03b.tar.gz
$ cd tint-0.03b
$ svn export svn://coreboot.org/repos/trunk/payloads/
↪external/tint/libpayload_tint.patch
$ patch -p1 < libpayload_tint.patch
$ make
Then, get the bayou payload:
$ svn co svn://coreboot.org/repos/trunk/payloads/bayou
$ cd bayou
Edit the bayou configuration file (bayou.xml), and add the required payloads (Listing 7).
Listing 7. Configuration for Bayou Payload
<BayouConfig>
    <global>
        <timeout>5</timeout>
    </global>
    <payloads>
        <payload type="chooser" flags="default">
            <file>payloads/filo.elf</file>
        </payload>
        <payload type="chooser">
            <file>payloads/coreinfo.elf</file>
        </payload>
        <payload type="chooser" flags="default">
            <file>payloads/tint.elf</file>
        </payload>
    </payloads>
</BayouConfig>
The config file is fairly straightforward. The default payload starts after five seconds, and if nothing is chosen, the default is FILO. The other options are tint or coreinfo (Figure 4 shows it running in QEMU).
Next, make a directory for the payloads, put them into it, and then run make:
$ ls -l payloads

-rwxr-xr-x 1 ab users 47004 2009-01-03 11:59 coreinfo.elf
-rwxr-xr-x 1 ab users 71440 2009-01-09 21:35 filo.elf
-rwxr-xr-x 1 ab users 49298 2009-01-10 09:40 tint.elf
-rwxr-xr-x 1 ab users 74334 2009-01-10 19:22 seabios.elf

$ make
Now, run image in QEMU, and you can play Tetris from the BIOS (Figure 5).
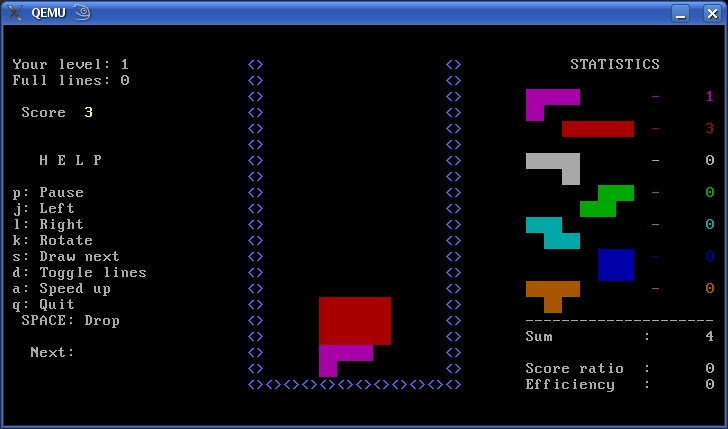
Figure 5. Take a rest—Tetris running from the BIOS.
Coreboot allows you to replace your motherboard's proprietary BIOS with a free and open-source BIOS. Coreboot already can boot Windows XP and Windows Vista as well as FreeBSD, Plan9 and, of course, Linux. Operating systems can be started from local disks, from a network connection or even from a serial port. Although it's not yet feature-complete, coreboot provides a base for building more flexible BIOSes.
Resources
Coreboot: www.coreboot.org
Coreboot Options: www.coreboot.org/Coreboot_Options
IOSS: www.ioss.com.tw
QEMU: bellard.org/qemu
Anton Borisov lives and works in Russia. Always fond of low-level programming, he has devoted his PhD work to the economic analysis of the advantages and ROI of custom-made firmware.

