
The Tao of Linux Security: the Five Phases of a Secure Deployment
A tao, meaning “the path” or “the way”, is a system of guidelines or rules meant to achieve a desired end. Like any tao, security requires a structured, systematic approach. It also should be holistic, encompassing every part of a system's life span from planning to retirement. The tao in this article consists of five simple phases that every Linux system should pass through to establish a secure baseline. The phases are not a be-all, end-all formula for security. They merely provide a foundation on which to build deeper levels of security later.
As I go through each phase, I will deploy two sample systems, a Red Hat Fedora desktop and a Debian server system, to show how security is implemented. I chose Fedora because it is arguably the most popular distribution out there. It works well for any purpose, has many desktop enhancements and is one of the easiest distributions for non-command-line Linux users to pick up. I chose Debian as our server platform because it is lightweight, has a long history of reliability, a great support community and extensive documentation. Both are excellent platforms and have their own unique security measures built in. If you have a different distribution preference, the phases presented here can be applied to any system.
The first phase of the tao is also the most important, as it is where you make most of the decisions that affect your overall security. The first step before all others is to define the purpose of the system being deployed. Will it be a mail server? A desktop? An intrusion-detection system? Once you have a purpose, you can use it as your guide throughout this process. The focus then becomes fulfilling that purpose while providing the most secure environment possible. After all, why deploy a system that no one can use? Security never should handicap functionality.
Next, you need to decide what your security goals are for the system. The primary goal of every build always should be the principle of least access or least privilege. This means providing only the minimum permissions to users and programs necessary for the system to operate. You may have other security goals, such as scanning every file with antivirus software or authenticating every user with LDAP, but least privilege always should be paramount.
Armed with these goals, you need to figure out how to accomplish them before actually building the system. Answering some simple questions will help determine the appropriate steps to meet the goals in phases 2 and 4. Will this system be server or a desktop? The answer to this question will dictate a great deal of the configuration on your new system. Will users access the system locally or remotely? This is another important configuration question with security implications. Will the system need a desktop environment?
If you or the people who will be administering the system are comfortable with the command line, deploy your system as “headless”, or without a GUI interface. By eliminating the X Window System from your install, you shrink your attack surface (your exposed area) dramatically. On the other hand, if you or your staff needs a GUI, install only one and understand that additional steps are required to lock down your system properly. It is a good rule of thumb to install a server without X and use a desktop environment for user desktop systems.
Finally, plan the applications that will operate on this system. Determine which dependencies and libraries are essential to operation. Too often, unnecessary libraries are used after a system has been compromised to run remote commands, mask an intruder's presence or probe networks. If you do not need a package do not install it.
When finished working out the answers to these questions, write them down in a build log or notebook and keep them up to date even after the initial build.
Armed with written plans, now comes the building phase. Here is where you begin the technical application of the security goals you set in the planning phase. Due to space constraints, the following section is not a detailed checklist of each of the example installs. I have highlighted only those options that are relevant to the focus on security. As in phase 1, write down your selections during installation in a build log in case you ever need to rebuild the system.
Fedora Core 7
Start by booting a fresh system from a Fedora 7 ISO available from any of the distribution's site mirrors. After entering your keyboard and language settings, you come to the disk partitioning utility. For most desktops, the installer does a fine job of configuring the drives appropriately. But, if the system will be used by someone whose work is sensitive, place the /home folder on its own partition.
After partitioning comes the bootloader options. Select GRUB and set a password. Using a password with your bootloader is good practice and helps prevent data loss if your drive or system ever is stolen. Like any good password, it should have complexity, avoid dictionary words and use numbers, letters and non-alphanumeric characters.
On the next screen, select DHCP, as client machines usually don't require static IPs. If you require one, make sure to use Network Address Translation (NAT) somewhere on your network. Next, set a hostname and domain, and set a complex root password. At the package selection screen, always review what you are installing by using the Customize Now radio button. On the Custom Selection screen, select only one desktop environment. Installing more than one environment leads to more vulnerabilities (and patches to update) later. Leave the default option on GNOME. Go through each of the other checked options, and you will discover a lot of packages will be installed (Figure 1). On my build, I have 843 packages using these options. Your number may vary. Use the Optional Packages button to eliminate any extraneous packages you do not need. When you're finished with package selection, the system will reboot.
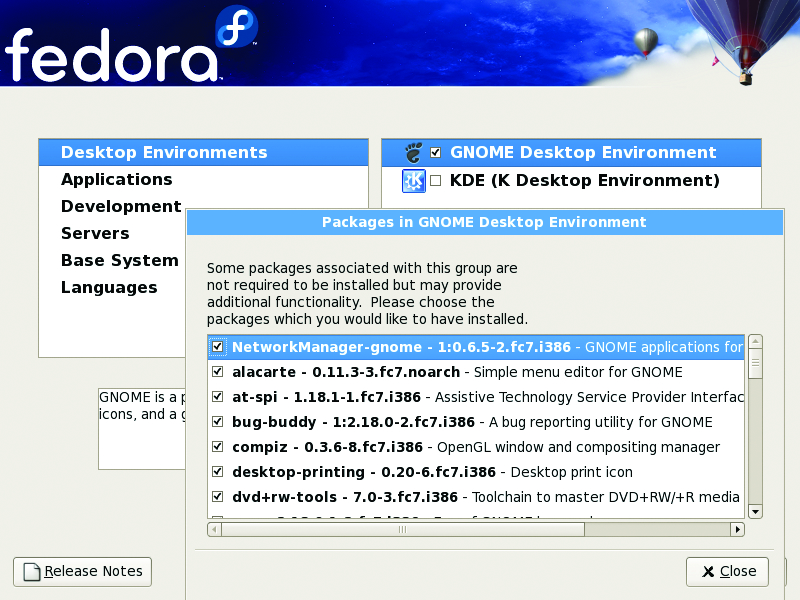
Figure 1. Install Package Selections in Fedora 7
Upon reboot, you are prompted to enable the firewall. Enable it, and add only the ports/programs you need to operate this system (Figure 2). At the Security Enhanced Linux screen, if you are able to, set the policy to enforcing (Figure 3). To those unfamiliar with SELinux, it's a policy-based protection scheme, originally developed by the National Security Agency, that adds a layer of security on top of the OS and several popular Linux applications, such as Apache. The downside to using SELinux is it sometimes can break the programs you are trying to protect (and other programs too). If you run into problems, you always can change the policy later, using the setenforce command or by editing the policy with a text editor. You then will be prompted to create a user account, and after a few other selections, the first login screen comes up.

Figure 2. Fedora Firewall Configuration
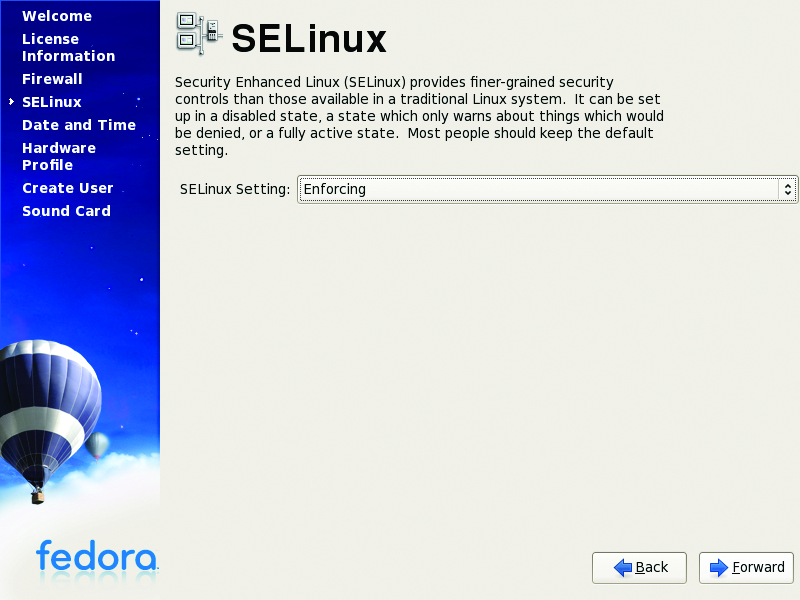
Figure 3. SELinux dramatically enhances security on your machine.
Debian
Start your blank server up with a Debian ISO (4.0r1 used here). Because I'm using this system as a server for this example, let's take a more Spartan approach toward the install. Servers usually are a juicier target than desktops for nefarious people, so you need to take extra precaution, especially if they will be deployed on a public network or the Internet.
After setting the usual options for time zone, country and so forth, you need to set a hostname and domain for your server. Next comes the partitioning options. Rather than putting many of the system directories on their own partitions, stick with putting the /home directory on a separate partition, and go one step further by encrypting your drive. This may sound difficult, but the Debian partitioning utility makes this easy. Select Guided partitioning from the options, and then select Guided - Use entire disk and set up encrypted LVM. Use the entire disk and select the option to use a separate home partition. Debian recommends further segregating your directories to keep the root, programs and user data separate, but configurations like this can be difficult to administer. Write the changes to disk and, when prompted (Figure 4), enter a complex passphrase to encrypt the volume. Next, set your time zone and root password, and then the base install will begin.
After the base install, the next few prompts are inconsequential until you get to the software selection screen. For our scenario, install an Apache Web server only. Finally, install the GRUB loader, and your new system is ready to go. Upon reboot, lock down the GRUB loader with a password, by adding the following lines to the /boot/grub/menu.lst file:
timeout 30
password yourpasswordhere

Figure 4. Debian makes complex partitioning schemes easy to configure.
The next phase in this deployment is to patch the systems. Although sometimes tedious, patching is a necessary evil. After all, 843 packages are a lot to protect. You also need to keep your systems updated to mediate the threat of new vulnerabilities. Thankfully, the example distros covered in this article make the process very easy. On the Fedora client, you already have this ability. Upon the first login, the system checks for updates automatically (Figure 5). Fedora uses the Yellow Dog Update Manager, better known as yum, and a new update GUI, pup, to automate the update process. However, the pop-up style reminder seems to work only in the GNOME desktop environment. If you want to update your system manually, you also can use the commands yum list updates or yum info updates to see which packages need an update. You also simply can run yum without any options to apply all available updates to all installed packages.
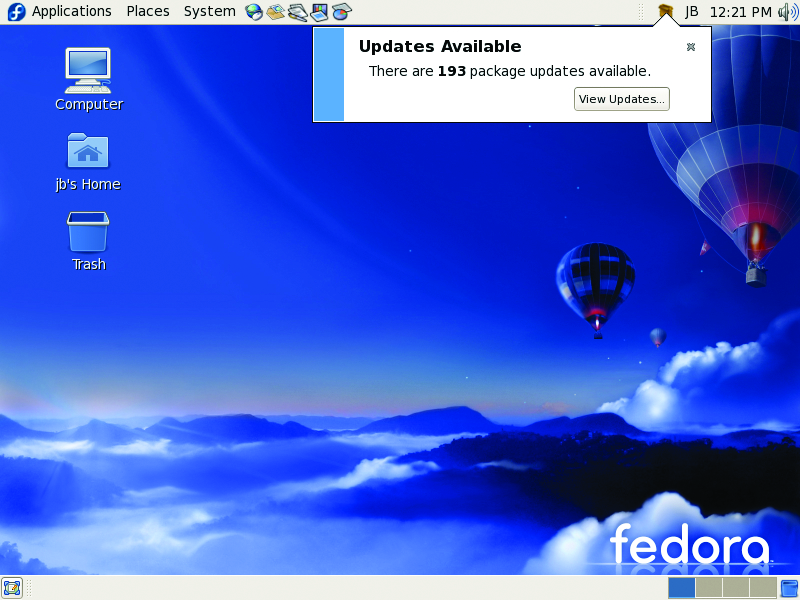
Figure 5. Fedora checks for updates immediately after install.
Moving on to the example server, Debian uses a utility called aptitude (apt) for updating packages. apt traditionally is used as a package manager, like Red Hat's RPM, but it also has the ability to check for updates like yum. It uses predefined and custom source lists to check for updates against your installed packages. If you do not have the following line in your /etc/apt/sources.list file, add it so you can check for updates against the main stable US archive:
deb http://http.us.debian.org/debian stable main contrib non-free
Run the apt-get update command after adding the line. To update all the packages on your system, type apt-get upgrade (Figure 6) from a command prompt, and the system will begin checking and, with your approval, downloading and applying the updates. If you want to see what packages you have before running apt-get, use the command dpkg -l. To check for updates once a week, use the commands below or write your own script and use crontab to schedule it:
echo /usr/bin/apt-get  update > /etc/check4updates
echo /usr/bin/apt-get  upgrade >> /etc/check4updates
chmod 750 /etc/check4updates
crontab -e
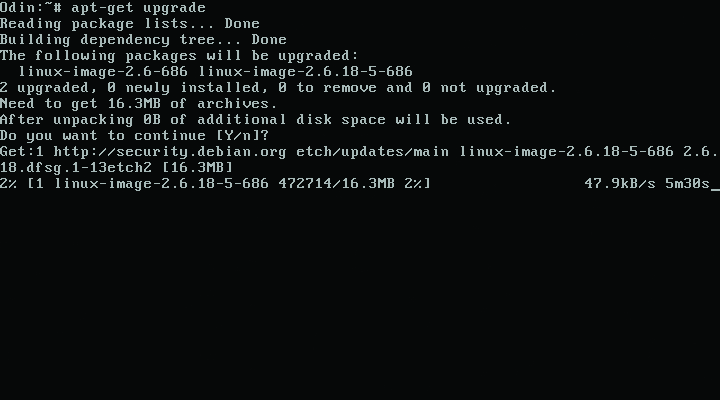
Figure 6. Use apt-get to look for Debian security updates.
Add the following lines to your crontab file to make the script run every Wednesday at 3:30am:
30 3 * * 3 /etc/check4updates
Beware—if you compile your own packages or use packages from another source, they may not be updated automatically using yum or apt-get.
After patching your new system, you may need to take additional steps to secure it. This is where having your security goals noted in the planning phase helps. You can use these goals to determine what additional steps are appropriate, as you more than likely will have more steps than the few illustrated here. The more goals you have, the more steps you are likely to have as well. Try to keep simplicity in mind. Complex settings actually can make a system less secure, because they often can lead to misconfiguration. Also, remember to note these steps in your build log.
The Fedora example already has shown two important steps to enhance security: enabling SELinux and installing a firewall. In most typical desktop-use scenarios, when combined with an antivirus application, this is enough. For the Debian box, I have selected three common steps that should be used on any server system: using sudo, locking down SSH and using a restrictive iptables firewall. These simple items should be considered the bare minimum on any server system, and if desired, they can be applied to a desktop as well.
sudo is a great application for limiting root access, which should be guarded closely on any server. Adding users to the /etc/sudoers file, limits their ability to use su to specific commands, specific directories or by network host. Any users in the sudoers file simply need to type sudo before the commands they want to execute to run under root credentials. This is much easier and much safer than giving the root password to everyone.
SSH is the standard remote access protocol in use on Linux systems today. In its default configuration, it has some settings that you definitely need to lock down. Add the following lines to /etc/ssh/sshd.config:
PermitRootLogin no
X11DisplayForwarding no
The first line prevents root from logging in to the server via SSH, which never should be done. The second line disables X forwarding, which would allow users to launch an X session from your server. In the example case, X isn't installed, so this should not be a problem. You could lock down SSH further by chrooting it or using TCP Wrappers; however, due to space constraints, I have omitted those configuration steps.
Rather than go into a long discussion on the proper configuration of a a firewall, I have created the following script with comments to secure the Debian system. It restricts traffic (statefully) only to new SSH, HTTP and SSL connections. Change the IP address in this example to your server's address. For more details on the options available in iptables, consult the man page. When building your own firewalls, keep in mind the goal of shrinking the attack surface by opening only necessary ports in iptables:
#!/bin/sh

PATH=/usr/sbin:/sbin:/bin:/usr/bin

#FLUSH PREVIOUS TABLE ENTRIES
iptables --flush

#CHANGE DEFAULT POLICIES FROM
#ACCEPT TO DROP
iptables -P INPUT DROP
iptables -P FORWARD DROP
iptables -P OUTPUT DROP

#ALLOW LOCAL LOOPBACK TRAFFIC
iptables -A INPUT -i lo -j ACCEPT
iptables -A OUTPUT -o lo -j ACCEPT

#ALLOW ESTABLISHED CONNECTIONS
iptables -A INPUT -m state --state \
ESTABLISHED,RELATED -j ACCEPT
iptables -A OUTPUT -m state --state \
ESTABLISHED,RELATED -j ACCEPT

#ALLOW DEFINED TRAFFIC
#
#SSH - 22
iptables -A INPUT -d 192.168.1.2 -p tcp \
--dport 22 --sport 1024:65535 -m state \
--state NEW -j ACCEPT

#HTTP - APACHE -80
iptables -A INPUT -d 192.168.1.2 -p tcp \
--dport 80 --sport 1024:65535 -m state \
--state NEW -j ACCEPT

#SSL - 443
iptables -A INPUT -d 192.168.1.2 -p tcp \
--dport 443 --sport 1024:65535 -m state \
--state NEW -j ACCEPT
Save this script locally, and copy or move it to the /etc/network/if-up.d directory so that it runs when the network comes up after boot. If you want to apply this configuration on a Red Hat-based system, you simply could run the above script and use the iptables-save command to keep the rule set across reboots.
Although you could take these steps and many more, there is a tool that makes this process much easier, Bastille (Figures 7 and 8). Bastille uses question/answer responses to script your preferred security settings and apply them to the actual system. There also are a multitude of manual security checklists available for most distributions and applications that can be found on the Internet. Some of the best checklists are the benchmarks put out by the Center for Internet Security. These benchmarks contain detailed settings and descriptions of “best practices” relating to specific operating systems and popular applications. They are excellent companions to Bastille.
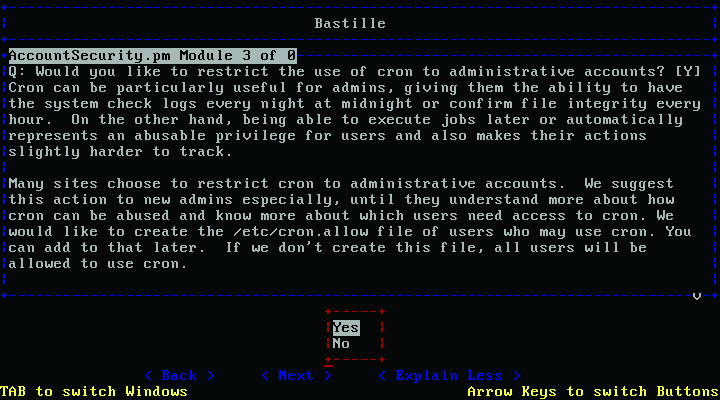
Figure 7. Bastille in Debian

Figure 8. Bastille in an X Window System Fedora Environment
The last phase of the tao is an ongoing process. Regular monitoring of your system will verify that your security goals are being met over time. The most useful tool for this is built right in to the system, syslog. From the /var/log/messages file, you can view a variety of security-related information for both the system and some applications. Many applications use their own log files. Be sure to look through those as well. If you have multiple systems, you should use a central syslog server to collect the logs. This easily can be configured in the syslog.conf file.
A newer alternative to syslog is called Splunk (Figure 9). Splunk has both free (limited to 500MB daily) and enterprise versions. The nice thing about Splunk is its super-easy install, and you can search through logs using Google-like commands through a streamlined Web-based interface.

Figure 9. Splunk is one of the best and most useful open-source projects available.
As useful as logs are, they do not provide a complete picture of how well your security is working. Only regular auditing can accomplish this. Doing so tells you if your security is still in place and functioning. I am not suggesting penetration testing for every system, but active testing of your settings is good insurance. Create checklists or scripts to test those settings that are important to maintaining your security goals. In lieu of a checklist, you could run Bastille using the --assess switch to get a security report of your current configuration. You also can use the CIS benchmarks (which rely on Bastille) as baseline checklists for an audit. If you can afford it, have an outside consultant come in and verify your security with his or her own tests to give you peace of mind, especially if you work in a heavily regulated industry.
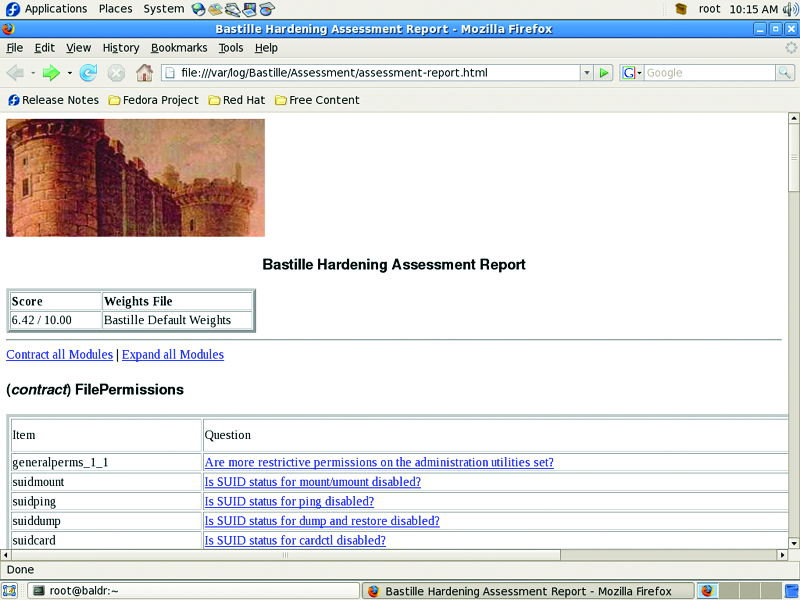
Figure 10. The Bastille assessment report gives you a detailed overview of your current security configuration.
Using the phases of the tao in your builds is the first step. This simple, ordered strategy will get you to a more secure place with your systems; however, each system is unique. Make sure your security goals match your system. Security is not difficult. Use simple and repeatable processes, stay informed of best practices and common vulnerabilities, exercise least privilege wherever possible, regularly review your logs, and you will find yourself on the Path.
Resources
Debian Security Manual: www.debian.org/doc/manuals/securing-debian-howto
Fedora 7 Security Wiki: fedoraproject.org/wiki/Security
Bastille-Linux: bastille-linux.sourceforge.net
Center for Internet Security: www.cisecurity.org
Splunk: www.splunk.com
Jeramiah Bowling has been a systems administrator and network engineer for more than ten years. He works for an accounting and auditing firm in Hunt Valley, Maryland, and holds numerous industry certifications, including CISSP and Linux+. Your comments are welcome at jb50c@yahoo.com.
