
Open-Source Compositing in Blender
Linux is bursting with multimedia potential—at least, that's the impression one gets from the plethora of multimedia-oriented distributions that have surfaced in recent years. DeMuDi, Planet CCRMA, Ubuntu Studio, 64 Studio and the list continues on ad infinitum. However, for many years now, the term multimedia proved deceptive. GIMP and Inkscape and other graphics tools meant that 2-D graphics were covered, and the astounding variety of audio tools available with real-time priority meant that users' needs for recording and audio processing were met. Video tools lagged behind, because video processing is both more difficult and more prone to patent encumbrance. In the last few years, things have begun to catch up to the point where it's feasible to create films or cartoons from concept through execution using only Linux tools.
Elephants Dream, one such cartoon, was the foundation for a major breakthrough in open-source video. Financed by presales of a then-unseen cartoon, Elephants Dream was a strategy for raising money to advance the development of and raise awareness for the open-source 3-D suite Blender (www.blender.org). In order to accomplish this goal, the creators had to develop something that never had been available before: an open-source compositor.
Compositing is the art of taking multiple image sources—whether from 3-D, vector graphics, photographs, video or procedurals—and marrying them together to create a seamless, integrated image. A good compositing program provides the means to access all the mathematical functions available in the image processing universe, and a good artist needs to be able to get down into the guts of an image from time to time, below the interface, and tweak it directly with mathematical functions.
Because of Linux's continuing adoption in post houses, several high-end compositing systems, such as Shake, D2 Nuke and Eyeon Fusion, have been available for years now, but the prices run up to thousands of dollars per seat with extra costs for maintenance and render-node licenses. For those with smaller budgets, Linux compositing has been perpetually out of reach, unless one has the patience to do hand scripting in ImageMagick, which is far more technical than most artists care to get and generally requires the addition of a hacker to the pipeline (another cost point), or work frame by frame in GIMP, which is laborious and not worth the effort for any but the smallest projects.
Consequently, the only budget-friendly solutions for a small studio has been Adobe's After Effects or Apple's Motion, which means adding a Windows or Mac OS machine to the pipeline. Both are very capable, useful tools that produce professional results, but neither are open source.
The two classes of compositors are built around two divergent interface paradigms, which dramatically effect work flow. The first of these paradigms is the Photoshop paradigm. It shows up most prominently in After Effects, and in a modified form in Apple Motion, and works by marrying the interface conventions of Photoshop with a basic multitrack editor interface. In this paradigm, composites are achieved using layers of images built atop each other, with each layer being operated upon by its own effects stack. The main advantages of this paradigm are the speed of work for simple and moderately complex effects and the ease of navigation for new users who already are familiar with Photoshop (Figure 1).
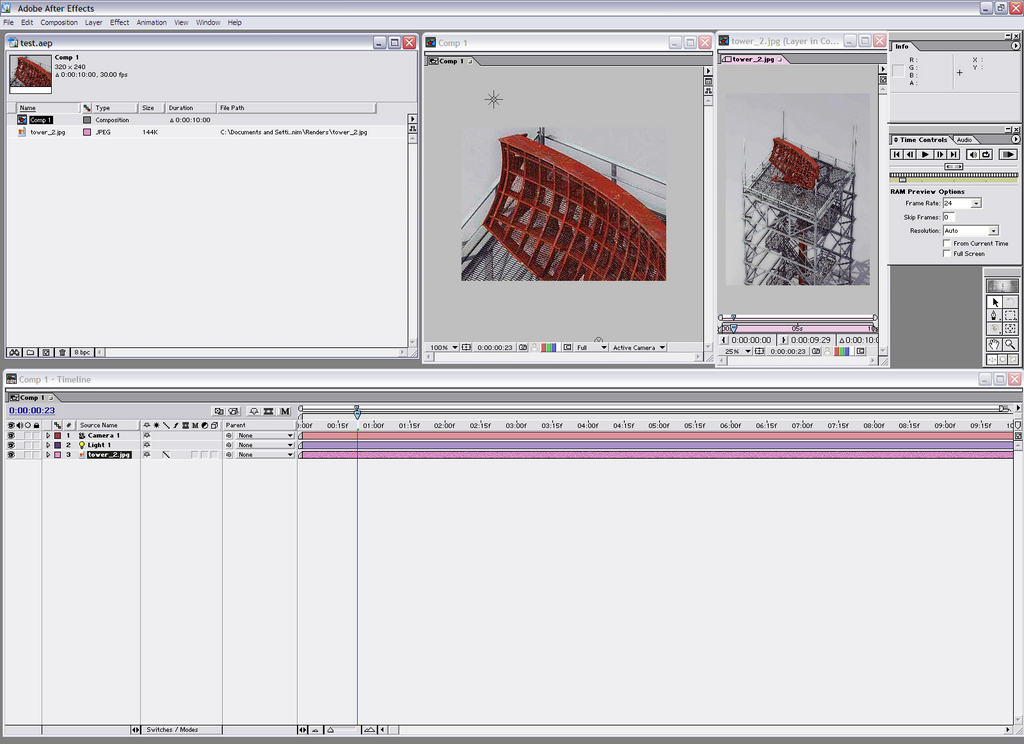
Figure 1. Adobe After Effects Interface
The second paradigm, the “node-based” paradigm, is the one that appears in the high-end professional compositors. It works by chaining together various image functions to create complex effects. Image functions are mathematical transforms applied to an image to change it in one way or another, and they reside at the base of anything one does in GIMP or ImageMagick or in video compositing. These functions are encapsulated in the interface by nodes. A node works a bit like a guitar pedal—it accepts inputs and generates outputs, and those outputs can be routed to an infinite number of other nodes. Thus, in a node-based compositor, one uses the node chains to accomplish one's goal, and there typically are two types of nodes from which to choose. One type is the familiar, user-friendly prepackaged effects plugins, such as one would find in the Photoshop universe. The other type is a set of mathematical interfaces that allow you to build custom effects yourself. This has the disadvantage of being far more visually complex and, for some people, much harder to learn. However, for that steeper learning curve, the artist gets a much more versatile work flow, which is better suited to doing highly complex work. Node-based compositors available for Linux include: Shake (now defunct), Eyeon Fusion, D2 Nuke (formerly of Digital Domain, now owned by the Foundry) and Blender (Figure 2).
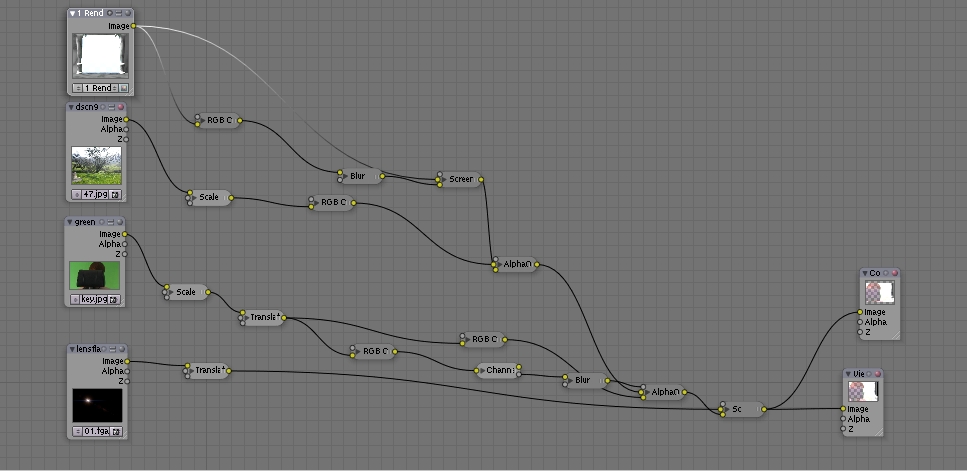
Figure 2. A Node-Based Interface
Blender itself has long had a rudimentary track-based compositing system, which has received a lot of attention since Elephants Dream and has become quite useful both as a video editor and a compositor. Alas, because its primary purpose is video editing, it lacks the ability to nest compositions or layer effects as complexly as can After Effects and Motion, leaving it firmly in the quick-and-dirty category for compositing work.
However, with version 2.43, Blender introduced its node-based compositor, the jewel in the crown of the Elephants Dream improvements. Professional-level open-source compositing has arrived, and it's integrated with an otherwise very powerful 3-D content creation suite.
To demonstrate what it can do, let's walk through a fairly simple five-layer composite.
To get to the compositor, fire up Blender and change the main 3-D window to the nodes editor (Figure 3). Toggle on the Use Nodes button. Because Blender uses nodes for material and texture creation as well as compositing, you need to depress the picture icon. By default, a render scene and a composite node will pop up. In the case of this project, one of the elements I'm using is a 3-D scene in Blender, so I retain this node and assign it to my primary camera (Figure 4).
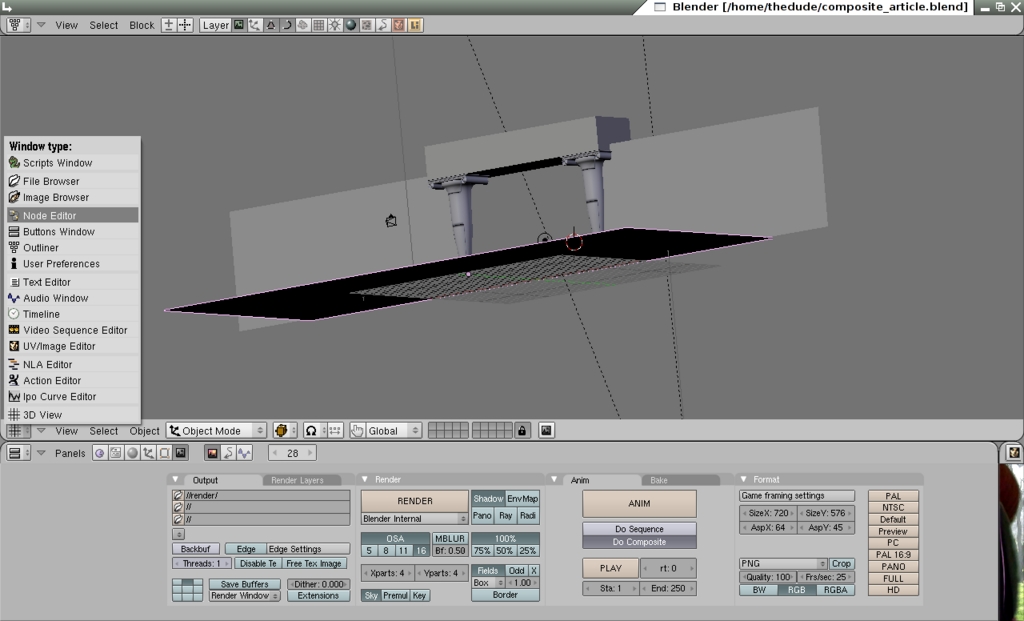
Figure 3. Finding the Nodes Editor
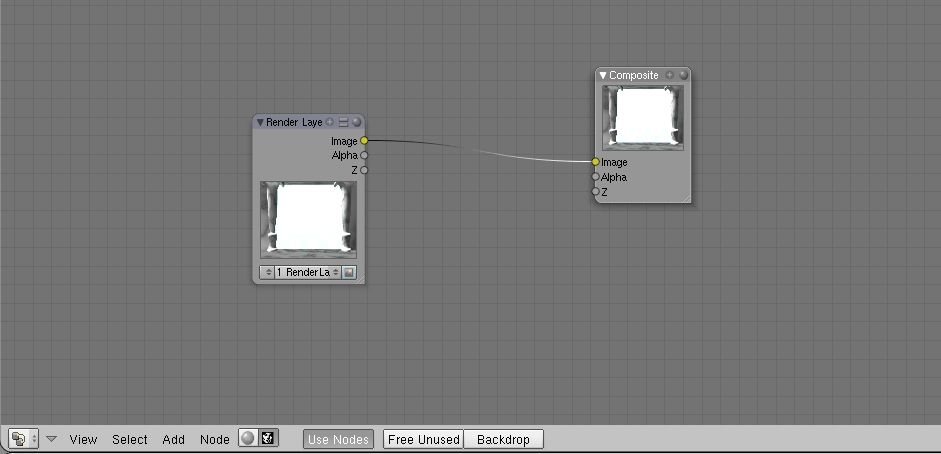
Figure 4. Basic Composite Nodes Setup
Next, I split the bottom view into two windows, and in the right-most pane, pull up the image editor window, where there is a list box that allows you to choose the output nodes from the compositor window. This is how you check your progress (Figure 5).

Figure 5. The Viewer Node and Window
Next, I add a few more sources. In each case, pressing space brings up a menu that allows me to add nodes. I want three additional input nodes, and from each I assign the appropriate type. For this project, I'm working with two still images (the lens flare and the background photo) and one image sequence (the greenscreen clip, rendered out from DV to an image sequence to make it easier to work with).
Why an Image Sequence Instead of a Video?
Working with image sequences offers three distinct advantages over working with video. First, with image sequences it's easier to retouch problems on individual frames without reprocessing an entire clip. Second, the variety of alpha-enabled lossless formats gives the operator a far greater flexibility than do video formats, very few of which are lossless or allow embedded alpha channels. Third, video codecs are, frankly, a big pain in the neck. They vary wildly in support from one program to another; however, image formats are universal and comparatively open. Converting your video to image sequences before piping it through your compositor or motion tracker means that you're going to encounter far fewer problems with moving between various programs in your work flow.
With Blender, there is one further advantage to using image sequences, and it has to do with a shortcoming of the program. Blender does not support NTSC drop or nondrop frame encoding, both of which run at 29.97 frames per second (fps). Because it's a European program and has historically been an animation program, the closest approximation it can hit is 30fps. Though .3fps seems like a trivial difference, it's more than enough to slip your sound sync beyond the limits of intelligibility, so it's far better to work with image sequences and then re-multiplex your audio with your video in your video editing software, such as KDENLIVE or OpenMovieEditor.
First, I build the nodes chain for the background image (Figure 6). The first node, moving left to right, is our source node—the photo itself. The second is a scale node, which I use to shrink my rather large digital photograph down to something approximating SD video resolution. Next, I've used an RGB curves node to blow the highlights out of the photo to help sell the illusion that our character is looking from a shaded courtyard out into a wild garden in direct sunlight.
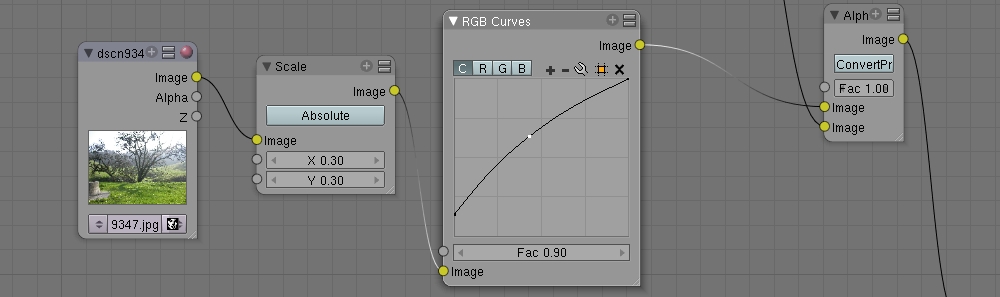
Figure 6. The Background Nodes Tree
Next, I take the pillars element, which is a rendered layer from within Blender proper, add a procedural glow layer to it, and marry the glow and the pillars to the background. To do this, I take an output from the source and run it through a curves pass to cut out all but the brightest highlights (Figure 7).
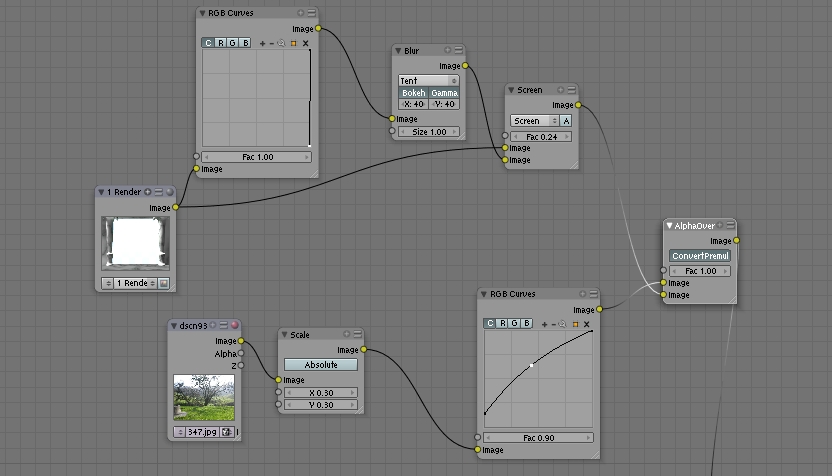
Figure 7. Pillars and Glow Pass
I pipe the output from the curves node into a blur node, where I do a 40-pixel x/y tent blur and then direct that into a Screen node, where the glow is composited back over the source picture of the pillars. This married image is then piped into an AlphaOver node, which pastes the pillars and glow over the top of the photo.
Now we come to the color keying. There are a number of ways to do color keying in a node-based compositor, not least among them is building your own keyer out of basic mathematical functions. Although this method is excellent and yields the best results (even on DV footage, which has some very particular problems with color keying), it requires far more ink than I have space for here. So, for the sake of brevity, I selected one of Blender's three native keying nodes, the channel key, to do the job (Figure 8).
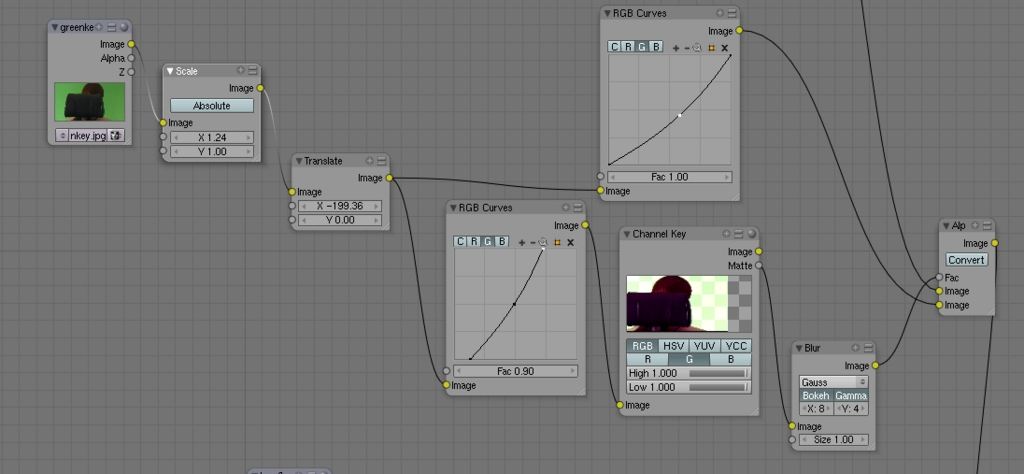
Figure 8. The Color Keying Nodes Tree
The footage, first off, needs some prep, and I've prepared the same footage two different ways—one for pulling the matte and the other for color matching. I first ran the footage through a scaling node to correct for the 16:9 aspect ratio I shot in—as the rest of my elements are in 4:3, I'm pre-correcting the footage rather than doing it at render time. I then ran it through a translate node, which allowed me to reposition the footage to the left, so that we actually can look over the actress' shoulder rather than just staring at the back of her head. From there, I send the output into two parallel subtrees—keying and color correction.
The keying subtree begins with a curves node, which pushes the green in the greenscreen into a narrow band to make it easier for the keyer to latch on to. Then, the output links to the input of a channel keyer, set to pull the cleanest possible matte (which I accomplished by hooking a viewer node to the image output, so I could see what I was doing when I played with the settings). The resulting matte is then run through a blur node. Normally, when keying DV footage, I would apply a 4x2 blur to soften the matte and compensate for the edge artifacting introduced by the DV compression. However, in this case, my edges were dark, because of how I lit the original scene, and I needed some extra feathering so the brightness from the background would bleed over. The output of this blur node is then piped into the Fac input of an AlphaOver node, which marries the greenscreen footage to the rest of the image. But, I'm getting ahead of myself.
Let's back up to the other half of the keying tree. This takes an additional output from the translate node into a curves node, which is set to tamp down the green channel to get rid of the green spill and help sell the different lighting conditions of the foreground vs. the background. The output of this curves node is then run into the bottom input on AlphaOver. Now, to complete the marriage of foreground with background, we run an additional noodle from the AlphaOver node at the end of the background subtree into the top image input on the keyer AlphaOver node.
I could leave things here, but the shot could use a little extra touch to tie all the layers together. To accomplish this, I created a nice lens flare and brought it in to Blender. I ran it through a translate node to put it into the right spot, and from there into another screen node, which lays it over the top of the previous composite. To do this, the lens flare went into the top image input, and the previous AlphaOver node went into the bottom image input, and I messed with the Fac, so I got the right effect—just a hint of extra brightness and anamorphic smear, which helps sell the integration of the different layers (Figure 9).
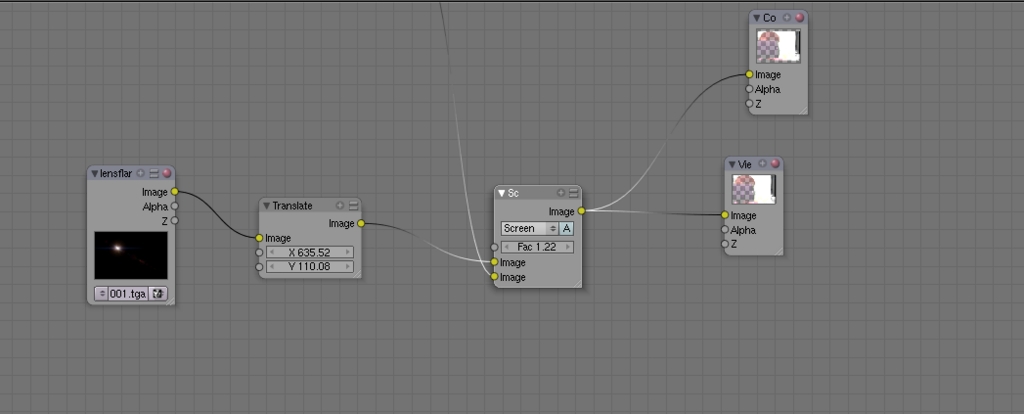
Figure 9. Layers of the Image Including Lens Flare
Now, all that remains is to hook up the Composite node, which is what Blender draws from for its output. This can be found next to the viewer node under output in the add nodes menu, which you get to by pressing the spacebar. Once the composite node is hooked up to the output, go to the renderbuttons window at the bottom of the screen, depress the Do Composite button, and click Render, or, if it's an animation, click Anim (Figure 10). The result of your hard work appears in the render window, from where you can save it using F3 (if it's a still). Or, you can find it on your hard drive in the temp directory or another directory that you have set for output in the renderbuttons window.
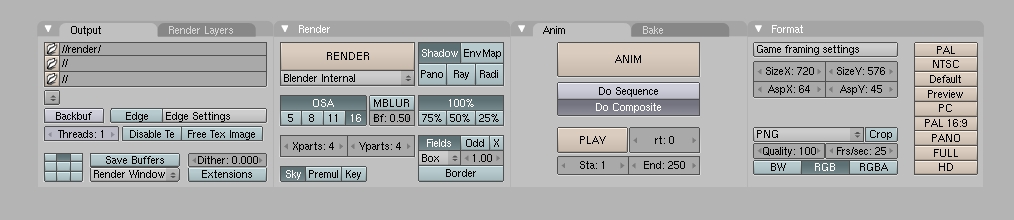
Figure 10. Click Render or Anim in the Blender Controls
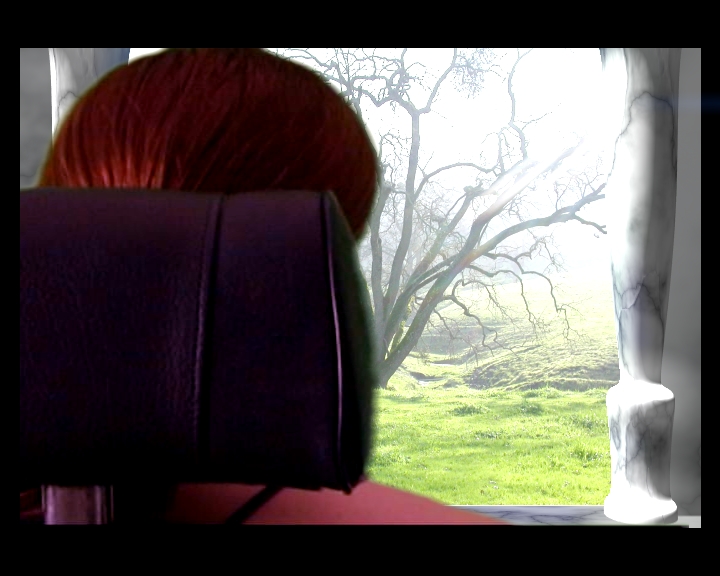
Figure 11. The Completed Project
Simple though this project is, it gives a good grounding in how nodes work and why they're useful. Enough access to basic image processing functions is included that the capabilities are very deep and extensive, and because of Blender's support for HDR formats, such as OpenEXR, and its lack of limitation on resolutions, it is squarely in the professional compositing camp, albeit at the less-sophisticated end of the spectrum (as one would expect from a brand-new project). It is advancing quickly. In future versions, more user-friendly keying tools and color tools are planned, and hopefully there also will be more direct access to the translation and garbage matting functions, which at the moment are obtuse and inconvenient. Until such tools emerge, I highly recommend that anyone wanting to use Blender as a workhorse compositor invest in a book that teaches how compositing works, both in theory and practice. The best available is The Art and Science of Digital Compositing (The Morgan Kaufmann Series in Computer Graphics).
Using Blender for composite work has significant advantages as well, since it's an integrated part of a 3-D content creation suite, the particle systems, fluid systems, procedural textures and all the traditional 3-D modeling and animation tools are at the compositing system's disposal, which is supremely useful for any number of highly complicated shots that normally would require using several programs in conjunction to pull off correctly.
Here's hoping the Project Peach, the currently in-process sequel production to Elephants Dream, gives us more such innovations that push the compositing system to the next plateau. Until then, there is much to explore, learn and use.
Open-source compositing has finally arrived. Enjoy!
Dan Sawyer is the founder of ArtisticWhispers Productions (www.artisticwhispers.com), a small audio/video studio in the San Francisco Bay Area. He has been an enthusiastic advocate for free and open-source software since the late 1990s, when he founded the Blenderwars filmmaking community (www.blenderwars.com). Current projects include the independent SF feature Hunting Kestral and The Sophia Project, a fine-art photography book centering on strong women in myth.
