
Build Your Own Arcade Game Player and Relive the '80s!
I grow weary of hearing how bad Linux is for gaming. In this article, I buck that stereotype and show how to use penguin power to relive the '80s. In this cool project, I describe how to construct a fully functional arcade cabinet. When complete, you'll be able to play all the old coin-op games from your childhood in the coin-free luxury of your living room (or garage—depending on the tolerance of individual spouses).
The system uses software based on the MAME (Multi-Arcade Machine Emulator) Project to play the original classics emulated in Linux. MAME uses software to emulate the original arcade hardware. This article explains how to connect the original joysticks and buttons, and even gives some pointers regarding purchasing rights to the original games.
First off, it's the arcade case that makes this project truly awesome. If you don't have an actual arcade cabinet, with original arcade controls, you might as well go back to playing Zork on your TSR-80 for your dose of nostalgia. The cabinet is what makes this cool, period. It's up to you to decide whether to make a cabinet or buy a used one. If you make the whole thing from scratch, the design is completely up to you. The downside is that doing this requires some woodworking skills. I have no such skills. In fact, to me, “saw” is a type of waveform on an oscilloscope. So, I opted to purchase an old arcade machine and gut it out. Unless you are a woodworker, this is the way I'd suggest doing it. As a bonus, I got all the buttons and controls I needed for free, and the case even smelled a little like a pizza parlor. (Okay, that might be my imagination.)
To find used cabinets, look up “coin op” or “arcade” in the phone book. It was my particular fortune to find a man willing to give me two used cabinets for $30. I did have to listen to a litany on the downfall of the arcade generation and how kids these days don't appreciate the classic games. I think he threw in the second case for me when I mentioned that I was rebuilding it because I wanted to relive my youth. He liked that idea almost as much as I did. Keep in mind that if you happen to get an arcade monitor, it's possible actually to use it, but it requires more work. For the purpose of this article, I assume you're using a standard computer monitor.
After I bought my wife flowers and took her out to dinner, I was allowed to bring one of the cases into the house and start the fun. My particular case was from an old Neo-Geo game, and I chose to leave the somewhat damaged decal on the side (Figure 1).

Figure 1. You can see the cabinet won't win any beauty contests, but it's just dripping with nostalgia.
If you are, in fact, a woodworker, you may want to purchase the particle board and make a truly custom cabinet. There are designs and original measurement specifications for some common arcade machines on www.arcadecontrols.com. In fact, that site has tons of information on constructing a MAME machine from the ground up, and it's an invaluable Web site. To be honest though, even if I were able to start from scratch, I actually prefer the used cabinet. There's something special about knowing it's the real deal, even if the insides are all different.
The most difficult part of construction, for me, was getting the monitor properly mounted. I used an old 17" Apple monitor that was destined for the trash. As you can see in Figure 2, the monitor shelf has to be at the right angle so that the face of the screen is flush with the Plexiglas front. I'm sure there are woodworking shortcuts for figuring out how to get the angle correct, but I ended up with some really complicated geometry equations involving SINE and COSINE. Yep, I'm a geek.
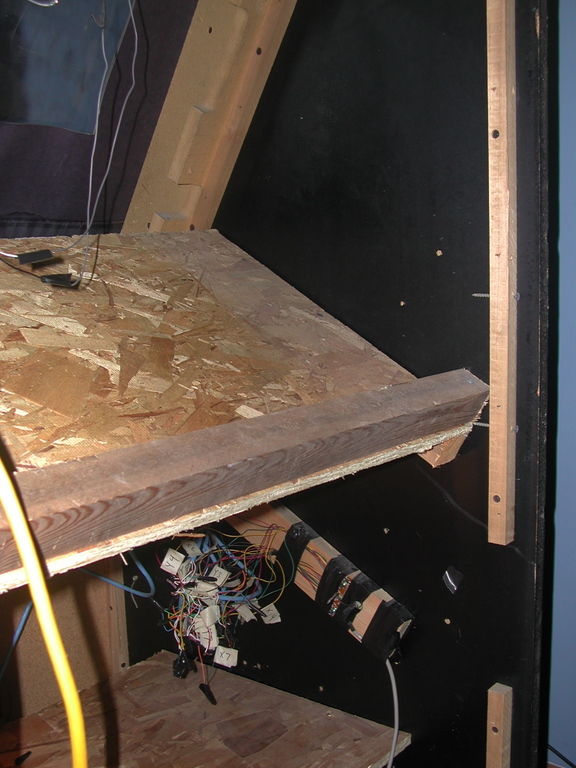
Figure 2. I most likely could have gotten just as close with a guess, but I must confess a lot of math went into the angle calculation for this shelf!
The shelf below is to hold the computer. All I did there was line up the shelf with the coin door in the front, so I could reach in to power the computer on and off. (The coin mechanism actually can be wired and used, but mine was broken, so I never installed it. Maybe next time.)
The last bit of woodworking is the most complicated. You must decide what button layout you desire. I'm the kind of person who spends 20 minutes looking at a dinner menu, so a decision like this was bordering on impossible for me to make. I read, I Googled, I compared and I surveyed. My suggestion is that you avoid all that and go with the layout I chose. Why? Because it works for most games, and you can always change it later. Figure 3 shows the button layout I chose, which happens to be a standard Street Fighter II layout.
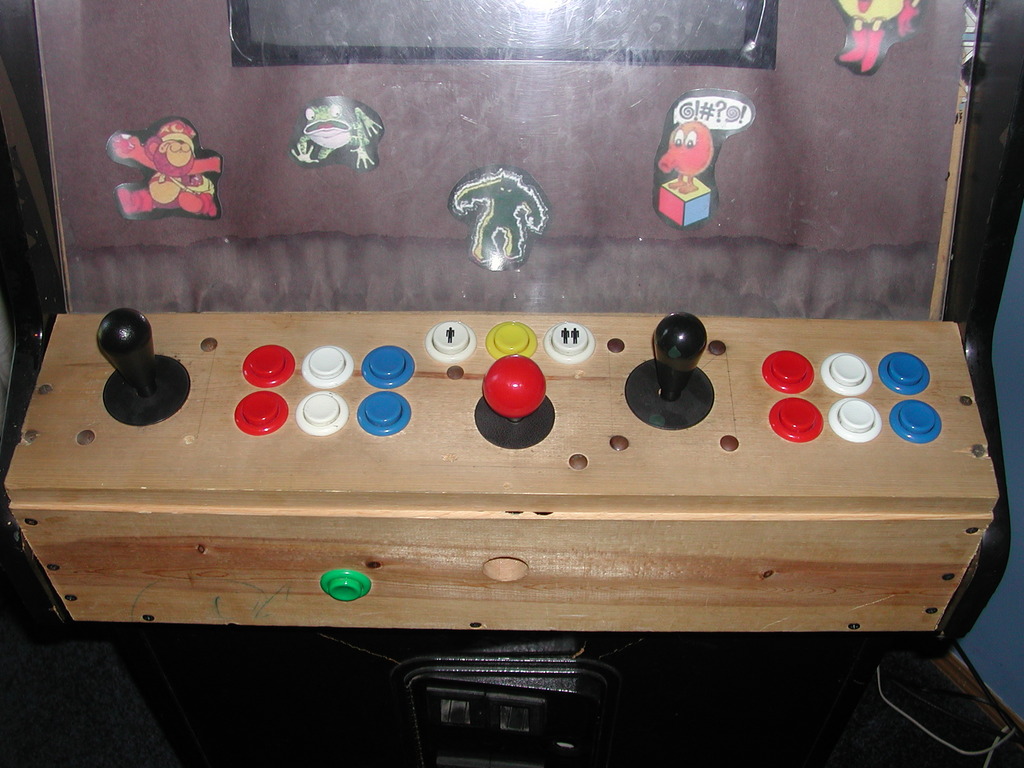
Figure 3. I really was lucky with the free buttons I got with the cabinets. I couldn't have planned the colors any better if I tried. You'll see evidence of my woodworking shortcomings by the extra hole I drilled.
You'll notice an extra joystick in the middle, which is not part of the Street Fighter layout. It's an original Ms. Pac-Man joystick that my wife got as a belated high-school graduation gift. (We're an odd family.) It's wired directly to the player-one joystick, so don't worry if you don't have such a beast, it's not really additional, just an alternate.
The joystick and button holes will vary in size, but standard buttons use 1 1/8" holes. Feel free to lay the buttons out however you like. I went out of my way to make sure the buttons were perfectly placed, but there aren't rules for these things. Don't forget a button for inserting coins! Mine is sticking out of the front of the machine, about where you'd put in a quarter if it were an actual arcade.
Now you should have a mostly empty case with a monitor shelf, computer shelf and a wooden control panel full of holes. If you are doing this work in the house, and you happen to be married, take this time to vacuum. You can thank me later.
If you are the artistic type and want to paint the control panel and cabinet, go ahead and do so. I couldn't wait, and to this day my cabinet has a raw-wood control panel.
This is where the magic happens. If you're anything like me, you've already tried MAME on your computer and played the classic games with your keyboard. It's fun, but it's definitely not the same as the original. In this step, we connect the real arcade controls to the computer. First, if you weren't lucky enough to get used joysticks and buttons on the cabinet, you need to buy some. There are a few places to buy arcade controls, but one of the most popular is Happ Controls (www.happcontrols.com). If you check out the controls section of the Arcade Controls Web site mentioned previously, you'll find a plethora of vendors for such things.
Once you have the actual buttons and joysticks, you need to decide whether you want to buy a keyboard encoder or hack a keyboard yourself. The former option is easier and more reliable, but the latter offers a certain geeky charm. I chose the latter. There are very in-depth instructions on the Arcade Controls Web site regarding how to figure out button layouts properly, but see the Keyboard Hacking sidebar for a quick description, so you can decide for yourself which way to go. If you do choose to hack a keyboard, I encourage you to come up with a better way to connect the wires than I did. Figure 4 shows my horrible rat's nest of wires. It's ugly, but it works.
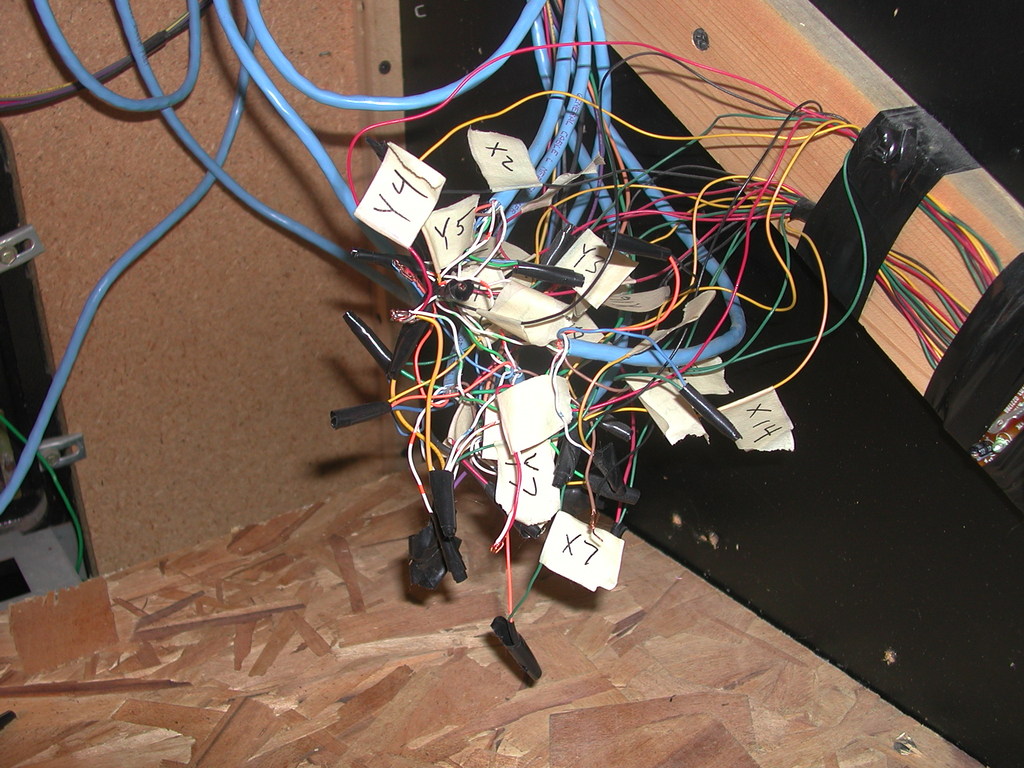
Figure 4. This photo pretty much speaks for itself. It's a great example of how not to organize wires.
Whether you choose to create your own keyboard controller or purchase one from a place like Hagstrom Electronics, you still have to connect the wires to the arcade controls. Because I'm terrible at woodworking, you'd think there would be a certain balance in the universe that would suggest I could solder well. Let me assure you that balance does not exist. I thought it would be really great to avoid soldering to all the buttons. I bought some spade connectors that would slide right onto the terminals (Figure 5). Although the idea still sounds great, it turns out that the microswitches in the buttons and joysticks really need a solid connection. Unless you want to take apart your control panel to wiggle wires every so often (like me), I highly suggest you solder everything. Invite a friend, because I'm under the opinion that soldering takes three hands. Perhaps your two hands are better than mine, but at least the friend can hold a light.
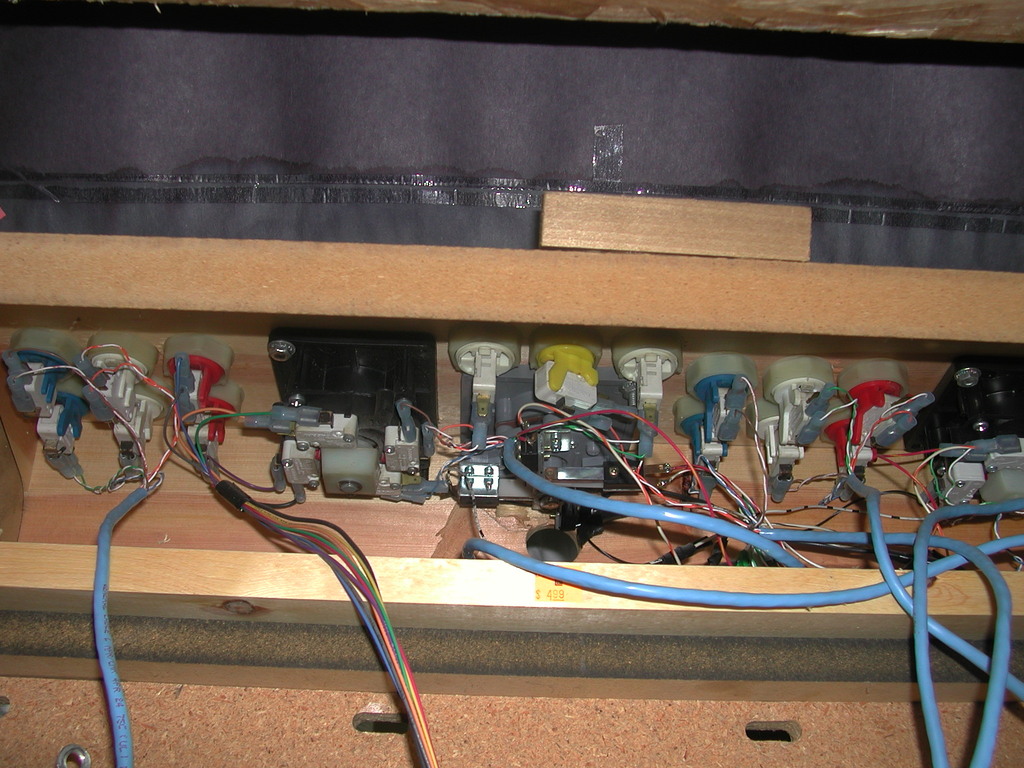
Figure 5. My goal was to avoid soldering. The spade plugs look great, but they honestly don't make a very good connection—another example of what not to do.
So now, you should have a cabinet, mounted controls, some sort of keyboard interface and an empty shelf waiting for a computer. The last step is to put in a computer and install the software. The horsepower you'll need really depends on what games you want to play. If you are planning to play the classics, like Pac-Man and Asteroids, a Pentium II should suffice. If, however, you want to play Street Fighter II, or any newer games, you should get a Pentium III or 4. I have a middle-of-the-road Pentium 4. If you want my advice, I'd say to use what you've got. If you feel the need to invest more later, you always can do so.
To run MAME in an arcade cabinet, you must configure two separate programs: MAME itself and a front end. Because MAME is a command-line program, you need a front end to launch the games with the joysticks and buttons. This last step is really my favorite part. If you thought my indecisiveness regarding the button layout was excessive, you don't want to know how long I spent determining what software to run. Obviously, I chose to run Linux. Check out the Options sidebar for some comparisons on a few common choices regarding distros and front ends.
Options
Software: AdvanceCD, custom Linux install.
Pros: creates a custom CD or bootable USB key that boots directly into the AdvanceMENU front end.
Cons: really tough to configure if you don't use the standard button layouts. If your hardware isn't detected properly, it's also hard to fix. Also it's kind of slow, especially if booting from USB 1.1.
Software: LinCade, based on Gentoo.
Pros: also uses the nice AdvanceMENU front end, and it's a little more configurable, with the option to add and modify games after the install.
Cons: still very difficult to configure if you don't use the standard MAME button layout.
Software: KnoppixMame, based on Knoppix.
Pros: great hardware detection.
Cons: really not designed for an arcade cabinet, but rather for someone with a keyboard and mouse.
Software: standard Ubuntu and WahCade front end.
Pros: very easy to configure. The Ubuntu install handles all the hardware detection. This is the option I chose.
Cons: not specifically designed for an arcade cabinet.
I chose to install a stock Ubuntu distribution. Really any distro would have worked, but I just happen to like Ubuntu's single CD install. Also, the WahCade front end has a really nice .deb installer, so Ubuntu's Debian roots really made sense. First, install Ubuntu like a normal desktop user. I chose to install Feisty Fawn, because it's the most recent release, and I happened to have a CD already burned. I'd highly suggest running the installation using the same monitor you plan to use in the arcade cabinet. It will save a lot of hassle later on.
After Ubuntu is installed, open up a terminal window, and install xMame (the X Window System version of MAME):
# sudo apt-get install xmame-x
Then, go to www.anti-particle.com and get the latest version of WahCade. You'll want to get the .deb file. To install it, type:
# sudo dpkg -i wahcade-xxx.deb
Now, you're ready to configure things. The installation instructions at the WahCade home page are pretty clear, but make sure to follow them carefully. You'll have to do a few command-line things and figure out where you want to store ROMs and such. There is a really nice GUI configuration tool, in which you can assign the proper keys (from your joysticks) to control the interface. Once you have the front end configured and ROMs in place, which admittedly will take a while, go ahead and fire up WahCade. Make sure to add the -fullscreen and -skip_disclaimer options for xmame, the latter because it's difficult to type OK with just a joystick. (MAME displays a disclaimer by default that forces you to type OK in order to continue.)
If everything is configured correctly, you should see the WahCade program and be able to select and launch games accordingly (Figure 6). I hate to admit this, but I spent hours trying to figure out how to configure the buttons for xmame. I tried to edit config files, but it was too complicated for me to figure out. In the end, it turns out MAME has a built-in method for reassigning keys. When I realized how simple it really was, I could have kicked myself. I still might. Simply press the Tab key once you're inside a game, and you get a nice configuration screen where you can configure either the default keys or the game-specific keys.

Figure 6. Here's the main WahCade screen. This screenshot was provided by Andy Balcombe, the WahCade developer. Thanks Andy!
One of the beauties of MAME is that it's possible to assign a command to a combination keystroke. For example, I didn't want to install a button just to exit a game, so I mapped “exit game” to pressing Player 1 and Player 2 simultaneously. It really limits the amount of buttons needed. MAME also has an option to pause, which is something the original arcade never had, but it's very nice for home use. The yellow button on my control panel is mapped to pause.
Once MAME and WahCade are working, you need to automate the process. Set the GNOME login manager to log in the user account automatically, and create an .xsession file that avoids the GNOME environment and launches WahCade directly. Here's an example of how to create an .xsession file:
# cat > ~/.xsession
# wahcade
# ^D  (actually press control-D)
#
# chmod +x ~/.xsession (this makes it executable)
So there you have it, an arcade system, complete with real controls and original games. You can customize your system to fit your needs. Perhaps you want a headphone jack, so you can play without disturbing others. Maybe you want to add music support and have your arcade machine double as a jukebox. Because the cabinet has a full computer with Linux under the hood, the possibilities are really endless. Have fun!
Keyboard Hacking
Hacking a keyboard in four easy steps:
Take apart the keyboard, making sure not to damage the PCB.
Find the two sets of connectors on the PCB, and on a chart, label them X and Y.
Trace the very small, fine lines on the flexible plastic sheets to determine the X and Y coordinates for every key. No, really, I'm not kidding.
Solder wires onto each X and Y terminal, and use those wires to connect to the arcade controls.
Obtaining Legal ROMs
MAME ROMs are easily located for download on the Internet, but the legality of using those ROMs are questionable. There are a couple ways to ensure that you have the legal right to your ROMs.
Buy the actual motherboard from the original game. This may sound far fetched, but it's not too difficult to purchase broken arcade boards from either local coin-op vendors or on-line from eBay. Because you're just looking for the legal right to use the downloaded ROM, it doesn't really matter if the board is broken.
You can buy the X-Arcade keyboard, which comes with a handful of classic ROMs.
Check out arcadecontrols.com. There are some free, noncommercial games available for download and some more ideas regarding obtaining legal ROMs. It often is difficult to find whom to buy the rights from, even if you want to spend the cash.
Resources
MAME Arcade Emulator: www.mame.net
WahCade Front End: www.anti-particle.com
Arcade Controls (Cabinet Building Info): www.arcadecontrols.com
Happ Controls: www.happcontrols.com
Hagstrom Electronics: www.hagstromelectronics.com
Ubuntu Linux: www.ubuntulinux.com
AdvanceMAME/AdvanceMENU: advancemame.sf.net
LinCade: www.pc2jamma.org
Shawn Powers is a geeky Technology Director for a small school in northern Michigan. He did manage to find a wife to love him and has three wonderful daughters. His wife even watches Star Trek with him, but he suspects it's just because she loves him. Send him e-mail at shawn@brainofshawn.com.
