
Building Firefox Extensions
Like many Linux Journal readers, Firefox is my browser of choice. One of its core strengths is the number of available extensions. Early extensions were focused around merely changing the look of the browser; however, in the past few years, extensions have been used to provide a very rich user experience while straddling the line between desktop and Web applications.
In this article, I explain how easy it is to extend Firefox by building an extension that integrates with a photo editing API provided by Picnik.
The first thing a new extension developer should do is set up a development profile. Although you can do extension development using your normal Firefox profile, it often is easier to create a new profile dedicated to development. First, start Firefox's profile manager:
$ firefox -ProfileManager
Next, click the Create Profile button. Once the wizard is loaded, click Next to get started. At this point, you should see a window similar to the one shown in Figure 1. Enter a name for your new profile (I used dev). Make sure you write down the path to the folder where your profile will be stored before clicking Finish. You'll be using that path later.
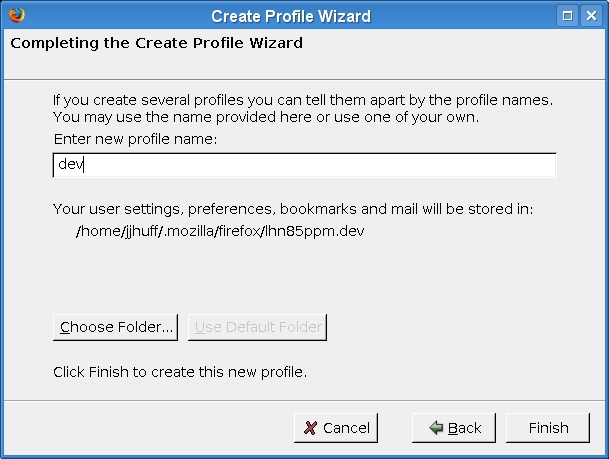
Figure 1. Creating the Profile Named dev
Now that you have a dedicated profile, you should install some extensions that make development easier. The first one you should install is the Extension Developer. This is a compilation of several handy extensions—all designed to make developers' lives easier. See Resources for several other handy extensions. I highly recommend that you install all of them.
At this point, you're ready to start your first extension. Nearly all extensions start with the same basic boilerplate code, so the same person who made the Extension Developer put together the Firefox Extension Wizard to automate this part of the process. You can find its URL in the Resources for this article.
Most of the required fields should make sense. The main one of note is the Extension ID. This is used to identify the extension uniquely for updates and other purposes. In the past, standard practice was to use a GUID (Globally Unique Identifier). Most developers recently have switched to a format that bears resemblance to an e-mail address. For this example, I used extension@linuxjournal.com. I also selected the option to create a context (right-click) menu. Figure 2 shows how I filled in the rest of the fields.

Figure 2. Navigating the Firefox/Thunderbird Extension Wizard
Once you are satisfied with your choices, click the Create Extension button. After a few seconds, your browser should prompt you to download a zip file. Go ahead and extract it:
$ unzip linuxjournal.zip
Archive:  linuxjournal.zip
  inflating: linuxjournal/install.rdf
  inflating: linuxjournal/chrome.manifest
  inflating: linuxjournal/readme.txt
  inflating: linuxjournal/content/firefoxOverlay.xul
  inflating: linuxjournal/content/overlay.js
  inflating: linuxjournal/skin/overlay.css
  inflating: linuxjournal/locale/en-US/linuxjournal.dtd
  inflating: linuxjournal/locale/en-US/linuxjournal.properties
  inflating: linuxjournal/config_build.sh
  inflating: linuxjournal/build.sh
Before going into the purpose of all those files, you should install it to see what the auto-generated extension actually looks like. Firefox can use extensions installed in two ways. The normal installation method involves opening the extension's .xpi file in Firefox. This is the way most extensions are distributed and installed. The other method is to create a pointer file that tells Firefox where to find your extension's files. With this method, you don't have to re-install the extension every time you want to test a change; all you have to do is create the pointer file:
$ cd linuxjournal
$ pwd > ~jjhuff/.mozilla/firefox/lhn85ppm.dev/extensions/
↪extension\@linuxjournal.com
Of course, you'll want to replace ~jjhuff/.mozilla/firefox/lhn85ppm.dev with your Firefox development profile directory.
Now, go ahead and start up Firefox using your development profile:
$ firefox -P dev
First, check to see that the extension is installed. Select Tools→Add-ons, and verify that LinuxJournal 1.0 is listed. You should see a window like the one shown in Figure 3. While you have the Tools menu open, you probably noticed the new (and red) menu item (Figure 4). Go ahead and right-click in the browser window. You should see a menu similar to the one shown in Figure 5. If everything looks right, your extension is installed properly.

Figure 3. The LinuxJournal extension is installed and ready to go.

Figure 4. The extension can create a custom menu item under Tools.

Figure 5. You also can create a custom right-click menu item.
Before modifying the generated code, you should understand how all the pieces interact. The main file for the extension is install.rdf. It specifies the extension's name, ID and version. The install.rdf file also contains a list of all the compatible applications and their versions. In this example, we specify a single application with an ID of {ec8030f7-c20a-464f-9b0e-13a3a9e97384}, which is the ID for Firefox. We also specify that we're compatible with Firefox versions 1.5 through 2.0.
The second file of interest is chrome.manifest, which tells Firefox what to expect inside the extension. The manifest also includes a list of overlays. (I explain overlays later in this article.)
Most extensions are organized into several directories. The content directory typically contains the bulk of your extensions UI and logic. The skin directory is where CSS and any graphics live. Finally, locale is for locale-specific files, such as translations. (I discuss localization later in this article.)
The user interface for Firefox (as well as some other Mozilla projects) is implemented in a file format known as XML User Interface Language (XUL) combined with JavaScript. Collectively, this is known as Chrome. If you installed the Chrome List extension, you easily can view the files that make up your browser and its extensions. For example, the file chrome://browser/content/browser.xul, contains the UI for the main Firefox window.
Additions and modifications to the user interface are created by overlaying additional XUL elements on to the existing Chrome. An extension's overlays are specified in chrome.manifest, with a line similar to the following:
overlay	chrome://browser/content/browser.xul
  ↪chrome://linuxjournal/content/firefoxOverlay.xul
This line specifies that firefoxOverlay.xul should be overlaid on top of browser.xul. If you add additional overlay files, or if you want to modify other parts of the application, you need to add more lines to chrome.manifest.
Let's take a look at how the extension adds a new item to the context menu. First, open chrome://browser/content/browser.xul in the Chrome Browser, and search for contentAreaContextMenu. The second hit should look similar to this:
<popup id="contentAreaContextMenu" ... >
    ...
    <menuitem id="context-stop"
              label="&stopCmd.label;"
              accesskey="&stopCmd.accesskey;"
              command="Browser:Stop"/>

    <menuseparator id="context-sep-stop"/>
    ...
</popup>
Now, open up firefoxOverlay.xul from your extension. You should see a block that looks like this:
<popup id="contentAreaContextMenu">
    <menuitem id="context-linuxjournal"
	          label="&linuxjournalContext.label;"
              accesskey="&linuxjournalContext.accesskey;"
              insertafter="context-stop"
              oncommand="linuxjournal.onMenuItemCommand(event)"/>
</popup>
When the overlay is loaded, the browser searches its existing Chrome for an element with the ID of contentAreaContextMenu and merges in the XUL from the overlay. It will end up with something like this:
<popup id="contentAreaContextMenu" ... >
    ...
    <menuitem id="context-stop"
              label="&stopCmd.label;"
              accesskey="&stopCmd.accesskey;"
              command="Browser:Stop"/>

    <menuitem id="context-linuxjournal"
	          label="&linuxjournalContext.label;"
              accesskey="&linuxjournalContext.accesskey;"
              insertafter="context-stop"
              oncommand="linuxjournal.onMenuItemCommand(event)"/>

    <menuseparator id="context-sep-stop"/>
    ...
</popup>
When this menu is rendered, our menu item appears along with the normal context menu items. In addition, we specified the insertafter attribute to tell the browser that we want our menu item to appear after the context-stop menu item.
The Chrome system builds on existing technologies to support localizing the UI easily. One major part of this is the ability to store strings separately from the UI itself in a DTD (Document Type Definition) file. In our code, firefoxOverlay.xul references that DTD with the line:
<!DOCTYPE overlay SYSTEM "chrome://linuxjournal/locale/linuxjournal.dtd">
Chrome URLs for locale are special, because the browser automatically expands them to reference the proper location in the extension. For example, Firefox automatically expands chrome://linuxjournal/locale/linuxjournal.dtd to chrome://linuxjournal/locale/en-US/linuxjournal.dtd for US English speakers.
The DTD is used to define new XML entities, which can be thought of as macros. Our DTD contains:
<!ENTITY linuxjournal.label "Your localized menuitem">
<!ENTITY linuxjournalContext.label "Your Menuitem">
<!ENTITY linuxjournalContext.accesskey "Y">
These are referenced in the XUL by prefixing them with an &, as in:
<menuitem id="context-linuxjournal"
          label="&linuxjournalContext.label;"
          accesskey="&linuxjournalContext.accesskey;"
This separation of strings from the UI can be awkward at first, but it has other advantages beyond localization. For example, if you make a spelling error in something that appears in multiple places, you have to fix it only once.
The actual code behind extensions is written in JavaScript, which makes writing them within reach of many seasoned Web developers. JavaScript also makes it easy for extensions to be cross-platform with very little work. In order for the code actually to be loaded, it must be referenced in an overlay XUL file. In our case, the following does the trick:
<script src="overlay.js"/>
One of the most important points to remember when writing extensions is that JavaScript's global namespace is shared between all the extensions as well as the core browser code. This means that developers need to use techniques to prevent name clashes. One simple method is to add a unique prefix to all of your variables and functions. The preferred method is to create an unnamed object that contains all of your variables and functions. Taking a look at the auto-generated extension we see:
var linuxjournal = {
    onLoad: function() {
        ...
    },
    showContextMenu: function(event) {
        ...
    },
    onMenuItemCommand: function(e) {
        ...
    },
};
window.addEventListener("load", function(e)
 ↪{ linuxjournal.onLoad(e); }, false);
Using this technique, our extension has exactly one entry in the global namespace (linuxjournal). This makes name clashes easier to avoid.
Notice the call to window.addEventListener. This ensures that our onLoad function is called when the overlay is loaded. In the case of the generated code, it creates a variable that we can use to access the string bundle.
Now that you have a basic understanding of how extensions are created, let's move on to a real-world example. My employer, Bitnik, recently published an API for its Flash-based photo editor, Picnik (www.picnik.com). Bitnik's initial plan was to make our service easy to integrate into third-party Web sites. However, the API also opened the doors to using extensions to achieve a level of integration that we couldn't get with Flash alone.
My first goal was to add a simple context menu item to allow users to edit existing photos easily. Luckily, most of that code is already in the code generated by the extension wizard. See Listings 1 and 2 for the full text of the two most important files (picnik.xul and contextmenu.js). I also created common.js to store some variables that will be shared between files as we add features.
Listing 1. picnik.xul
<?xml version="1.0"?>

<!DOCTYPE picnik SYSTEM "chrome://picnik/locale/picnik.dtd">

<overlay id="picnik-overlay"
     xmlns="http://www.mozilla.org/keymaster/gatekeeper/there.is.only.xul"
     >

  <script type="application/x-javascript"
          src="chrome://picnik/content/common.js"/>
  <script type="application/x-javascript"
          src="chrome://picnik/content/contextmenu.js"/>

  <popup id="contentAreaContextMenu">
    <menuitem class="menuitem-iconic"
        id="picnik-ctx-edit"
        insertafter='context-viewimage'
        label="&picnik.edit_picture;"
        oncommand="picnikContextMenu.editImage();"
        image="chrome://picnik/content/picnik_16x16.png"/>
  </popup>
</overlay>
Listing 2. contextmenu.js
var picnikContextMenu = {
  onLoad:function()
  {
    // Attach the showContextMenu function
    // to the context menu
    var e = document.getElementById("contentAreaContextMenu")
    if( e )
      e.addEventListener("popupshowing", function(ev){
picnikContextMenu.showContextMenu(ev); }, false);
  },

  // Called right before the context menu
  // popup is shown
  showContextMenu: function(event)
  {
    if( gContextMenu )
    {
      var edit_picture = document.getElementById("picnik-ctx-edit");
      if( edit_picture )
        edit_picture.hidden = ! (gContextMenu.onImage ||
gContextMenu.hasBGImage);

      if( gContextMenu.onImage )
        this.imageURL = gContextMenu.imageURL;
      else if( gContextMenu.hasBGImage )
        this.imageURL = gContextMenu.bgImageURL;
      else
        this.imageURL = '';
    }
  },

  // Called if the user clicks the 'edit'
  // menu item
  editImage: function()
  {
    var url = picnikCommon.baseURL + "?import=" + escape(this.imageURL);
    gBrowser.selectedTab = gBrowser.addTab(url);
  },

};
window.addEventListener("load", picnikContextMenu.onLoad, false);
Most of the modifications occurred in the function showContextMenu. This function is called immediately before the context menu is actually shown to the user. This gives our extension a chance to modify the menu items on the fly. In our case, I wanted to show only the Edit in Picnik option when the user was actually right-clicking on an image.
Firefox provides our function with a global variable (gContextMenu), which contains a wealth of information about what the user clicked on. For example, gContextMenu.onImage is true when the user activated the menu on an image. First, showContextMenu gets a reference to the actual menu item via its ID of picnik-ctx-edit. Then, it hides the item if the user didn't click on an image. Finally, the function saves the image URL so that the extension knows what image to load into Picnik if the user actually selects the menu item.
When the user selects the menu item, the browser calls picnik.editImage. This function constructs a URL to pass to Picnik and then creates a new tab with that URL. The server at picnik.com first downloads the image and then responds with a page containing the actual Flash application and the image, ready for editing.
While browsing on the Mozilla Developer Center's Web site, I encountered something that I saw as a natural improvement for Picnik's Firefox extension—the ability to take screenshots of complete Web pages. The first part of the puzzle is the new Canvas HTML element that provides a flexible 2-D drawing canvas for JavaScript. Canvas originally was envisioned as a way to produce dynamic graphics client side.
Two additional Canvas functions make screenshots possible. The first is the drawWindow function. drawWindow, as its name implies, renders an XUL window to the canvas. In our case, we'll use it to render the Web page. The second important function is toDataURL, which allows a script to get an image of what's on the canvas.
Typically, URLs reference an object on a remote server or in the local filesystem. Data URLs store the actual object as part of the URL. This can be handy for embedding small graphics directly in CSS or HTML. This technique allows the browser to avoid another request to the Web server. In our case, we'll use it to get a PNG file of our canvas.
As you can see in Listing 3, picnik.xul has been modified to add a pop-up menu to both the context menu and the Tools menu. An additional file, screengrab.js (Listing 4, available on the Linux Journal FTP site—see Resources), contains the code for actually grabbing the screenshot. As with the context menu code, this file also has an onLoad. In this case, however, the function's job is to detect whether either Canvas or toDataURL is missing. If so, it disables the screen grab functionality. This allows the extension to run on Firefox 1.5 without confusing error messages.
Listing 3. Expanded Version of the picnik.xul File
<?xml version="1.0"?>

<!DOCTYPE picnik SYSTEM "chrome://picnik/locale/picnik.dtd">

<?xml-stylesheet href="chrome://picnik/content/toolbar.css"
type="text/css"?>

<overlay id="picnik-overlay"
     xmlns="http://www.mozilla.org/keymaster/gatekeeper/there.is.only.xul"
     >

  <script type="application/x-javascript"
          src="chrome://picnik/content/common.js"/>
  <script type="application/x-javascript"
          src="chrome://picnik/content/contextmenu.js"/>
  <script type="application/x-javascript"
          src="chrome://picnik/content/screengrab.js"/>

  <popup id="contentAreaContextMenu">
    <menuitem class="menuitem-iconic"
          id="picnik-ctx-edit"
          insertafter='context-viewimage'
          label="&picnik.edit_picture;"
          oncommand="picnikContextMenu.editImage();"
          image="chrome://picnik/content/picnik_16x16.png"/>

    <menu class="menu-iconic" id="picnik-ctx-grab"
        insertafter='context-sendpage'
        label="&picnik.menu;"
        image="chrome://picnik/content/picnik_16x16.png">
      <menupopup>
        <menuitem label="&picnik.grab_visible;"
            oncommand="picnikScreenGrab.grabVisible();"/>
        <menuitem label="&picnik.grab_full;"
            oncommand="picnikScreenGrab.grabFull();"/>
      </menupopup>
    </menu>
  </popup>

  <menu id="tools-menu">
    <menupopup id="menu_ToolsPopup">
      <menu class="menu-iconic" id="picnik-tool-menu"
          label="&picnik.menu;"
          image="chrome://picnik/content/picnik_16x16.png">
        <menupopup>
          <menuitem label="&picnik.grab_visible;"
              oncommand="picnikScreenGrab.grabVisible();"/>
          <menuitem label="&picnik.grab_full;"
              oncommand="picnikScreenGrab.grabFull();"/>
        </menupopup>
      </menu>
    </menupopup>
  </menu>

  <toolbarpalette id="BrowserToolbarPalette">
    <toolbarbutton id="picnik-button"
        type="menu-button"
        class="toolbarbutton-1"
        label="&picnik.label;"
        tooltiptext="&picnik.menu;"
        oncommand="picnikScreenGrab.grabVisible();">
      <menupopup>
        <menuitem label="&picnik.grab_visible;"
            oncommand="picnikScreenGrab.grabVisible();
event.stopPropagation();"/>
        <menuitem label="&picnik.grab_full;"
            oncommand="picnikScreenGrab.grabFull();
event.stopPropagation();"/>
      </menupopup>
    </toolbarbutton>
  </toolbarpalette>
</overlay>
The two functions grabFull and grabVisible set up the parameters to grab either the full page or the visible area, respectively. They leave the bulk of the work to the aptly named grab function. In order to limit the amount of data that needs to be uploaded, grab scales the canvas so that it will be smaller than 2800x2800 before actually rendering the window. Next, grab creates a canvas and renders the window before retrieving a data URL via toDataURL.
saveDataUrl has the job of actually sending the image to Picnik. It constructs a multipart/form-data request containing several API parameters as well as the image data. Picnik's servers respond with a URL for the browser to load. When that happens, requestState is called with a req.readyState of 4. Finally, requestState creates a new tab with that URL.
Most Firefox extensions are distributed at Mozilla's Add-ons site as Cross-Platform Installs (.xpi). This site provides users with a central trusted source for extensions. Because the site is pre-trusted by the browser, it makes installation easier for users. The Add-ons site also makes it easy to provide auto-updates to users. You simply can upload a new version, and users automatically will be prompted to upgrade.
The extension wizard created a shell script (build.sh) to automate the process of creating the XPI. Once it's created, you can send it to friends, post it on your blog, upload it to addons.mozilla.org or distribute it any way you see fit.
I hope this article has given you an idea of how easy it is to write Firefox extensions and how powerful they can be. Don't forget that you can learn by using the Chrome List extension to explore the inner workings of both the browser and other extensions. Also, the Mozilla Developer Center has a wealth of how-tos and reference resources waiting to be tapped. Happy coding!
Resources
Code for this article, including screengrab.js (Listing 4): ftp.linuxjournal.com/pub/lj/listings/issue160/9730.tgz
Extension Developers Extension: ted.mielczarek.org/code/mozilla/extensiondev
Console2: https://addons.mozilla.org/en-US/firefox/addon/1815
Chrome List: https://addons.mozilla.org/en-US/firefox/addon/4453
Venkman: https://addons.mozilla.org/en-US/firefox/addon/216
Firefox Extension Wizard: ted.mielczarek.org/code/mozilla/extensionwiz
Mozilla Developer Center: developer.mozilla.org
Mozilla Add-ons: addons.mozilla.org
Picnik API: www.picnik.com/info/api
Justin Huff is a Software Engineer with an embedded systems background, working for a little Web 2.x company called Bitnik. He resides in Seattle, Washington.
