
Deep Images
I run a small multimedia studio and often do a number of jobs simultaneously, from sound engineer to producer. But, when the client calls go quiet, and no projects are pressing, I take time to indulge in my escapist passion: photography.
I keep Photoshop at the ready in case of emergencies, but I don't use it if I don't have to. Most of my machines run Linux, and I prefer it that way. I love the variety of CLI tools for batch processing in ImageMagick, and PanoTools (though I doubt I'll ever master all their capabilities). I love the UNIX philosophy of creating larger applications by knitting together a suite of modular programs that do one thing and do it well. I love that RAW image processing is simple and efficient with UFRAW, which saves to high bit-depth formats and preserves one of the great advantages of using RAW for texture and HDRI work. Most of all, I love the pixel pushers—those end-user programs for editing raster graphics.
For years now, I've been using The GIMP for the most of my postprocessing work. GIMP frequently may be maligned for its un-Photoshop-like interface and its utilitarian approach to filters, but I've grown to love it precisely for these reasons.
During its 2.x release cycle, GIMP has outgrown a lot of its early awkwardness. It is now more memory-efficient, and its new features, such as improved font handling, keep it looking fresh and chipper. But, under the hood, it truly is becoming gimpy, because its core is hobbled by design.
The problem started as a political one. Once upon a time, Rhythm and Hues submitted a set of patches to GIMP that gave it high-color depth capability (a necessity for retouching movies). But GIMP, still in the 1.x release series, didn't know what to do with it, and it rejected the patches out of hand. The patches were primitive and didn't seem important anyway. After all, Photoshop didn't support such images then either, and no one really needed it.
That decision proved remarkably short-sighted. There have since been a number of abortive attempts to replace GIMP's color engine with GEGL to handle high-depths, but so far it's been vaporware.
In the intervening years, computing power comfortably chugged along the path of Moore's Law to Kurtzweil's Singularity, and some startling changes happened. Consumer equipment outgrew GIMP.
First, GIMP can handle only 8 bits of contrast per channel. There are 24 million possible colors and 255 different potential levels of brightness. Although this looks wonderful on a computer screen compared to what we once saw, and although the sharpness and resolution of modern flat panels mean that they often look better than old CRTs or television, the fact remains that a contrast ratio of 255:1 is small, particularly compared to the thousands of gray shades that film reproduces and the hundreds of thousands that our eyes perceive. To put it bluntly, even at its best, color in the digital world has pretty much always sucked.
That is changing. High-def video formats have a wider contrast ratio, using a 10-bit floating point rather than an 8-bit linear color format; one of the high-def formats, HDV, is priced to sell to more spendy consumers in the form of camcorders from all the major manufacturers, starting at around $1,000.
In the world of film and photography, high-quality film scanning has pushed the contrast resolution of a good drum scan higher still, into the realm of 16-bit float or 32-bit linear. Although that may seem irrelevant to most end users, the corollary is not. Nikon, Canon and most of the other major manufacturers have priced Digital SLRs below $800, and almost all of these cameras allow users to shoot in RAW format.
RAW formats are CCD data dumps—the three color sensors aren't interpolated, blended or processed like you would normally expect. This is left up to users to do with their computers when they offload the images, which easily can run more than 10MB each. Most of the time, people shoot RAW and then process the images to ordinary JPEGs under the mistaken presumption that they're getting more bang for their buck, when in fact they're just creating more work for themselves. JPEG compression is, after all, JPEG compression. JPEG is a lossy, 8-bit format, period. JPEGs can look stunning, and most of the time they are perfectly adequate, even for some print jobs. But they do not preserve the advantages to shooting RAW, which are twofold:
No lossy compression.
Higher bit depths.
How much higher the bit depth varies by camera between 10-bit float and 16-bit linear. These higher depths are desirable for shooting light maps or textures for use in 3-D programs. The broader contrast range of these images means far subtler color reproduction, smoother exposure curves, more detail in the shadows and less blowout in the highlights than ever before. But, in order to use this extra detail, you have to preserve it. In order to preserve it, you have to be working with high-depth file formats.
So, GIMP won't do. Thankfully, there are some excellent alternatives.
CinePaint is the descendant of the Rhythm and Hues fork of The GIMP, and it expands on the broad file format compatibility of that branch. In the intervening years, it has grown into a dependable scratch-and-dust removal program for motion picture films and is now pushing toward becoming a proper compositing system. It is currently under heavy development in its Glasgow branch, while the original branch is more or less stable and being updated only for bug fixes and small feature additions. Aside from the basic GIMP feature set, CinePaint sports a proper color management system—the very thing whose absence renders GIMP inappropriate for professional and near-professional work. There is also a flipbook player for tracking changes across animations, write-out to Cineon and OpenEXR and an excellent plugin for assembling High Dynamic Range images from regular snapshots (a process called bracketing). It is currently the only open-source GUI program for Linux that supports bracketing.
The interface is familiar—any GIMP user will feel right at home—and its other features make it an indispensable part of any photographer's graphics toolbox (Figure 1).
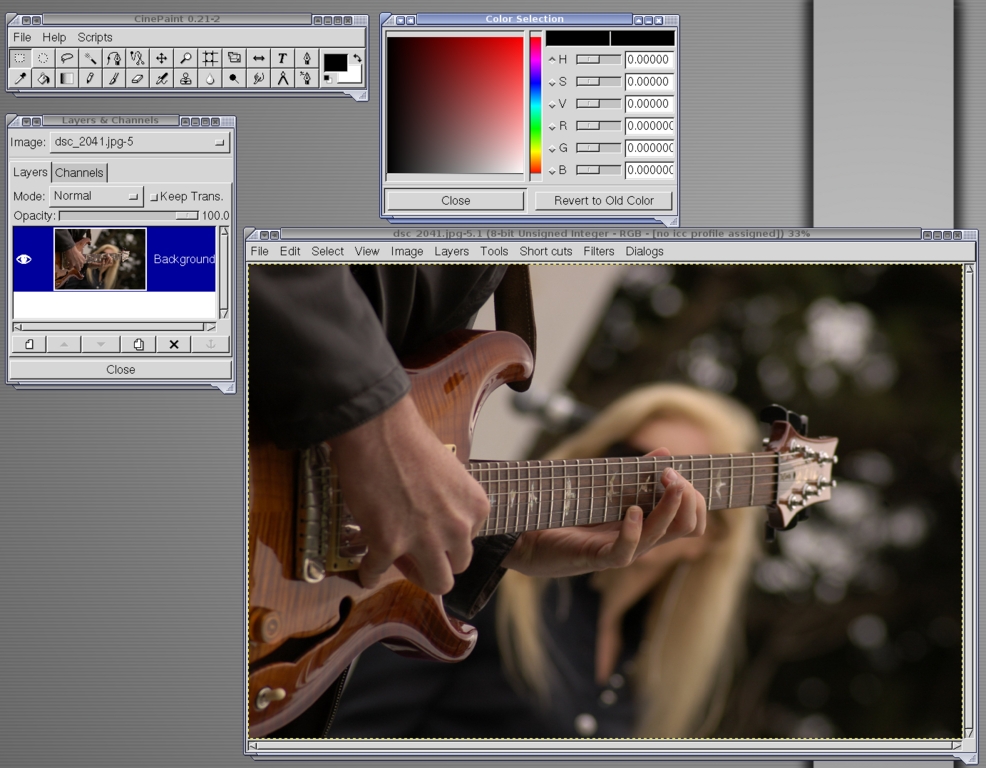
Figure 1. CinePaint has a UI similar to GIMP.
However, CinePaint's intended market is movie retouching, so its feature set for photographers is fairly limited beyond the basics and some of the impressive new features. Its early forking from GIMP and its radically different internals mean that GIMP plugins do not port easily to CinePaint, so casual users will find themselves frustrated by what feels like a functionality hit. Further, it is difficult to compile and fairly crash-prone on some distros (this is part of the reason for Glasgow's move to FLTK, but that branch isn't yet usable). Even with these inconveniences, CinePaint is still a must-have tool, and as the project moves forward, it will hopefully become ever-more useful and stable.
Krita is the KOffice paint utility, and it's enough to make people rethink their dislike of KOffice (Figure 2). Even at first glance, it looks like a whole different animal than GIMP. Rather than floating windows, it starts in a single-pane, integrated view. Thankfully, there is salvation in the fact that Krita's design is modular: every panel and tool is dockable, making the user interface as configurable as you please.
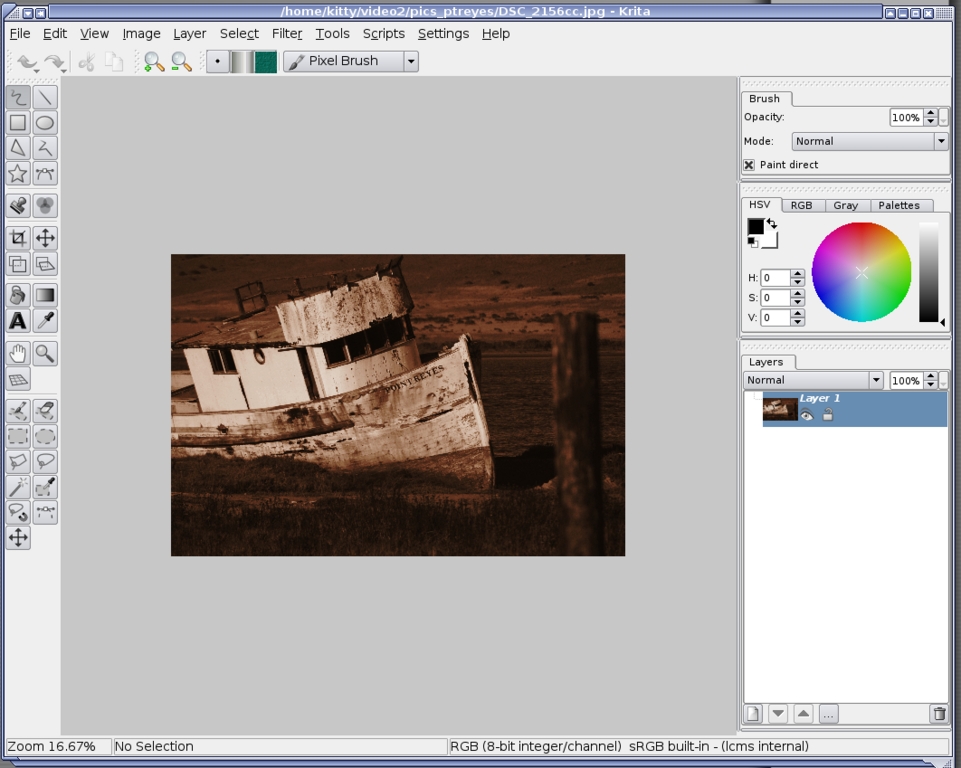
Figure 2. The Krita interface is designed for graphics professionals.
The differences don't end there—Krita's entire approach sets it apart. GIMP originally was designed to give UNIX a way to deal with Web images, and it fulfilled this mission admirably for a long time. Krita, on the other hand, was designed with a different target in mind—it is aimed directly at graphics professionals.
Built from the ground up on LCMS, Krita's 32-bit color management system is flanked by well-built, sophisticated tools for accessing it. It works in more than a dozen different colorspaces and converts between them cleanly, making it suitable for a broad range of professional graphics demands (CMYK and RGB are only the beginning). For print work, Krita has its bases well covered, something that GIMP hasn't yet mastered.
Though not managed by a graphics professional, Krita's design shows a deep familiarity with graphics processing engineering. It starts with much more sophisticated drawing and selection tools than have been available in Linux before—from guided line drawing that aids precision when working without a Wacom tablet to a magnet selector for modifying existing selections on the fly. The number of drawing tools is rivaled only by Photoshop, and there are a few nifty enhancements in this area where Krita outdoes the venerated veteran from Adobe. It's not above pinching some of Photoshop's better innovations, either.
Adjustment layers are finally here, as are layer grouping and layered effects stacks—a distinct advantage over the GIMP/CinePaint paradigm. No longer must one apply a single adjustment, make sure it's right, and then move on. With the power of adjustment layers and filter stacks, the changes are applied to the image only on export, which makes mid-stream tinkering far more efficient.
Krita also has a few tricks of its own, such as the Filter Brush, where one can paint a filter's effect directly onto the image in specific places, rather than being forced to use the powerful but tedious process of masking different layers in great detail.
The guesswork of filter selection is also a thing of the past. Rather than bringing up standalone filter dialogs and tweaking them while watching the preview as one does in GIMP, users may use the Filter Gallery, which lists all installed filters, provides full access to their parameter UIs and includes thumbnail previews of their default settings side by side with one another—not the little window covering a piece of the image such as one gets in many GIMP previews, mind you, but a full thumbnail preview (Figure 3).
This work-flow streamlining is great and doubtless will make its way back into other applications as Krita gains notice.
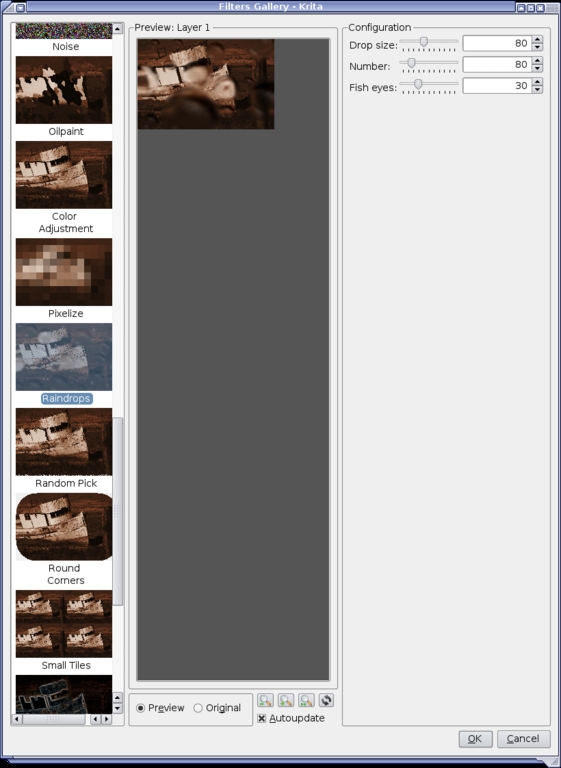
Figure 3. Krita supports full thumbnail previews.
Krita excels in scripting support as well; the Python and Ruby engines behave more like Adobe's Action scripts than like GIMP's and are pleasantly non-crash prone.
As a cherry on top of this already tempting sundae, Krita has a number of color profiles to chose from—a must in today's world of multifaceted graphics acquisition. Different cameras, scanners and graphics programs use different color profiles for different reasons, as do different printers and destination formats. These color profiles govern how the picture is interpreted and parsed by programs and devices, and if you want your colors reproduced accurately across today's myriad devices, your graphics package has to be able to speak several languages. NTSC, PAL and SEACAM video formats all have peculiar color profiles, professional print shops use CMYK, different digital cameras use Adobe RGB or sRGB, Apple has its own color profile, as does SMPTE. All of these, and more, are supported in Krita by default (Figure 4).

Figure 4. Krita supports several color profiles.
Alas, not everything is hearts and flowers. Krita's text tool is primitive—like GIMP before its recent improvements, it rasterizes text as soon as it's added so it can't be edited later. Like CinePaint, it can't use GIMP filters, so new plugins have to be written to its architecture. Because of this, the ability to duplicate some of the basic GIMP filters, such as procedural plasma generation, simply don't exist yet. Still, what filters are there do a bang-up job and often eclipse their GIMP counterparts.
Krita also is still in the refinement stage, and its code is not well optimized. It has a high system overhead—it looks pretty, but it drags on the resources of even a well-equipped system. The adjustment layers don't require multiple copies of the same image in order to stack filters, so the load is lighter. Even so, the interface can lag, a lot. Unlike both GIMP and CinePaint, Krita doesn't yet have any animation capabilities, to say nothing of a flipbook. Finally, it doesn't yet support LDR bracketing to HDR—a considerable drawback (though this feature is on the to-do list for future releases).
Still, all told, Krita is an excellent package. It is very capable as is, and it shows a lot of potential.
Although GIMP is useful, it's showing its age, and the time is coming soon when it either will adapt or be shuffled to the wayside by more capable tools. For the photographer working in Linux, as well as for the high-depth CGI artist, both Krita and CinePaint are welcome tools. Each is strong where the other is weak. As both programs continue to develop, we can expect great things from them—they have both proven themselves to be well-designed packages with deliberate and capable teams behind them. The odd mix of Darwinian competition and cooperation has given us a new generation of these tools, and they're ready to be used. Enjoy!
HDRI: Faking Film's High Bit Depth
High Dynamic Range Imaging was originally developed for lighting 3-D scenes, as a way to capture the real-world range of luminescence, and has been a boon to realistic 3-D lighting work for many years.
But, it has another use. By tone mapping the image, HDRI's wide contrast range can be represented in 8-bit space to stunning effect—preserving details in the shadows and minimizing clipping in highlights. As this aesthetic became popular, several techniques have developed to create HDRIs from digital snapshots and then convert them for display on monitors or in print.
Creating HDRI images from digital photographs requires Bracketed Exposure—taking a set of photos with different exposure settings to give a wider collective latitude than the camera natively allows (Figure A). Afterward, the bracketed images are combined into a single HDRI. Although this can be in the terminal, it's far easier with CinePaint's self-explanatory Bracket to HDR plugin (included in the package). Once created, the HDRI either can be turned into a light probe (for lighting a 3-D scene) or tone mapped for display and/or printing (Figure B).
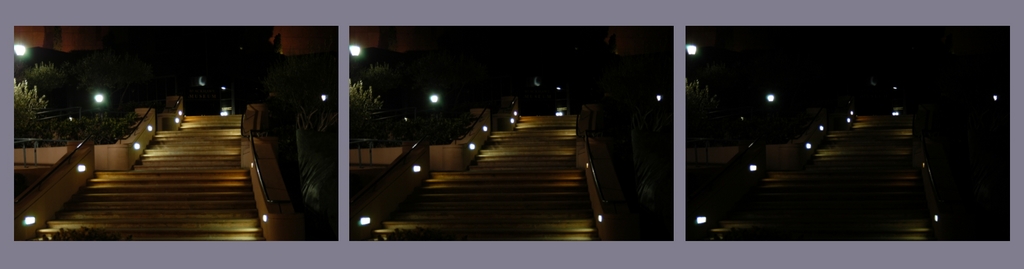
Figure A. A Set of Photos with Different Exposures
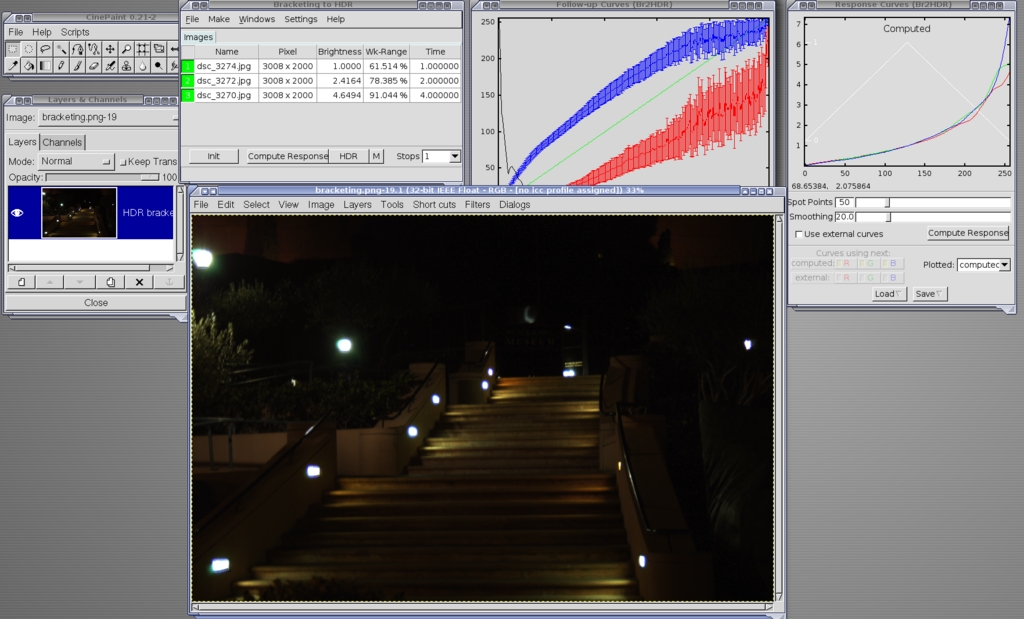
Figure B. Using the Bracketed Exposures to Create the Perfect Picture
Tone mapping interpolates an HDRI into 8-bit space without clipping the high and low ends—it compresses the image nonlinearly to preserve the details otherwise lost. The result is a much richer image than could normally be captured by 8-bit equipment. At the moment, tone mapping isn't available in CinePaint or Krita (although it is on Krita's to-do list). Instead, pfstools, a command-line suite of algorithms for configuring the interpolation curves, does the job.
Fortunately, for those of us who don't like experimenting blindly in the terminal, a thoughtful soul has written a GUI that offers the full range of options available at the command line, with a preview window. The program, Qpfstools, along with an introduction and tutorial, can be found here: theplaceofdeadroads.blogspot.com/2006/07/qpfstmo-hdr-tone-mapping-gui-for-linux_04.html.
Dan Sawyer is the founder of ArtisticWhispers Productions (www.artisticwhispers.com), a small audio/video studio in the San Francisco Bay Area. He has been an enthusiastic advocate for free and open-source software since the late 1990s, when he founded the Blenderwars filmmaking community (www.blenderwars.com). Current projects include the independent SF feature Hunting Kestral and The Sophia Project, a fine-art photography book centering on strong women in myth.
