
Automated GIMP Processing of Web Site Images
The GIMP is a great interactive image editor, but it also can be used to automate the mundane tasks that are involved in creating Web sites. Commercial Web sites that are designed to sell products rather than deliver technical text content tend to rely heavily on images to make users stick around. This article is about using The GIMP to create the visuals for such image-laden sites. The sites targeted by this article generally are not using Flash and are expected to work cross-browser, which means they support Internet Explorer's limitations on alpha masks.
In this article, I ignore HTML and stylesheet specifics and concentrate on batch image processing with The GIMP. The two main image targets that minimally are expected to work are 8-bit GIFs with a single-bit alpha mask and JPEGs with no auxiliary alpha support at all. Unfortunately, image formats, such as PNGs, which offer a nice 8-bit alpha mask, cannot be used for cross-browser Web sites with nontechnical audiences. Many people still are using whatever browser came by default with their operating system, and businesses tend not to want to ignore potential customers.
As an example, consider a site that wants to have a tiled background image, oval buttons and a side panel with a drop shadow and images that are not confined to sitting evenly inside the side panel. Part of the Web site is about showing images of various products, which are to sit nicely shadowed and/or antialiased on top of the background or another random pixel offset on the site.
A single-bit alpha mask is not useful for displaying many types of images on top of a complex background image. This is because the edges of some images need to be blended explicitly to the color of the background in order not to look jagged. With a single-bit alpha mask, the background color needs to be very stable for the entire perimeter of the image in order to look acceptable.
As an example, I show here how easy it is to make things, such as the composition shown in Figure 1, with the final image without the layer perspective as in Figure 2. This example is of a cake image, placed half on the side panel and half on the background of the page—as though the user has haphazardly left the cake slightly aside for now. The layers shown could be stored in different xcf files for easy maintenance and properly composited with The GIMP scripting into a caramel-cake.jpg, which can be included by the Web site.
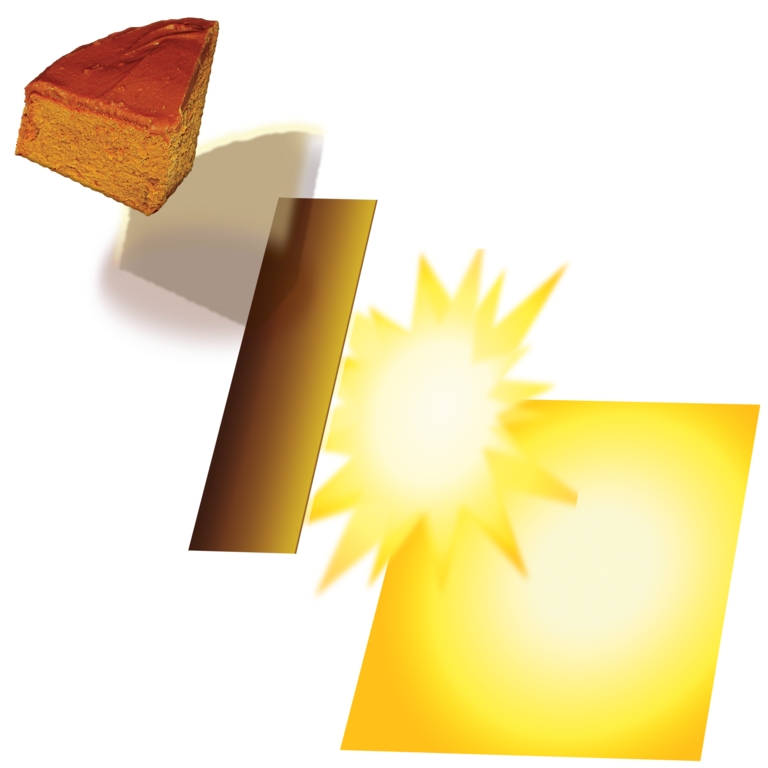
Figure 1. The cake is composited onto a drop shadow, placed slightly over the border layer on top of a highlight over the Web page background.

Figure 2. Compositing a Cake with the Background and Side Panel
Unfortunately, some distributions no longer package gimp-perl. It is available for GIMP 2.x from ftp.gimp.org, and once perl-PDL and perl-ExtUtils-Depends are installed along with GIMP, gimp-devel and the Perl bindings for GTK+ 2.x, the module itself can be installed using the classic CPAN trio shown in Listing 1.
Listing 1. Compile and install gimp-perl.
perl Makefile.PL ; make;
su -l;
make install;
Start The GIMP without a GUI, ready to process Perl commands with the following:
gimp -i -b '(extension-perl-server 0 0 0)' &
The scripts shown in this article tend to follow the pattern of taking a single image as input and generating a single output image to try to mimic Linux command-line pipes. Unfortunately, the scripts in this article can't be piped together but rely on temporary image files to save each image modification. The images are passed in using the -inputimage parameter, and the -outputimage parameter is used to name where the image is saved for the next script to process.
Note that both images should be specified using full paths to ensure that The GIMP puts them where you expect.
More complex translations can be streamlined into a single Perl script. Although using many smaller scripts is slower, because of the extra image save/load cycles, this is less relevant for batch processing images. The upside is that once the little scripts are known about, they can be strung together quickly from both the command line and Makefiles. Common utility functions have been moved into the MonkeyIQGIMP module so that many little image editing scripts can be created quickly.
As a first example, suppose we have an image file that has full 8-bit transparency and we want to export that image as a GIF with only one bit of alpha mask. To make this image look best, we first should perform some processing on pixels that are not either fully opaque or fully transparent. Such semi-transparent pixels should be mixed with a desired background color in order not to appear jagged on the Web site.
The image is a button (Figure 3) with the soft shadow blended to a gray background. If this button is exported to an image with a single-bit alpha mask without any special treatment, it may look poor. Aliasing with the gray background will be merged into the exported image itself, and if the Web site has a different colored background, it will not give a pleasing appearance, as shown in Figure 4. Ignoring the bad choice of bright green as a background, the edges are extremely jagged, and the soft shadow effect is lost.

Figure 3. Button with a Gray Background behind a Soft Shadow
Figure 4. Button intended to have a gray background behind a soft shadow, exported with a single-bit alpha mask and overlayed on a different color background.
The code shown in Listing 2 takes any image file supported by The GIMP, an output file path and an expected background color, and creates an output image that is suitable for using with a 1-bit alpha mask. Both the input and output images can be anything The GIMP can read or write. For this script, it is most likely reading an xcf file and writing a PNG file. The PNG image is processed later with an export to the webgif script to obtain the final image.
Listing 2. Exporting an xcf with 8-Bit Alpha to an Image with One Bit of Pretreated Alpha
#!/usr/bin/perl

use Gimp ":auto";
use Gimp::Fu;
use lib '/usr/local/bin/';
use MonkeyIQGIMP;

sub monkeyiq_gimp_convert {
  my( $inputimagename, $outfilename,
      $aliascolor ) = @_;

  Gimp->palette_set_foreground( $aliascolor );

  $img = Gimp->file_load( $inputimagename,
                         $inputimagename );
  $layer = Gimp->layer_new(
     $img,
     Gimp->image_width( $img ),
     Gimp->image_height( $img ),
     RGBA_IMAGE,
     "background merge image",
     100, NORMAL_MODE );
  Gimp->image_add_layer( $img, $layer, -1 );
  Gimp->image_lower_layer( $img, $layer );
  Gimp->edit_fill( $layer, BACKGROUND_FILL );

  $oldlayer =
    Gimp->image_merge_visible_layers(
      $img, EXPAND_AS_NECESSARY );
  Gimp->layer_set_name( $oldlayer, "oldlayer" );

  Gimp->selection_none( $img );
  $threshold = 1;
  Gimp->by_color_select( $oldlayer, $aliascolor,
                 $threshold, 0, 1, 0, 0, 0 );
  Gimp->selection_invert( $img );

  ##################################################

  $newlayer = Gimp->layer_new( $img,
                        Gimp->image_width( $img ),
                        Gimp->image_height( $img ),
                        1, "test xl", 100, 0 );
  Gimp->image_add_layer( $img, $newlayer, -1 );
  Gimp->edit_fill( $newlayer, TRANSPARENT_FILL );
  Gimp->edit_copy( $oldlayer );
  my $floatobject = Gimp->edit_paste( $newlayer,0 );
  Gimp->floating_sel_anchor( $floatobject );

  ##################################################

  # delete old background layer
  Gimp->layer_set_visible( $oldlayer, 0 );
  Gimp->layer_set_visible( $newlayer, 1 );

  imageOutput( $img, $outfilename );
}

register "monkeyiq_gimp_alias",
  "Alias alpha values to a background color",
  "Alias alpha values to a background color (and then
   remake one bit trans)",
  "Ben Martin", "Ben Martin",
  "2007-Mar-16",
  "<Toolbox>/Xtns/Perl-Fu/Alias As X",
  "*",
  [
   [PF_STRING, "inputimage",
     "Name of image to export", ""],
   [PF_STRING, "outputimage",
     "Name of image to save to", ""],
   [PF_COLOR,  "aliascolor",
 "Background color to alias with", ""],
  ],
  \&monkeyiq_gimp_convert;

if( $#ARGV <= 0 ) {
  print "Usage: $0 -inputimage imagepath";
  print " -outputimage full_dst_path";
  print " -aliascolor #000000 \n\n";
  exit;
}

# Handle over control to gimp
exit main();
Let's walk through the code in Listing 2. First, The GIMP API is imported, and then the main function of the script is declared with its arguments clearly stated as variables. Skipping the function itself for now, there is a register call at the bottom of the script giving some metadata for The GIMP as to where this script should appear in menus and the number and types of arguments it expects along with a reference to the above function that actually does the work. There is a tiny bit of argument checking before handing control over to The GIMP.
With the metadata-handling code out of the way, let's go back to the monkeyiq_gimp_convert function. The nominated image file is loaded and a new layer, $layer, is created with the same dimensions as the image itself, and it will be filled with the nominated background color. This new layer is then put to the bottom, and visible layers are merged. This makes all the transparency in the image be evaluated against the new background layer's color. In the case of our button on a gray background, assuming the input xcf file has the gray background layer hidden, if the script is run with the bright green background color nominated, the soft drop shadow is blended with the green in accordance with each pixel's old alpha values. Next, a selection is performed using the nominated background color, and that selection is inverted. So, the selection should contain everything in the image and effectively be defining a single-bit alpha mask for what pixels should be fully transparent in the image.
The next block adds another new layer to the image, $newlayer, with a transparent color, and then it copies and pastes the selection from the above merged layer (everything other than the background color) into the new layer. We don't need the old merged image layer anymore, so it is set to hidden and only the new layer is shown.
The result is that the new layer contains the old image data that has had any partially transparent pixels merged with the nominated background color. There is a only a single color that is transparent, and the rest are fully opaque.
The imageOutput function is a little utility function in the MonkeyIQGIMP module that handles saving to native GIMP xcf files, but it also does something sane if a non-xcf file is desired. Parts of MonkeyIQGimp are shown in Listing 3. The imageOutput function simply dispatches to one of the gimp_*_save() functions with the only difference being that for non-native formats, first getMergedLayer() is called to get a single layer to export. In getMergedLayer(), if there is only a single layer, we are done; otherwise, we merge the visible ones and return that. If there is more than one layer, but none of them are visible, the code creates a single layer to return to avoid runtime errors from calling code. If nothing is visible, it's the same as saving a fully transparent layer.
Listing 3. MonkeyIQGimp Saving Functions
#!/usr/bin/perl

package MonkeyIQGIMP;

use Gimp ":auto";
use Gimp::Fu;
require Exporter;
...

sub imageOutput {
  my( $img, $outfilename ) = @_;

  if( $outfilename =~ ".xcf" )
    {
      print "Save to xcf file $outfilename\n";
      Gimp->xcf_save( 0, $img, 0,
          $outfilename, $outfilename );
    }
  else
    {
      $layer = getMergedLayer( $img );
      Gimp->file_save( $img, $layer,
         $outfilename, $outfilename );
    }
  Gimp->image_delete( $img );
}

sub getMergedLayer {
  my( $img ) = @_;

  my $existinglayer =
    Gimp->image_get_active_layer($img);

  @layers = Gimp->image_get_layers( $img );
  print "layers size:" . $#layers . "\n";

   if( $#layers <= 1 )
     {
       $layer = Gimp->image_get_active_layer($img);
     }
  else
     {
       $layer =
        Gimp->image_merge_visible_layers( $img, 1 );
     }

  if( $layer == 0 )
    {
      print "Creating a new layer to merge in\n";
      $newlayer = Gimp->layer_new(
        $img,
        Gimp->image_width( $img ),
        Gimp->image_height( $img ),
        $existinglayer->type(), "trans merge layer",
        100, NORMAL_MODE );
      Gimp->image_add_layer( $img, $newlayer, -1 );
      Gimp->edit_fill( $newlayer, TRANS_IMAGE_FILL);
      $layer =
        Gimp->image_merge_visible_layers( $img, 1 );
    }

  return $layer;
}
To generate the properly aliased button, run the command shown in Listing 4. The result will look like Figure 5. Notice that the shadow is now a soft graduation to the green background.
Listing 4. Merge the button with the nasty green background color.
gimp-monkeyiq-alias \
  -inputimage  Button-with-8bit-alpha.xcf \
  -outputimage Button-nicely-merged-with-green.png \
  -aliascolor '#00ff00'
Figure 5. The green background now plays a role in the partially transparent pixels.
The final output GIF image is created with the command shown in Listing 5.
For more-specific image settings for GIF files for use on the Internet using gimp-monkeyiq-webgif, see Listing 6. Here, the depth of the GIF is set to less than 256 colors, and the image is dithered to try to compensate for the lower number of available colors.
Listing 5. Finally, convert to a 6-bit GIF for the Internet.
$ gimp-monkeyiq-webgif \
   -inputimage Button-nicely-merged-with-green.png \
   -outputimage Button.gif  -dither 1 -depth 64
$ identify Button.gif
Button.gif GIF 317x213 317x213+0+0 PseudoClass ...
Listing 6. Export to a GIF image with some handy options. Do we really need those 8 bits for this image?
...
sub gif_to_web {
  my($inputimagename, $outfilename,
       $num_cols, $use_dither) = @_;
  my $palette_type = 0;

  $img = Gimp->file_load( $inputimagename,
                          $inputimagename );
  Gimp->convert_indexed( $img, $use_dither,
     $palette_type, $num_cols, 0, 1, "" );

  imageOutput( $img, $outfilename );
}
...
  [
   [PF_STRING, "inputimage",
      "Name of image to export", ""],
   [PF_STRING, "outputimage",
      "Name of image to save to", ""],
   [PF_INT,    "depth",   "depth", "255"],
   [PF_INT,    "dither",  "dither", "1"],
  ],
As imageOutput() exports all the visible layers of an image by default, a few other scripts allow you to slice up the layers in an xcf file to make only the desired layers visible and thus exported to the final image. Ignoring the boilerplate registration code for each script, hiding all layers can be done with the script shown in Listing 7. Then, a regular expression can be used to show desired layers (Listing 8).
The Layers_hideAll() and Layers_showByRE() functions are in the shared MonkeyIQGIMP module, so that all scripts easily can toggle layer visibility too.
Listing 7. Make all layers hidden in the output image.
#
# Hide all layers
#
sub Layers_hideAll {
  my( $img ) = @_;

  @layers = Gimp->image_get_layers( $img );
  foreach $l (@layers) {
    Gimp->layer_set_visible( $l, 0 );
  }
}
...
sub monkeyiq_gimp_layers_hideall {
  my($inputimagename,$outfilename) = @_;

  $img = gimp_file_load( $inputimagename,
                         $inputimagename );
  Layers_hideAll( $img );

  gimp_xcf_save( 0, $img, 0,
              $outfilename, $outfilename );
  gimp_image_delete( $img );
}
Listing 8. Show layers that have a name matching the given regular expression.
sub Layers_showByRE {
  my( $img, $layersre ) = @_;

  @layers = Gimp->image_get_layers( $img );
  foreach $l (@layers) {
    $n = Gimp->layer_get_name( $l );
    if( $n =~ m/$layersre/ )
      {
	Gimp->layer_set_visible( $l, 1 );
      }
  }
}
...
sub monkeyiq_gimp_layers_hideall {
  my($inputimagename,$outfilename,$layersre) = @_;

  $img = gimp_file_load( $inputimagename,
                         $inputimagename );
  Layers_showByRE( $img, $layersre );

  gimp_xcf_save( 0, $img, 0,
                 $outfilename, $outfilename );
  gimp_image_delete( $img );
}
Let's look at one more simple script before moving on. The generation of prelight images for mouse-over events can be automated by adjusting the brightness or contrast of each layer.
The script and its arguments are shown in Listing 9. A slight bump in brightness (say to 5 or 10) is usually enough to make a quick prelight image for many images.
Listing 9. Create a quick prelight image for mouse-over events.
...
sub monkeyiq_gimp_prelight {
  my($inputimagename,$outfilename,
      $brightness, $contrast ) = @_;

  $img = gimp_file_load( $inputimagename,
                         $inputimagename );

  print "prelight $inputimagename";
  print " to $outfilename\n";
  @layers = gimp_image_get_layers( $img );
  foreach $l (@layers)
    {
      gimp_brightness_contrast( $l,
         $brightness, $contrast );
    }
  imageOutput( $img, $outfilename );
}
...
  "*",
  [
   [PF_STRING, "inputimage",
     "Name of image to export", ""],
   [PF_STRING, "outputimage",
     "Name of image to save to", ""],
   [PF_INT,    "brightness",
     "-127 to 127", ""],
   [PF_INT,    "contrast",
     "-127 to 127", ""],
  ],
...
Now, suppose we have a directory full of xcf files of product images and we want to composite all those images onto a background image and save them to JPEG files with the same base name. This can be driven from a Makefile as shown in Listing 10. The Makefile defines a JPEG target for every xcf file in the current directory. Each of these JPEG targets are processed the same way, and the JPEG file is dependent on its xcf file. If you change one of The GIMP product images (xcf files), the Makefile will reprocess only that xcf file.
A thumbnail image also is created for each product. The catch here is that the thumbnail is expected to be displayed at a different offset on the background image. This means the thumbnail has to have all the image data shifted relative to the background prior to scaling and saving. If many products are to be shown on a single page, the call to gimp-monkeyiq-move-visible-layers would have to work out which offset to use for each thumbnail to make the blend with the background image pleasing when shown on the Web site.
Listing 10. Makefile to Convert xcf Files to Composited JPEG Images
tmp_img=/tmp/tmp_img.xcf
tmp2_img=/tmp/tmp_img.xcf
background_img=mybackground.png
simplelayered_extension=xcf
simplelayered_targets=\
  $(patsubst %.xcf,%.jpg,$(wildcard *.xcf))

all: $(simplelayered_targets)

$(simplelayered_targets): %.jpg: %.xcf
	if_xcf=$<; \
	if=`basename $< .xcf`.png \
	of=$@; \
	of_thumbnail=`basename $@ .jpg`-thumb.jpg \
        gimp-monkeyiq-append-layer-from-image-file \
           -inputimage `pwd`/$$if_xcf \
           -outputimage $(tmp_img) \
           -layerimage `pwd`/$(background_img) \
	   -layername  "background-layer"; \
        gimp-monkeyiq-save-as-jpg \
           -inputimage  $(tmp_img)
           -outputimage $$of; \
        gimp-monkeyiq-scale \
           -inputimage  `pwd`/$$if_xcf \
           -outputimage $(tmp_img); \
	   -ratio 0.15; \
        gimp-monkeyiq-append-layer-from-image-file \
           -inputimage  $(tmp_img) \
           -outputimage $(tmp2_img) \
           -layerimage `pwd`/$(background_img) \
	   -layername  "background-layer"; \
        gimp-monkeyiq-layers-showall \
           -inputimage  $(tmp2_img) \
           -outputimage $(tmp_img); \
        gimp-monkeyiq-layers-hidebyre \
           -inputimage  $(tmp_img) \
           -outputimage $(tmp2_img) \
	   -layersre "background-layer"; \
        gimp-monkeyiq-move-visible-layers \
           -inputimage  $(tmp2_img) \
           -outputimage $(tmp_img) \
	   -xoffset 200 -yoffset 100; \
        gimp-monkeyiq-save-as-jpg \
           -inputimage $(tmp_img)
           -outputimage $$of;
Let's start from the simple and move to the more complex scripts from Listing 10. The gimp-monkeyiq-save-as-jpg script is shown in Listing 11. The getMergedLayer() function is from the MonkeyIQGIMP module shown in Listing 3. It gets all the visible layers as a single merged layer. Given a single layer, it can be exported as a JPEG, and I use the specific JPEG save GIMP function to allow various parameters specific to JPEG image compression to be set. Apart from the image in/out parameters, the two main parameters are quality and comment. Being able to embed a comment in the JPEG image itself allows metadata to be added to the Web image, such as an image copyright and author data string.
Listing 11. Save any image The GIMP can load as a JPEG image with given compression parameters.
sub monkeyiq_gimp_convert {
  my( $inputimagename, $outfilename, $qual,
      $smoothing, $comment ) = @_;

  $img = gimp_file_load( $inputimagename,
                         $inputimagename );

  $layer = getMergedLayer( $img );

  file_jpeg_save( $img, $layer,
                  $outfilename, $outfilename,
		  $qual, $smoothing, 1, 1,
		  $comment, 0, 1, 0, 1 );
  return $img;
}

register
  ...
  "*",
  [
   [PF_STRING, "inputimage",
      "Name of image to export", ""],
   [PF_STRING, "outputimage",
      "Name of image to save to", ""],
   [PF_FLOAT,  "quality",
      "0-100 quality of JPG", ""],
   [PF_FLOAT,  "smoothing",
      "0-1 smoothing", ""],
   [PF_STRING, "comment",
      "Comment for image", ""],
  ],
  \&monkeyiq_gimp_convert;

exit main();
A slightly more complex script is the gimp-monkeyiq-append-layer-from-image-file, which is designed to act like the command-line cat img1 img2 >| bar command sequence. We are “appending” a layer from one image file to another. From the image from which we are reading a new layer, getMergedLayer() is called to grab all the visible layers as a single layer. As there are other scripts to hide and show layers in images, the input image can be prepared in a temporary image file to have only the desired layer(s) visible. The output image will be resized to the larger size of both input images. The code for the append layer is shown in Listing 12.
Listing 12. Append a layer from one image to another.
#!/usr/bin/perl -w

use Gimp ":auto";
use Gimp::Fu;
use lib '/usr/local/bin/';
use MonkeyIQGIMP;

sub monkeyiq_gimp_append_layer_from_image_file {
  my($inputimagename, $outfilename,
    $inputimagenameSecond) = @_;

  print "cat $inputimagename";
  print " $inputimagenameSecond >> $outfilename\n";

  $img  = gimp_file_load( $inputimagename,
                          $inputimagename );
  $img2 = gimp_file_load( $inputimagenameSecond,
                          $inputimagenameSecond );

  $layer = getMergedLayer( $img2 );
  if (!$layer->has_alpha)
  {
    $layer->add_alpha;
  }

  $img2->selection_all;
  $layer->edit_copy;
  $newlayer = Gimp->layer_new(
    $img,
    Gimp->image_width( $img2 ),
    Gimp->image_height( $img2 ),
    RGBA_IMAGE,
    "appended image data",
    100,
    NORMAL_MODE );
  $newlayer->drawable_fill(TRANSPARENT_FILL);
  Gimp->image_add_layer( $img, $newlayer, -1 );
  Gimp->image_lower_layer( $img, $newlayer );
  $floater = $newlayer->edit_paste( 1 );
  $floater->anchor;

  $imgw  = Gimp->image_width( $img );
  $imgh  = Gimp->image_height( $img );
  $img2w = Gimp->image_width( $img2 );
  $img2h = Gimp->image_height( $img2 );

  $img->resize( $imgw >= $img2w ? $imgw : $img2w,
                $imgh >= $img2h ? $imgh : $img2h,
                0, 0 );

  imageOutput( $img, $outfilename );
}

register
   ...
  [
   [PF_STRING, "inputimage",
     "Name of image to load", ""],
   [PF_STRING, "outputimage",
     "Name of image to save to", ""],
   [PF_STRING, "newlayerimage",
     "Name of image to append to inputimage", ""],
  ],
  \&monkeyiq_gimp_append_layer_from_image_file;


if( $#ARGV <= 0 ) {
  print "Usage: $0 -inputimage imagepath";
  print " -outputimage full_dst_path ";
  print " -newlayerimage imagepath2 \n\n";
  exit;
}

# Handle over control to gimp
exit main();
Layers can be moved around with given x,y deltas using gimp-monkeyiq-move-visible-layers, as shown in Listing 13.
Listing 13. Move a layer around a little.
...
sub monkeyiq_gimp_move_visible_layers {
  my($inputimagename, $outfilename,
    $xoffset, $yoffset ) = @_;

  $img  = gimp_file_load( $inputimagename,
                          $inputimagename );

  @layers = Gimp->image_get_layers( $img );
  foreach $l (@layers) {
    if( $l->get_visible ) {
      $l->translate ( $xoffset, $yoffset );
    }
  }

  imageOutput( $img, $outfilename );
}
...
  [
   [PF_STRING, "inputimage",
     "Name of image to load", ""],
   [PF_STRING, "outputimage",
     "Name of image to save to", ""],
   [PF_INT, "xoffset",
     "X offset to move layers by", ""],
   [PF_INT, "yoffset",
     "Y offset to move layers by", ""],
  ],
...
The dimensions of images also can be set aside for use in PHP Web pages. The gimp-monkeyiq-get-dimension creates a bunch of PHP variables set to interesting image metadata (Listing 14). The writedata() function sets the PHP variables in the output file for the desired input layer.
Listing 14. Get the metadata from an image for use in PHP.
...
use MonkeyIQGIMP;
use FileHandle;

sub writedata {
  my( $fh, $name, $ext, $x, $y, $w, $h ) = @_;

  $fh->print(" \$${name}${ext}_width = $w;\n ");
  $fh->print(" \$${name}${ext}_height = $h;\n ");
  $fh->print(" \$${name}${ext}_left = $x;\n ");
  $fh->print(" \$${name}${ext}_top = $y;\n ");
  $fh->print(" \$${name}${ext}_offsetx = $x;\n ");
  $fh->print(" \$${name}${ext}_offsety = $y;\n ");
}

sub monkeyiq_gimp_get_dimension {
  my($inputimagename,$outfilename,
    $desiredlayername) = @_;

  $img = gimp_file_load( $inputimagename,
                         $inputimagename );

  if( length( $desiredlayername ) )
    {
      $layer = getLayerByName(
         $img, $desiredlayername )
       or die("Layer $desiredlayername not found");
    }
  else
    {
      $layer = getMergedLayer( $img );
    }

  $name = gimp_layer_get_name( $layer );
  my( $x, $y ) = gimp_drawable_offsets( $layer );
  $w = gimp_drawable_width( $layer );
  $h = gimp_drawable_height( $layer );

  $fh = new FileHandle;
  if( $fh->open( $outfilename, "w" ))
    {
      $fh->print("<?\n");
      writedata( $fh, $name, "", $x, $y, $w, $h );

      $fh->print("?>\n\n");
      $fh->close();
    }

  gimp_image_delete( $img );
}

register "monkeyiq_gimp_convert",
...
  [
   [PF_STRING, "inputimage",
      "Name of image to export", ""],
   [PF_STRING, "outputfile",
      "Name of file to save metadata into", ""],
   [PF_STRING, "inputlayer",
      "Name of layer to export (optional)", ""],
  ],
  \&monkeyiq_gimp_get_dimension;
...
Not only are the width and height available, but the position in the original xcf file is stored as well. This makes it easy to build pixel offset-based Web sites using The GIMP to position various graphical elements and have the Web site offsets updated automatically. A Web site can be designed at 1600x1200 and saved in xcf files. The scaling script can then be used to generate an 800x600 version of the Web site automatically, together with the corresponding image offset and size metadata.
As I have little interactive skill with The GIMP, the cake multilayer images in Figures 1 and 2 were kindly created for the article by Dennis Braun (info@dennbe.com).
Resources
Code for the Article: sourceforge.net/project/showfiles.php?group_id=16036
GIMP Perl Module: ftp.gimp.org/pub/gimp/plug-ins/v2.0/perl
A Tutorial for GIMP Perl Users: imagic.weizmann.ac.il/~dov/gimp/perl-tut-2.0
GIMP—Basic Perl: www.gimp.org/tutorials/Basic_Perl
Marc Lehmann's “Gimp”: www.goof.com/pcg/marc/gimp.html
API Documentation: www.goof.com/pcg/marc/pdb/index.html
Ben Martin has been working on filesystems for more than ten years. He is currently working toward a PhD combining Semantic Filesystems with Formal Concept Analysis to improve human-filesystem interaction.
