
Create a Linux VPN for a Nokia E61 with Openswan
A virtual private network (VPN) allows you to send traffic across an untrusted network without exposing the content of that traffic. Conceptually, this is done by creating a pipe between two hosts where all network traffic transferred is protected by cryptography.
The example in this article is connecting a Nokia E61 device to a home network through a VPN over the Internet. The Nokia E61 is a smartphone that has Wi-Fi support as well as a VPN client. A similar procedure might work for other phone models using the same VPN client software, though the hardware was not on hand to test this. The Linux side was run on Fedora Linux 6; other distros might have slight path and package name changes.
The VPN support on the Nokia E61 uses IP security (IPSec). Openswan is an IPSec server that is configured on the Linux machine to provide the other end of the virtual network.
I should mention one caveat up front: I've been unable to configure the VPN client on the phone to connect to a server that does not have a static IP address.
To keep notation simple, I refer to the phone as e61 and the server running Openswan as vserv. The IP address of the e61 is irrelevant to the article, as you likely will be moving around to different Wi-Fi hotspots with the phone. When a VPN is set up, the e61 gets another IP address, which the e61 refers to as the virtual IP address. Once the VPN is set up, this virtual IP address is where all traffic to and from the e61 is sent. For this article, I use a 192.168.x.x IP address for this e61 VPN address. As the non-VPN IP address of the e61 is mostly irrelevant, unless I explicitly mention otherwise, the e61 IP address will be this non-Internet-routable IP address.
Unlike the other network settings on the phone, you cannot configure the VPN manually using the e61 itself. You have to create a package containing all the information about the VPN and install that package on the phone. These packages are the SIS files. A VPN SIS file also must be digitally signed before the e61 will allow you to install it. Signed SIS files normally have an sisx extension. The most difficult part of setting up the e61 to talk to Openswan is in creating the sisx file to install on the phone.
The SIS file still must be digitally signed, even if you have set the configuration parameter Software installation to All in App Mgr/Options/Settings.
The sisx package is composed of three files. Two of these are boilerplate-type package metadata (the VPN.pin and VPN.pkg files).
Getting the boilerplate files out of the way, the VPN.pin file is mostly uninteresting and is shown in Listing 1, and the VPN.pkg file is shown in Listing 2. Both files should work fine without any changes. Note that the paths shown in Listing 2 are to be interpreted relative to the phone itself and should not be changed.
Listing 1. Some Very Basic Package Metadata
[POLICYNAME]
VPN public
[POLICYDESCRIPTION]
VPN public
[POLICYVERSION]
1.1
[ISSUERNAME]
Do not edit
[CONTACTINFO]
Do not edit
Listing 2. Package manifest and description about the application type. You can change the “VPN Policy” string that is right before 0x1000597E to something else.
:"VPN public"
&EN
%{"VPN public"}

;
; A VPN POLICY PACKAGE
;


; LANGUAGES
; - None (English only by default)


; INSTALLATION HEADER
; - Only one component name is needed
;   to support English only
; - UID is the UID of the
;   VPN Policy Installer application
#{"VPN Policy"},(0x1000597E),1,0,1,TYPE = SA


; LIST OF FILES

; Policy file
"VPN.pol"-"C:\System\Data\Security\Install\VPN.pol"

; Policy-information file
; - NOTE: The policy-information file
;   MUST be the last file in this list!

; - FM (FILEMIME) passes the file to the
;    respective MIME handler
; (in this case, the VPN Policy Installer
; application).
"VPN.pin"-"C:\System\Data\Security\Install\VPN.pin",
 FM, "application/x-ipsec-policy-info"


; REQUIRED FILES
;     - The VPN Policy Installer application
(0x1000597E), 1, 0, 0, {"VPN Policy Installer"}

[0x101F7961], 0, 0, 0, {"S60ProductID"}
The VPN.pol file shown in Listing 3 defines the meat of how to connect to the VPN and what key to use for authentication.
Some things need to be changed in VPN.pol before using it. The main changes are the static IP address of the Openswan server (192.168.0.1) and the password to use to connect. The server's IP address appears more than once in the configuration file. To avoid any confusion about virtual IP addresses mentioned above, this IP address is the one from which vserv can be reached publicly from the Internet. The password is in the last field: the KEY. The number is the string length of the key that follows after a space.
If USE_XAUTH is set to true, when establishing the VPN connection the e61 prompts you for a user name and password with which to connect. This provides an additional level of security. In the event that the e61 is stolen, the thief will have to know your user name and password in order to access your VPN.
Openswan can use either PAM or a separate config file to test the user name and password on the server (more on this later).
Listing 3. Policy for the VPN: Where to Connect, How to Do It and How to Tell It's Me
SECURITY_FILE_VERSION: 3
[INFO]
VPN
[POLICY]
sa ipsec_1 = {
 esp
 encrypt_alg 12
 max_encrypt_bits 256
 auth_alg 3
 identity_remote 0.0.0.0/0
 src_specific
 hard_lifetime_bytes 0
 hard_lifetime_addtime 3600
 hard_lifetime_usetime 3600
 soft_lifetime_bytes 0
 soft_lifetime_addtime 3600
 soft_lifetime_usetime 3600
 }

remote 0.0.0.0 0.0.0.0 = { ipsec_1(192.168.0.1) }
inbound = { }
outbound = { }

[IKE]
ADDR: 192.168.0.1 255.255.255.255
MODE: Main
SEND_NOTIFICATION: TRUE
ID_TYPE: 11
FQDN: MobileGroup
GROUP_DESCRIPTION_II: MODP_1536
USE_COMMIT: FALSE
IPSEC_EXPIRE: FALSE
SEND_CERT: FALSE
INITIAL_CONTACT: FALSE
RESPONDER_LIFETIME: TRUE
REPLAY_STATUS: TRUE
USE_INTERNAL_ADDR: FALSE
USE_NAT_PROBE: FALSE
ESP_UDP_PORT: 0
NAT_KEEPALIVE: 60
USE_XAUTH: TRUE
USE_MODE_CFG: TRUE
REKEYING_THRESHOLD: 90
PROPOSALS: 1
ENC_ALG: AES256-CBC
AUTH_METHOD: PRE-SHARED
HASH_ALG: SHA1
GROUP_DESCRIPTION: MODP_1536
GROUP_TYPE: DEFAULT
LIFETIME_KBYTES: 0
LIFETIME_SECONDS: 28800
PRF: NONE
PRESHARED_KEYS:
FORMAT: STRING_FORMAT
KEY: 3 foo
Three Windows executables are used to create a signed SIS file. DevCertRequest.exe is used once to create a certificate to sign the SIS file; makesis.exe and signsis.exe then are used to create the package and sign it. The last two commands are part of the S60 SDK available for free from Nokia's Web site. All of these Windows executables can be run in Wine, though you need to have MFC42.DLL and MSVCP60.dll available to run DevCertRequest.
It's best to get the certificate in order to begin; register for free at symbiansigned.com, and download the DevCertRequest executable. Registration requires your name, e-mail address, organization, address and phone number.
DevCertRequest is used only to input a few settings and generate a key and a certificate sign request (.csr file). Unfortunately, the DevCertRequest executable is actually an installer, so you have to install this application and then execute it (Figure 1). For this article, DevCertRequest_30_10_2006_v2.0.exe was used.

Figure 1. Installing the DevCertRequest Application in Wine
After all the pain of installing DevCertRequest, using it consists of five simple steps, and it isn't needed again afterward. You give the location for the new csr file (monkeyiq.csr); the location for your new private key (monkeyiq-private-key.key) and a password for it; your country, state and company; the IMEI of your phone (as DevCertRequest tells you, keying *#06# on the phone will show it) and which capabilities you want for your certificate; and a confirmation that the information is correct.
To create the certificate itself, you have to return to symbiansigned.com and upload the csr file. First log in, and then select the My Symbian Signed tab. In the side panel, the Developer Certificates option has the Request sub-option. At the bottom of this page, you can upload the csr file (Figure 2). The next page allows you to download your certificate (Figure 3).

Figure 2. Uploading the Certificate Request
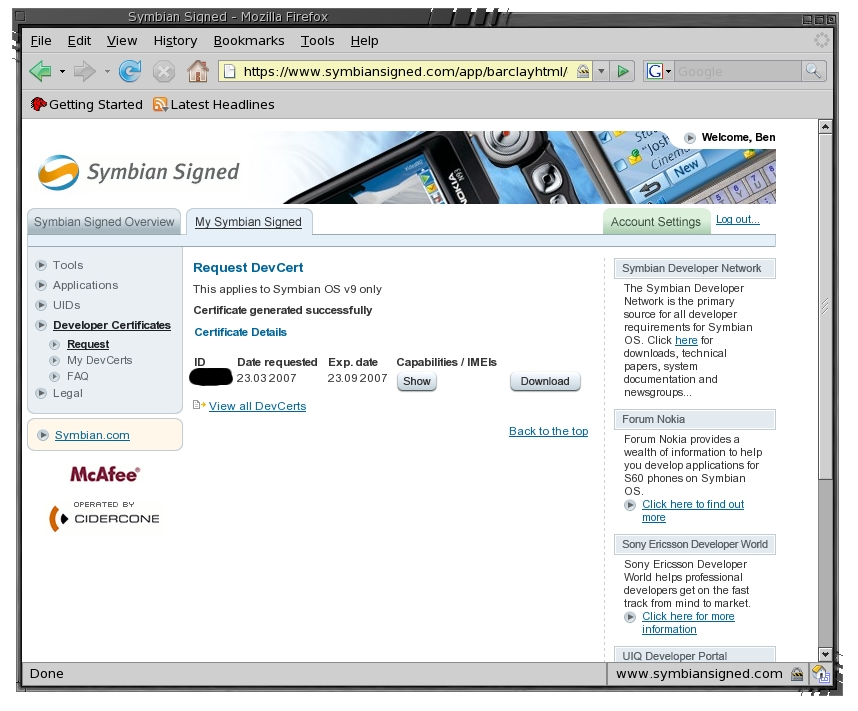
Figure 3. Download the Certificate Needed to Sign SIS Files
The makesis.exe and signsis.exe files can be extracted from the “S60 Platform for Symbian OS” SDK, as shown in Listing 4.
Listing 4. Extracting the makesis and signsis Executables
$ mkdir /tmp/e61-sdk
$ cd /tmp/e61-sdk
$ unzip /tmp/S30_3rded_f0___S60-SDK-0548-3.0.zip
$ unshield x data2.cab
$ cd Epoc32/tools
$ mkdir -p ~/e61tools
$ cp makesis.exe signsis.exe ~/e61tools
With the certificate (monkeyiq.csr) file, you now can roll the sisx file with the code shown in Listing 5. Make sure the three files that make up the package use the carriage return plus new line combination to terminate each line instead of the standard Linux new line only; see unix2dos(1). These three files are the pol, pkg and pin files shown in Listings 3, 2 and 1, respectively.
Listing 5. Rolling the Signed Package File
wine makesis.exe VPN.pkg VPN.sis
wine signsis VPN.sis VPN.sisx monkeyiq.cer \
  monkeyiq-private-key.key my-certificate-password
Any method can be used to transfer the sisx file to the e61. I've used Bluetooth push, in which case it can be installed on the e61 directly from the incoming messages list. As this sisx file contains a password, it is better to transfer it to the phone using a wired method.
Using a mini-SD card in the e61 and plugging in the USB connection cable to the phone and a Linux machine likely will bring up a file browser for the mounted SD card on the e61. Copy the file to a convenient location, such as Documents/vpn on the e61, and eject or unmount the SD card to force a disk sync before removing the cable (Figure 4).
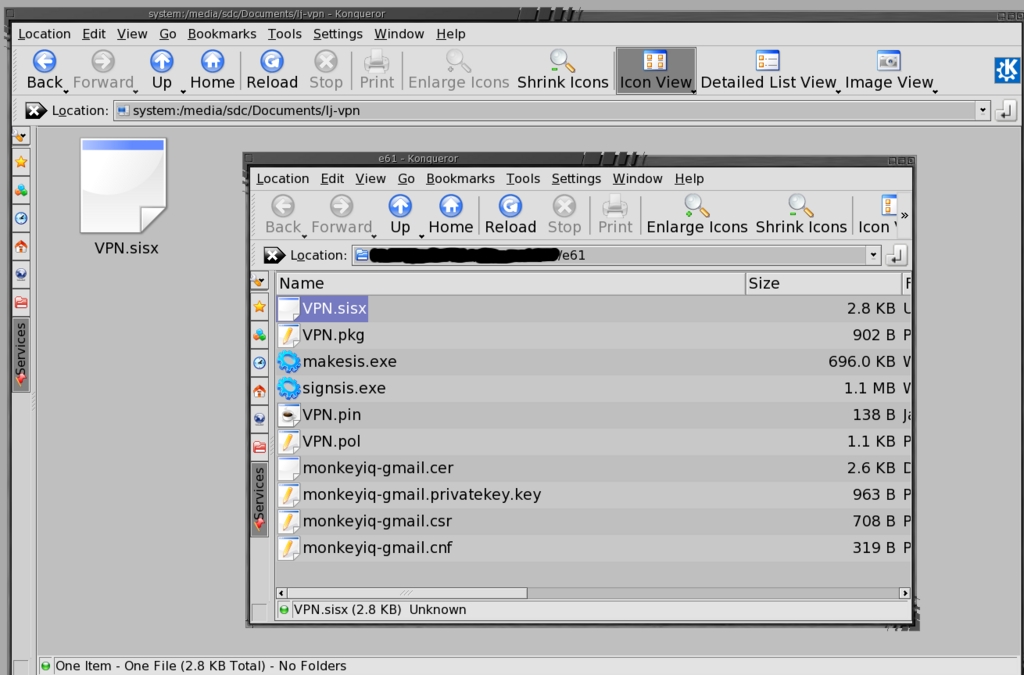
Figure 4. Copy the VPN file to a subdirectory of Documents on the memory card.
Once the sisx file is copied to the e61 memory card, the Menu/Office/File Manager on the e61 lets you navigate to the VPN directory on your memory card. When you click the joystick on the VPN sisx file, the phone asks if you want to install it. Right after clicking on the sisx file, you should see something like that shown in Figure 5. After inspecting some metadata, you'll see the ominous-looking screen shown in Figure 6. As you have just created the package from a bunch of text files and you've looked over them for nasties, this security warning shouldn't really be much of a problem to ignore.
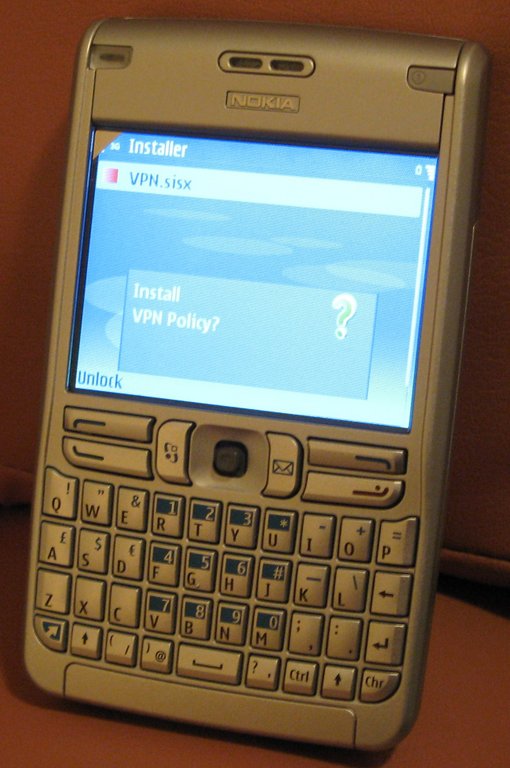
Figure 5. Starting the VPN Policy sisx Install
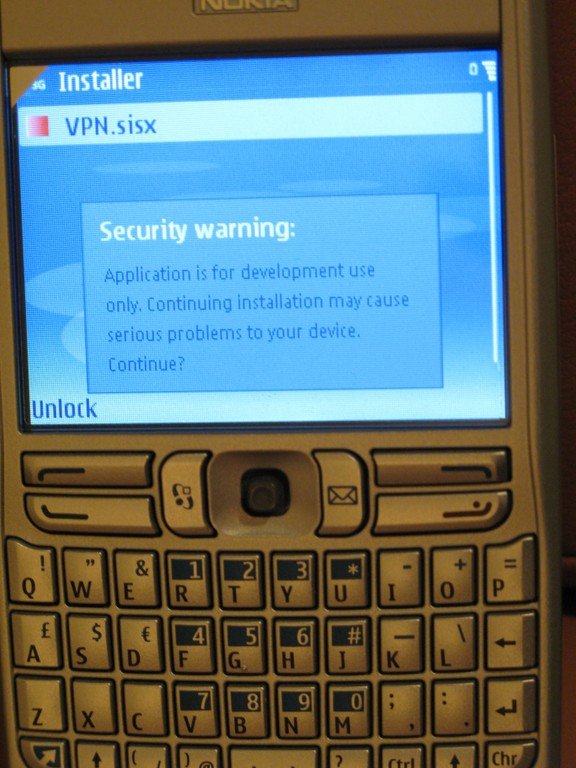
Figure 6. As we made the package, we trust that this is not really a security issue.
The VPN sisx file can be prepared for use by going to Menu→Tools→Settings→Connection→VPN. Select VPN access points and Options→New access point. Set the connection name to something memorable, and set the policy name and access point. A convenient access point is EasyWLAN. You also might want to set the proxy server address and port. It's nice to be able to surf the Internet and get to Intranet servers over the VPN. Directing all Web traffic to the VPN has the added bonus that the Wi-Fi hotspot you are using isn't able to record the Web sites you visit. The final stage is shown in Figure 7.
If you are already using WEP to connect locally and want to continue to do so and be able to test the VPN locally, define another VPN access point, setting its Internet access point to your WEP access point. Having the second VPN config means you won't be prompted for the WEP key when connecting locally. There is little gain in doing VPN over WEP except for not having to loosen the security on your wireless access point.

Figure 7. The final setup—give a name and Wi-Fi access point to the policy, and maybe set a proxy server too.
Packages are shown at rpmseek.com for Fedora, Mandriva and SUSE Linux. Debian.org also lists an Openswan package. On a Fedora Linux machine, Openswan can be installed simply by using yum install openswan. As mentioned previously, I used a Fedora Linux machine for this article; other distributions may have subtle differences.
The two main areas for configuring Openswan are the /etc/ipsec.conf file and a handful of files in /etc/ipsec.d. The main config file can be left as it stands. A few settings that might be of interest are forwardcontrol=yes to turn packet forwarding on and off when Openswan is started and stopped. The other interesting option is the interfaces setting, allowing you to control which IPSec interface is bound to which network interface—for example, interfaces="%defaultroute ipsec2=eth1 ipsec3=ppp1". If no interfaces parameter is specified, Openswan works on the network interface that has the default route. For Internet VPN connections, this is fine.
Another parameter that might come in handy in the ipsec.conf file is setting plutodebug=all, and reading your syslog files if you can't connect.
To describe a connection to Openswan for the e61, create a config file /etc/ipsec.d/e61.conf, as shown in Listing 6. The pfs setting is for perfect forward security. Unfortunately, I've had no luck using this option and connecting from the e61. As shown in the VPN config for the e61, I've listed the left value as %defaultroute, so Openswan will substitute the IP address of the network interface to which the default route points. As the default route is to the Internet, this works well. I've also used the DNS name of the vserv as leftid; this should be optional. You need to substitute your DNS name for monkeyiq.example.org in the config file. The rightsourceip is the virtual IP address that the e61 will use when talking over the VPN. For the firewall rules (shown later), I have assigned the hostname for the e61 to 192.168.6.252 in /etc/hosts.
Listing 6. The Openswan Configuration File to Allow the e61 to Connect
conn e61
        # Key exchange
        ike=aes256-sha1-modp1536
        # Data exchange
        esp=aes256-sha1
        # Authentication method PSK
        authby=secret
        auto=add
        keyingtries=3
        # Modeconfig setting
        modecfgpull=yes
        pfs=no
        rekey=no
        leftid=@monkeyiq.example.org
        left=%defaultroute
        leftsubnet=192.168.0.1/0
        leftrsasigkey=none
        leftmodecfgserver=yes
        leftxauthserver=yes
        rightrsasigkey=none
        right=%any
        rightxauthclient=yes
        rightmodecfgclient=yes
        rightsourceip=192.168.6.252
        rightsubnet=192.168.6.252/32
The same private key that was specified in the KEY field of the VPN policy above should be placed into the /etc/ipsec.d/e61.secrets file, shown in Listing 7.
Listing 7. Private Key for the VPN
: PSK "foo"
Finally, the USE_XAUTH option in the VPN policy needs Openswan to have a user name and password lookup for this connection. The Openswan README.XAUTH file recommends against using PAM for this. The password file can be created using htpasswd from the Apache package, as shown in Listing 8. A sample of the passwd file is shown in Listing 9.
Listing 8. Making the initial passwd file with htpasswd. The -c option creates the passwd file if it doesn't exist or replaces it if it does. Use the -c only once. Make sure your umask is set first, as some distributions have lax defaults.
umask 0027
htpasswd -b -c   passwd ben     your-password-here
htpasswd -b      passwd chidori her-password-here
Listing 9. The XAUTH user name and password lookup file—the password itself is linuxjournal.
ben:n0ta0uj0p2G4g:e61
chidori:....:e61
Trying to debug packet logs on the machine that is running as the IPSec server can be a little difficult. Packets that arrive encrypted are decrypted and put onto the network interface to appear as though they have arrived without any encryption. Part of a packet log is shown in Listing 10, showing a packet that appears to have come from the e61's IP address without any encryption. The log is further complicated because the WEP setup gives the e61 the same IP address as the VPN does. For traffic from the Internet, the top two packets will have a random IP address instead of the e61. To get a clearer picture of the packet data, connecting the e61 through a laptop to vserv allows proper packet snooping on the laptop. The imaps packet in Listing 10 will not be seen by the laptop—only a bidirectional stream of ESP packets.
Listing 10. Partial Traffic Log for eth0 on the IPSec Server
15:58:07.n IP ipsecserv > e61: ESP(spi=...), len...
15:58:07.n IP e61 > ipsecserv: ESP(spi=...), len...
15:58:07.n IP e61.57397 > ipsecserv.imaps: . ack...
The iptables commands shown in Listing 11 provide a base to allow the e61 to connect to the IPSec server from the Internet.
The packet filtering rules are quite simple. Allow Internet Security Association and Key Management Protocol (ISAKMP) packets to enter and exit the server and allow any Encapsulating Security Payload (ESP) traffic, assuming that the IPSec server will be responsible for sorting out fraudulent packets. VPN traffic itself is sent through the ESP packets; the ISAKMP is used at the VPN session startup, and those packets also are logged, so that the syslog monitor can alert you of strange connection attempts or door knocking.
Because the non-encrypted traffic is placed on the network interface when Openswan is done with it, the rules have to allow e-mail and squid connections from the e61 IP address. I need to have these rules here because normally no connections can be initiated on the network interface connected to the Internet. If you filter outward traffic too, you have to allow packets from these services to the e61 to be sent to the Internet network interface (to be encrypted by Openswan before being sent to the proper Internet address).
The firewall rules are designed to be used with a default policy of drop. The logging commands can be added or removed to help debugging by searching for the relevant log prefix in /var/log/messages to see which packets are moving around before the firewall may drop them. The script shown in Listing 12 undoes what was done by Listing 11 to disable remote access again.
You also might want to consider using a Single Packet Authorization (SPA) client on the e61 and setting up the server to open the firewall ISAKMP port only after a successful SPA. See Michael Rash's “Single Packet Authorization” article in the April 2007 issue of Linux Journal for more information on SPA.
Listing 11. Punching a little hole in the firewall. Note that the e61 is set in /etc/hosts to 192.168.6.252.
iptables -X REMOTEVPN_INPUT   2>/dev/null
iptables -X REMOTEVPN_OUTPUT  2>/dev/null
iptables -N  REMOTEVPN_INPUT
iptables -N  REMOTEVPN_OUTPUT

iptables -I INPUT  -j REMOTEVPN_INPUT
iptables -I OUTPUT -j REMOTEVPN_OUTPUT

iptables -A REMOTEVPN_INPUT -p esp -j ACCEPT
iptables -A REMOTEVPN_INPUT -m udp -p udp \
  --dport isakmp -j LOG \
  --log-prefix "incoming-ipsec-key "
iptables -A REMOTEVPN_INPUT --src e61 \
  -p tcp --dport imaps -j LOG \
  --log-prefix "incoming-imaps "
iptables -A REMOTEVPN_INPUT -m udp -p udp \
  --dport isakmp -j ACCEPT
iptables -A REMOTEVPN_INPUT --src e61 -p tcp \
  --dport imaps -j ACCEPT
iptables -A REMOTEVPN_INPUT --src e61 -p tcp \
  --dport smtp  -j ACCEPT
iptables -A REMOTEVPN_INPUT --src e61 -p tcp \
  --dport squid -j ACCEPT
iptables -A REMOTEVPN_INPUT --src e61 \
  -j LOG --log-prefix "e61-strange "

iptables -A REMOTEVPN_OUTPUT -p esp -j ACCEPT
iptables -A REMOTEVPN_OUTPUT -m udp -p udp \
  --sport isakmp -j LOG \
  --log-prefix "outgoing-ipsec-key "
iptables -A REMOTEVPN_OUTPUT -m udp -p udp \
  --sport isakmp -j ACCEPT
Listing 12. Remove the e61 access.
iptables -D INPUT  -j REMOTEVPN_INPUT
iptables -D OUTPUT -j REMOTEVPN_OUTPUT
One more complication exists for using some of the publicly available Wi-Fi hotspots. Depending on where on the globe you are, many of these hotspots follow the pattern that when you try to open a Web site, they redirect you to their Wi-Fi login page, you authenticate to them, and then you can use the Internet. If you simply open up a VPN access point on the e61 that is set to use the EasyWLAN as its Internet access point, things will not work. The e61 will start the Wi-Fi connection and immediately try to send data to set up a VPN connection. As you have to authenticate with the Wi-Fi hotspot before this, it will let traffic through, but then things will come crashing down.
A way to get around this is to open the Web browser and directly connect just using EasyWLAN without any VPN whatsoever. Once you have authenticated to the hotspot, leave the browser running and use the menu key to get back to the main menu, and then open the e-mail client. For the access point this time, use the VPN that has EasyWLAN set as its Internet access point. The existing Wi-Fi connection is reused, and the VPN is layered on top. To get secure Web browsing, you can then leave the e-mail program by holding the menu key and going back to the browser. Exit the browser, and the still-running e-mail program holds the VPN open. Start the browser again, and select the VPN as your access point.
Of course, if the Wi-Fi network you are connecting to allows connections without this preamble, opening any application that wants a data connection should allow you to select the new VPN as your access point. Also, if the Wi-Fi hotspot remembers your MAC address and allows reconnection without explicitly having to log in each time, you can start the VPN directly on subsequent connections.
Once the VPN has connected to vserv, the e61 prompts you for the user name and password to use for XAUTH verification (Figure 8).
After XAUTH verification, you should be able to use the VPN without noticing it. In this case, I can browse the Internet using my LANs proxy server to fetch the data (Figure 9).
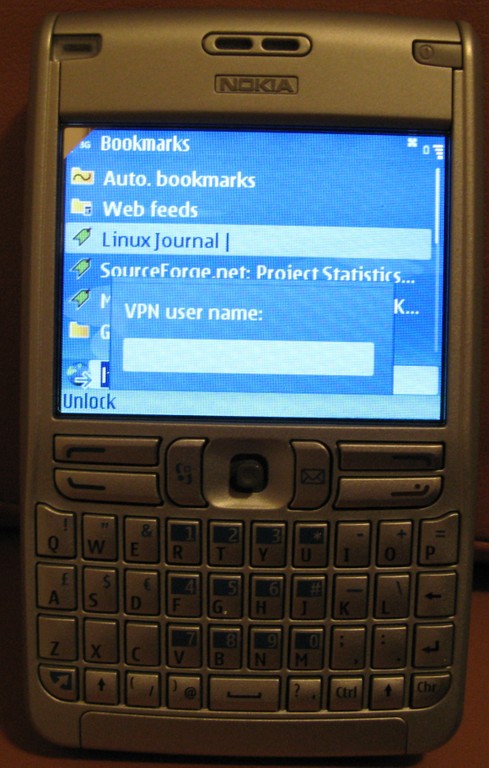
Figure 8. Once the VPN is set up, XAUTH user name and password verification starts.

Figure 9. Success! We can read Linux Journal through the VPN link.
Being able to use a DNS name in the e61 VPN policy would be wonderful for folks who don't have cheap access to static IP addresses. I'm still investigating how to connect using public key cryptography instead of the preshared key as shown in this article. For connecting a single e61 to the network, using a large enough preshared key should still be quite secure.
The information in the article comes with no guarantee of being correct, secure or suitable for anything; use it at your own risk and discretion.
Resources
Symbian Signed: symbiansigned.com
Symbian SDK on Unix HOWTO: www.koeniglich.de/sdk2unix/symbian_sdk_on_unix.html
Symbian SDKs: www.forum.nokia.com/main/resources/tools_and_sdks/index.html
Nokia VPN Client How-To: pipip.de/index.php?section=other&sub=nokia_vpn_en
Wine and MFC42.DLL: bugs.winehq.org/show_bug.cgi?id=4461
“Single Packet Authorization” by Michael Rash (Linux Journal, April 2007): www.linuxjournal.com/article/9565
Ben Martin has been working on filesystems for more than ten years. He is currently working toward a PhD combining Semantic Filesystems with Formal Concept Analysis to improve human-filesystem interaction.
