
VoIP with CommuniGate Pro
Setting up your CommuniGate Pro (CGP) VoIP phone system is as simple as just installing the program. VoIP functionality is part of the base product, so there is no special configuration or licensing necessary. After you have initially downloaded and installed the platform package of your choice ( www.communigate.com/download), you simply need to start the CommuniGate Pro server. To do this, at a UNIX prompt on your server, type /etc/init.d/CommuniGate start.
Once you have the CommuniGate Pro server up and running, you need to locate the randomly generated postmaster password from the postmaster accounts settings file. For most Linux platforms, the default location is /var/CommuniGate/Accounts/postmaster.macnt/account.settings. cat this file to obtain the predefined random postmaster password.
When you have found your postmaster password, open a Web browser of your choice and connect to the CommuniGate Pro Web-Administration Interface at either of these locations (where mail.example.com is the name of your new CGP system in DNS): http://mail.example.com:8010 or https://mail.example.com:9010.
The next step is setting up users on the CGP server. To do this, in the Web-Admin Interface, select the Users tab along the top of the window. CommuniGate Pro will ask you to authenticate—do so as postmaster, with the password you obtained from the postmaster accounts settings file. Next, select the Domains, sub-tab. Select the domain name corresponding to the domain where the new user(s) will be added. Find the button labeled Create Account (Figure 1). Enter the login for a new user in the field to the right of the button. Now, click Create Account.
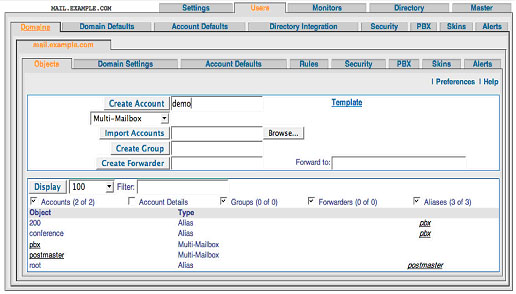
Figure 1. Create the account.
After the account has been created, a Settings page for this new user is displayed. Enter a Real Name for the account, as well as a password. This will be the new user's password for all client applications, such as e-mail, voice and video. Scroll down to the field labeled Aliases. In order to assign an “extension” to the new user, enter the desired extension in the Aliases field. All extensions are really just CGP aliases for an account. Finally, click the Update button located right under the Aliases field. The new user has now been provisioned and already has access to all services, by default, including VoIP.
Repeat the provisioning process above for additional users by clicking the Objects tab located near the top of the tabs. Enter the login for the next new user and so on.
Now that users are provisioned on the CGP server, the next step is to install and configure a device or service known as a VoIP-to-PSTN gateway. The function of such a device or service is to route inbound and outbound telephone calls through the gateway and convert signaling from IP to PSTN and back.
There are numerous PSTN gateway devices supported by CommuniGate Pro, including Cisco Routers with SIP module, AudioCodes Mediant, Mediatrix, VegaStream and Sipura. Also, a number of gateway services are available that CGP supports, such as VoicePulse, Voxeo and Tario.
Suppose, for example, you elect to purchase the Sipura 3000. This device provides decent quality, is well valued and supports three ports:
An analog (RJ-11) line from your telephone provider (such as SBC).
A LAN Ethernet connection (RJ-45).
A second analog (RJ-11) line for connecting a standard telephone.
Note: if you're using a PSTN device such as those listed above, you need to pay for a PSTN line to your location. The smaller devices (such as Sipura and Mediatrix) can use RJ-11 analog lines as input. The larger devices typically require a dedicated T1 PRI to your site.
To configure the Sipura 3000 to work with CGP, follow these steps:
Plug in the Sipura—power, analog line (to your wall socket) and Ethernet (to your LAN).
By default, the Sipura should get a DHCP address on your network and start its administration interface (accessible via a Web browser).
Connect to the administration interface http://IP.address.of.Sipura/admin. The default login is admin, and there is no default password (it should accept a blank password).
The Sipura 3000 uses a tabbed administration interface much like CGP. The Info tab displays the current configuration. The System tab (Figure 2) should be configured for a hostname and any other relevant information to your site (DHCP, Domain, DNS and so forth).
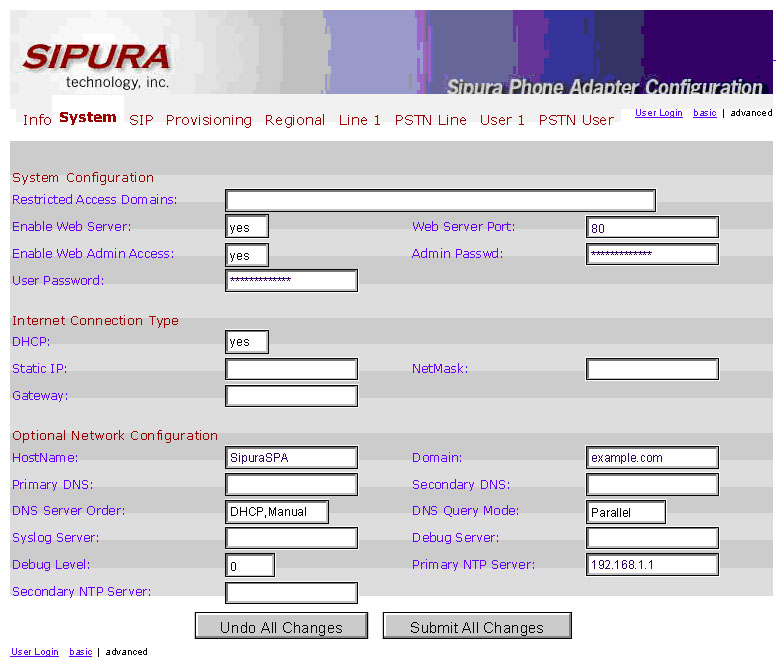
Figure 2. Use the Web interface to set up the Sipura 3000.
If you are just using the PSTN and Ethernet ports, then the only other configuration changes that need to be set are on the PSTN Line tab. These changes include the following for a very simple setup. Note that no security restrictions have been added here, so any system that can route SIP traffic to the Sipura device will be able to initiate outbound calls to the PSTN:
PSTN Line
Line Enable: yes
NAT Mapping Enable: no
SIP Port: 5060

Proxy and Registration
Proxy: cgpserver.domain.com (fill in correct host)
Use Outbound Proxy: yes
Outbound Proxy: cgpserver.domain.com (or IP address)
Register: no
Display Name: Sipura3000
Use Auth ID: no

Dial Plans
Dial Plan 1: S0<:pbx@cgpserver.domain.com>
Dial Plan 2: (xx.<:@gw0>)


VoIP-to-PSTN Gateway Setup
VoIP-to-PSTN Gateway Enable: yes
VoIP Caller Auth Method: none
One Stage Dialing: yes
VoIP Caller Default DP: 2

PSTN-To-VoIP Gateway Setup
PSTN-to-VoIP Gateway Enable: yes
PSTN Caller Auth Method: none
PSTN Caller Default DP: 1
The dial plans are required with the Sipura device to select a routing destination. Many PSTN gateway devices do not require specific dial plans, as the default VoIP-to-PSTN and PSTN-to-VoIP directions are relatively straightforward. The above dial plans should be entered exactly as listed, except for the hostname of your CommuniGate Pro server. Note too the pbx account name—if you used a different name as the pbx account on your CommuniGate Pro server, it should be used here instead. Now, all incoming calls from the PSTN line will be routed to the LAN network with a destination of this account on the CommuniGate Pro server.
Routing some or all numeric addresses (calls to the PSTN) from CommuniGate Pro to your FXO Gateway (Foreign eXchange Office—Sipura, in this case) is very easy.
First, log in to the Web-Admin Interface: https://mail.example.com:9010. Then, select the Settings menu option, and then Router (Settings→Router). Next, add the desired routing table entries for the matched numbers you want routed to the FXO gateway. For example:
NoRelay:Signal:<1*@example.com> = 1*@192.168.1.136
This special syntax simply says, “ relay all calls starting with a 1 to the device at 192.168.1.136”, which for this example would be a Sipura 3000. Similar routing could be done using a 9 prefix, or 011 for international calls:
NoRelay:Signal:<9*@example.com> = *@192.168.1.136
NoRelay:Signal:<011*@example.com> = 011*@192.168.1.136
Note: for the 9-prefix example above, the 9 is stripped from the call when it is routed to the FXO device.
Much more complex signal routing and digit-matching plans can be configured—see the on-line CommuniGate Pro guide at www.communigate.com/CommuniGatePro.
At this point, you should have your software set up to route calls correctly. Now, you need either a softphone or an IP phone.
CommuniGate Pro supports SIP (Session Initiation Protocol). SIP enables real-time communications, including instant messaging, Voice-over-IP, video conferencing, multimedia, whiteboard and application sharing. Required for implementation is CommuniGate Pro version 5.0 or 5.1 and a SIP-enabled client device.
There are many types of SIP-enabled clients. One type of SIP client is a softphone. A softphone is a voice application run on your desktop computer, laptop computer or mobile computing device that acts just like a normal phone, except that you use a microphone or computer headset to talk.
These clients have all the functionality of their physical counterparts and, in some cases, more. Here are just a few of the softphones available at this time:
CounterPath's eyebeam and X-Lite products (Windows/Mac).
Twinkle (Linux).
SJphone (Windows/Mac/Linux).
Another group of SIP clients, known as IP phones, are physical devices that look just like any other desktop phone. However, these devices are connected to the Ethernet over Internet Protocol instead of the telephone network over twisted pair. These devices are just as easy to set up and configure as their softphone counterparts and typically have an HTML interface for exactly this purpose.
Finally, there are soft-client applications that are capable of providing multiple types of SIP services—including instant messaging, voice, video conferencing and whiteboarding—in one package. Some of these applications include Microsoft Windows Messenger, Linphone and KPhone, with more on the way from both the commercial and open-source sectors.
CommuniGate Systems integrates with all SIP-standards-based IP phones. Phones tested to date include those from Polycom, SNOM, Grandstream, ZyXel, Hitachi Cable, Cisco and various other lesser-known IP devices.
All SIP-standards phones should work with CommuniGate Pro. However, SIP has evolved and, in the event that a specific device is found not to work, CommuniGate Pro provides a SIP Workaround feature that can be implemented while the system is running to provide specific workarounds to a specific device.
The following describes the setup of a common IP phone, the Polycom 501. Most IP phones use a similar configuration process.
Each Polycom phone contains a built-in Web server for configuration. After putting the phone on your LAN network, it will get a DHCP address, which can be viewed on the phone's LCD screen.
Use your favorite Web browser to connect to the IP address of the phone. The default login for the Polycom phones is:
http://IP.address.of.phone
username: Polycom
password: 456
After logging in, select the SIP Conf. tab (Figure 3), and enter the hostname or IP address of your CommuniGate Pro system for the Outbound Proxy.
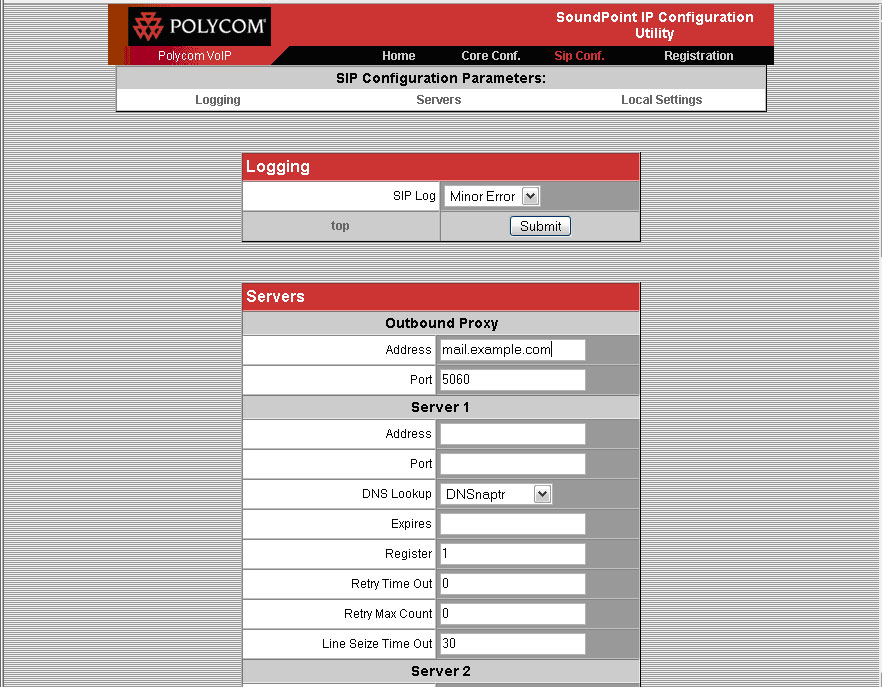
Figure 3. Set up the Polycom IP phone with the Web interface.
Locate the Registration tab (Figure 4), and enter your Display Name (real name), SIP address (same as your e-mail address) and Auth User ID and Password. The Auth User ID could be your short user name, such as demo, or it also can work as the fully qualified name, such as demo@example.com. Also enter the Address of the server, which in most architectures is the hostname or domain name of your environment, and often it is the same as your Outbound Proxy address above.
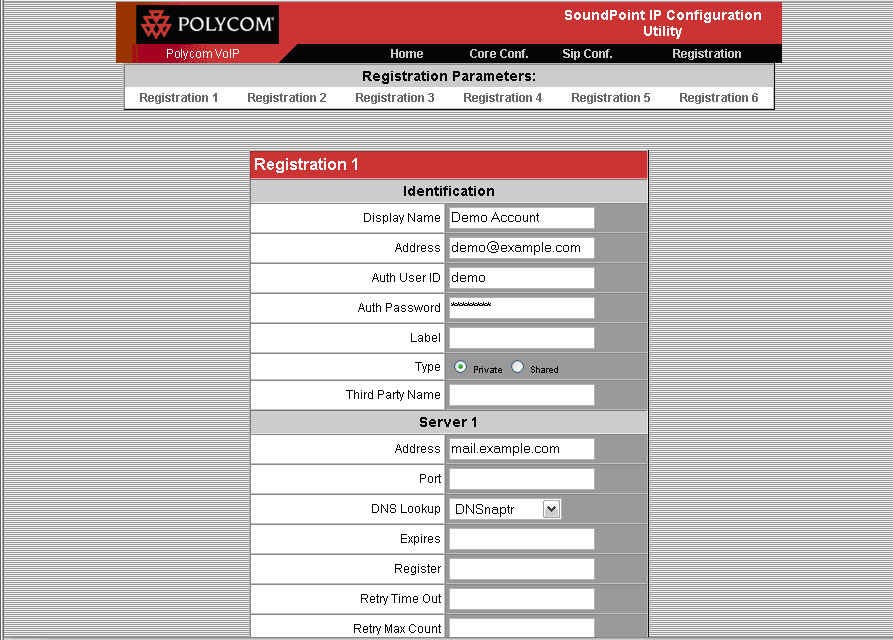
Figure 4. Finish setting up the Polycom phone.
That's it. After updating each change, the phone restarts. After your last set of changes, the phone should REGISTER as your account, and your account name will be displayed on the phone's LCD screen. Incoming calls to your account or extension will ring the phone, as well as your other SIP devices.
You are now ready to place a call. You can dial from one test user to another you've configured either by entering the login name or, alternatively, the extension assigned as the alias for that user. If you want to call people who also are using VoIP on the Internet, try calling them with their URI. For example, on your eyeBeam softphone, instead of dialing digits, type an address (JohnDoe@another.example.net). Of course, your CGP server must have access to the Internet. Enjoy!
Daniel Sadowski assists in the marketing department of CommuniGate Systems. He obtained his degree in International Communication Studies from Sonoma State University with study abroad at Uppsala University in Sweden. Sadowski contributes to CGS media relations, in addition to creating and writing of marketing collateral to include case studies, advertising, on-line content and articles.
Stephen Pratt is the Senior Sales and Systems Engineer for CommuniGate Systems. He has extensive experience in messaging servers along with in-depth knowledge of antivirus and antispam and VoIP technologies. His background includes work experience both as employee and installation and services of messaging systems with such companies as SUN Microsystems, Mirapoint, Resumix, Inc., and Computer Curriculum Corporation. Steve also serves on the SPECmail Server subcommittee and helps drive benchmark standards in performance testing.
