
Fedora Directory Server: the Evolution of Linux Authentication
In most enterprise networks today, centralized authentication is a basic security paradigm. In the Linux realm, OpenLDAP has been king of the hill for many years, but for those unfamiliar with the LDAP command-line interface (CLI), it can be a painstaking process to deploy. Enter the Fedora Directory Server (FDS). Released under the GPL in June 2005 as Fedora Directory Server 7.1 (changed to version 1.0 in December of the same year), FDS has roots in both the Netscape Directory Server Project and its sister product, the Red Hat Directory Server (RHDS). Some of FDS's notable features are its easy-to-use Java-based Administration Console, support for LDAP3 and Active Directory integration. By far, the most attractive feature of FDS is Multi-Master Replication (MMR). MMR allows for multiple servers to maintain the same directory information, so that the loss of one server does not bring the directory down as it would in a master-slave environment.
Getting an FDS server up and running has its ups and downs. Once the server is operational, however, Red Hat makes it easy to administer your directory and connect native Fedora clients. In addition to providing network authentication, you easily can extend FDS functionality across other applications, such as NFS, Samba, Sendmail, Postfix and others. In this article, we focus solely on using FDS for network authentication and implementing MMR.
To begin, download a Fedora 6 ISO readily available from one of the many Fedora mirrors. FDS has low hardware requirements—500MHz with 256MB RAM and 3GB or more space. I recommend at least a 1GHz processor or above with 512MB or more memory and 20GB or more of disk space. This configuration should perform well enough to support small businesses up to enterprises with thousands users. As for supported operating systems, not surprisingly, Red Hat lists Fedora and Red Hat flavors of Linux. HP-UX and Solaris also are supported. With your bootable ISO CD, start the Fedora 6 installation process, and select your desired system preferences and packages. Make sure to select Apache during installation. Set your host and DNS information during the install, using a fully qualified domain name (FQDN). You also can set this information post-install, but it is critical that your host information is configured properly. If you plan to use a firewall, you need to enter two ports to allow LDAP (389 default) and the Admin Console (default is random port). For the servers used here, I chose ports 3891 and 3892 because of an existing LDAP installation in my environment. Fedora also natively supports Security-Enhanced Linux (SELinux), a policy-based lock-down tool, if you choose to use it. If you want to use SELinux, you must choose the Permissive Policy.
Once your Fedora 6 server is up, download and install the latest RPM of Fedora Directory Server from the FDS site (it is not included in the Fedora 6 distribution). Running the RPM unpacks the program files to /opt/fedora-ds. At this point, download and install the current Java Runtime Environment (JRE) .bin file from Sun before running the local setup of FDS. To keep files in the same place, I created an /opt/java directory and downloaded and ran the .bin file from there. After Java is installed, replace the existing soft link to Java in /etc/alternatives with a link to your new Java installation. The following syntax does this:
cd /etc/alternatives
rm ./java
ln -sf /opt/java/jre1.5.0_09/bin/java java
Next, configure Apache to start on boot with the chkconfig command:
chkconfig -level 345 httpd on
Then, start the service by typing:
service httpd start
Now, with the useradd command, create an account named fedorauser under which FDS will run. After creating the account, run /opt/fedora-ds/setup/setup to launch the FDS installation script. Before continuing, you may be presented with several error messages about non-optimal configuration issues, but in most cases, you can answer yes to get past them and start the setup process. Once started, select the default Install Mode 2 - Typical. Accept all defaults during installation except for the Server and Group IDs, for which we are using the fedorauser account (Figure 1), and if you want to customize the ports as we have here, set those to the correct numbers (3891/3892). You also may want to use the same passwords for both the configuration Admin and Directory Manager accounts created during setup.

Figure 1. Install Options
When setup is complete, use the syntax returned from the script to access the admin console (./startconsole -u admin http://fullyqualifieddomainname:port) using the Administrator account (default name is Admin) you specified during the FDS setup. You always can call the Admin console using this same syntax from /opt/fedora-ds.
At this point, you have a functioning directory server. The final step is to create a startup script or directly edit /etc/rc.d/rc.local to start the slapd process and the admin server when the machine starts. Here is an example of a script that does this:
/opt/fedora-ds/slapd-yourservername/start-slapd
/opt/fedora-ds/start-admin &
Looking at the Administration console, you will see server information on the Default tab (Figure 2) and a search utility on the second tab. On the Servers and Applications tab, expand your server name to display the two server consoles that are accessible: the Administration Server and the Directory Server. Double-click the Directory Server icon, and you are taken to the Tasks tab of the Directory Server (Figure 3). From here, you can start and stop directory services, manage certificates, import/export directory databases and back up your server. The backup feature is one of the highlights of the FDS console. It lets you back up any directory database on your server without any knowledge of the CLI. The only caveat is that you still need to use the CLI to schedule backups.
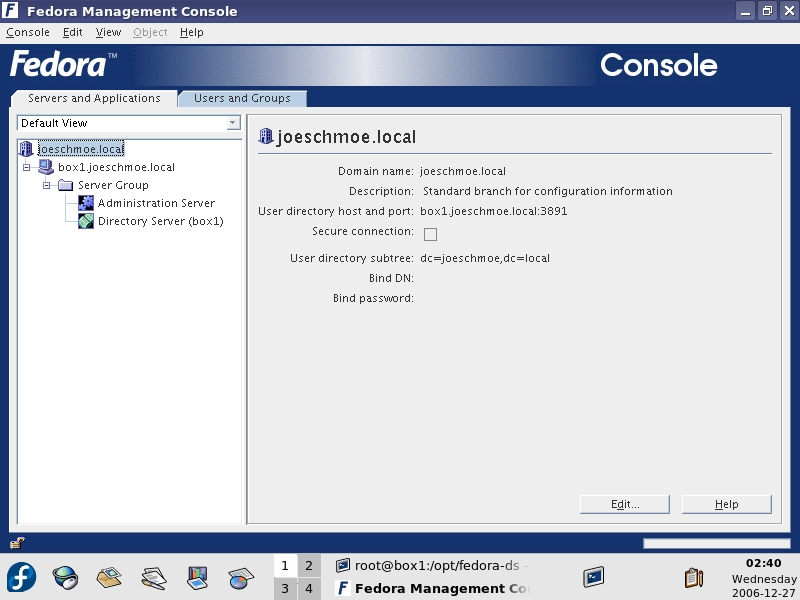
Figure 2. Main Console
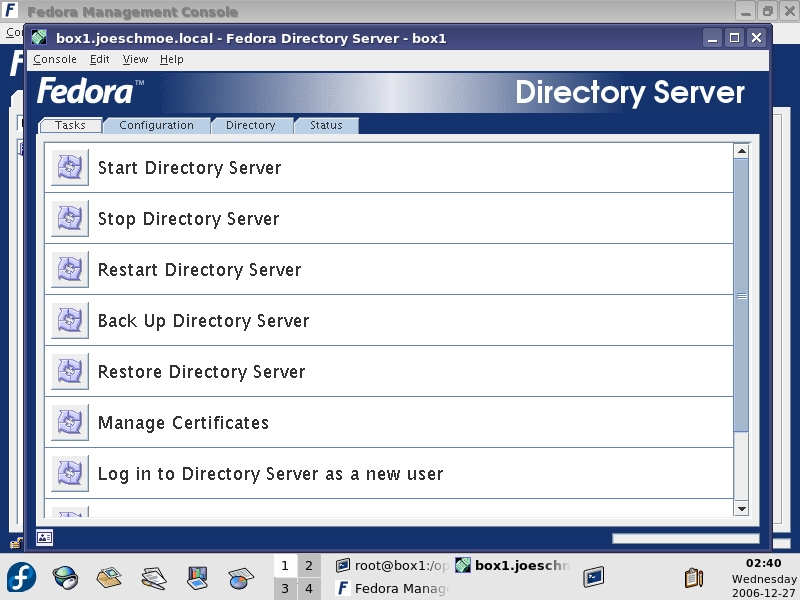
Figure 3. Tasks Tab
On the Status tab, you can view the appropriate logs to monitor activity or diagnose problems with FDS (Figure 4). Simply expand one of the logs in the left pane to display its output in the right pane. Use the Continuous Refresh option to view logs in real time.

Figure 4. Main Logs
From the Configuration tab, you can define replicas (copies of the directory) and synchronization options with other servers, edit schema, initialize databases and define options for logs and plugins. The Directory tab is laid out by the domains for which the server hosts information. The Netscape folder is created automatically by the installation and stores information about your directory. The config folder is used by FDS to store information about the server's operation. In most cases, it should be left alone, but we will use it when we set up replication.
Before creating your directory structure, you should carefully consider how you want to organize your users in the directory. There is not enough space here for a decent primer on directory planning, but I typically use Organizational Units (OUs) to segment people grouped together by common security needs, such as by department (for example, Accounting). Then, within an OU, I create users and groups for simplifying permissions or creating e-mail address lists (for example, Account Managers). FDS also supports roles, which essentially are templates for new users. This strategy is not hard and fast, and you certainly can use the default domain directory structure created during installation for most of your needs (Figure 5). Whatever strategy you choose, you should consult the Red Hat documentation prior to deployment.
To create a new user, right-click an OU under your domain and click on New→User to bring up the New User screen (Figure 5). Fill in the appropriate entries. At minimum, you need a First Name, Last Name and Common Name (cn), which is created from your first and last name. Your login ID is created automatically from your first initial and your last name. You also can enter an e-mail address and a password. From the options in the left pane of the User window, you can add NT User information, Posix Account information and activate/de-activate the account. You can implement a Password Policy from the Directory tab by right-clicking a domain or OU and selecting Manage Password Policy. However, I could not get this feature to work properly.

Figure 5. User Screen
Setting up replication in FDS is a relatively painless process. In our scenario, we configure two-way multi-master replication, but Red Hat supports up to four-way. Because we already have one server (server one) in operation, we need another system (server two) configured the same way (Fedora, FDS) with which to replicate. Use the same settings used on server one (other than hostname) to install and configure Fedora 6/FDS. With both servers up, verify time synchronization and name resolution between them. The servers must have synced time or be relatively close in their offset, and they must be able to resolve the other's hostname for replication to work. You can use IP addresses, configure /etc/hosts or use DNS. I recommend having DNS and NTP in place already to make life easier.
The next step is creating a Replication Manager account to bind one server's directory to the other and vice versa. On the Directory tab of the Directory Server console, create a user account under the config folder (off the main root, not your domain), and give it the name Replication Manager, which should create a login ID (uid) of RManager. Use the same password for the RManager on both servers/directories. On server one, click the Configuration tab and then the Replication folder. In the right pane, click Enable Changelog. Click the Use Default button to fill in the default path under your slapd-servername directory. Click Save. Next, expand the Replication folder and click on the userroot database. In the right pane, click on enable replica, and select Multiple Master under the Replica Role section (Figure 6). Enter a unique Replica ID. This number must be different on each server involved in replication. Scroll down to the update section below, and in the Enter a new supplier DN: textbox, enter the following:
uid=RManager,cn=config
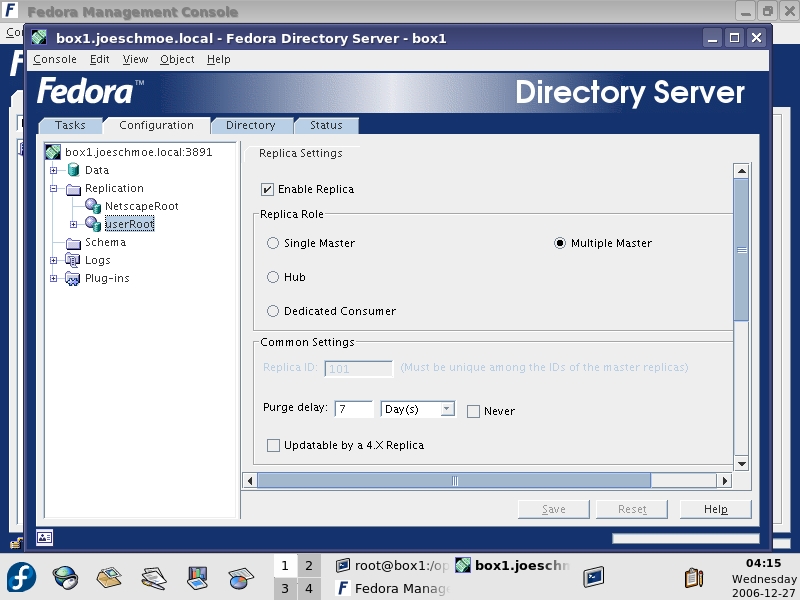
Figure 6. Setting Up Replica
Click Add, and then the Save button at the bottom. On server two, perform the same steps as just completed for creating the RManager account in the config folder, enabling changelogs and creating a Multiple Master Replica (with a different Replica ID).
Now, you need to set up a replication agreement back on server one. From the Configuration tab of the Directory Server, right-click the userroot database, and select New Replication Agreement. A wizard then guides you through the process. Enter a name and description for the agreement (Figure 7). On the Source and Destination screen under Consumer, click the Other button to add server two as a consumer. You must use the FQDN and the correct port (3891 in our case). Use Simple Authentication in the Connection box, and enter the full context (uid=Rmanager,cn=config) of the RManager account and the password for the account (Figure 8). On the next screen, check off the box to enable Fractional Replication to send only deltas rather than the entire directory database when changes occur, which is very useful over WAN connections. On the Schedule screen, select Always keep directories in sync to keep. You also could choose to schedule your updates. On the Initialize Consumer screen, use the Initialize Now option. If you experience any difficulty in initializing a consumer (server two), you can use the Create consumer initialization file option and copy the resulting ldif folder to server two and import and initialize it from the Directory Server Tasks pane. When you click next, you will see the replication taking place. A summary appears at the end of the process. To verify replication took place, check the Replication and Error logs on the first server for success messages. To complete MMR, set up a replication agreement on the server, listing server one as the consumer, but do not initialize at the end of the wizard. Doing so would overwrite the directory on server one with the directory on server two. With our setup complete, we now have a redundant authentication infrastructure in place, and if we choose, we can add another two Read-Write replicas/Masters.

Figure 7. Enter a name and password.
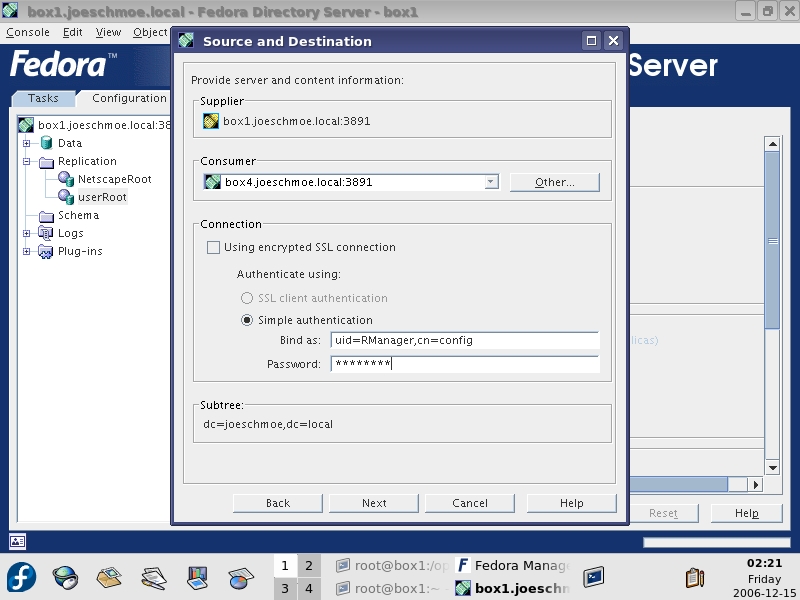
Figure 8. Enter information for the RManager account.
With our infrastructure in place, we can connect our desktop clients. For our configuration, we use native Fedora 6 clients and Windows XP clients to simulate a mixed environment. Other Linux flavors can connect to FDS, but for space constraints, we won't delve into connecting them. It should be noted that most distributions like Fedora use PAM, the /etc/nsswitch.conf and /etc/ldap.conf files to set up LDAP authentication. Regardless of client type, the user account attempting to log in must contain Posix information in the directory in order to authenticate to the FDS server. To connect Fedora clients, use the built-in Authentication utility available in both GNOME and KDE (Figure 9). The nice thing about the utility is that it does all the work for you. You do not have to edit any of the other files previously mentioned manually. Open the utility and enable LDAP on the User Information tab and the Authentication tabs. Once you click OK to these settings, Fedora updates your nsswitch.conf and /etc/pam.d/system-auth files immediately. Upon reboot, your system now uses PAM instead of your local passwd and shadow files to authenticate users.
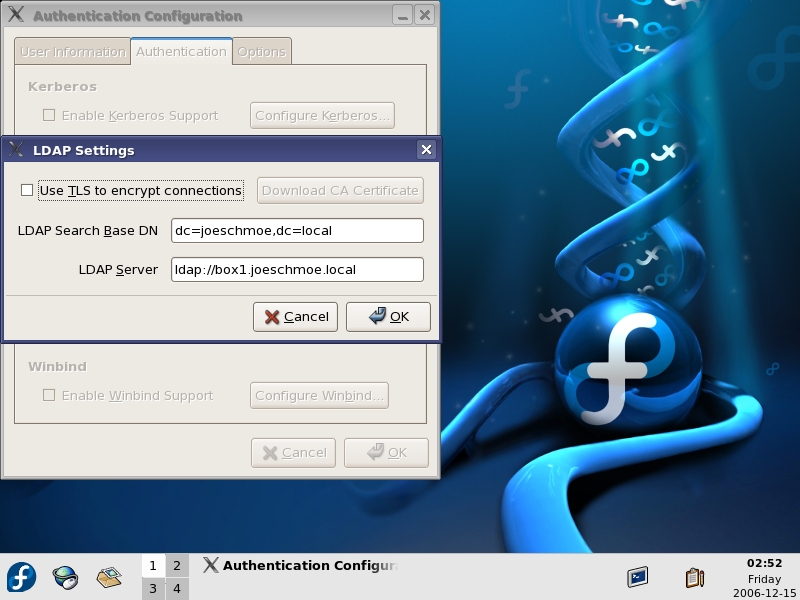
Figure 9. The Built-in Authentication Utility
During login, the local system pulls the LDAP account's Posix information from FDS and sets the system to match the preferences set on the account regarding home directory and shell options. With a little manual work, you also can use automount locally to authenticate and mount network volumes at login time automatically.
Connecting XP clients is almost as easy. Typically, NT/2000/XP users are forced to use the built-in MSGINA.dll to authenticate to Microsoft networks only. In the past, vendors such as Novell have used their own proprietary clients to work around this, but now the open-source pgina client has solved this problem. To connect 2000/XP clients, download the main pgina zipfile from the project page on SourceForge, and extract the files. For this article, I used version 1.8.4 as I ran into some dll issues with version 1.8.8. You also need to download and extract the Plugin bundle. Run the x86 installer from the extracted files, accepting all default options, but do not start the Configuration Tool at the end. Next, install the LDAPAuth plugin from the extracted Plugin bundle. When done installing, open the Configuration Tool under the Pgina Program Group under the Start menu. On the Plugin tab, browse to your ldapauth_plus.dll in the directory specified during the install. Check off the option to Show authentication method selection box. This gives you the option of logging locally if you run into problems. Without this, the only way to bypass the pgina client is through Safe Mode. Now, click on the Configure button, and enter the LDAP server name, port and context you want pgina to use to search for clients. I suggest using the Search Mode as your LDAP method as it will search the entire directory if it cannot find your user ID. Click OK twice to save your settings. Use the Plugin Tester tool before rebooting to load your client and test connectivity (Figure 10). On the next login, the user will receive the prompt shown in Figure 11.

Figure 10. Plugin Tester Tool

Figure 11. Login Prompt
FDS is a powerful platform, and this article has barely scratched the surface. There simply is not room to squeeze all of FDS's other features, such as encryption or AD synchronization, into a single article. If you are interested in these items or want to know how to extend FDS to other applications, check out the wiki and the how-tos on the project's documentation page for further information. Judging from our simple configuration here, FDS seems evolutionary, not revolutionary. It does not change the way in which LDAP operates at a fundamental level. What it does do is take the complex task of administering LDAP and makes it easier while extending normally commercial features, such as MMR, to open source. By adding pgina into the mix, you can tap further into FDS's flexibility and cost savings without needing to deploy an array of services to connect Windows and Linux clients. So, if you are looking for a simple, reliable and cost-saving alternative to other LDAP products, consider FDS.
Resources
Main Fedora Site: fedora.redhat.com
Fedora ISOs: fedora.redhat.com/Download
Fedora Directory Server Site: directory.fedora.redhat.com
Main pgina Site: www.pgina.org
pgina Downloads: sourceforge.net/project/showfiles.php?group_id=53525
Jeramiah Bowling has been a systems administrator and network engineer for more than ten years. He works for a regional accounting and auditing firm in Hunt Valley, Maryland, and holds numerous industry certifications including the CISSP. Your comments are welcome at jb50c@yahoo.com.
