
AcidRip—a Gtk2 Front End to MEncoder
MEncoder is a wonderful little command-line utility included with MPlayer for encoding video. It can take as its source file any video format that MPlayer can read, including Windows Media, MPEG-2 (DVD), QuickTime, MPEG-4, DivX and many others. It then can convert those source files using several encoders, such as lavc, libdv, xvid and x264.
The reasons for doing what basically amounts to conversion from one digital format to another format—possibly the exact same—are several. Converting from the North American NTSC standard framerate of approximately 29.97 frames per second to the European PAL standard of 25 frames per second is one reason. Removing dust and scratches and performing color correction are others. My reason is disk space—newer video codecs like xvid and x264 can do more in less space than older formats, such as MPEG-2. With no detectable loss in quality, a 4GB DVD movie easily can fit in much less than 2GB of space. Furthermore, if you are more aggressive and don't mind scaling the picture, you can shrink it further so that it will fit on a CD-ROM. Even at that size, the picture and sound quality can still be excellent—if you know how to use MEncoder.
Sadly though, MEncoder is not that easy to learn to use properly. The man page alone clocks in at 7,216 lines. Given time and patience, I am sure it is possible to learn the ins and outs of this wonderful program, but I do not have much patience, and I have no time.
The problem is this: my children seem determined to break every DVD in the house. It's not that they are trying to, they're just being kids, but children and DVDs are a bad mix. DVDs are simply too fragile. They seem to get scratches and cracks as soon as you open the case the first time. My little angels have already destroyed Shrek, Ice Age, Black Beauty and Chitty Chitty Bang Bang, among others—I would prefer the destruction to stop there.
My plan is to back up every DVD in the house onto my Linux server. Then, using MythTV or another suitable front end, enable the kids to watch their movies on the television as much as they like. The original DVDs, meanwhile, will be placed carefully in their cases and locked away where little fingers cannot get to them.
There is a lot of storage on my server, but at four-plus gigabytes per disk, and with a growing library of DVDs that is already more than a 100 discs, I don't have that much storage. This is where MEncoder comes in—sort of. I need to convert my DVD library from MPEG-2 into a more storage-friendly format, and MEncoder can do it, but it has me beat—at least for now.
The design goal of MEncoder seems to be to give you the ability to tweak every aspect of your encoding, from format to framerate to bitrate to dimensions to color. With this much power, I have found it very easy to make many errors. Others also have gone through the struggle to learn MEncoder, and thankfully, some of them have tried to make it easier to use. The result is not perfect, but it is a step in the right direction.
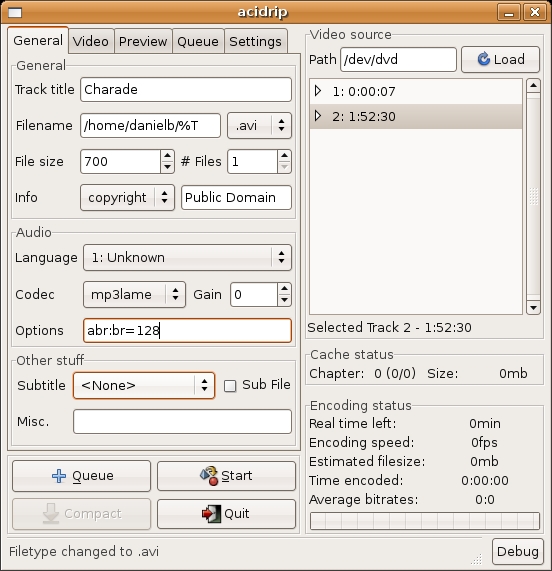
Figure 1. The AcidRip General Settings Tab
AcidRip is a Gtk2::Perl front end to MEncoder. It guides you through setting the options for MEncoder and warns you if you try to do something that will result in a less-than-stellar outcome.
You can download AcidRip from the SourceForge product page. It is also in the package repositories of some Linux distributions. Because AcidRip is a Perl program, once you have unpacked the source files, you can launch AcidRip right from the source folder.
AcidRip depends on MPlayer and MEncoder, so you need to have them installed and working. You also need the DeCSS package to enable the reading of encrypted DVDs. Basically, if you can use MPlayer to watch a DVD, you can use MEncoder to rip it. MPlayer and MEncoder are included with most distributions, so there more than likely is a prebuilt package available in your distribution's package repositories. If not, download the MPlayer source and essential codecs packages from the MPlayer Web site. Follow the installation instructions (see the on-line Resources), and you should be in business.
The AcidRip program also utilizes a little program called lsdvd that is included in the AcidRip source package.
After starting AcidRip, the first thing you need to do is load a DVD. Load the DVD in your DVD drive, and press the Load button in the Video Source section. You will see a listing of all of the chapters and tracks on the DVD. My example DVD has only two tracks; other DVDs could have one or several. To view the chapters in each track, click on the disclosure triangle.
Look for the longest track; this will be the actual movie. If you are ripping a DVD filled with behind-the-scenes extras, interviews and such, there may be many short tracks with no real indication of which one is the main movie, so you may have to try a few until you get to the one you want to encode. Select the track you want to encode by clicking on it.
Now that we've selected the track to encode, we need to set a few options. First, under the General tab, put in the track title. This will end up being the filename for the resulting .avi file. In the Filename field, put in the path to where you want to save the file, ending with %T (the default save location is your home directory), but you can set it to wherever you want. We will get to the file size and number of files boxes later.
If you like, you can add some basic metadata about the movie you are ripping into the Info box, such as the name, artist, subject, genre and copyright information. This information can be read by MPlayer on playback, but otherwise, it is not very useful.
In the Audio section, you can leave the selection on “<Default> English” or choose another audio track using the drop-down menu. Be careful when selecting audio tracks, as some may be commentary tracks, and on some DVDs, certain entries may simply be blank.
From the Audio Codec drop-down box, choose how you want to encode your audio. The choices are dependent on the codecs you have installed. On my machine, they are copy, pcm, mp3lame, lavc and faac. For speed, copy is the fastest, as it simply copies the audio track from the DVD straight into the resulting .avi file. If you choose to encode your audio as MP3 using the mp3lame or lavc codecs, you can adjust the bitrate, but the higher you set the bitrate, the longer your encoding will take. If you find your encodes are too soft or too loud, you can adjust the gain up or down as needed. I have not found this to be necessary in most, if not all, cases.
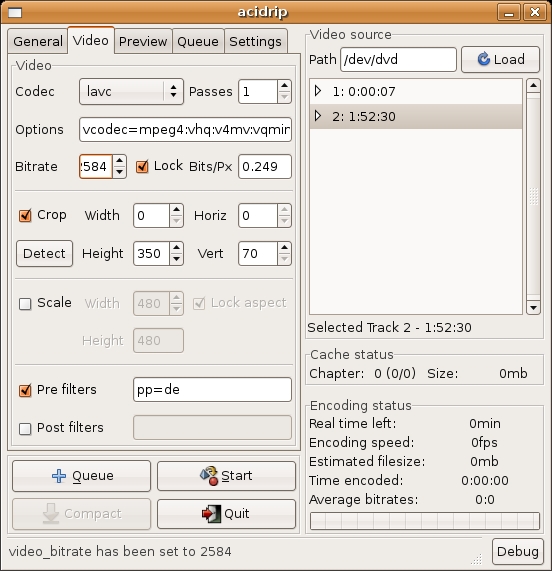
Figure 2. The AcidRip Video Settings Tab
Now we need to set the video options. Click on the Video tab to view them. Again, the codec choices you see are dependent on which codecs you have installed. On my machine, the choices are copy, raw, nuv, lavc, vfw, qtvideo, libdv, xvid and x264. For the best quality in relation to file size, use the x264 codec. I also have had great success with the lavc codec set to its default values. We'll get to the Passes, Bitrate and Bits/Px boxes later.
It is always a good idea to select the crop check box, especially when ripping a widescreen DVD. The last thing you want to do is waste a lot of time and disk space encoding the two black bars at the top and bottom of the video frame. By pressing the Detect button, AcidRip uses MPlayer to skip around to several different individual frames of your selected video track. MPlayer then uses those frames to try to guess at the appropriate crop settings. You can fiddle with the Width, Height, Horiz and Vert to adjust the auto-detected crop if you want, but I usually leave them as they are. For manual cropping, see the Manual Cropping sidebar.
If you are trying to fit the entire film on a single CD-ROM, you may want to scale the picture. The scale feature scales after the cropping is done, so don't try to adjust the crop to fit the scale, simply enter in the scale size you want. Also keep the Lock aspect check box ticked to avoid a distorted picture.
The final options on the Video tab are to adjust the Pre and Post filters. I usually leave them alone.
If you choose lavc as your video codec, you can fiddle with the Bitrate, Bits/Px and set the number of encoding passes you want to use. Generally speaking, the optimal Bits/Px setting is right around 0.249 for MPEG-4 video. If you tick the Lock check box you can adjust the Bitrate manually until you arrive at a Bits/Px setting of right around 0.249. Multiple passes can and will greatly increase the encoding time, but they also will increase the file quality.
By locking the bitrate, you will have no control over the size of the resulting file. After setting your video options, switch back to the General tab, and you will see that an estimated file size has been entered. If you would like to determine the file size manually and have the bitrate adjusted accordingly, untick the Lock check box on the Video tab, switch back to the General tab and adjust the file size. This is normally done when you want to fit a DVD onto one or more CD-Rs.
If you are planning to burn the ripped DVD onto CD, there are a couple of ways to go about doing it. First is to encode at full size into multiple files. Four 700MB CDs are usually enough to hold a full-size movie at good quality. The second option is to set your target file size and then scale down until the Bits/Px is good.
When adjusting the scale size, use the up and down arrows. That way, you will be able to see the bitrate adjust in real time. There is a glitch that prevents auto-updating of the other fields if you type them in manually. This applies to all fields that you can adjust.
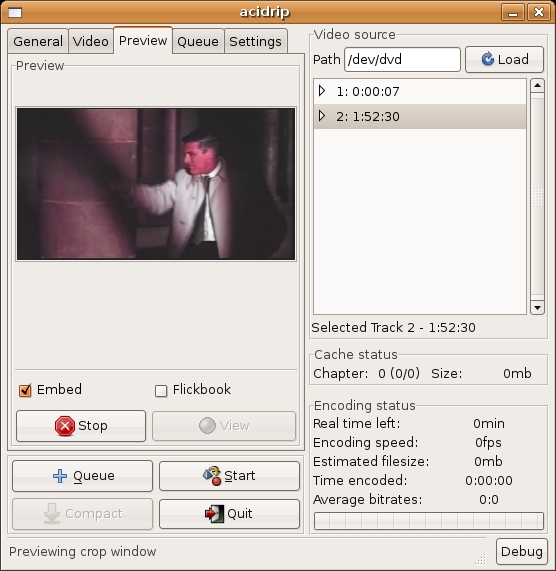
Figure 3. Preview your settings here. If you don't see a picture or hear any audio, you probably need to tweak your settings.
Once you think you have your settings correct, switch over to the Preview tab. Keep the Embed check box ticked and the Flipbook check box unticked, and click the Preview button. As long as there are no errors in your settings, the movie will play. You may find that you have to adjust your crop settings. One thing I like to do to get a better idea of what the movie will look like is to select a chapter from the middle of the movie in the Video Source section instead of watching the movie from the beginning. When doing this, I just have to be sure to change it back before encoding for real. When you have seen enough, press the Stop button.

Figure 4. The Queue tab—this shows you the MEncoder command that AcidRip will run to rip your DVD.
Once you are happy with the settings, you are ready to queue the film for encoding by pressing the Queue button. Switching over to the Queue tab, you can choose to clear the queue or to export the current queue as a shell script. You also can set up multiple encodes to run sequentially, which is very useful for encoding a group of behind-the-scenes extras all into their own files.

Figure 5. The Incredibly Uninformative Progress Dialog
Once your queue is set up with the encode or encodes you want, press the Start button to begin. You then will be presented with a small progress window showing—nothing. This is probably the biggest glitch of AcidRip. It's possible that this might be fixed by the time you read this, but with the current versions of AcidRip (0.14) and MEncoder (1.0pre8), the display is broken. MEncoder is working though; AcidRip is just not telling you about the progress.
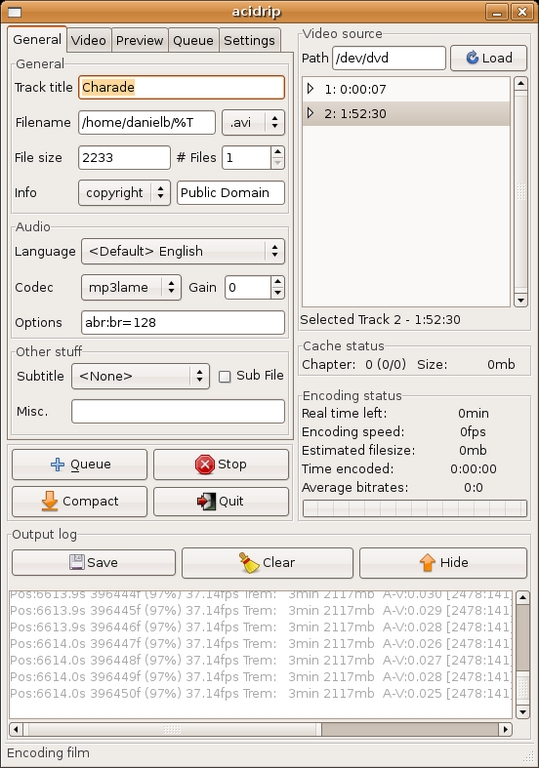
Figure 6. The Incredibly Informative Output Log
To view the progress, click on the Full view button to return to the regular interface and then on the Debug button to view MEncoder's raw output. Scroll to the bottom, and you will see its progress. You should also view the debug window if AcidRip fails to encode the movie for some reason, as it can provide you with good clues as to why and which option caused the encoding to fail.
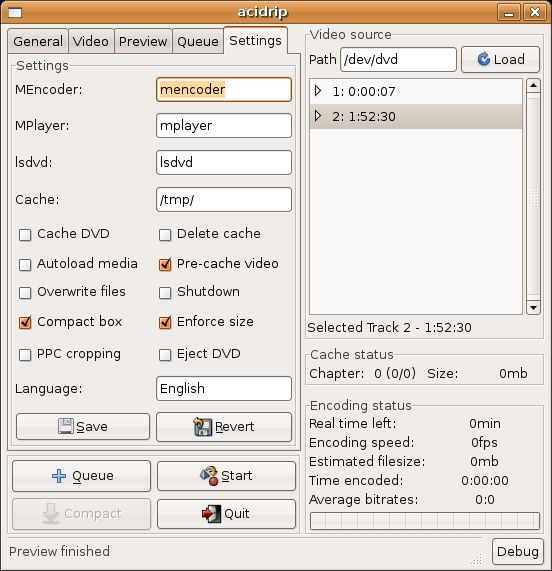
Figure 7. The AcidRip Settings Tab
The final tab in AcidRip is the Settings tab. There you can tweak various settings, including the paths to the MEncoder and MPlayer applications—useful if, for example, you have them installed in nonstandard places. You also can set other options, which are fairly self-explanatory.
In conclusion, AcidRip is a very useful application that, for me at least, helped me get a handle on ripping my DVD collection to my computer. It could use some bug fixes to correct the interface glitches, but apart from those, it works and works well.
The only really unfortunate thing about AcidRip is that the author, Chris Phillips, has stated that he is not interested in updating the product much, if at all. But, due to the beauty of open source, an energetic Perl hacker easily could fork the project and make the necessary updates. Any takers?
Manual Cropping
Some DVDs may give AcidRip trouble due to fuzzy borders, so if it returns with a “crop failed” message, you may have to set the crop manually. If this is the case, start with a width of 720, a height of 480 and go down from there. 720x480 is the size of a standard NTSC DVD frame. For PAL DVDs, the size is 720x568.
When cropping manually, the Horiz and Vert sections can be a little confusing. What they are is the offset from the top-left corner of the full frame of where the crop frame should be positioned. The crop frame itself is specified in the width and height boxes.
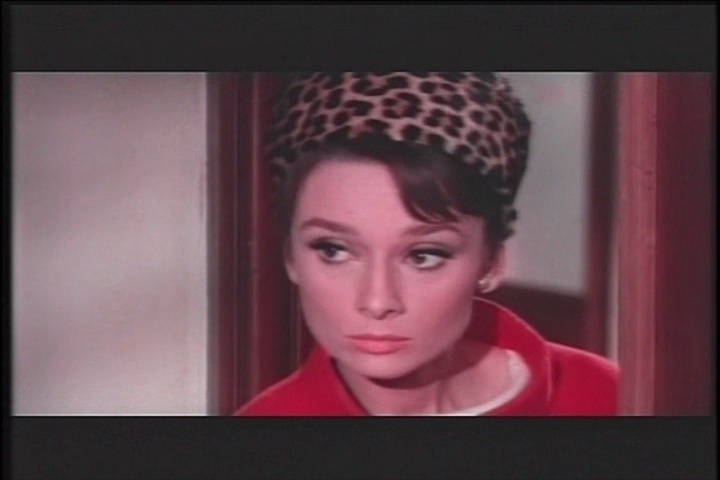
Figure I. An Example Frame from the Movie Charade
For example, take the image shown in Figure I from the film Charade, starring Audrey Hepburn and Cary Grant. This film is good to use as an example for two reasons. First, AcidRip could not detect the the proper crop settings. Second, due to a quirk in United States copyright law, when this film was released, Charade fell into the public domain, and it can be used by anyone for any purpose, including this one.
As you can see from Figure I, there is a black bar down the left side of the film, which exists throughout the film. There is also a small black border down the right side. Both borders are fuzzy, and therefore they are hard to detect accurately. The top and bottom borders of the film also exhibit some variation throughout. The manual crop settings that eventually worked for me were:
Width: 705
Height: 346
Horiz: 11
Vert: 71
This is simply another way of saying that my crop rectangle is 705 pixels wide and 346 pixels tall. The crop rectangle is offset from the left edge by 11 pixels and from the top edge by 71 pixels.

Figure II. The final crop settings I used with this movie.
To get at these final dimensions, I first started with a width of 700, a height of 400, a horizontal offset of 10 and a vertical offset of 60, which were my best guesses of what the dimensions were. Then, by switching back and forth between the Video and Preview tabs, I was able to fine-tune the settings until I was happy with the result.
Advanced Encoding
Now that I am familiar with encoding with AcidRip, my next project is to try to take it to the next level by using MEncoder directly. AcidRip's queue export feature really helps with this. You can export a small shell script of the exact commands that AcidRip passes to MEncoder. Using that as a starting point, I can tweak the settings even further.
The MEncoder documentation is also a great source for encoding instructions and ways to tweak the parameters to get the best image quality. Now if I could only find the time.
Resources for this article: /article/9389.
Daniel Bartholomew has been using computers since the early 1980s when his parents purchased an Apple IIe. After stints on Mac and Windows machines, he discovered Linux in 1996 and has been using various distributions ever since. He lives with his wife and children in North Carolina.
