
Do-It-Yourself Robots with Linux
Robots have been a passion of mine since I was a child, so imagine my excitement when I was given the opportunity to add a robotics class to our high school's computer curriculum! We recently celebrated our second year of offering robotics at Greater Houlton Christian Academy (GHCA), the school where I teach. During this time, we've produced three different robots, each based on a PC running Linux. We work with a tight budget, so we have to be creative in our design, use of materials and tools. This results in robots that any do-it-yourself hobbyist can build.
The first robot to roam the halls of GHCA is K9, a robot dog based on the British sci-fi show, Doctor Who. I created K9 myself as a way to jump-start our Robotics program. K9's main purpose is to “ooh and ahh” students, hopefully encouraging an interest in the field of robotics. I used common angle iron and 1/4 nuts and bolts to assemble K9's “skeleton”, much like an Erector Set from years gone by. In fact, K9's head was built using an Erector Set from 1971! Sheet metal provides the finished look for our class mascot.
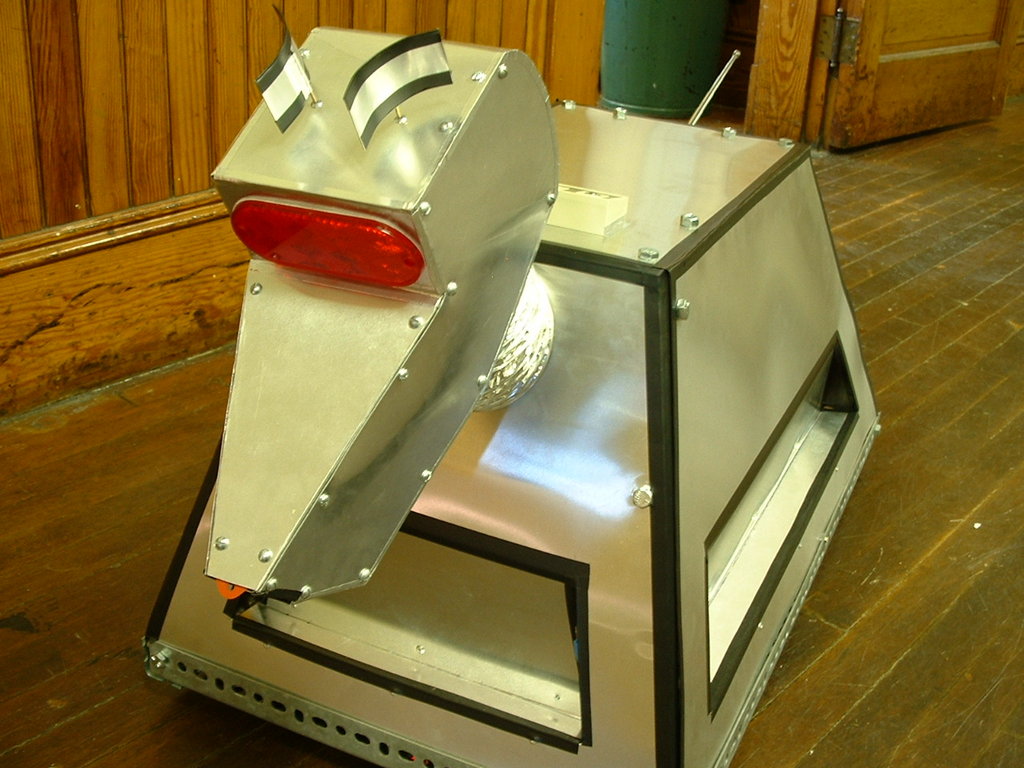
Figure 1. K9 was the first robot built at GHCA.
The second robot was designed by students Aaron Bither and Brian Thompson during our first year of offering robotics. At the beginning of each school year, we start by defining a “problem” that we'd like to overcome, and then we proceed to brainstorm how a machine can solve this problem, what features it will need and so on. Aaron and Brian decided to build a robot that could deliver messages from one classroom to another. They quickly learned that what is simple for humans is usually quite complex for robots. By the end of the school year, they had a robot that could be programmed to navigate the hallway, but much was left undone. It was a learning experience for us all.
Our third robot, and the featured robot of this article, was designed by students Jordan McGuire, Jeromy Nevers and Barrett Jewell. I am also part of the team, contributing ideas and guiding the students, teaching them through the hands-on process of design and construction. The problem this group of students wanted to tackle is security, so they decided to make a “sentry bot” that could patrol the hallways and scan for intruders. Again, easier said than done.
A functioning, autonomous robot has three major components: the mechanical systems, the electronic systems and the software. Design typically begins with the mechanics of the robot, and of particular interest is the method of locomotion. There are many ways to make a robot move, but our class adheres to the KISS principle—keep it simple, silly! For example, we don't build complex legs when wheels work just fine. In fact, all three robots use ordinary lawn-mower wheels with various drive systems.
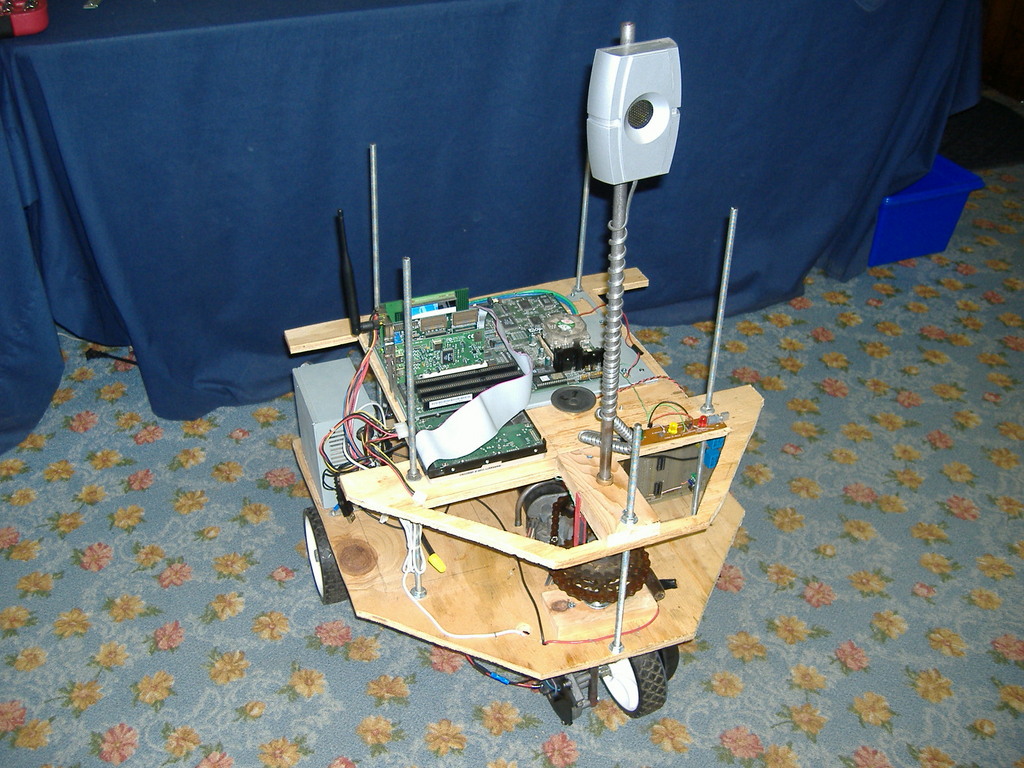
Figure 2. The Sentry Bot
Our sentry bot uses a very simple tricycle design. To drive a robot's wheels, we use windshield-wiper motors. These motors can be purchased on-line for less than $20 US or torn out of an old car for free. They run on 12VDC and provide very high torque at a nice rotation rate. Our sentry bot uses two of these motors: one to drive the front wheel and the other to turn the steering strut.
Once the means of locomotion has been chosen, it's time to design the frame. The frame needs to be strong but not too heavy, and it must accommodate the drive system, any additional mechanical systems (such as arms and sensors), the power source (we use a 12V garden tractor battery) and the electronics. We decided on plywood for the sentry bot because it is relatively inexpensive and easy to work with. We cut out the frame using a simple jigsaw. One trick to reduce weight was to cut out sections of the interior of the plywood frame—just don't cut out too much or the frame will become weak.
Our electronics systems consist of the main computer and interface board that connects the computer to the drive system and sensors. Although I would love to equip every robot with a low-power embedded computer, our budget simply does not allow for this. However, we do have access to a number of old Pentium desktop computers. Considering the processing power of the Mars Rovers, a 200MHz Pentium is more than enough for our humble robot.
A big challenge in using old desktop computers for robotics is the power consumption. These motherboards draw a lot of current. Another problem is the voltages that the motherboard needs. For the sake of time and money, we use a power inverter with the original AT power supply. This is easy to do but not very efficient. Future robots will use components from old laptops that are donated to us, which consume less power and can run directly off the battery.
Interface boards are designed and built in class. The main purpose of this component is to take the low-current outputs of the PC's parallel port and allow those outputs to power the motors. We use transistors and relays to construct our control circuits, as well as a logic circuit to prevent motor “twitching” during bootup. Our logic circuit also ensures that the motors don't exceed any limits, such as turning the steering strut too far left or right. Inputs from sensors are routed through buffers before going to the parallel port. Simple, but it works!
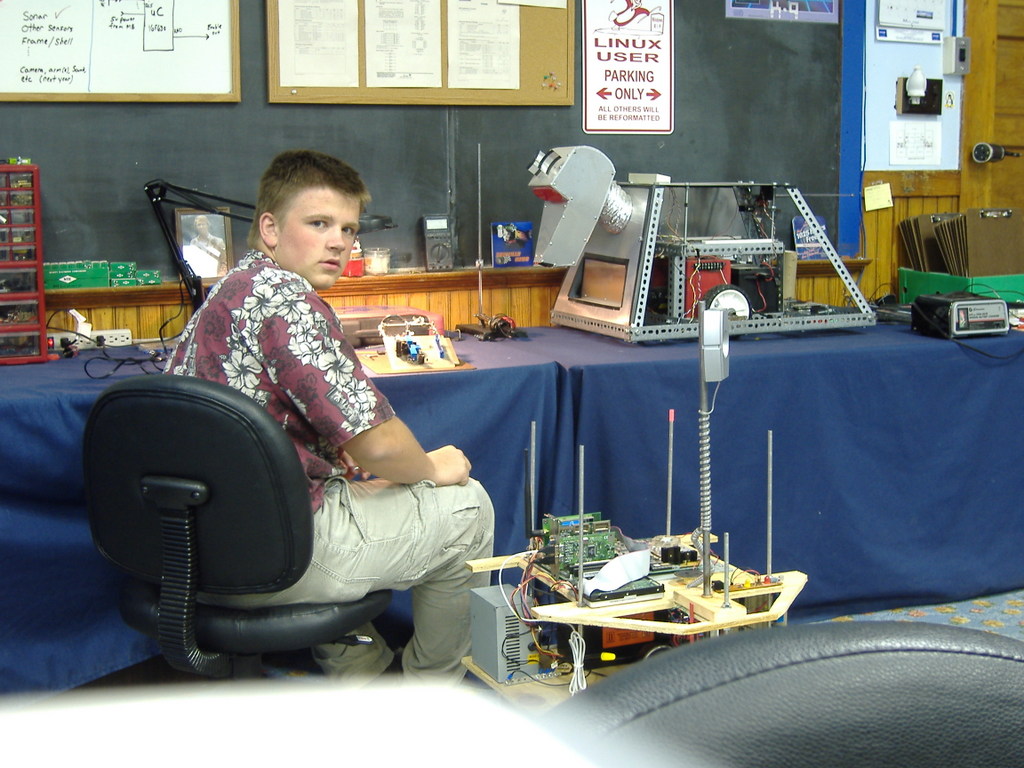
Figure 3. Barrett Jewell works on the interface board.
Of course, what you really want to learn about is the software and operating system that run our robots. Yes, all three robots run Linux! In the beginning, we experimented using DOS and QBasic. However, we were quite limited in what we could do with DOS, so I started experimenting with Linux using K9 the robot dog.
When K9 was built, we used the Mandrake Linux distribution at our school. Mandrake offered a minimum installation option, which was enough for the simple demands of our robots. Since then, however, our school has switched over to Gentoo Linux, and thus our sentry bot actually runs on Gentoo. Maybe some of you are thinking that Gentoo is overkill for a simple robot. Maybe, maybe not.
I personally find that installing Gentoo is faster than installing most other distributions, maybe because I've done it so many times. A bare system (stage 3) install of Gentoo is relatively small, at least compared to the storage available on the robot's hard drive. However, Gentoo's biggest offering is the ability to add and update the software our robot needs quickly and easily, all compiled to make our old hardware run as fast as possible.
In case you are wondering how useful it is to compile software on an old Pentium system, know that our sentry bot has network access to our computer lab. Using distcc, a distributing compiler, our bot has the processing power of 20 Athlon 1500+ processors and more than 7GB of RAM at its disposal for compiling new software. Trust me, sentry bot can compile source code pretty quickly.
Gentoo Linux comes with another plus—it is very Python-centric (due to the Portage system). Our school offers a class to all 8th graders where they use Python to learn the basic concepts of programming. This provides a natural stepping stone for students who later want to take our Robotics class. Python is both simple and powerful, and although it is an interpreted language, it runs plenty fast for the simple needs of our robots. We use some C to interface Python to the parallel port, as well as to deal with time-critical operations, such as drift corrections. However, most of our code is in Python. This allows the students to make changes quickly and see immediate results in the robot's behavior. Because our computer lab is Linux-based, students easily can access the robot using SSH and KDE's fish from their workstations.
Controlling the motors using Linux and Python isn't difficult. The real challenge lies in the implementation of awareness, both of the environment and the robot's internal conditions. For example, a simple program coupled with a few electronic components can turn on the main drive motor for ten seconds, propelling the robot forward. But what's to stop the robot from drifting to the left or the right, or from running into a wall or person? Although the robot easily can track its progress based on time (driving ten seconds forward), the speed of the motor varies with battery charge and friction. To tell the robot to go forward exactly 50cm requires something a bit more complicated; it requires a feedback loop.
Most robots use motors with encoders of some sort to act as a digital “odometer”. These encoders can be built using simple IR emitter/receiver pairs and a disk with holes in it. In fact, old-style computer mice work using this very principle. This got me thinking—instead of building a fancy encoder circuit and interface to the computer, followed by the software needed to read the encoder, why not use a simple device that provides the same information in a very computer-friendly format? Hence the “invention” of the optical mouse encoder.
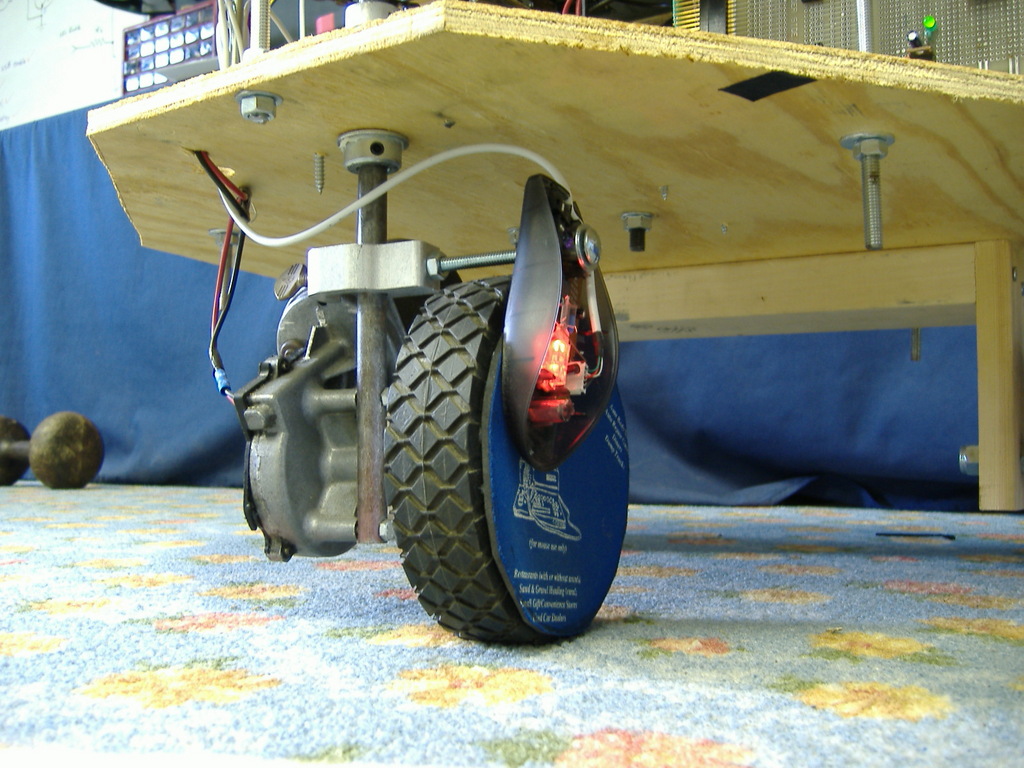
Figure 4. A Close-up of Our Optical Mouse Encoder
Like everything else about our robot, our optical mouse encoder is simple yet effective. We took a mouse pad, cut out a circle and glued it to the main drive wheel. We then mounted an optical mouse to the steering strut so that the mouse rests over the circular mouse pad. As the wheel turns, the mouse pad rotates beneath the mouse, which sends very precise positioning data to the computer. This movement easily can be read by opening and reading from the /dev/psaux or equivalent device file. Optical mice provide a high resolution with great accuracy, so with the proper conversions, we can track our robot's movement down to a fraction of a centimeter. Knowing how far it has traveled, the robot can know where it is on a preprogrammed map, assuming it hasn't been picked up and moved and that there is no drift or wheel slipping.
Of course, drift and wheel slipping do occur, and maps can't predict moved furniture, people or bookbags. The robot needs a way to detect its environment, and to do this we are using sonar and bump sensors. Typically, sonar is neither cheap nor simple, but it just so happens that I had recently “won” a car parking assistant at a Christmas party Yankee swap. This device uses sonar and has three lights to tell drivers how far to back up their cars as they pull into the garage. Well, you can't beat free, and although this device does not measure distance in the traditional sense, it was a working sonar that can detect objects that are close (yellow light) and really close (red light). By wiring the yellow and red LEDs to our parallel port's input lines, our robot can detect objects as it approaches them and take action, such as stop or turn. The sonar emitter is mounted on the front wheel strut, so the sonar is always “looking” in the direction the robot is heading.
Even though we've tried to keep things simple, we still have much work to do. Our students are looking forward to the coming school year when they can continue working with the physical platform they've constructed. With the majority of the hardware in place, our focus will turn to the software. One challenge we've already run into is making sure the robot is going perfectly straight and not drifting to the left or right. Although it may be possible to design the hardware to lock the front wheel pointing exactly forward, there is still the issue of drift due to friction differences at each wheel. To solve this problem, we're turning to software.
Instead of measuring the rotation rate of the single front wheel per our current design, we recently experimented by attaching two optical mice to measure the two rear wheels. Linux provides a separate device file for each mouse, allowing us to track both rear wheels independently and compare them. By measuring differences in rotation rate, we can use software to adjust the steering motor until the robot is going perfectly straight. This also will let us precisely calculate the robot's heading as it makes turns or is affected by drift and wheel slippage. Couple this with external sensors, and we will have a robot that can know exactly where it is in our building.
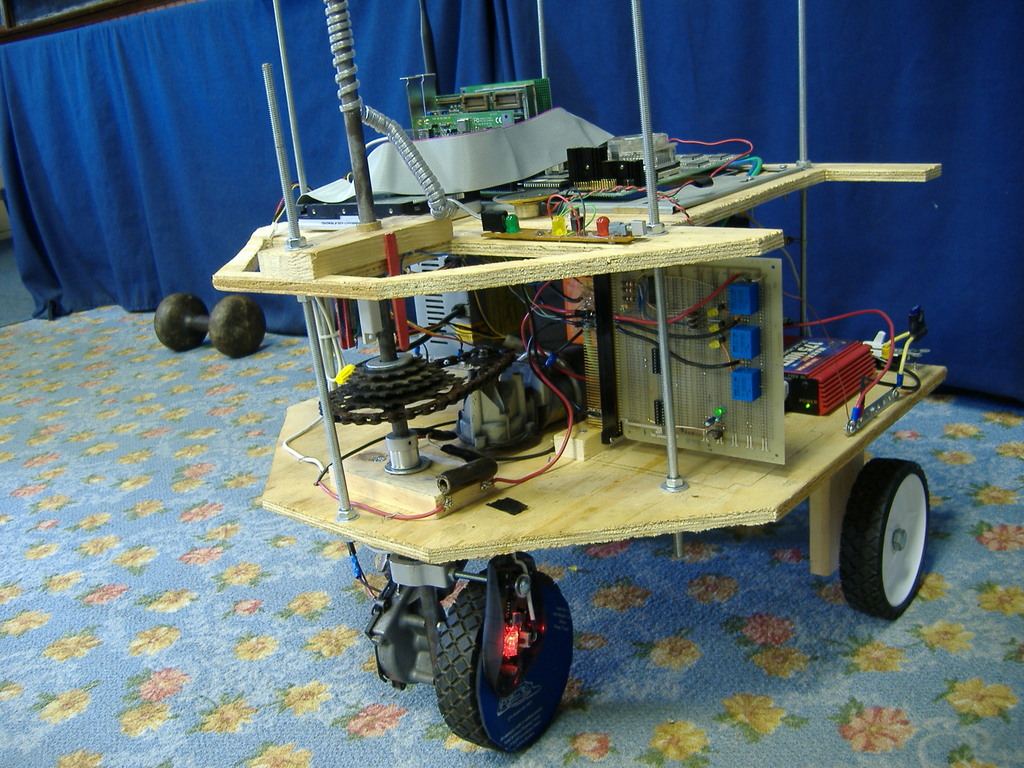
Figure 5. A Look at the Steering Mechanism and Interface Board
High school student Jordan McGuire has written software that allows the robot to correct its internal position based on sonar readings of known boundaries, such as walls. Similar techniques can be used to detect objects that “don't belong”, and then use other sensors, such as heat and motion, to detect a possible intruder during times when the building should be empty. With Linux, it is simple to add a Webcam that can capture and send the images of an intruder via a wireless network. A sentry bot's best weapon is its camera.
With Linux as our operating system, we can expand the capabilities of the robot well beyond the original “mission” given it. We've even discussed adding a GPS receiver and programming the robot to fetch us milkshakes from the local ice cream stand. Okay, maybe that's a little far-fetched, but it is good to dream big!
Speaking of dreams and future designs, as the Robotics program matures and students are introduced to robotics at a younger age, I plan to bring in more advanced concepts. We will still work to keep it simple, but there definitely are better ways to do some of the things we are currently doing. For example, the power requirements of a desktop PC are unrealistic for a battery-powered robot. Laptop components will be a great improvement, but if money were no object, embedded computers would be the way to go. A recent donation has purchased a TS-7260 ARM computer board for K9 that requires less than a watt of power to run. This Linux-based board has a number of I/O ports that are better suited for interfacing to the various motors, servos and sensors of a robot when compared to a PC's parallel port. The other inefficiency our simple approach introduces is the burden of a central PC managing minute yet very time-sensitive tasks, like speed control of the main drive motors. I'm currently redesigning K9's controller board to use simple microcontrollers to unload the low-level tasks from the CPU. Although our class may not be ready to tackle microcontrollers just yet, they definitely will be introduced to the concept and get to see the results.
I realize this article doesn't give step-by-step instructions on how to build a DIY robot. There are many good books and informative Web sites on that topic. My goal is to share what can be done with inexpensive, easy-to-obtain parts and our favorite operating system. Linux is loved by tinkerers and hobbyists, and an exciting and challenging extension to this line of tinkering is to add motors and sensors and autonomy. Like peanut butter and jelly, Linux and robotics are a perfect combination!
Michael Surran has been the network administrator and computer science teacher at Greater Houlton Christian Academy for the last seven years. He has published two articles advocating the use of open-source software in K–12 schools. Outside his life of computers, he enjoys the great outdoors of Maine. Comments can be sent to michael@ghca.com.
