
Remote Temperature Monitoring with Linux
I started this project to record and access temperature readings remotely after I had a conversation with a friend who is in the HVAC business. His job is to make sure the climate indoors is comfortable—not too hot and not too cold, depending on the weather outside. He finds many new installations have startup bugs that must be worked out, because no two installations are exactly the same. The end of the job is the most stressful. A customer calls after he is done and lets him know something is wrong. The customer isn't happy, but he doesn't know where to start looking for the problem because there isn't any good objective information about what is going wrong with the installation.
We agreed that it would help to be able to record the outside temperature and log the readings electronically. This would be one way of improving the troubleshooting process. I then started the search to purchase an off-the-shelf recorder that was inexpensive, easy to install and simple to use. While looking, I found a wide range of commercial products and kits. Some are standalone and some use a PC for displaying and recording temperature data. Each of our three requirements was equally important and I found that most of the products were too expensive for our budget. Ease of installation was typically another problem. Some devices had complicated wiring or the requirement that they be placed where temperature was measured. Many people consider thermostats to be just clutter on a wall, so it wasn't going to be easy to convince them to have another box to record temperature.
Finally, to solve the problems of cost and installation, I looked at the possibility of building a system from components. Following the Linux idea of assembling and integrating tools to get a task done, I looked at using a digital multimeter, a PC and software to make them work together. The digital multimeter with an RS-232 serial port interface would measure temperature using a sensor. The PC would collect the data from the multimeter and process it for display.
I was aware of open-source utilities for the multimeter serial port interface using Linux and had purchased a multimeter earlier for general troubleshooting. We had a retired PC available, so all the components were on hand to build a prototype temperature recording system.
The digital multimeter came with a serial port cable and DOS software. I didn't use the supplied DOS program. There was no way to modify the program to allow temperature measurements with the sensor. Instead, I used QuickBasic to write new software from the ground up. I had the necessary details about the serial port interface for the multimeter, and QuickBasic had all the features I needed. I got a prototype communication program to work, but I ran into memory management issues with DOS and QuickBasic as the application grew in size, especially when I started dealing with the need to display and record data.
It seemed like a big step backward to struggle with memory management at this point. I knew Linux would provide an environment where I wouldn't need to be concerned with memory management, so I looked for a distribution to use as a replacement for DOS.
I found that the most popular Linux distributions weren't appropriate for this application. Even a minimal installation of these distributions would exceed the capacity of the retired PC. The distribution I found that overcame these restrictions was University Linux from Paul Muller. It has small memory and disk requirements. I was able to run it on the retired PC using less than 20MB of DOS formatted hard disk space and 24MB of RAM. Best of all, the distribution is tolerant to power failures. If the power goes out, the PC reboots without causing file corruption problems that need manual help. This saves money and reduces complexity, because I didn't need a UPS to keep the system running during power failures.
Once I configured everything on the PC, there was no need for a keyboard or monitor. I could use a Windows PC and Telnet, along with an Ethernet connection to communicate with the system PC for development and testing. I prefer to write and test incrementally, so I chose Perl for the language for this project. University Linux comes with Perl version 5.003. I couldn't use Perl modules, the application size was too small, so this was a minor inconvenience. University Linux also includes Acme Labs thttpd server. This allowed me to set up the system to use a Web browser for viewing temperature measurements.
I used a Tandy Catalog No. 22-805 digital multimeter that comes with an operating manual, DOS software, wire test leads and serial cable with nine pin connectors. According to the manual, the communication settings are 600 baud, seven data bits, two stop bits and no parity. Important information was left out of the operating manual, but I found what I needed on the Web. The DTR and RTS lines need special attention. The DTR line has to be set low and the RTS line set high for the meter to communicate through the serial port. It is impossible to get data from the meter without the two lines set this way.
I could use only stty for serial communication with this distribution and couldn't explicitly control the DTR and RTS lines in the script. This meant I needed a hardware hack to make things work.
I found that DTR and RTS change from a low to high state when I call stty in the script. This works out okay for DTR, but RTS has to remain low. I realized that the second serial port on the PC has RTS low as it isn't being used. If I connected the multimeter serial interface cable RTS to the RTS pin of the second serial port, the multimeter would be faked into seeing the correct line setting. I simply removed the RTS line from the multimeter and connected it to the second serial port.
With that problem solved, I powered up the multimeter and put together a short test script (serialtest.pl), as follows:
# !/usr/bin/perl
#
# serialtest.pl
#
# Script for reading Tandy Model 22-805 meter
# through serial port.

$port = "/dev/ttyS1"; # set to COM1

system ("stty 600 cs7 cstopb clocal -ixon -echo < $port");

open (SERIALPORT, "+>$port") or die "can't open $port. ";

print SERIALPORT ("\n"); #  take a reading

$R = <SERIALPORT>; # read returned string

print "$R" ;

close (SERIALPORT); # close port

exit 0;
If the script ran successfully, I would get a string with the same reading shown in the multimeter LCD. I set the multimeter to the resistance measurement range and ran the script. The result was:
OH O.L MOhm
A good start! The hardware hack worked. Now it was on to measure a temperature sensor with the multimeter.
I chose an NTC (negative temperature coefficient) thermistor for the temperature sensor. Despite the fearsome sounding name, this is just a small two-wire electronic component that changes electrical resistance with temperature. With a multimeter, the resistance measurement provides information to tell temperature. The thermistor is impossible to wire backward, because it isn't voltage-polarity (+ or -) sensitive. This means one less thing for the technician installing it in the field to worry about.
The thermistor isn't fragile, but the leads to the body can be broken with excessive tugging or bending. I used a two-position terminal block to solve this problem and make the connection to the wiring simple. I placed one thermistor lead and a wire under a screw terminal and then tightened the screw to make a solid mechanical and electrical contact.
With the thermistor connected to the ends of the test leads and the test leads plugged in to the multimeter, I powered up and ran the test script again. The result was a resistance reading:
OH 34.23kOhm
The numeric portion of the reading is 34.23 with a k after it. The k is an abbreviation for kilo or 1,000. Because the multimeter LCD doesn't have enough characters to display large numbers, it uses a multiplier. In this case 34.23k is 34,230 Ohms.
I found that this reading was very close to 0 degrees C by referencing a table of resistance-to-temperature values supplied by the manufacturer. It matched the temperature reading of another thermometer with a sensor in the general area, so I was confident that this assembled system would work and provide accurate readings.
Now it was time to create a script to to use the data and display the temperature value.
Two choices were available to perform resistance-to-temperature conversion in the script. I could use a lookup table with pairs of resistance-to-temperature values in an array. The sheer number of elements in this array would be a drawback to this approach. A span from -40 degrees C to +40 degrees C requires 81 (don't forget 0 degrees C) pairs of values. There was no easy way to manipulate a text file available from the thermistor manufacturer, and entering the values by hand would take time and be prone to errors.
Instead, I used what's called the Steinhart-Hart equation (see sidebar). The equation was developed in the late 1960s to help process ocean temperature data collected with thermistors and provides direct conversion of resistance to temperature. A spreadsheet utility found on the Web helped with calculating coefficients unique to each family of thermistors and was used in the equation.
Once the script calculates temperature from a multimeter reading, it needs to be displayed or stored. With this in mind, I extended the test script to convert and display temperature, and show the time and resistance reading. University Linux uses the 2.0 kernel, and root user login by Telnet is allowed. When ordinary users attempt to run the grabtemp.pl script, an error is displayed because of the file permissions used for the serial port, /dev/ttyS1. I fixed this by changing permissions with:
chmod a+x /dev/ttyS1
Now, ordinary users could log in and run the script to check temperature. They wouldn't need root access.
Here is the output from the resulting showtemp.pl script:
/perlserial: perl -w showtemp.pl
01-05-2006 14:43 34 F 1.3 C 30.52 k Ohms
Here you can see the date, time, temperatures in degrees F and degrees C, along with the actual resistance reading. I checked the temperature where the sensor was located and found that the reading was accurate, so the conversion formula part of the script worked.
Not too many computer users are comfortable with using a command-line program interface. Web browsers with a point-and-click interface are a lot less intimidating. So, I extended the script once again to allow users to operate the system with a Web browser.
With the thttpd server configured and running, it was just a matter of directing the output from the script to build a Web page for display. This was fairly straightforward as the following code shows: shows:
print "content-type: text/html \n\n";
print "<HTML><BODY><P>";
print "<HEAD><title>Remote Temperature Measurement Page</title></HEAD>";
print "<H2>Mechanical Room</H2> ";
print '<form action="webtemp.pl" method=post> <P> <P>';
print "Interior Air Temperature = $out_tempF<BR>";
print "<BR>";
print "<BR>";
print "Date: $out_date  <BR>";
print "Time: $out_time  <BR>";
print "<BR>";
print '<input type=submit value="Update Reading">';
print "</form>";
print "</BODY></HTML>";
Running the webtemp.pl script from /cgi-bin gives the user a display like the example shown in Figure 1.
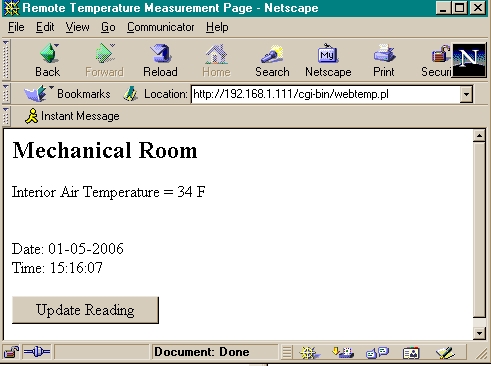
Figure 1. The temperature monitor now has a Web interface.
This example shows the temperature in the room as well as the time and the date of the reading. You can press the Update Reading button to rerun the script and display another temperature value.
It is easy to write an extension to the script to log temperature over time. I put a line in the rc (boot) script that launches a data logging script, which then runs continuously in the background. I found that I could use measurement intervals of 5-10 minutes, because changes in air temperature are slow indoors in an air-conditioned space.
You can access the temperature log through the command line by using Telnet. Because the format was space-delimited, the date file was used with Microsoft Excel to plot graphs and view trends. You can see a sample output in Figure 2.

Figure 2. A sample set of values kept in the temperature monitoring log as seen through Telnet.
The overall objective was to create a reliable and easy-to-use electronic means to display and record temperature data. When you actually deploy the system, the location of the system and the network connection can vary widely. Depending on circumstances, you have to evaluate the security concerns for each installation. You may have to implement some workarounds to address the security concerns. For example, you can log temperature readings in the form of text or HTML pages by a script running in the background and not by a script in the cgi directory, which isolates the logging process from Web access. Alternately, you can gather data from this server using another secure server through FTP or HTTP. This would add another layer to prevent direct access by the outside world, but still make the information available.
Digital multimeters are general-purpose electronic measurement tools. Although I used a thermistor for temperature measurement in this application, you can use other sensors that have resistance, voltage or electrical current as outputs. Some other conditions to measure include flow, pressure, weight, light level and humidity.
You don't need more multimeters to measure more than one temperature. You can connect a single multimeter to a switching device. You then would create a script to operate the switching device, which allows you to select one temperature sensor at a time.
This example shows how the tool concept behind Linux works for solving applications where cost and flexibility requirements are important. The wide variety of distributions available compared with other operating systems meant developing a system with all the features needed was practical. Additionally, you can add features using Perl and the development environment provided by the University Linux distribution.
The system can be duplicated for less than $100 US. The multimeter, thermistor and wiring accessories are available from numerous electronics retailers. Many retailers have Web sites, so it's easy to compare features, specs and pricing before ordering. Purchasing a used digital multimeter should be done with caution, as there is no easy way to tell whether accuracy of the instrument has been affected by the previous use.
Thermistors and Steinhart-Hart Equation
The plot of resistance to temperature on a graph for a thermistor looks a lot like the curve of a ski jump, and each family of thermistors has their own unique curve. So, simple y = mx + b algebra won't help to convert resistance to temperature. The equation of the curve can be described by a polynomial. The Steinhart-Hart equation is a trinomial or an equation with three terms. Solving the equation at each resistance measurement point requires three coefficients; a, b and c. Some manufacturers provide these for their thermistors. Others provide only tables of resistance to temperature.
When the coefficients aren't available, a spreadsheet utility is available to help find them using the manufacturer's tables. No algebra is required; simply enter the three values of temperature and resistance into the spreadsheet and the coefficients are calculated automatically. They are usually very small numbers, expressed in scientific notation. But the calculated coefficients can be cut and pasted from the spreadsheet into the Perl script for use, reducing errors from typing
Resources for this article: /article/8833.
Steven M. Lapinskas has a professional background that includes the areas of software quality assurance, mechanical design and project management. Some of his free time is spent experimenting to interface Linux with the real world outside the computer.
