
MSP430 Development with Linux
Linux embedded development doesn't only mean embedding Linux in a product, it also means using Linux as a development platform for embedded microprocessors. The majority of computer processors are not on the desktop or in Beowulf clusters, they are embedded in the millions of devices that you use every day: your alarm clock, microwave, thermostat, car, cell phone and so on. Linux can be used to develop software for embedded projects using microprocessors like the Microchip PIC, Atmel AVR, Philips LPC ARM and TI MSP430 devices.
You don't need to be a professional developer to have fun with these tiny computer devices. The development tools are inexpensive, and the hardware required is minimal. Soldering skills and some experience writing in C are really all you need to get started creating a controller for your next Sumo Bot, remote controlled helicopter or digital lock.
The Texas Instruments (TI) MSP430 family of microprocessors have a wide range of features:
Power consumption as low as 0.1uA in off mode.
Multiple 16-bit timers with capture/compare.
PWM outputs, which are very useful for robotics.
A/D converters for monitoring sensors.
SPI and Asynchronous UARTs for communications.
Integrated LCD display controllers.
Onboard oscillators.
Multiple clock sources for low-power sleep modes.
The '430 family includes more than 80 devices in four major groups. Flash, where the program is stored, ranges from a paltry 1KB to an extravagant 60KB. The available RAM is as large as 5KB or as small as 128 bytes.
Of course, 128 bytes isn't much RAM, but it is enough to get the job done for small projects. Many of my embedded projects are written in assembly code to conserve space, but with the MSP430, I have found myself using C as the primary language. Instead of using a commercial compiler or IDE, I have chosen to use the GNU GCC toolchain, which has had MSP430 support added to it. The GCC compiler does a pretty good job of generating code, and C is certainly the better choice if the the code is going to be maintained over a number of years. There's nothing worse than returning to heavily optimized assembly project five years later and trying to make adjustments without the whole system crumbling to its knees.
With the Microchip PIC processors that I wrote about in 1998, the development process was a bit tedious. I would write some code, compile it, flash the PIC, wonder why it didn't work and then repeat. I used a couple of I/O lines and LEDs as debugging tools, but there's only so much information that you can grok from two flashing LEDs. I really had no way to know exactly what was going on inside the processor when things went wrong. One solution could have been to buy an In Circuit Emulator (ICE). An In Circuit Emulator is a device you plug in to the socket where the processor normally goes. It emulates the CPU and lets you examine every instruction, memory locations and much more. But the $1,200+ US price for an ICE was out of my reach.
Today, things are much easier for both the the hobbyist and professional. Many of the newer processors include built in real-time debugging support using the IEEE Std 1149.1 JTAG specification. This six-wire interface allows real-time debugging of the software running on the target device. You can step through your code, watch registers and memory locations change, insert breakpoints and modify RAM on the fly. This is a dramatic improvement over the old 1- or 2-bit diagnostic line.
Instead of dropping a dozen c-notes on expensive debugging tools, you can get a parallel port JTAG adapter from Olimex for the amazing price of $15 US. This allows people to debug their code with interactive debuggers like gdb instead of relying on blinking LEDs and serial ports.
MSP430 support was added to GCC by a group headed by Dimitry Diky and Chris Lichti. Their project includes the gcc compiler, linker, libraries, gdb debugger and a closed-source interface to the parallel JTAG adapter. The main emphasis of the mspgcc project has been on the Windows. Getting it working on Linux is a bit of a struggle, involving compiling the alternate toolchain, libraries and so on. Maybe I'm getting old, lazy or just used to .deb and .rpm packages, but these days, I prefer not to fight with the software I'm installing. Running rpm -Uhv <package> saves my energy for debugging my MSP430 code.
Thanks to Stephan Linz and his Cross Development Kit for MSP430, I don't need to spend more than five minutes installing development tools. He has done all the hard work getting mspgcc compiled and packaged as RPMs. Stephen also has created Cross Development Kits for the AVR processor and the Altera soft core NIOS, if you are interested in those target processors. If I ever need to write code for the AVR, I know where to go.
The cdk4msp project is available from SourceForge, and here is a minimal list of the packages that need to be installed from the cdk4msp SourceForge download page:
cdk-msp-base-0.2-20031111.i386.rpm
cdk-msp-binutils-2.14-20031106.i386.rpm
cdk-msp-examples-libc-20031101cvs-20031102.noarch.rpm
cdk-msp-examples-mspgcc-20031101cvs-20031102.noarch.rpm
cdk-msp-gcc-3.3.2-20031106.i386.rpm
cdk-msp-gdb-5.1.1-20031106.i386.rpm
cdk-msp-gdb-proxy-5.1.1-20031106.i386.rpm
cdk-msp-jtag-lib-20031101cvs-20031102.i386.rpm
cdk-msp-libc-20031101cvs-20031102.noarch.rpm
Additional document packages can be downloaded, depending on your preference for man pages, info files, PDF or HTML pages. I have successfully used these packages on Fedora Core releases 1 through 4, and although I haven't tried any other RPM-based distributions, I expect them to work just fine. These RPM packages function as a self-contained unit, and don't depend on any outside packages.
Install the packages in this order with the following commands:
rpm -Uhv cdk-msp-base-0.2-20031111.i386.rpm
rpm -Uhv cdk-msp-binutils-2.14-20031106.i386.rpm
rpm -Uhv cdk-msp-libc-20031101cvs-20031102.noarch.rpm
rpm -Uhv cdk-msp-gcc-3.3.2-20031106.i386.rpm
rpm -Uhv cdk-msp-gdb-5.1.1-20031106.i386.rpm
rpm -Uhv cdk-msp-jtag-lib-20031101cvs-20031102.i386.rpm
rpm -Uhv cdk-msp-gdb-proxy-5.1.1-20031106.i386.rpm
rpm -Uhv cdk-msp-examples-libc-20031101cvs-20031102.noarch.rpm
rpm -Uhv cdk-msp-examples-mspgcc-20031101cvs-20031102.noarch.rpm
The install places everything in the directory tree below /opt/cdk4msp. Take a look at the examples in /opt/cdk4msp/examples/mspgcc and the documents in /opt/cdk4msp/doc, info and man directories, depending on which style of documentation you installed.
Blinking an LED is the embedded equivalent of “Hello World”. We will modify one of the examples to make it a little easier to understand. Copy the leds example from /opt/cdk4msp/examples/mspgcc/leds/ to a working directory, and replace main.c with the simplified version below. Edit the Makefile and set the CPU variable to msp430x149 so that it compiles for the correct target. If you are using a different version of the MSP430, you can get a list of the supported types by running msp430-gcc --target-help | less and then set CPU to the appropriate type.
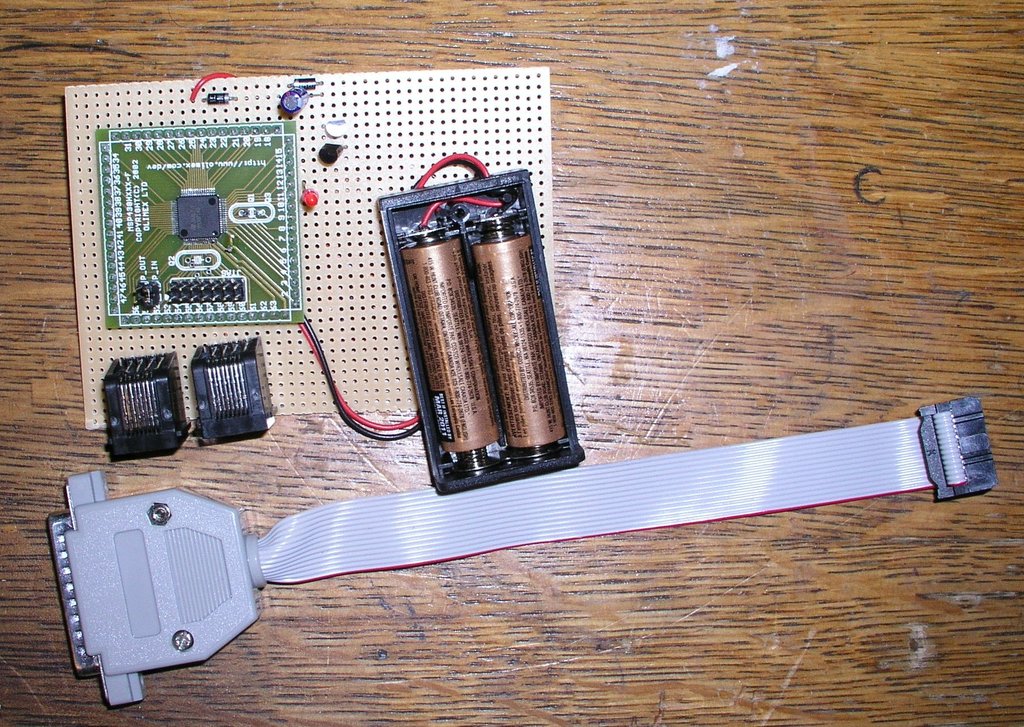
Figure 1. Picture of My LED Blinker Development Board and JTAG Adapter
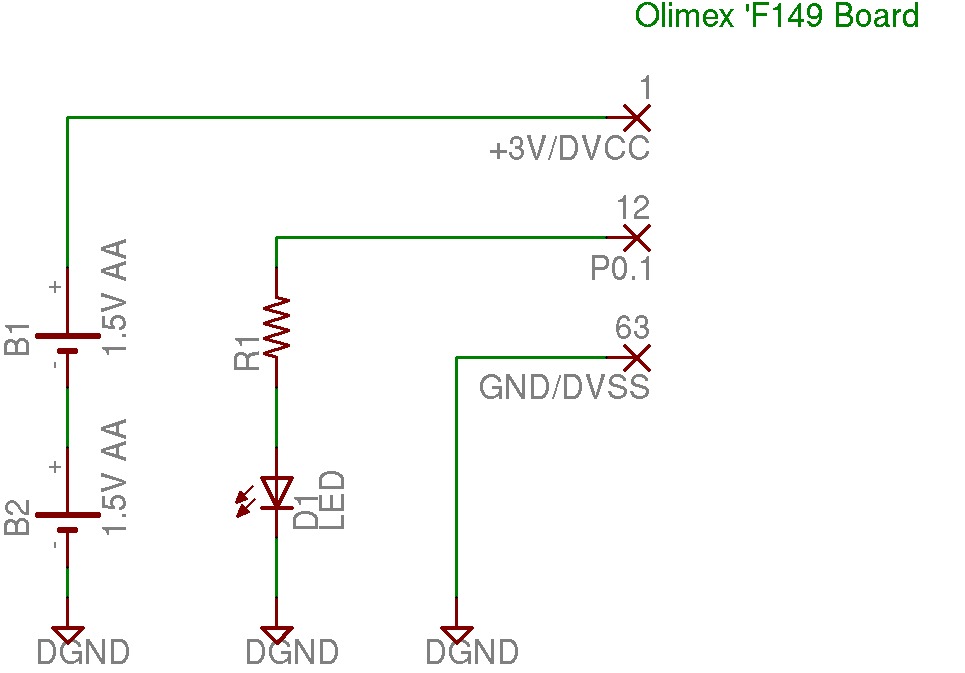
Figure 2. Simple Schematic of the LED Blinker Setup
Replacement for main.c:
/* Simple LED Blinker program for MSP430 */
#include <msp430x14x.h>

/* Brute Force delay loop */
void delay(unsigned int d)
{
    for (; d>0; d--) {
        nop();
        nop();
    }
}

int main( void )
{
    /* Init watchdog timer to off */
    WDTCTL = WDTPW|WDTHOLD;

    /* Init Output ports to GND */
    P1OUT  = 0x00;
    P2OUT  = 0x00;

    /* I/O not module control */
    P1SEL  = 0x00;
    P2SEL  = 0x00;

    /* Setup the data direction registers
       P1.0 output, input on the rest
    */
    P1DIR  = 0x01;
    P2DIR  = 0x00;

    /* No Interrupts on Port Pins */
    P1IES  = 0x00;
    P2IES  = 0x00;
    P1IE   = 0x00;
    P2IE   = 0x00;

    /* Loop until the universe breaks down */
    while (1) {
        /* Toggle P1.0 ouput pin */
        P1OUT ^= 0x01;

        /* Delay for a while before blinking */
        delay(0x4fff);
    }  /* while */
}
Run make to compile it. You should see no warnings or errors:
msp430-gcc -mmcu=msp430x149 -O2 -Wall -g   -c -o main.o main.c
msp430-gcc -mmcu=msp430x149 -o leds.elf main.o
msp430-objcopy -O ihex leds.elf leds.a43
msp430-objdump -dSt leds.elf >leds.lst
At this point, we have the software development set up, but no hardware to run it on or LEDS to blink.
Very little hardware or money is required to get started with the MSP430. You need a PC board with the processor on it and a JTAG adapter to connect the board to the parallel port. Olimex makes a number of inexpensive evaluation boards and JTAG adapters for the MSP430, ARM, AVR and PIC. In the US, their products are carried by a neat place called Spark Fun Electronics, which carries the Olimex boards as well as its own unique collection of adapter boards and projects. Table 1 shows what's needed to build the circuit on the schematic in Figure 1.
Table 1. Materials and Cost for Circuit
| Description | Part # | Price (US) |
|---|---|---|
| Olimex MSP430F149 header board | MSP-H149 | $22 |
| Olimex MSP430 JTAG Adapter | MSP-JTAG | $15 |
| AA battery pack from DigiKey | 2463K-ND | $0.78 |
| Red LED from DigiKey | 160-1499-ND | $3.60/10 |
| 330-ohm resistor | 220QBK-ND | $0.56/10 |
| Total: | $41.96 |
One problem with low-powered devices like the MSP430 is that when you try to turn them off, they don't discharge the supply capacitors all the way to ground. This can result in a brownout condition where the processor won't reboot until reset properly. For the sake of simplicity, we are going to run the processor directly off of a pair of AA batteries. It will also run off the power from the JTAG adapter itself if you don't have any batteries handy.
In a production design, I would add a power supply with reset manager to prevent any brownout problems, but for our simple circuit, pulling the batteries loose for a few seconds is sufficient to reset it.
The next thing we need to do is set up the gdb proxy and JTAG software. This requires using the PC's parallel port, and if your Linux installation is set up to use a local printer, you need to remove the printer and disable the printer dæmon before you can use the port for JTAG. You also may need to add your development user to the group that has access to the port. On Fedora Core, this is the lp group, and you can add users to it by editing the /etc/group file as root.
Now that we have the required hardware set up, it's time to compile and flash our LED blinker program. In the directory where we ran make earlier, you can now run make download-jtag, and the program will be flashed into the target processor:
msp430-jtag -e leds.elf
MSP430 parallel JTAG programmer Version: 1.3
SHF_MASKPROC    = 0xf0000000
Mass Erase...
Program ...
188 bytes programmed.
Next, we need to start the gdb proxy that creates a local port for gdb to connect to and handles the communication with the target hardware. Run this in a second window, because it outputs debugging info to stdout while it is running:
msp430-gdbproxy --debug --port=2000 msp430

Remote proxy for GDB, v0.7.1, Copyright (C) 1999 Quality Quorum Inc.
MSP430 adaption Copyright (C) 2002 Chris Liechti and Steve Underwood

GDBproxy comes with ABSOLUTELY NO WARRANTY; for details
use --warranty' option. This is Open Source software. You are
welcome to redistribute it under certain conditions. Use the
'--copying' option for details.

debug:     msp430: msp430_open()
info:      msp430: Target device is a 'MSP430F149' (type 7)
notice:    msp430-gdbproxy: waiting on TCP port 2000

Figure 3. Simple Diagram of GDB to Target Board Connections
GDB needs to know how to connect to the MSP430 JTAG proxy port. Create a file named .gdbinit in your working directory and put the following three lines into it:
set remoteaddresssize 64
set remotetimeout 999999
target remote localhost:2000
Now we are ready to debug our LED blinker program. When you ran make download-jtag, the LED should have begun to blink, and when the gdbproxy was started, it should have stopped, because the processor is being held in reset by the JTAG.
Start debugging by using the msp430-gdb program:
msp430-gdb leds.elf
Run until main() by entering:
break main
c
Debug as you normally would. Here is an example session:
(gdb) break main
Breakpoint 1 at 0x1152: file main.c, line 16.
(gdb) c
Continuing.

Breakpoint 1, main () at main.c:16
16          WDTCTL = WDTPW|WDTHOLD;
(gdb) n
19          P1OUT  = 0x00;
(gdb) n
20          P2OUT  = 0x00;
(gdb) break delay
Breakpoint 2 at 0x1140: file main.c, line 7.
(gdb) c
Continuing.

Breakpoint 2, delay (d=20479) at main.c:7
7           for (; d>0; d--) {
(gdb) n
8               nop();
(gdb) n
9               nop();
(gdb) n
7           for (; d>0; d--) {
(gdb) print d
$1 = 20479
(gdb)
What's happening here is that the proxy is communicating with the JTAG adapter and opening up port 2000 to accept connections from the gdb debugger. The debugger needs to know where to connect to, hence the creation of the .gdbinit file with the port number and timeout in it. When you run msp430-gdb, it is making a TCP/IP connection to the JTAG proxy program, which is in turn communicating with the target hardware if all is going well.
Flashing LEDs get boring pretty quickly. Once you get the bugs worked out of your blinking LED, you probably are going to want to design a custom PC board with interfaces to the outside world. One of my projects is a one-wire lock controller with an RS232 interface that uses Dallas Semiconductor iButtons for access control.
For this project, I chose one of the smallest of the family, the MSP430F1101 with 1KB of Flash and 128 bytes of RAM. It uses a pair of transistors to switch a DC motor on and off and a MAX3221 for serial communications with a PC. The C code to control the lock just barely fits into the 1K Flash space of the '1101. A low dropout voltage regulator is used to power the board and provide a clean reset to the processor. I drew the schematic and designed the board using Eagle CAD Lite under Linux. Eagle has several versions of its schematic and PCB auto-router, including a free version for noncommercial use:
Free for noncommercial use.
Board size limited to 3.2"x4" and two layers.
One schematic sheet.
Lite version for $49 US with same limitations as the free version.
Standard version for $600 US.
Pro versions for $1,200 US.
Linux, Windows and Mac versions are available
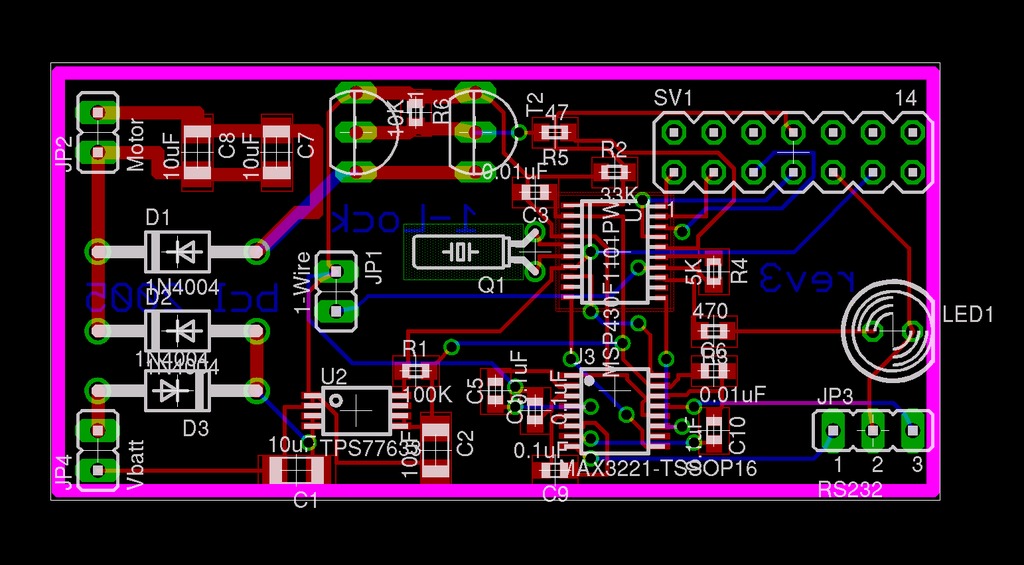
Figure 4. Lock Project PC Board Layout from Eagle

Figure 5. Picture of the Prototype PC Board
Eagle CAD is easy to get started with, low cost and very powerful. A user scripting language allows you to add features and customize the program to fit your needs. User support for Eagle is very strong, and the Web site has an extensive collection of user-created libraries.
The Eagle auto-router supports advanced features like back-annotation, keepout areas, design rules checks and one of my favorites—flood fill with thermal relief. If you have ever tried to solder a pin surrounded by a large ground plane, you will appreciate the advantage of thermal relief on power pins. Without it the ground plane acts like a large heat-sink and solder won't stick. All levels of the PCB and Schematic editor support the concept of back (and forward) annotation. You can make changes on the PCB, and they will be reflected on the schematic and updates made to the schematic are reflected on the PCB.
After designing a PC board, you actually need to make one. You can etch your own, but it is difficult to match the quality of even the least-expensive board manufacturers. Some manufacturers will accept Eagle PCB files directly, which saves you the step of converting the design to the Gerber format. The Gerber format is a lot like an old pen plotter, it tells PCB etching equipment where to draw the trace and how large a line to draw. Most PCB manufacturers still require Gerber files, so Eagle includes a script to output the necessary Gerber files.
One difficulty in dealing with Gerber files is that although Eagle can export the PCB in the correct format, it has no way to view the output to verify it was converted correctly. Linux has needed a good Gerber viewer for years, but it has been available only with recent releases of the gerbv program. It isn't as intuitive as I would like, but it does function well enough to display the Gerber files so that you can check the final output before sending it off to have 1000 of your latest widget design created.

Figure 6. Picture of LinkWiFi PC Board
I have used four different PCB manufacturers myself. Their prices and features vary, but customer service and quality from all four have been excellent. Olimex and PCB Pool both accept Eagle CAD files directly, with no need for conversion to Gerber. Olimex is in Bulgaria, and turn-around time can be up to three weeks, but prices are excellent. PCB Pool is in Ireland and has quick turn-around or longer turn-around times, depending on price (as do most). I used PCB Pool for the one-wire Wi-Fi boards (Figure 6).
AP Circuits is in Canada and has very good prices and very fast turn-around. The bare one-wire lock boards were ordered on a Saturday, and I received them on Wednesday. I ordered them with no silkscreen or solder mask in order to keep the price low. For production, I used E-Teknet for my DT-1A temperature sensor boards with excellent results.
The MSP430 is a fun and easy-to-use processor; its wide range of features and access to free development tools and low-cost JTAG hardware make this processor a good choice for both the hobbyist and the professional developer. Using the GNU gcc toolchain reduces the learning curve and allows you to use the same tools for developing code on the MSP430 that you would use for Linux projects. My set of development tools includes make, gcc, gdb and joe.
Resources for this article: /article/8697.
Brian C. Lane lives in Port Orchard, Washington, with his wife and son, who is a huge Tux Racer fan. He serves as Webmaster For Life for the Kitsap Peninsula Linux User Group and writes Linux apps in his spare time.

