
How a Linux Distro Saved Hard Disk Data
Not too long ago, a friend sent me an e-mail that said, "I want to ask for a favor and see if you can help me to recover the data in the hard disk of my daughter's PC." I came to learn that some combination of utilities had wiped out the partition table in the master boot record (MBR). Maybe a tool such as fdisk could fix this problem, but the cylinder numbers weren't available. This article describes how, using a typical Linux distro (SuSE 8.0, in this case) it was possible to recover the master boot record and, with it, my friend's daughter's data.
My friend's e-mail went on to explain:
The original configuration was Windows 98SE with GoBack installed. GoBack is a utility that is supposed to help disaster recovery by rolling back to earlier checkpoints. I disabled GoBack and set up a dual boot of Windows98 and XP on her PC since my daughter wanted to run a school program that only works on XP. Unfortunately, the school program did not work. So I deleted the XP partition with Partition Magic 7 and disabled the BootMagic. Then I re-enabled GoBack. Everything seemed to work fine for a couple of weeks.
Murphy's law dictates that disaster would strike while I was in Toronto. Norton SystemWorks was scheduled to run on Friday nights. No problem during the first couple of weeks. But when I was visiting my brother last week in Toronto, Norton reported a lost cluster. My daughter OKed the fix and, from that time on, the system would not boot.
In particular, when booting from the hard disk drive (HDD), the NT Loader (NTLDR) wasn't found. Trying to boot win98 from floppy produced a message about no FAT or FAT32 partition being found. Diagnostic programs pronounced the hardware healthy. My friend continued:
To my horror, I found that GoBack wrote on the MBR (Master Boot Record) using its proprietary format. The disk was originally divided into 4 partitions. But GoBack made the whole disk appear as a single partition of 40GB now since the software cannot access the partition tables in the MBR.
As sometimes happens, the vendor's recovery instructions didn't work. My friend was a little desperate, and I thought I could help, so I accepted the challenge. He told me that if we could recover only the files in the "data" partition, that would be enough: "I told her to back up her data every week, but...". You know the rest. Anyway, my friend handed over the disk drive, and I considered how to make use of tools I had on hand to help him out.
I was lucky enough to have a "spare" desktop PC, which had been rescued from the dumpster a few months before. From loading SuSE 8.0 on it, I remembered that the hard drive was on /dev/hda (IDE0 "master") and a CD-writer was at /dev/hdc (IDE1 "master"). (See Sidebar 1 below for a brief review of IDE addressing.) This setup was good, because it meant two IDE ribbon cables were in the box--one for IDE0 and one for IDE1--and one might have a spare connector in a convenient physical location.
Opening up the case, I found that the IDE1 ribbon cable, connected to the CD-writer (/dev/hdc), had a spare connector near a spare drive bay, as shown in Figure 1.
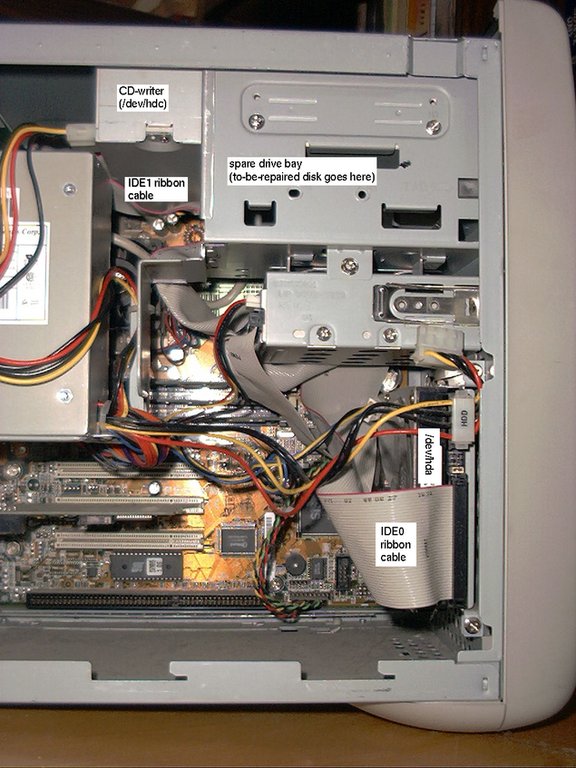
Figure 1. The Spare Ribbon Cable
Referring to the legend printed on the disk drive (see Figure 2), I configured the jumpers on my friend's drive to be "slave". The connectors on the back of the drive are shown in Figure 3, and a close-up of "J5" is shown in Figure 4.

Figure 2. The Disk Drive Legend

Figure 3. The Drive Connectors
You might notice that the jumper is connecting pins A-C together. I placed the jumper there, in the "spare jumper" position, so it wouldn't get lost.

Figure 4. J5 Close-Up
I then powered down my PC, inserted the damaged drive into the spare drive bay--as shown in Figure 1--and connected it using the IDE1 ribbon cable. I also connected a power cable.
When I booted up my machine after completing these steps, the scrolling messages showed that "hdd" was recognized. I was in business.
So, what did fdisk think of my friend's HDD?
    % sudo fdisk -l /dev/hdd

    Disk /dev/hdd: 255 heads, 63 sectors, 5005 cylinders
    Units = cylinders of 16065 * 512 bytes

       Device Boot    Start       End    Blocks   Id  System
    /dev/hdd1   *         1      5005  40202631   44  Unknown
    %
Sure enough, it found a single partition of type 0x44. I was unable to find any reference that explained this type of partition. I then examined the partition table directly.
    % dd if=/dev/hdd bs=512 count=1 | od -x

                                           ... 0180
    0000700 0001 fe44 ffff 003f 0000 e30e 04ca 0000
    0000720 0000 0000 0000 0000 0000 0000 0000 0000
    *
    0000760 0000 0000 0000 0000 0000 0000 0000 aa55
The infamous od program prints 16-bit quantities as big-endian "short" ints. Because x86 architecture is little-endian, I should not have used od. I would have done better to issue hexdump -C. Then, the offsets would have been in hex rather than octal, and the bytes would have been printed one at a time.
That said, let's dissect this partition table. It has only one entry, at bytes 0676-0715 (0x1be-0x1cd), with contents
80 01 01 00 44 fe ff ff 3f 00 00 00 0e e3 ca 04
Looking at a site that describes the partition table, such as this one, we see the breakdown is:
             80: bootable flag (YES)
       01,01,00: starting C/H/S
             44: filesystem descriptor
       fe,ff,ff: ending C/H/S
    3f,00,00,00: starting logical sector (32-bit)
    0e,e3,ca,04: ending logical sector (32-bit)
where the starting C/H/S is head 1, sector 1, cylinder 0, and the ending C/H/S is head 0xfe (254), sector 0x3f (63), cylinder 0x3ff (1023). The cylinder number is suspicious, because all available bits are set to 1. I guess that's what happens when you try to represent cylinder number 5004 in ten bits. (Sidebar 2 contains a brief refresher on C/H/S addressing; Wikipedia probably has a better one.)
Looking at the 32-bit logical sector numbers shows that the disk should have 0x04cae30e (80405262) sectors, which exactly matches the 40202631 blocks of "1K" or 1024 bytes each that are shown above.
Sure enough, this partition table was useless. It should have been simple enough to fix using fdisk or cfdisk or sfdisk. The old fdisk is my favorite, but that's only because I'm a dinosaur; you don't have to follow my example. All I needed was the original cylinder numbers, and I could just plug them in.
Do you remember this bit of advice your distro's installation manual: "Keep a hardcopy of your output from fdisk -l"? This situation is exactly why you're advised to save that printout. If that information had been available, a few commands could have restored everything on my friend's HDD.
But, of course, the cylinder number information wasn't available, as I soon found out from my friend:
Windows does not give you the cylinder and block numbers. The original first partition C was 8G. I think I shrank it to 6G (or 4GB) and created an XP partition of 2G (or 4GB). Then I deleted the XP partition but did not expand the C partition back to original due to lack of time (I had to leave her apartment). The second partition D (for applications) is 8G. The third one E (for data) is 2G. Then the rest 20G for drive F (for multimedia).
What to do? Should I add up the amount of space my friend told me and pray that the partition began right there? This option didn't seem safe to me. Although the data partition probably began about 16GB from the start of the disk, I didn't know if a GB here was 1000MB or 1024MB? For that matter, what's an MB--1000KB or 1024KB? Worse, my friend's memory of partition sizes didn't seem to be 100% rock solid either.
I was hoping that there might be a telltale sign at the beginning of each FAT partition. I wasn't sure what exactly to look for, although I knew each partition had a "boot sector" containing the filesystem parameters, such as the super block of ext2 and other filesystems. But what did it look like?
Figuring that I'd have to look at a lot of sectors, I hacked together a script, which would print out the contents of
 * head 0, sector 0
 * head 0, sector 1
 * head 1, sector 0
I chose these because the partition's boot sector probably would be in one of those positions in some cylinder or another. At this point, I must apologize because I refer to the first sector as 0, whereas traditionally it's referred to as 1.
The first 3,000 cylinders would cover over 20GB, which ought to include completely the desired data partition. The script deduces the size of each track and cylinder by looking at the fdisk output. I stored the results in a rather large disk file, where I was hoping to find some commonalities regarding where each partition was likely to begin. Then, I hoped, it would be obvious exactly where partition E began, as that was the important one. Anyway, here's the script:
#!/bin/bash
cyl=0			# let's start at the very beginning
disk=/dev/hdd
climit=3000		# about 3/5 of the disk
# I am gonna take it for granted that the disk sector size is "1b" or 512.
SECTS=`fdisk -l $disk | sed -n '/^Disk/s/^.* \([1-9][0-9]*\)  *sector.*$/\1/p'`
CYLSIZE=`fdisk -l $disk | sed -n '/^Units/s/^.*cylinders of  *\([1-9][0-9]*\)  *\*.*$/\1/p'`
((count=SECTS+1))
echo on disk $disk, cylinder size is $CYLSIZE blocks
echo I am going to make $climit passes, each time reading $count sectors
echo and printing sectors 0, 1, and $SECTS
echo 'Is this OK?  Hit ctrl-C if not.'
read X
echo -n 'OK, abandon hope all ye who proceed.  Start in five seconds.'
sleep 5
echo Done.
while [[ $cyl -lt $climit ]] ; do
    ((skip=cyl*CYLSIZE))
    dd if=$disk of=/tmp/x bs=1b skip=$skip count=$count 2>/dev/null
    echo Cylinder $cyl sector 0:
    dd if=/tmp/x bs=1b             count=1 conv=swab 2>/dev/null | od -Ax -x
    dd if=/tmp/x bs=1b             count=1           2>/dev/null | od -Ax -c
    echo Cylinder $cyl sector 1:
    dd if=/tmp/x bs=1b skip=1      count=1 conv=swab 2>/dev/null | od -Ax -x
    dd if=/tmp/x bs=1b skip=1      count=1           2>/dev/null | od -Ax -c
    echo Cylinder $cyl sector $SECTS:
    dd if=/tmp/x bs=1b skip=$SECTS count=1 conv=swab 2>/dev/null | od -Ax -x
    dd if=/tmp/x bs=1b skip=$SECTS count=1           2>/dev/null | od -Ax -c
    ((cyl=cyl+1))
done > out
Looking at the potential boot sectors on my friend's disk, I found out that I was very lucky. Not only was there a boot sector at each partition, there was another partition table at each partition. These partition tables announced their presence by the tell-tale byte pattern 55,AA at the end of the sector. The swab in the script means I could search for 55AA *$ in the file and see exactly where this nice pattern was located. According to Werner Almesberger's excellent LILO User's Guide, this is what happens when all partitions are logical partitions. His guide, which contains a detailed description of the disk layout, is located at /usr/doc/packages/lilo/user.ps.gz on my distribution. Or you can Google on "lilo user guide", without the quotes, of course.
If the disk had been repartitioned many times, I might have found a bunch of residual 55AAs lying around. Instead, I found only one extra occurrence--where my friend had deleted the XP partition.
The partition table closest to 16GB from the beginning of the disk happened to be 2073 cylinders in. From the fdisk output above, a cylinder is 16065 * 512 bytes. So 2073 cylinders is fairly close to 17GB, if a GB is 1000*1000*1000 bytes:
    % dc
    2073 512* 16065*p
    17051005440
But if a GB is 1024MB, and if an MB is 1024KB, then 16GB would be
    16 1024*1024*1024*p
    17179869184
This seemed about right. Looking at the partition table, I discovered that the partition began 33302808 sectors from the start of the disk. This works out to 63 sectors from the beginning of cylinder 2073, or cylinder 2074 if you start counting with cylinder 1.
The size of the partition, translated into decimal, was 2040192 sectors. This works out to be 63 sectors shy of 127 cylinders. That is, 127 * 16065 - 63 = 2040192. So it looked like my friend's E drive occupied 127 cylinders. But I wasn't 100% sure this was true, and I didn't want to write on his disk until I was 100% sure.
Another thing: as alert readers may have noticed, 2040192 sectors works out to about 1GB for the size of the E partition, rather than the 2GB my friend remembered.
From here, I copied out a subset of the disk onto a spare area on my disk, something like this:
    # dd if=/dev/hdd of=/extra/diskimage bs=512 skip=33302808 count=2040192
    # mount -t vfat -o ro,loop /extra/diskimage /mnt
    # ls /mnt
And it worked! This step provided me with a sanity check without actually writing on the disk drive. I even ran a du and sent the results to my friend. He was very encouraged that I was able to get to this point.
I burned a Windows-visible CD from the data on the partition, but I had trouble with one file. It had a very long name, well beyond the 64-character limit on the Joliet extension. At the time, I don't think I knew about the -joliet-long option to mkisofs. Anyway, I told mkisofs to hide that file from the Joliet directory and then e-mailed the file to my friend separately, using mpack(1).
Exactly how did I burn the Windows-visible CD? True confession: I don't remember. But the process probably was similar to the way I described in this earlier article.
Not being completely confident in my ability to burn a Windows-visible CD, I took the CD with me to the office, where the corporate Windows laptop was able to read it just fine. I e-mailed my friend a Windows Explorer screenshot and told myself that even if I later trashed the disk drive, at least I had the CD to give him.
My friend was delighted that his daughter would soon have her data back. He told me that if I was short on time--and I was--that it would be enough simply to get the data partition back. So I contented myself with only partitioning the drive that far.
Remembering that fdisk numbers the cylinders starting at 1 rather than 0, I told the HDD to
delete the old 0x44 partition
create a primary partition of about 16GB (2073 cylinders)
create an extended partition starting at cylinder 2074
create a FAT32 partition starting at cylinder 2074, occupying 127 cylinders and ending at the end of cylinder 2200
like this:
Command (m for help): m
Command action
a   toggle a bootable flag
b   edit bsd disklabel
c   toggle the dos compatibility flag
d   delete a partition
l   list known partition types
m   print this menu
n   add a new partition
o   create a new empty DOS partition table
p   print the partition table
q   quit without saving changes
s   create a new empty Sun disklabel
t   change a partition's system id
u   change display/entry units
v   verify the partition table
w   write table to disk and exit
x   extra functionality (experts only)

Command (m for help): p

Disk /dev/hdd: 255 heads, 63 sectors, 5005 cylinders
Units = cylinders of 16065 * 512 bytes

Device Boot    Start       End    Blocks   Id  System
/dev/hdd1   *         1      5005  40202631   44  Unknown

Command (m for help): d
Partition number (1-4): 1

Command (m for help): n
Command action
e   extended
p   primary partition (1-4)
p
Partition number (1-4): 1
First cylinder (1-5005, default 1):
Using default value 1
Last cylinder or +size or +sizeM or +sizeK (1-5005, default 5005): 2073

Command (m for help): n
Command action
e   extended
p   primary partition (1-4)
e
Partition number (1-4): 2
First cylinder (2074-5005, default 2074):
Using default value 2074
Last cylinder or +size or +sizeM or +sizeK (2074-5005, default 5005):
Using default value 5005

Command (m for help): n
Command action
l   logical (5 or over)
p   primary partition (1-4)
l
First cylinder (2074-5005, default 2074):
Using default value 2074
Last cylinder or +size or +sizeM or +sizeK (2074-5005, default 5005): 2200

Command (m for help): p

Disk /dev/hdd: 255 heads, 63 sectors, 5005 cylinders
Units = cylinders of 16065 * 512 bytes

Device Boot    Start       End    Blocks   Id  System
/dev/hdd1             1      2073  16651341   83  Linux
/dev/hdd2          2074      5005  23551290    5  Extended
/dev/hdd5          2074      2200   1020096   83  Linux

Command (m for help): t
Partition number (1-5): 5
Hex code (type L to list codes): L

0  Empty           1c  Hidden Win95 FA 65  Novell Netware  bb  Boot Wizard hid
1  FAT12           1e  Hidden Win95 FA 70  DiskSecure Mult c1  DRDOS/sec (FAT-
2  XENIX root      24  NEC DOS         75  PC/IX           c4  DRDOS/sec (FAT-
3  XENIX usr       39  Plan 9          80  Old Minix       c6  DRDOS/sec (FAT-
4  FAT16 <32M      3c  PartitionMagic  81  Minix / old Lin c7  Syrinx
5  Extended        40  Venix 80286     82  Linux swap      da  Non-FS data
6  FAT16           41  PPC PReP Boot   83  Linux           db  CP/M / CTOS / .
7  HPFS/NTFS       42  SFS             84  OS/2 hidden C:  de  Dell Utility
8  AIX             4d  QNX4.x          85  Linux extended  df  BootIt
9  AIX bootable    4e  QNX4.x 2nd part 86  NTFS volume set e1  DOS access
a  OS/2 Boot Manag 4f  QNX4.x 3rd part 87  NTFS volume set e3  DOS R/O
b  Win95 FAT32     50  OnTrack DM      8e  Linux LVM       e4  SpeedStor
c  Win95 FAT32 (LB 51  OnTrack DM6 Aux 93  Amoeba          eb  BeOS fs
e  Win95 FAT16 (LB 52  CP/M            94  Amoeba BBT      ee  EFI GPT
f  Win95 Ext'd (LB 53  OnTrack DM6 Aux 9f  BSD/OS          ef  EFI (FAT-12/16/
10  OPUS            54  OnTrackDM6      a0  IBM Thinkpad hi f0  Linux/PA-RISC b
11  Hidden FAT12    55  EZ-Drive        a5  FreeBSD         f1  SpeedStor
12  Compaq diagnost 56  Golden Bow      a6  OpenBSD         f4  SpeedStor
14  Hidden FAT16 <3 5c  Priam Edisk     a7  NeXTSTEP        f2  DOS secondary
16  Hidden FAT16    61  SpeedStor       a9  NetBSD          fd  Linux raid auto
17  Hidden HPFS/NTF 63  GNU HURD or Sys b7  BSDI fs         fe  LANstep
18  AST SmartSleep  64  Novell Netware  b8  BSDI swap       ff  BBT
1b  Hidden Win95 FA
Hex code (type L to list codes): b
Changed system type of partition 5 to b (Win95 FAT32)

Command (m for help): p

Disk /dev/hdd: 255 heads, 63 sectors, 5005 cylinders
Units = cylinders of 16065 * 512 bytes

Device Boot    Start       End    Blocks   Id  System
/dev/hdd1             1      2073  16651341   83  Linux
/dev/hdd2          2074      5005  23551290    5  Extended
/dev/hdd5          2074      2200   1020096    b  Win95 FAT32

Command (m for help): w
The partition table has been altered!

Calling ioctl() to re-read partition table.

WARNING: If you have created or modified any DOS 6.x
partitions, please see the fdisk manual page for additional
information.
Syncing disks.
pav23:/home/collin # mount -t vfat -o ro /dev/hdd5 /mnt
pav23:/home/collin # ls /mnt
[[DELETED... it worked]]
pav23:/home/collin #
I congratulated myself, disconnected the drive from the ribbon cable, put my spare desktop back together and cleaned up the den. I then returned the disk drive to my friend, along with the CD I had burned.
A typical PC has two IDE buses, allowing four separate disk or CD drives to be connected:
IDE bus 0
     +-------- "master" = /dev/hda
     +-------- "slave" = /dev/hdb

IDE bus 1
     +-------- "master" = /dev/hdc <---corrected
     +-------- "slave" = /dev/hdd  <---corrected
Note that one drive on a given IDE bus is the so-called "master" and one is the "slave." These are traditional misnomers, but the thing to remember is that conflicts must be avoided. For example, two masters on a single bus equals bad medicine.
If you have only one disk or CD drive on a given IDE bus, it used to be important to make sure this one drive was configured as master. It may or may not be necessary for your particular controller. I've violated this rule at times and nothing bad has happened. But, if you have a slave-without-master configuration and things are flaky or don't work at all, it might be worth a try to make the slave into the master.
What determines whether a particular drive is a master or a slave on the bus? Every ATA drive I've seen answers this question with one word: jumper. Depending on the position of the jumper(s), a drive can declare itself to be master, declare itself to be slave or say cable select. Cable select means the drive's orientation depends on which connector on the cable it's plugged into. Apparently there is a wiring trick on the cable that allows the drive to know which connector it's plugged into and, hence, whether it should respond to commands directed at the master or the slave drive. I don't recommend the cable select (CS) setting, because of past reports of flaky behavior.
Here is a brief tutorial for those unfamiliar with C/H/S addressing. More elegant explanations probably are available elsewhere on the Web, but here's my take on the topic.
Imagine your disk drive as a set of platters stacked one above the other and spinning in unison. The platters are divided into concentric tracks, with track 0 typically nearest the outer rim. One point in the platters' rotation is arbitrarily defined as "sector 0".
Each platter is coated on both sides with magnetic material. Just micro-inches from each surface is a head that can read or write data. The heads can move toward the outer rim or toward the center of the platters, but they do not spin. To read and write data on a particular sector on a particular track, the heads must "seek" to the appropriate track, settle into place and then wait for the desired sector to pass under the heads so that the data can be read or written.
In the old days, disk drives could be accessed in "surface mode" or "cylinder mode". In surface mode, head 0 track 0 is followed by head 0 track 1, then head 0 track 2, and so on. At the end of each track, you have to move the head to the next track. This makes surface mode slow, but it was useful for disk drives with one fixed and one removable platter.
In cylinder mode, head 0 track 0 is followed by head 1 track 0 and so on. That is, once sector 0 is under the heads, you don't have to move the heads right away. Instead, you switch to using the next read/write head. Only when you've read track 0 with all heads do you need to move the heads to track 1. This group, track 0 on all heads, collectively is referred to as cylinder zero.
The BIOS on most PCs and utilities such as fdisk refer to blocks on the disk in terms of cylinder, head and sector numbers. For historical reasons, the heads are numbered starting at 0, and the number is represented in 8 bits. Sectors are numbered starting at 1, and the numbers are represented in 6 bits. Cylinders are numbered from 0 and are represented in 10 bits. Older BIOSes could address the disk using only this C/H/S method; thus, they could address only the first 1024 cylinders on a drive. This is why it used to be important to put your Linux kernel on a partition that was contained entirely within the first 1024 cylinders.
When you buy a disk drive today, you likely will see "255 heads, 63 sectors, N cylinders" written on it. There are not really 255 heads in such a disk drive, but the drive identifies itself that way to the BIOS to allow C/H/S addressing to get at the largest possible area on the disk.
Although the cylinders are fictional nowadays, the BIOS and the partitioning utilities still want disk partitions to begin at cylinder boundaries.
By the way, newer BIOSes aren't restricted to C/H/S addressing, in particular to the old 1024-cylinder limit. Instead, every 512-byte block on the disk drive can be addressed using a 32-bit linear address space. This is what "lba32" in lilo.conf means. Newer BIOSes thus can access over a terabyte (1000 gigabytes), which ought to be enough for at least a few more months.
Collin Park works for Network Appliance, where he uses Linux on his desktop and laptop computers. He does data recovery and other Linux-related stuff at home, where he lives with his wife and their two teenage daughters. All use Linux to meet their computing needs.
