
Build a Home Terabyte Backup System Using Linux
A terabyte-plus backup and storage system is now an affordable option for Linux users. This article discusses options for building and configuring an inexpensive, expandable, Linux-based backup server.
High-capacity disk drives are now widely available at prices that are incredibly cheap compared to those of only a few years ago. In addition, with so many Linux users now ripping CDs to disk, saving images from their digital cameras and recording video using digital camcorders and DVRs, such as MythTV, the need for backing up and archiving large amounts of data is becoming critical. Losing pictures and videos of your kids—or your audio music library—because of a disk crash would be a catastrophe. Fortunately, a high-capacity, Linux-based backup server can be built easily and cheaply using inexpensive disk drives and free software.
Virtually any home PC can meet the basic requirements for a backup server. If you have long backup windows or relatively small amounts of data, a slow computer is not an obstacle. Make sure your network is fast enough to transfer data within your backup window. For older equipment, the bottleneck for backups can be the disk data transfer bandwidth (30-150Mbps depending on disk technology).
Many consumer-level computers do not have cooling capacity for more than two internal hard disks. Most motherboards support a maximum of four onboard disks (often four ATA/IDE devices, but the two ATA/IDE and two SATA combination is becoming common). External USB high-capacity drives are also available. If your computer is older and has USB1, purchase an inexpensive USB2 PCI expansion card, which is ten times faster.
SCSI has fewer limitations, but it is expensive and has tended to lock purchasers in to “flavor-of-the-month” SCSI technologies. One option for disk expansion and upgrade is the Host Bus Adaptor (HBA), such as those made by Promise Technology. An HBA is a disk controller on a PCI expansion card. HBAs typically require no additional software, have their own BIOS and are not constrained by PC BIOS limits on disk size. HBAs let you put large disks (more than 120GB) into systems with legacy BIOSes, upgrade from ATA-33 to ATA-150 or mix ATA and SATA disks.
You may want to consider purchasing a dedicated fileserver. A bare-bones server capable of holding six disks (fully preassembled, no disks or OS) can cost less than $1,500 US. With this initial investment, you can expand disk space as needed for less than $0.80 per GB or grow by plugging in USB disks. Once you have decided how many disks you need, consider their space, cooling and noise requirements. Figure 1 shows an example of a backup system build from an old server. The system has well over a terabyte of storage capacity.
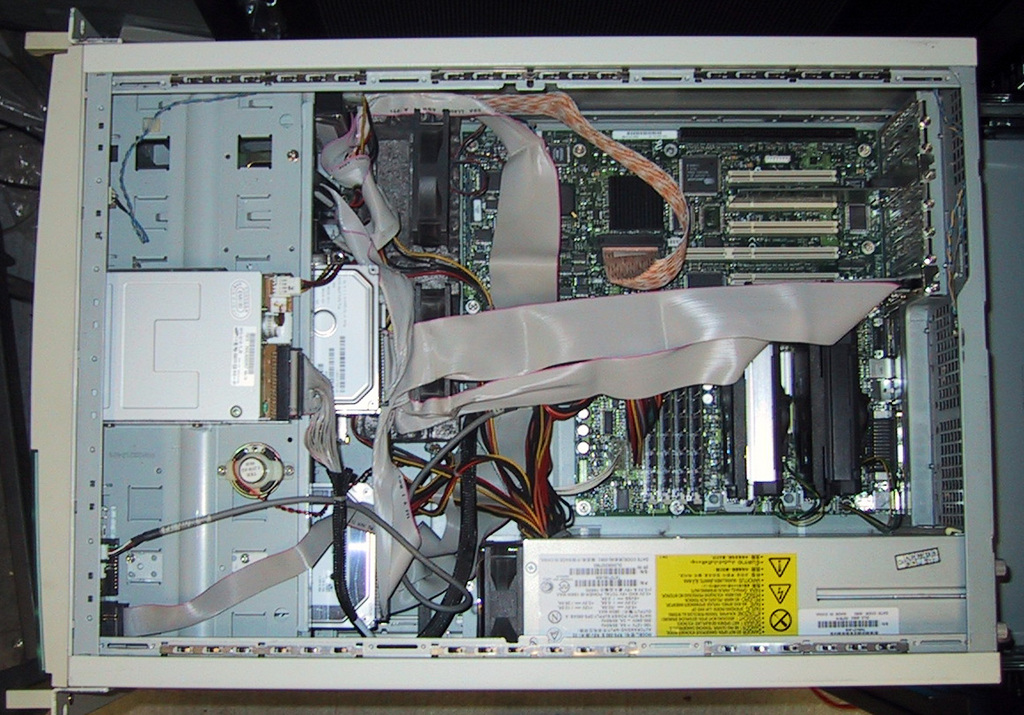
Figure 1. Storage array build from an old server (capacity of nine IDE disks, including five in a converted SCSI RAID stack). Additional IDE spots added with Promise HBA.
Even if you choose to build a server from scratch and populate it with high-capacity disks, you can expect costs for your terabyte-plus backup server still to be minimal in terms of its per-gigabyte price. This is because storage costs have decreased so dramatically. Table 1 provides a variety of different configurations for a backup server, along with estimated prices per gigabyte for each (note: prices are estimates and do not include taxes or shipping costs). As you can see from the table, costs for a new server equipped with more than two terabytes of storage can be built for a cost of less than $1.50 per gigabyte. That will back up a lot of home movies, digital pictures and music files!
Table 1. Some Backup Options, with Estimated per-GB Costs
| Type | Configuration | Capacity (TB) | Cost per GB ($) |
|---|---|---|---|
| ATA/SATA Disk | Internal disk | 0.4 | 0.56 |
| Linux Desktop* | Three internal disks | 1.2 | 0.84 |
| Linux Desktop* | Three internal disks plus two USB external | 2.0 | 0.73 |
| LaCie 2TB Storage | Network server appliance | 2 | 1.15 |
| Linux Server** | Six internal disks | 2.4 | 1.21 |
| Linux Server** | Six internal plus two USB external | 3.2 | 1.08 |
*Intel Celeron D 478 325 2.53GHz, 256MB of RAM. **Intel SC5275 chassis, Intel ATX Motherboard, dual-3GHz Xeon CPUs, 2GB of RAM.
During the past few years, I have built backup servers using Red Hat Linux 9, but you can use any flavor of Linux. I use Red Hat 9 because it is stable, free, currently maintained (Fedora Legacy Project) and simple to install and configure. If you buy a new computer, you may have to use a more current version of Linux. I generally do not use RAID for low-budget systems where cost is paramount, but it is worth considering.
Software requirements for a Linux backup server are minimal. Basic network administration utilities (including the secure shell, SSH, and secure shell daemon, sshd) and rsync are required. rsync is a fast, incremental duplication/synchronization utility that comes with most Linux distributions. With SSH and rsync, you can carry out virtually all basic backup tasks. It is advantageous for a backup server also to be a fileserver, so I install Samba, the SMB fileserver as well. I use Samba because it is the default fileserver for MS Windows clients, and it also is readily accessible by any UNIX system (including Mac OS X) using a Samba client. If you have a homogenous UNIX network, you can use NFS, which I will not discuss here.
If you need to attach additional disks to your server, begin by making sure you have enough data (IDE/SATA/SCSI) cables and power lines to accommodate the expansion. Ensure that your drive is Linux-compatible (although most are). Turn off the power to your computer and disconnect the power cable. Physically attach the disk(s) to your computer. Linux should recognize the new disk(s) on boot. If your drive is not recognized, your disk is incompatible or you need to locate and install a driver for it. Check boot messages for new drives using the dmesg command. The boot message for an IDE drive may look like this:
hdb: ST3400832A, ATA DISK drive
All IDE/ATA (and some SATA) drives have the designation hdx, where the x is replaced with a letter of the alphabet (b in this case). Similarly, adding new USB or SCSI (and some SATA) disks gives boot messages indicating a new drive designation sdx, where the x is replaced by the appropriate letter.
Most Linux distributions come with a GUI disk manager. These disk managers let you define and format partitions (I generally use one partition per backup disk), assign mountpoints (for example, /data1, /data2) and mount the partition. The process also can be done from the command line using fdisk to create partitions.
Creating New Partitions
To create new partitions on hdb (above), type:
fdisk /dev/hdb
Type m at the fdisk prompt for a help summary. Typing n at the prompt asks about the new partition we are creating:
Command action
   e   extended
   p   primary partition (1-4)
p
For a single primary partition, type in p:
Partition number (1-4):1
You are then prompted for a partition number (type 1 for a single partition). Next, set the partition size by determining the first and last cylinder. Because we are using the whole disk, you should be able to select the default values (the first and last cylinders):
First cylinder (1-48641, default 1):
Using default value 1
Last cylinder or +size or +sizeM or +sizeK (1-48641, default 48641):
Using default value 48641
Type w to write the partition table. You now have a partition, /dev/hdb1, that occupies the whole disk.
Next, format the partition in the filesystem of choice (mine is in the ext3 format) using the mkfs command:
mkfs -t ext3 /dev/hdb1
Create a mountpoint for the new partition of your new disk (I'll call it /data1):
mkdir /data1
Mount the newly created ext3 partition:
mount -t ext3 /dev/hdb1 /data1
And, test reading and writing. Finally, add a line in /etc/fstab, the mount table, to mount automatically during the boot process:
# Device                mountpoint       fstype   options      freq   pass_no
/dev/hdb1              /data1            ext3    defaults        1        2
rsync is included in most Linux distributions. You need rsync and SSH on both your backup client and server. Check to see whether rsync installed by typing rsync at the command prompt or check your list of installed packages. If you cannot find a binary distribution for your package, you can download the source code for rsync by following links on the rsync home page (see the on-line Resources).
The simplest way to run rsync over a network is as a standalone application using SSH for authentication. You can run rsync as a daemon with more features, but you won't need to in this case. I illustrate this here with a backup client named foo and a server named bar.
To replicate the directory /home on Linux machine foo with directory /data1/foo of backup server bar from client foo using rsync and SSH, type:
rsync -az /home -e ssh bob@bar:/data1/foo
You will be prompted for user bob's password, and then the foo /home directories are replicated to /data1/foo/home on bar (bob needs an account on the server and write permission for /data1/foo).
To avoid having to type bob's password each time, create a private/public key pair for SSH authentication without a password. This allows you to automate the login process.
Generating the Key Pair
On the machine you want to log in to (logged on as bob on bar in this case), type ssh-keygen -d to generate the key pair. Enter a password if the key will be accessible/readable to other users. Otherwise, press Return. Change into the .ssh directory and copy the public key to the allowed list:
cd ~/.ssh
cp id_dsa.pub authorized_keys2
Copy the private key to the .ssh directory of the account on the machine you will be logging in from (for example, root user on foo). Remove the private key from bar (the machine you want to log on to):
scp id_dsa root@foo:~/.ssh/id_dsa
rm id_dsa
On the machine you're logging in from, start the SSH agent, and add the key to the agent's list (ssh-add asks for a password if you typed one in the first step above):
eval `ssh-agent`
ssh-add
You can now log in to account bob bar from foo without a password:
ssh bob@foo
You can run a script on foo to replicate foo on bar using bob's account on bar. You should read the documentation for rsync, which has numerous features (more than 70 command-line options). In particular, the -delete option can have disastrous consequences if misused. Listing 1 shows a seven-day incremental backup. Files altered or deleted on each day of the week are deposited in directories named for the day (set by -backup-dir). The most recent backup is stored in the directory current.
Listing 1. Full and Incremental rsync
#!/bin/sh

# This script does backups of foo to the backup server bar
# in a 7 day rotating incremental backup.
# Based on script by Andrew Tridgell

# directory to backup
BDIR=/home

# Remote directory on backup server
BACKUP_HOME=/data1/foo

# Backup login account on remote server
BACKUP_LOGIN=bob

# the name of the backup server
BSERVER=bar
BACKUPDIR=`date +%A`
OPTS="--force --ignore-errors --delete --backup
-backup-dir=$BACKUP_HOME/$BACKUPDIR -av"

export PATH=$PATH:/bin:/usr/bin:/usr/local/bin

# Dump output to backup file
date > /var/log/backup.$BACKUPDIR.log

# the following line clears the last week's incremental directory
[ -d /tmp/emptydir ] || mkdir /tmp/emptydir
rsync --delete -a /tmp/emptydir/
BACKUP_LOGIN@$BSERVER:$BACKUP_HOME/$BACKUPDIR/
rmdir /tmp/emptydir


# now the actual transfer
rsync $OPTS $BDIR BACKUP_LOGIN@$BSERVER:$BACKUP_HOME/current >>
/var/log/backup.$BACKUPDIR.log
If you prefer a compressed archive format, you still can run tar for a full backup over the network:
tar cvfz - /home | ssh bob@bar dd of=/data1/foo/current.tar.gz
and use the -newer option for an incremental tar backup.
rsync is more efficient than the tar command, because rsync copies only the differences between the current and previous copy of the data.
You can get by with rsync and SSH on most platforms (including MS Windows), but in reality, a fileserver setup is preferable, especially if you are running MS Windows clients. For MS Windows machines, a Windows backup application is preferable. The easiest way to do this is to run the backup to write to a share on the Samba server.
If your Linux installation supports SMB file sharing, Samba is probably installed. If not, binaries are included with virtually all distributions. If this isn't the case with your distribution, or if you prefer to use the very latest Samba version, download the source code and compile and install. Official Samba distributions are available from the Samba home page (see Resources). Refer to the documentation there for installing and initially configuring Samba.
Once your backup server has Samba server installed, all Samba configurations are made by editing the smb.conf file, which is usually in /etc/samba/smb.conf or /usr/local/samba/lib/smb.conf. Graphical configuration utilities like SWAT usually are included with Samba. See your documentation for information about starting or stopping Samba. You should configure your server to ensure that Samba starts when the server initially boots up.
Following our backup example above, on server bar, set up a simple smb.conf file or try appending the section below to the existing smb.conf file to define a share called bob:
[bob]
   comment = foo backup account
   path = /data1/foo
   valid users = bob
   public = no
   writable = yes
Next, add bob with any secure password as a Samba user (bob must have a Linux account as well as permission to read/write the /data1/foo directory):
smbpasswd -a bob
New SMB password: somepassword
Retype new SMB password: somepassword
Added user bob
For MS Windows clients, map the share \\bar\bob as a network drive in MS Windows using the user name bob and the SMB password for the bob Samba account. You then should be able to run backups to the mapped network drive. I typically use the free ntbackup software and set it up to write .bkf files to network storage. ntbackup comes free with Windows 2000 and XP and can run automated, regularly scheduled backups from the Windows client. Windows client-based backups have the advantage of backing up the entire state of the system (including the Windows registry).
You also can use Samba to serve files to most UNIX or Mac OS X clients. The smb client is installed by default in Mac OS X. In Linux distributions, make sure that the smb client package is installed. The smb share should be mounted onto the /backup mountpoint of machine foo:
mount -t smbfs -o username=bob,password=somepassword //bar/foo /backup
To have the backup drive mount when the system boots, place a line such as the following in /etc/fstab:
//bar/data1/foo /backup smbfs rw,username=bob,password=somepassword 0 0
To add an additional level of security, you may consider adding a second server to your overall backup plans consisting of a server that exists off-site, away from the home or office location where your primary backup server is located. This allows you to mirror your backup server to an off-site location once a week. That way, if you have a fire or some other catastrophe at your primary location, your data still will be available. Figure 2 shows a sample configuration for this setup.
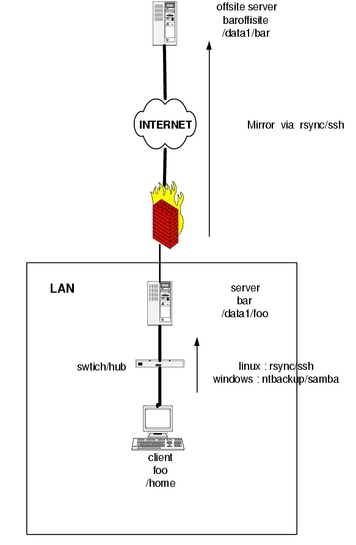
Figure 2. Example backup scenario with client foo, backup server bar and off-site mirror baroffsite.
Listing 2 is a basic script that mirrors the server bar with an off-site mirror baroffsite using rsync. Always set up backups to run automatically and on a regular schedule. Always keep logs of your backups, and always check the backup logs.
Listing 2. rsync Mirroring bar to baroffsite
#!/bin/sh

# Mirror /data1 on bar to /data1/bar on baroffsite.

#Backup directory on bar
BACKUP=/data1
#Backup directory on baroffsite
BACKUP_OFF=/data1/bar

# Give the day of week as name of backup
BACKUPNAME=`date +%A`

# Offsite server
BSERVER=baroffsite
# Backup account on backup server
BAC_ACC=backup

date >  /var/log/backup.$BACKUPNAME.log

/usr/bin/rsync -avz --delete -e ssh $BACKUP $BAC_ACC@$BSERVER:$BACKUPOFF
>>  /var/log/backup.$BACKUPNAME.log

# Email the log to administrator

cat /var/log/backup.$BACKUPNAME.log | mail -s 'Mirror Check'
backup_guy@mycompany.com
In order to monitor your backup process and make sure your backups are running as scheduled (and that your backup server hasn't run out of disk space), it's important to put some automated monitoring and reporting into place. Listing 3 is a simple script that can be set up to run periodically via cron and send you a summary of the backups that have occurred and how much disk space is remaining on each of your partitions.
Listing 3. Simple Timestamp and Disk Space Lister
#!/bin/sh

# Check space on partitions
# List timestamps in chronological order

BACKUPS=/data1      #Identify directories to check
# Give the day of week as name of backup
BACKUPNAME=`date +%A`

#Timestamp
date >  /var/log/backup.$BACKUPNAME.log
# Disk space on partitions
df -k > /var/log/backup.$BACKUPNAME.log
echo ' ' >>  /var/log/backup.$BACKUPNAME.log

#List timestamps on backup server
# ls -lRt is much more verbose
ls -lt $BACKUPS/* >>  /var/log/backup.$BACKUPNAME.log

# Email the log to administrator

cat  /var/log/backup.$BACKUPNAME.log | mail -s 'Backup Check'
backup_guy@mycompany.com
Resources for this article: /article/8635.
Duncan Napier works as computer and instrumentation consultant in the Vancouver area of British Columbia.
