
The Arrival of NX, Part 5: Using NX
This is the fifth in a seven-part series written by FreeNX Development Team member Kurt Pfeifle about his involvement with NX technology. Along the way, he gives some basic insight into the inner workings of NX and FreeNX while outlining its future road map. In Part 5, Kurt explains how you can start to explore what NX offers by following his step-by-step instructions. Much of what Kurt describes in this series can be reproduced and verified with one or two recent Knoppix CDs, version 3.6 or later. A working FreeNX Server setup and the NoMachine NX Client has been included in Knoppix now for over a year.
The NoMachine NX Client license says, "Redistribution of NX Client software, including commercial Closed Source packages, is allowed, free of charge, for commercial and non-commercial use...". This enabled Klaus Knopper to include the NoMachine NX Client in Knoppix, versions 3.6 and later, even though it is not free software. It also is included in Kanotix. The NX Client is released in binary form under a free for commercial and non-commercial use license similar to the Adobe Acrobat reader software that we find in most Linux distributions. A KDE-based NX client, kNX, also is available. kNX works and is used by quite a few people daily, but it more of a proof-of-concept implementation, though, and its use is not yet generally recommended.
Knoppix also includes FreeNX, a fully GPLed implementation of an NX server application, based on the NoMachine GPLed Core NX libraries and utilities. So Knoppix enables you to access any free or commercial NX server in the world or even run your own FreeNX one from CD-ROM.
We have arrived at a point in this series where we can conduct various hands-on exercises. I have been using the Knoppix-4.0 DVD Edition, as released by Klaus Knopper during LinuxTag 2005. However, any other CD- or DVD-version of Knoppix torrent or Kanotix torrent since the 3.6 release (March 2004) should work the same or similarly. Depending on whether you have one or two machines available booted from Knoppix, you should be able to follow along with most or all of the different activities we describe here:
Use the NoMachine NX Client started from Knoppix to run a remote NX session to the NoMachine "testdrive" NX server in Rome/Italy. How to do so is explained in this article.
Use the FreeNX server started from Knoppix to run a local NX session to the same Knoppix instance. This is explained in the next article, Part 6.
Use the NoMachine NX Client started from one Knoppix to run a remote FreeNX session to a second Knoppix. This also is explained in Part 6.
Implement some artificial TCP/IP "traffic shaping" for the NX connections to simulate link conditions on a modem line, and compare NX performance over this medium with plain vanilla X11 performance; also in Part 6.
Be aware that your performance measurements may deviate from the ones presented in this article. This will depend on how much your hardware--mainly RAM size and CPU power--differs from mine.
Boot up Knoppix, and make sure you have an Internet connection. As our first exercise is to run a remote NX session to the public NoMachine testdrive NX server, you need to create an account for yourself. Open a Web browser and go to http://www.nomachine.com/testdrive.php. There you need to register a temporary testdrive user account (see Figure 1) so you can access that testdrive server in Italy or, alternatively, another testdrive server in Germany.
Registration does not require any information beyond your name and e-mail address; see Figures 2 and 3. You then need to wait for the confirmation e-mail to show up in your inbox (Figure 4); it should arrive within a few minutes.
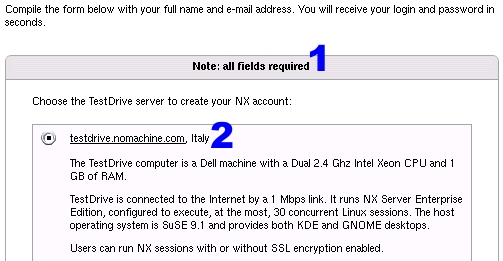
Figure 1. Creating an account for the NX testdrive server is easy and straightforward.
Use the remote testdrive offered by NoMachine to form an initial valid impression about NX's performance in a real-life environment over an Internet connection. This is the quickest way to come to an initial conclusion about the viability of NX or FreeNX for your remote terminal server requirements.
Be aware that there is an upper limit of 30 concurrent NX user sessions on testdrive.nomachine.com. Also, currently no public testdrive option is available for remote sessions to a Windows Terminal Server. If you urgently need to test that, send an e-mail to NoMachine and ask for special permission.

Figure 2. Your name and e-mail address is all that is required to receive a seven-day test account for the NoMachine NX server.
If you find the NX testdrive server interesting enough, you then can proceed with your own tests and set up your own (Free)NX server. One quick way to do so is by running the FreeNX server provided on any recent Knoppix Live CD.

Figure 3. A confirmation note assures you that an e-mail with your test account credentials is on its way to your mailbox.
Notice that the User ID text field is labeled Login in the NX client that you will use shortly.

Figure 4. Indeed, a few minutes later the account credentials have arrived.
The mail details the NX server name, the (SSH) port number to use, your login name and your password. Asterisks were inserted to hide the real password in the figure. Test accounts are valid for one week and automatically expire thereafter.
You do not need to download and install the newest NX Client from NoMachine. The version included in Knoppix, namely 1.4.0, is good enough for now. I know that the more adventurous readers will be tempted to download the new 1.5.0 client, knowing that Knoppix with the new UnionFS filesystem easily can install and run new software packages while running from CD. If you know how to do this, go ahead.
It took only 50 seconds for me to receive an e-mail with my login data. After 50 more seconds, I successfully was logged in to the testdrive server and was running a KDE session. testdrive.nomachine.com is not in any way a highly tuned big machine ready to be LinuxJournal.com-dotted, though; it is a dual 2.4GHz Xeon PC with 1,024MB of RAM.
I noticed during my tests for this article that the testdrive server was a bit slow due to heavy loads: 24 other NX sessions were running, 19 KDE and 5 GNOME. The site is not set up to provide a leaner or more optimized-for-remote-access desktop than what installs out of the box--SuSE 9.1 Professional--nor is it tuned to minimize the resources used. If you wait long enough, even a random screensaver may kick in, using some quite unnecessary resources. Also during my test, one malicious NX testdrive user deliberately was trying to bring the server to its knees by opening more than 300 Bash sessions, one after the other, producing a very high load for the box. My NX session still worked, albeit a bit slowly.
To connect to the NoMachine NX testserver, in the Knoppix main menu (KDE session) select Internet --> NX Client for Linux --> NX Client for Linux from the main program menu (see Figure 5). When you start the NX client for the first time, it runs in wizard mode (see Figure 6).

Figure 5. Connecting to testserver

Figure 6. The client runs in wizard mode when started for the first time. The initial screen's only choices are to click Next (1) to continue the wizard steps or Cancel (2), which brings up the normal NX Client mode. This also allows you to fill in all the connection data.
Any future start-up of the NX Client brings it up in normal mode (see Figure 10). If you prefer to see the wizard, you always can re-run it from the command line by typing /usr/NX/bin/nxclient --wizard.

Figure 7. The Second Screen of the NX Connection Wizard
The second screen is the most important screen of the NX Connection Wizard. You use it to:
assign a name to the session; all other session parameters are stored under this name, with a .conf (in 1.4.0) or .nxc (in 1.5.0) suffix. If you connect to different NX servers or to the same one with various settings, this is a handy feature.
fill in the fully qualified hostname or the IP address of the NX server to which you want to connect.
use the correct port number to connect. Because NX utilizes the target system's SSH daemon for connections, this usually is port 22, but this need not be so. An SSH daemon may be configured to listen on multiple ports or on a more unusual one. If you plan to set up an "outside" NX server that you need to access from an internal network through a firewall, port 443 (usually assigned to the HTTPS protocol) often is convenient to use, because most firewalls and their admins already allow access to that port. If in doubt, check with your network administrator.
use the slider to change the level of NX compression from highest (Modem) to none at all (LAN). It doesn't hurt and often is beneficial to use the Modem compression level, even if you are on a DSL line. Notice that the LAN setting does not use any compression at all, so be sure to play with variations for that setting if the session performs too slowly for you.

Figure 8. The Third Screen of the NX Connection Wizard
On the third Wizard screen, you can select the session type. The NoMachine NX testdrive server does not offer Windows or VNC connections, however. For Figure 8, the numbered fields correspond accordingly to the following tasks:
this dropdown menu offers Unix, Windows and VNC connections
this dropdown menu offers KDE, Gnome, CDE or Custom sessions for Unix connections; it is grayed out and disabled for Windows or VNC connections.
the Settings button is enabled for Unix/Custom or Windows and VNC connections. A Unix/Custom connection and Windows or VNC ones are explained in other screenshots.
this field determines the window size of your remote NX session. 1.5.0 NX servers allow to change the size on the fly; 1.4.0 server sessions use the same fixed size throughout their lifetime. You can select between various pre-defined sizes, a custom size or Fullscreen. Fullscreen is particularly interesting in that it creates a window without any borders that overlays the original client machine screen. This way you can pretend to run a Linux KDE session even from a Windows NX client without much risk that the occasional observer will discover the "fake". If you choose a custom window size, you set the width and height in 4a and 4b. There is no restriction here; you even may choose a portrait type window for your remote desktop.
enabling "SSL encryption of all traffic" permanently is highly recommended. However, be aware that the ongoing encryption and its companion decryption of all traffic puts more load onto both CPUs, NX client as well as NX server. You may want to disable it for older client hardware with weaker CPUs, in case you are running your NX network inside an isolated corporate network with trusted users only.

Figure 9. The Final Screen of the NX Connection Wizard
On the final screen of the Connection Wizard, you can use Field 1 to create a shortcut on the desktop that is handy to re-run the remote session. The Advanced Configuration dialog is introduced in other screenshots below.

Figure 10. The Standard NX Client Login Dialog
The standard NX Client login dialog provides spaces for you to enter:
your login name or user ID to use, as communicated to you by e-mail.
your password, not displayed in clear text but hidden behind the asterisks.
a self-invented name for your upcoming NX session. This name is used to store your selected settings in a sessionname.conf config file. You can have variants of settings for the same or various remote NX servers stored under different names for easier re-use at a later time. The Session field is editable. If you change it, NX asks you if you want to create a new configuration under the changed name or if you want to rename the old configuration.
the Configure... button brings up the advanced configuration dialog, which is discussed in other screenshots below.
click Login to start up a remote session.
You can access the Advanced Configuration dialog any time before starting a new NX session to modify previously used settings. Once a session is running, most settings are fixed. Also, suspending a session and resuming it at a later stage re-uses the same settings as when initially creating it. As of version 1.5.0 of the NX Core libraries, however, it is possible to re-size the NX session window to any arbitrary values of width and height or to toggle between windowed and fullscreen mode with the [Strg]+[Alt]+[f] keyboard shortcut.
We now take a closer look at the five tabbed screens of the Advanced Configuration dialog, beginning with the General tab.
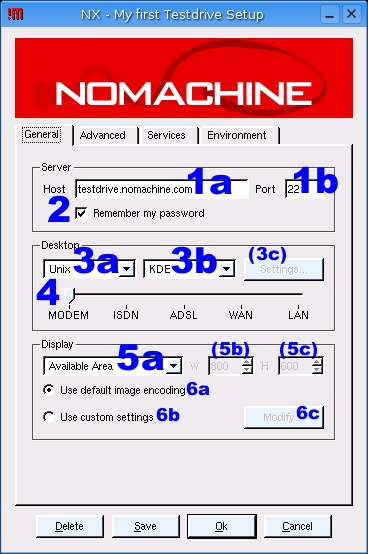
Figure 11. The General Tab of the Advanced Configuration Dialog
The fields within the General tab are explained here:
1a, 1b: these setting are already familiar to you from the Connection Wizard screenshot.
2: you can save your NX password in the session configuration file. Though not in clear text, but in a modestly scrambled (not encrypted!) form to avoid a too-easy retrieval, and though protected by user-only access in your home directory, you still should be aware that the password is stored on disk and may be retrieved by other users of the same system. Anybody who gets physical access to your client computer can run an NX session to your remote account without even needing to detect a password, so take your precautions
3a, 3b, 3c, 4, 5a, 5b, 5c: you should recognize these settings and their meanings from the Connection Wizard screenshot and explanation.
6a, 6b, 6c: the default image encoding usually yields good results while still saving bandwidth. It uses JPEG level 6 quality. This way you may see some typical JPEG artifacts in highly compressed remote sessions, for instance in desktop background wallpapers with color shadings. You can customize the image encoding to use either PNG compression (lossless--higher quality, but also more network traffic) or even higher JPEG compression with better network savings yet more visibility of JPEG compression artifacts.
Figure 12 shows the Advanced tab and its fields.
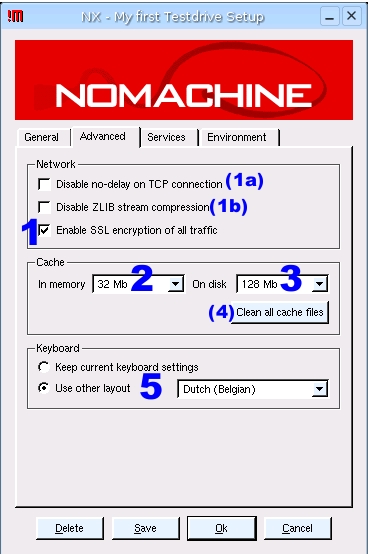
Figure 12. The Advanced Tab of the Configuration Dialog
the "Enable SSL encryption" dialog.
during a running NX session, NX keeps in memory a cache for images and other data. This cache helps a good deal in creating the fabulous NX speedup for remote sessions. After the session ends, the cache is stored on disk. The disk cache file then may be re-used in the future. The disk cache covers two cases: the same user+client runs another session to the same server or the NX session gets suspended and is resumed at a later stage. Set the amount of RAM you want to reserve for the NX session here. The default is 4MB; I mostly use 32MB, because I do not run on a memory depleted thin client.
this dropdown sets the disk space limit for stored session cache files. Default is 16MB; I always increase it to 128MB, because I have enough free space on the hard disk. Should the limit be reached, the oldest files and/or cache entries are auto-deleted first to create new space for the current session.
this button deletes all past cache files.
the keyboard may be mapped to a different layout, depending on your needs. The default, however, is to use the NX client machine's current settings.
Figure 13 depicts the Services tab and its input fields.
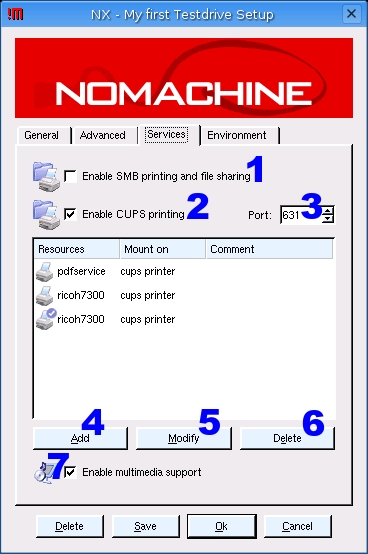
Figure 13. The Services Tab of the Configuration Dialog
Enable this checkbox if you want to share local files and directories on your NX client system with your remote NX server. This setting enables remotely running applications on your NX server to access these files and modify them or to save new documents into the shared directory. This function uses the SMB protocol and the smbmount utility to perform its actions. This way you easily can store an image on your local hard disk even though it was created with the help of a remotely running instance of The GIMP.
Enable this checkbox to print (via CUPS) from your remotely running applications to your locally attached printers. Each individual shared CUPS printer needs to be configured individually (see the Add and Modify buttons described below).
The port number CUPS uses in your local environment. This usually is 631. If in doubt, ask your local printer administrator.
Click Add to add another printer to the list; the list initially is empty. A new dialog pops up that lets you select a printer from a list of resources available from your locally running CUPS daemon and a driver to be used for the remote session.
Highlight one of the printers in the list and click Modify to change its settings. The list is empty initially and the Modify button disabled. A new dialog pops up that lets you select a printer from a list of resources available from your locally running CUPS daemon and a driver to be used from the remote session.
Highlight one of the printers in the list and click Delete if you want to remove it from the list of printers available for NX. This will not delete the printer from your local CUPS installation but only make it unavailable to NX.
Multimedia support essentially tunnels sound events from your remote NX session to your local speakers. So if your remote KDE is configured to issue a startup sound hymn, you will hear it at the beginning of each new NX session.
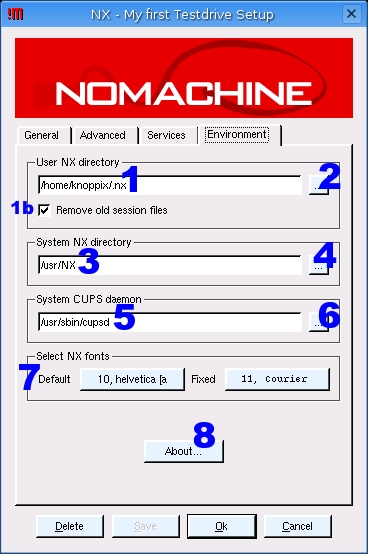
Figure 14. The Environment Tab of the Configuration Dialog
The Environment tab of the Advanced Configuration dialog (Figure 14) contains the following fields:
This line hints at the directory, located on the NX client box, where user-specific session files logs, settings, caches, images, traffic statistics and the like are stored. Note, you usually do not need to change this. Enable the checkbox in 1b if you do not want to keep old session files on your hard disk. Note that you should disable this checkbox if you need access to old session files for debugging purposes in case of a problem with your NX session.
Click on this button if you want to navigate to a different directory for storing NX session files. You normally do not need to change this.
This line hints at the directory, located on the NX client box, where system-wide NX files--binaries, libraries, etc.--are stored. You usually do not need to change this.
Click on this button if you want to navigate to a different directory for storing NX session files. You normally do not need to change this.
This line writes the full path, located on the NX client box, where the executable file to start up the CUPS daemon--local to the NX client box--can be found.
Click on this button if you want to navigate to a different path to find your local system's cupsd executable. You normally do not need to change this.
Click on these buttons if you want your NX client dialogs to show up in a different font. Note that the Fixed font in some older releases is set to an unreadably small value and can't be changed permanently due to a bug. The bug is fixed in the latest releases.
The About box reveals the version of the NX Client to you. This may be important in case you report a bug or ask for help on the FreeNX mailing list or in the #nx IRC channel on Freenode.
I hope you've succeeded to connect to one of the NoMachine testdrive servers by now. As mentioned before, the testdrive servers aren't capable of handling a ton of traffic, so you may not be able to try your own NX session immediately after reading this article. But while you're on the site, try a few things that don't work with the old FreeNX version contained on your Knoppix CD, which we will be using for the next tests:
Use the key combination [Ctrl]+[Alt]+[f] to toggle full-screen and windowed NX session modes.
Use the mouse to drag the window border and resize the NX session window to any size you like, even in portrait shape.
These features are included in the NX Core libraries of the 1.5.0 release for the first time. They also work with older NX clients, 1.4.0-75 and 1.4.0-91, as they are included in Knoppix.
You also can familiarize yourself with a few other shortcuts that work with the FreeNX server version included in Knoppix:
Click on the magic pixel located in the uppermost right corner of your desktop to escape NX full-screen mode and minimize the window to a button hosted in the task bar.
Use key combination [Ctrl]+[Alt]+[t] to terminate or suspend your session.
Use key combination [Shift]+[Ctrl]+[Alt]+[Esc] to kill your running session.
Here are some neat tricks you may find useful in your future NoMachine NX Client installations. You can start the NX Session Administrator with this command /usr/NX/bin/nxclient --admin (Figure 15). This utility lets you comfortably start new sessions, disconnect or kill running ones, view session logs or remove old session files. Probably the most under-rated feature in here is its capability to produce session statistics about the efficiency of the NX protocol. Facts and figures compression ratios, cache hits and misses as well as an overall summary are only one mouseclick away. It's also a great tool for debugging sessions.
Most useful to administrators of sites that are planning big NX installations with large numbers of clients may be the nopasswd, noexit and noconfig special files. Create one or all of these as empty files in /usr/NX/share/ with the touch command and make sure the permissions are set to read-only:
touch /usr/NX/share/{noexit,noconfig,nopasswd}
chmod 444 /usr/NX/share/{noexit,noconfig,nopasswd}
The mere existence of these empty files lock down the NX client user environment considerably. Try it for yourself: create the files and watch their effect. Remove the functions again by simply deleting the files. You should see the following:
file /usr/NX/share/nopasswd disables the functionality to save the username and password in the NX session file. This is handy when an NX terminal has multiple users and the administrator needs to enforce the keying in of the NX user credentials before each session. It ensures that only pre-established users can access the NX server via NX client.
file /usr/NX/share/noexit disables all Close buttons in the NX client GUI. When the user closes or loses a running session, a new NX client dialog box automatically appears on the desktop, ready for the next user to start a new session or for the current user to re-connect to his lost session. This is welcome where client terminals have multiple users who need to access their session quickly and easily.
file /usr/NX/share/noconfig disables all user possibilities to configure new session setups or modify existing ones. This allows the administrator to completely lock down the types of sessions a user can run. This feature works only when the NX client is started with the --session or --plugin option.
A final hint: visit the excellent NoMachine Knowledge Base. There you will find a wealth of advanced information about NX technology and its usage. The FAQ section and the collected articles may save you a lot of time. Also be sure to check out the NoMachine support and resources Web sites rather than rely only on Google search results. I want to warn readers: Google digs up many outdated pages on NX, several of which are plain wrong in their advice to (Free)NX users.
The next installment of this series, Part 6, will show you how to run the FreeNX server from a Knoppix CD. Moreover, it will introduce you to a simple method that lets you emulate a slow modem link on the Knoppix loopback network device. It also will teach you how to run a side-by-side comparison of an NX session with an Xnest session to see some NX's speed improvements over traditional X11 remoting.
Kurt Pfeifle is a system specialist and the technical lead of the Consulting and Training Network Printing group for Danka Deutschland GmbH, in Stuttgart, Germany. Kurt is known across the Open Source and Free Software communities of the world as a passionate CUPS evangelist; his interest in CUPS dates back to its first beta release in June 1999. He is the author of the KDEPrint Handbook and contributes to the KDEPrint Web site. Kurt also handles an array of matters for Linuxprinting.org and wrote most of the printing documentation for the Samba Project.
