
Building a Home Automation and Security System with Python
In this article, I describe the process I used to create a home automation system using off-the-shelf products, Python and Linux. I start by describing the Serial I/O Kit, drive alert, water alarm, smoke detector and cameras that make up the hardware portion of the system. Next, I give a short description of the command-line programs and packages that are used by the Python program. I finish up by giving a brief run-down of the major parts of the Python program that ties all of the hardware and packages together.
The idea for this system was born when some of my neighbor's party guests parked in my drive for several minutes while they were trying to figure out if they were at the correct house. I was caught off-guard, because I didn't immediately notice that someone had pulled up. It became very clear to me that they could have entered my residence or shop unnoticed. I decided to create a system on my own, because I knew that a commercial security system that would monitor driveway traffic and capture images from the various cameras positioned around my property would be expensive.
Because I have coded several programs at work in Python, I have had firsthand experience with the rapid development provided by Python. It allowed me to concentrate on the problem at hand rather than the complicated language syntax and semantics. I would recommend Python for any program that crunches text-based data, because it is easy enough for beginning programmers, but powerful and flexible enough to handle larger tasks.
The Python home automation system is centered around an Isolated Serial I/O Kit (Figure 1) from Quality Kits, which is available assembled for an extra $10 US. The kit contains four inputs and eight relays. The inputs detect DC voltage from a source within the 6-24 volt range. The relays can be used to turn voltage to a source on or off, so they can be used to control the power to multiple 12v light bulbs or any other gadget that requires DC voltage within the relay's specified voltage range. The Serial I/O Kit uses simple read and write commands to a serial port connection for setting the relays and monitoring the inputs. The inputs and relay circuits are isolated, which means there is no direct connection between these circuits and the computer's serial connection. This prevents damage to the computer if something goes wrong with the Serial I/O box. Figure 2 shows how to connect the Mier Drive Alert and alarms to the Serial I/O box inputs.
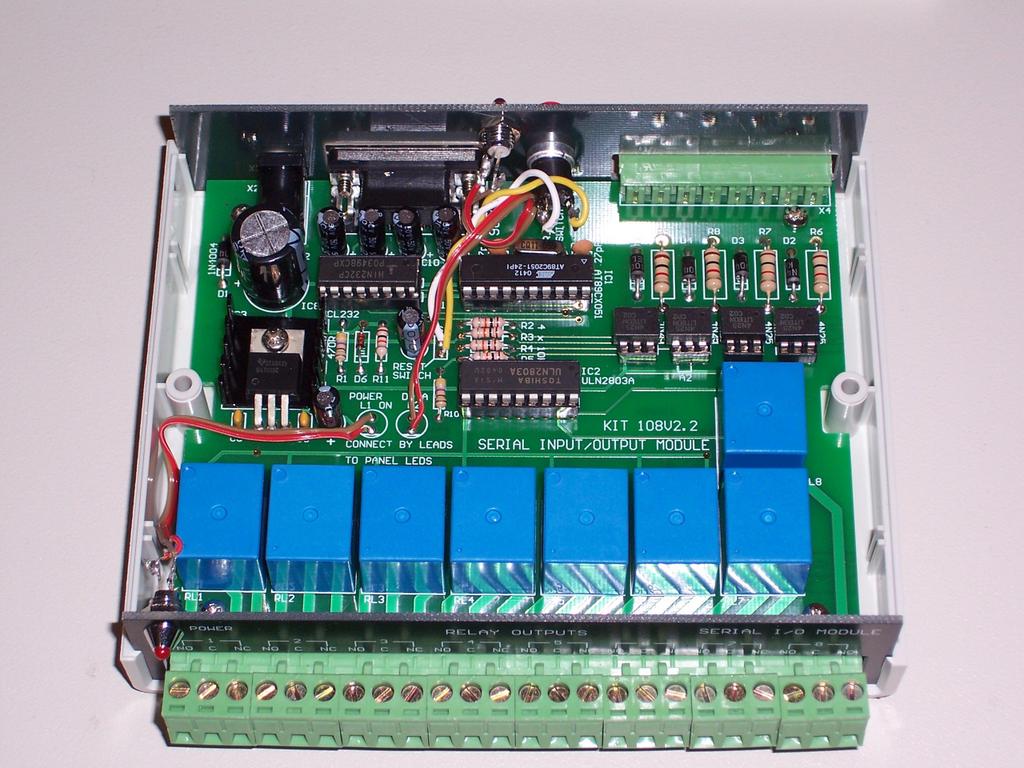
Figure 1. Isolated Serial I/O Kit (courtesy of store.qkits.com)
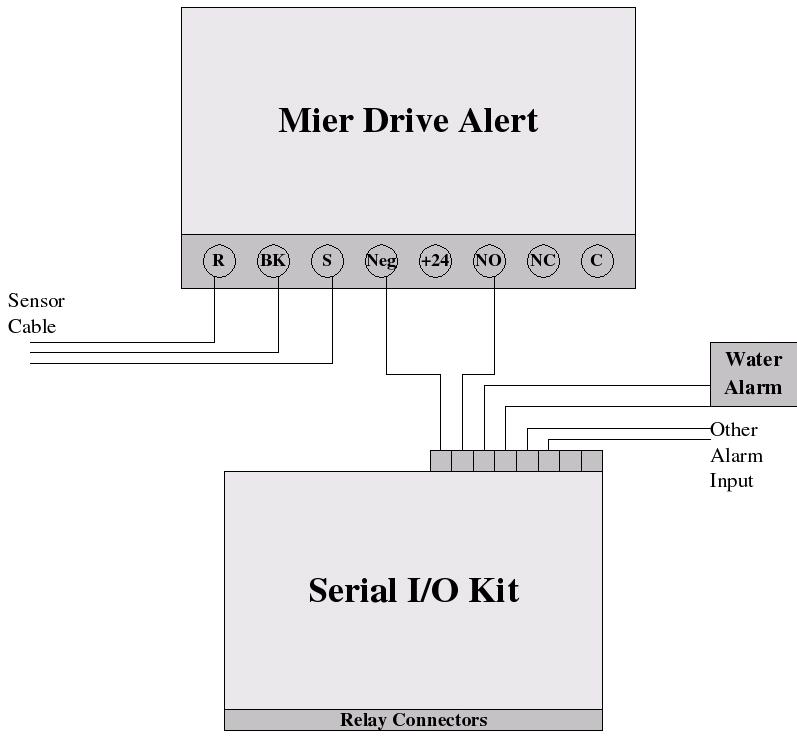
Figure 2. Connecting the Mier Drive Alert and Alarms to the Serial I/O Box Inputs
The second major part of the system is the Mier Drive Alert (Figure 3). This system is reliable, and it also provides an adjustable timed 24-volt output when activity is detected. If you decide to use the Mier Drive Alert, connect one of the Serial I/O inputs to the terminals marked Neg and NO on the Mier Drive Alert controller. Otherwise, any drive alert system that provides a voltage output in the 6-24 volt range when activity is detected should work. If you are not sure that the unit you chose provides this type of output, you probably need to contact the company.
The Mier controller box detects very small changes in voltage, which are produced by the sensor probe due to changes in the earth's magnetic field when a metal object passes by the sensor probe. This is why the sensor probe cannot be connected directly to the Serial I/O Kit's input, because the voltage produced by the probe is much smaller than the input's minimum voltage detection value of 5 volts.
Other drive alert systems are available that use a beam or a pressure-activated switch and a rubber hose. This type was once pretty common at drive-throughs and full-service gas stations. I didn't choose the beam type, because it would detect anything that moves, and I doubt that a rubber hose would have held up very well on my gravel drive. The Mier unit produces an occasional false alarm due to inclement weather and lighting strikes, but these are minimal and could be reduced if the controller sensitivity were adjusted.
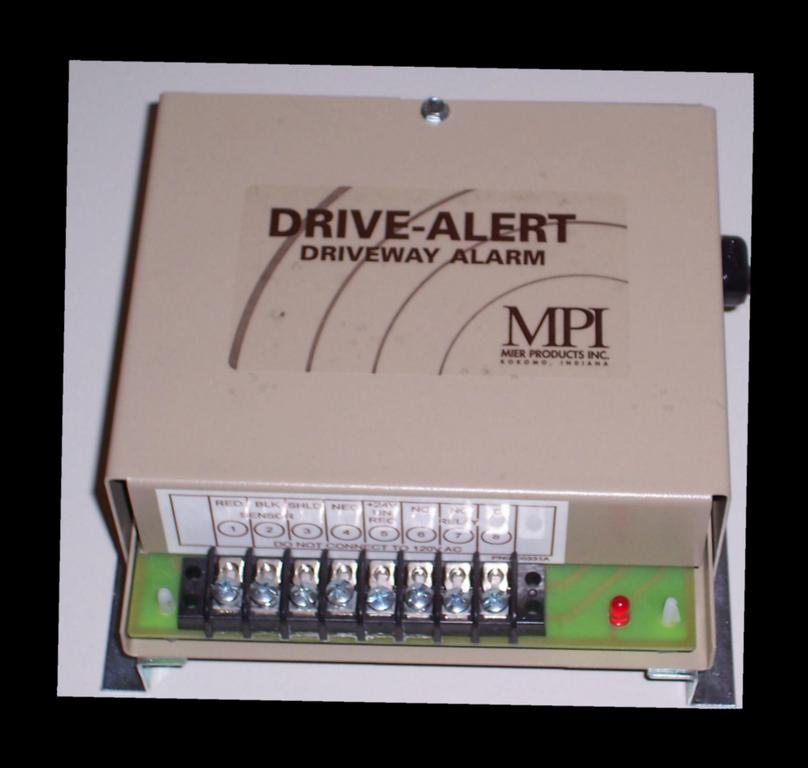
Figure 3. Mier Drive Alert (courtesy of absoluteautomation.com)
As we all know, water and house interiors don't mix, which is why I added this cheap and simple water-detection circuit to the mix. The circuit performed well in a test environment using a pan of water, but lacks any real-life testing. The circuit shown in Figure 4 was created from a schematic that is listed in the on-line Resources. I removed the timer, buzzer and other unnecessary components, leaving a single switching transistor and a resistor. The circuit can be powered by a DC adapter in the 6-9-volt range. The probes in my system are simply a short piece of scrap copper tubing, and they just sit on the floor of my shop bathroom several inches apart. I have multiple probes connected to the same water alarm circuit, which provides multiple monitoring points per circuit at the loss of being able to identify the exact location of the leak. I leave it up to you to determine the correct probe separation for your application, because I don't have any exact distances. The water alarm (Figure 5) that I created contains two transistors and thus two alarm circuits on the same board.
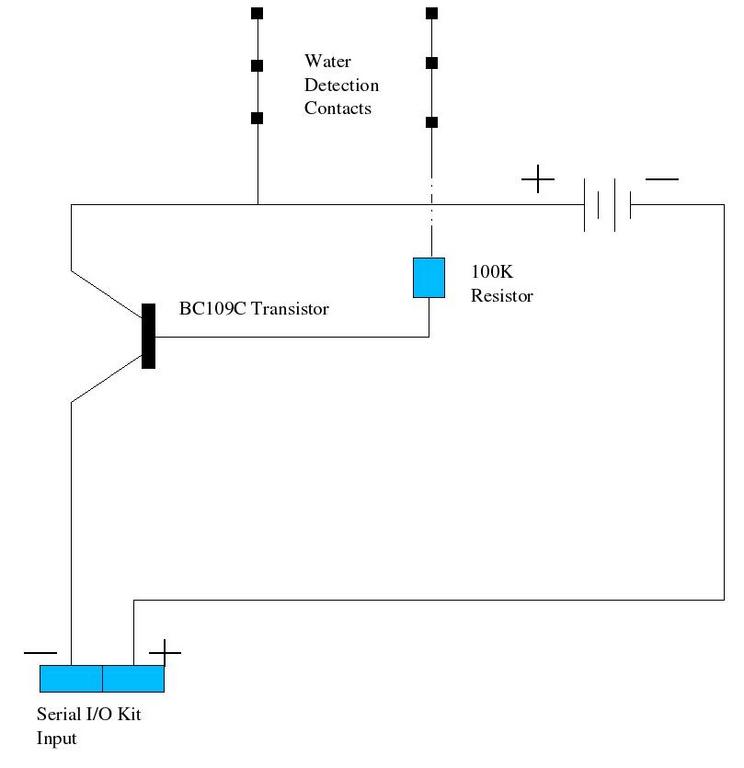
Figure 4. Circuit
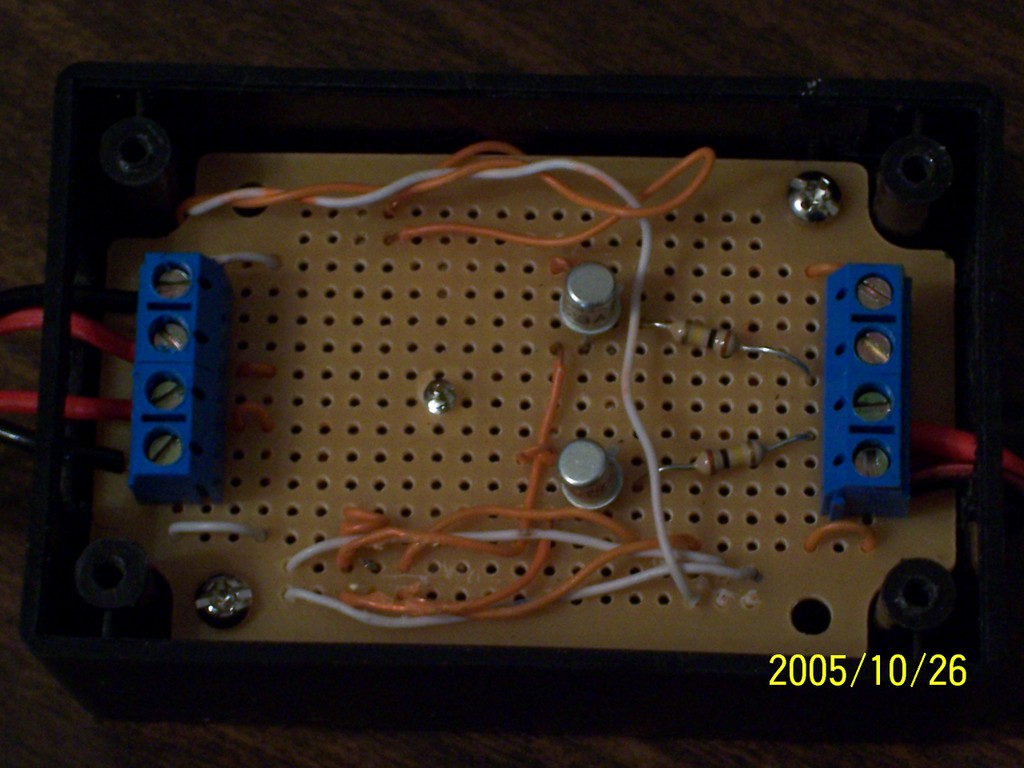
Figure 5. Water Alarm
The smoke alarm has never been tested in a real emergency and was added as an afterthought. Do not replace any existing smoke alarms with this modified version, because it must be tampered with. The following reasons are very good reasons not to rely on it in case a fire occurs, because if your computer, the Serial I/O Kit connection, and/or your Internet connection is the first to go, the alarm is useless. If you decide to duplicate this portion of the project, do so at your own risk. The smoke detector used in this portion of the project is just a model with an exit light that should be available from your local home hardware center. It employs two 9-volt batteries; one to power the alarm, and the other to power the light. Now, you need to void the warranty by modifying the detector as follows. Begin by removing the cover and locating the exit light. Use a volt meter to determine the positive and negative connections to the light. Then just solder a couple of wires to the proper connection points and connect them to one of the Serial I/O Kit's inputs.
The system uses several relatively inexpensive Logitech Webcams along with a couple of network cameras. Any cam that's supported by video for Linux should work along with most network camera models. The best advice I can offer is to verify that the camera is supported by Linux and that a driver is available. Logitech Quickcam Pro models perform quite well, but not all of the Logitech models are supported by the same driver. The Quickcam Pro models use the pwc module available from saillard.org.
The system uses several command-line programs available for Linux that handle WAV-file playback, zip file creation and image file captures. The SOX package is a sound conversion and utility package for Linux. It provides the play command, which is used for playing the various alarm warning sounds. Several sound wrapper modules are available for Python, but I found that it was fairly easy to make a system call to the play command. The zip command is used to create zip files from the camera image captures. Python includes a zipfile module, but it was easier to use the command-line version, which easily can be replaced with another command, such as tar.
Image file captures are handled using Motion and Curl. The later is a fairly powerful program that will transfer data from a server. According to the man page, it handles http, https, ftp, telnet and some other formats. I make a system call to it to retrieve images from the D-Link network camera's HTTP server by using a command similar to this one, curl http://192.168.0.98/IMAGE.JPG -uusername:password -m2 >outputfile.jpg, where -m2 tells it to stop trying after two seconds. Motion creates MPEG motion capture and time-lapse movie files along with single JPEG image files at a preset rate. The simple HTTP server built into Motion provides an image stream, but it does not allow for single image retrieval using Curl. For more information on Motion, see the Linux Journal March 2005 article, “GNU Motion: Your Eye in the Sky for Computer Room Surveillance” by Phil Hollenback, because it does a good job explaining the details required to get it up and running.
Once you have a working Motion setup, you should change the snapshot_interval in Motion's config file to a one or a value acceptable to your application. Lower values are better, because they prevent duplicate image captures. Now set the snapshot_filename value to a temporary filename, such as, tempmotionimagefile, so that Motion creates only a single capture file. Leaving the default motion.conf snapshot_filename will work, but Motion will create a new file using the snapshot interval value, which can result in a very large number of stored image files. These settings cause Motion to create a symbolic link named lastsnap.jpg that always points to the latest snapshot file, which in the case of the settings above, always is overwritten with the most recent image.
Now that all of the hardware and required programs above are configured, installed and are functioning on their own, it is time to discuss the Python program that glues all of it together. I briefly touch on the most important parts of the program, along with any second-party modules that are required. The pyserial module contains a posix serial I/O implementation for Linux and is used to handle reads and writes to the Serial I/O Kit. A thread-enabled Python installation is required by the program, because it must perform several simultaneous operations in order to monitor input activity and so forth.
The MonitorInputs class is one of the most important, because it handles input monitoring by employing the GetInputStatus method (Listing 1). This method checks for input activity by writing the input name (I1 to I4) to the serial port. The write method is provided by the Serial class in the pyserial module. Notice that there is a Python list defined as Expect in the example code. This is a list of the expected output from the serial class read command executions that are required to clear and validate information that is returned from the write request. If an unexpected read result is obtained, the serial port connection is reset. This allows the program to recover from serial communication failures and short power losses to the Serial I/O Kit.
Listing 1. Employing the GetInputStatus Method
def GetInputStatus(self, Input = None):
            self.ser.write(Input + '\r\n')
            Expect = [Input[0], Input[1], '\r', '\n']
            cnt = 0
            while cnt <= 3:
                a = self.ser.read()
                if a == '' or a != Expect[cnt]:
                    return -1
                cnt += 1
            val= self.ser.read()
            Expect = ['\r', '\n', '#']
            cnt = 0
            while cnt <= 2:
                a = self.ser.read()
                if a == '' or a != Expect[cnt]:
                    return -1
                cnt += 1
            if val == '1':
                return 1
            else:
                return 0
When activity is detected, MonitorInputs checks to make sure that input activity has not occurred within the input activity timeout. The timeout is used to keep the alarm threads, which simply send a plain-text e-mail, from executing too many times during a single input activity voltage on condition. The timeout is not the best solution, because the smoke and/or water alarm would still send a new e-mail every 60 seconds. This is acceptable to me, because if I receive a water alarm e-mail while at work, I'm going to rush home. The unused Serial I/O Kit relays could be used to correct this shortcoming, because each input positive connection could be routed through a relay, which could be turned off to disable the alarm voltage.
Another solution is to signal the GetInputStatus method to ignore input activity on a specific input. Either method will work, but a remote trigger mechanism will be required in either case, because the serial port connection is maintained by the home automation program. A possible solution adds a server thread to the home automation program that would accept simple string commands from a client connection. This would allow a simple Python CGI script to send commands that could control input monitoring and/or the relay states. Pyro is a Python distributed object system that provides another more complex solution using an event server. This is very similar to the client/server approach, but Pyro is more robust and provides opportunities beyond the scope of this article. One of these solutions will probably find its way into a future upgrade to the home automation program.
Now that the program is monitoring for input activity, it needs to produce notifications, such as a warning sound or e-mail when activity is detected. Smoke and water alarm activity is handled by the generic threaded Alarm class, and drive alert activity is handled separately. The Alarm class plays a WAV file using the PlayWav class, and it also sends a notification e-mail using the MailAttachment class. The PlayWav class uses a popen call to the wavcmd value (sox play command) set in the configuration file. The PlayWav class is threaded to prevent a busy sound device from holding up the e-mail notifications. The end result of all of the threaded classes is that the input activity is monitored almost continuously with only slight delays.
The DriveAlert class handles detected input activity for the drive alert signal. This class employs the GetImage (Listing 2), PlayWav and SSHRemote threaded classes. A new GetImage instance is created for each camera command (camcmd) set in the configuration file, so that images can be collected from each camera at about the same time. The GetImage class makes a popen call to the camera command and waits until it has completed. This is repeated until the number of images set in the configuration file have been collected and saved in the directories defined in the camdir section of the configuration file. Once all of the images have been collected, the GetImage class uses the ZipIt class to create a zip file via a popen call to the zip command. When all of the image files are zipped up, the MailAttachment routine is used to e-mail the zip files. If you would like to stagger the images collected from the cameras, you can add a camera image delay section to the configuration file and modify the GetImage class by adding a call to the sleep function using the preset camera delay as input.
Listing 2. DriveAlert Class
class GetImage(threading.Thread):
    def __init__(self, cam = None, numImages = 1):
        self.cam       = cam
        self.JobBegin  = -1
        self.camCmd    = CamCOMMANDS[cam]
        self.numImages = NumCamImages[cam]
        self.Zip = None
        threading.Thread.__init__(self)

    def run(self):
        for i in range(self.numImages):
            self.JobBegin =
int(time.strftime("%H%M%S",time.localtime(time.time())))
            if QUIET == 0:
                print 'Getting %s image' %self.cam
            filename = time.strftime("%H%M%S",
time.localtime(time.time())) + '.jpg'
            execcmd = self.camCmd %filename
            self.p = popen2.Popen3("exec " + execcmd, 1024)
            self.errReader = PipeReader(self.p.childerr);
self.errReader.start()
            self.outReader = PipeReader(self.p.fromchild);
self.outReader.start()
            try:
                self.p.wait()
            except OSError, (errno, errnostr):
                if QUIET == 0:
                    print 'ERROR: GetImage self.p.wait Errno %s: %s'
%(`errno`, `errnostr`)
            except:
                if QUIET == 0:
                    print 'ERROR: self.p.wait Unknown error'
            time.sleep(IMAGE_DELAY)
        #Popen complete - create zipfiles
        self.Zip = ZipIt(self.cam)
        self.Zip.start()
        self.Zip.join() #Wait on zip file creation
I briefly mention the SSHRemote class because the name is ambiguous. This class could be used to execute any command by replacing the ssh remote command in the configuration file with another one. I currently use it to play some tunes on my shop machine to make it appear that someone is home. The ssh call executes another simple Python script on the remote machine, which uses the play command to play all WAV files in a specified directory.
This article shows how Linux, Python and some cheap off-the-shelf hardware can be used to create a home automation system in a reasonable amount of time. The article focuses on the main parts of the system and cannot possibly describe the setup of all of the required components in detail. I must also stress that this system has not been tested in a production environment and therefore comes with no guarantees, express or implied, as to its suitability for any of the purposes listed above, so use it at your own risk. I am looking forward to making future enhancements, such as a voice modem that will dial a preset number and play a message. This will supplement the unreliable e-mail notifications, which are often delayed. I hope this article sparks your interest in simple monitoring systems and the flexibility of the Serial I/O Kit used in this project.
Resources for this article: /article/8696.
Fred Stelter has a BS in Computer Science from Baylor University in Waco. When he's not writing code for a local company, he likes to pop some tires at the local mountain bike trails, work on his hot rod or occasionally hit the water for some kneeboarding.
