
An Introduction to Gambas
Have you ever wanted to use Visual Basic on Linux? Why? Well, you could be like me and have spent many years programming in VB, but want to move to Linux without having to learn a new language. It could be that you're brand new to programming and need something you can learn quickly and easily—and still be able to produce a good quality application.
Well, now you can—almost.
Gambas is short for Gambas is—almost—Basic, and it has been designed to look at the good things VB can do for Windows and then does them for Linux. Above all, Gambas is easy to use—as this article shows. I explain how to build a useful application in Gambas—a bug-tracking system that stores its information in a MySQL database.
Installation is as simple. First go to the Gambas Web site, and check the Distributions & OS page—this is just to make sure there are no known peculiarities with your flavour of Linux. Then, go to the Download page and get the most current, stable version (1.09 at the time of this writing). If you've done this type of thing before, simply carry on and get yourself ready to use Gambas; if not, don't worry—we're nearly there.
Open a terminal and move to the directory where you've saved the bz2 file. If you're going to use 1.09, it will be called gambas-1.0.9.tar.bz2. Now bunzip2 the file, and follow the installation instructions (unless the distribution page has given you some additional parameters for your distribution).
With that, you're ready to use Gambas. Type gambas on the command line, and the welcome screen appears (Figure 1).
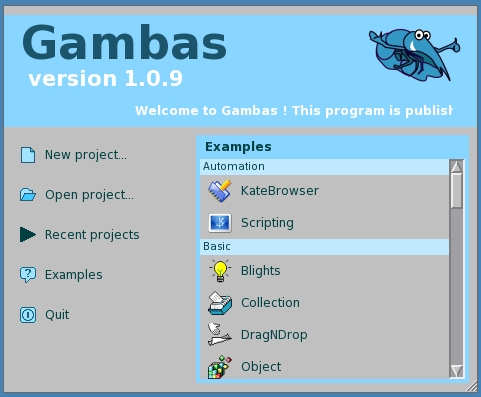
Figure 1. The Gambas Welcome Screen
The Gambas screen gives you access to example applications—you'll find these very useful if you are new to programming. In this case, click on New Project. Gambas now displays its project creation wizard, so follow the instructions to create your first project. When asked create a graphical project, set the name to bugTracker (note that underscores are not allowed), and then set the title to Bug Tracker. You also will be asked where to store your project. I suggest you create a new directory called Gambas in your home directory and then use it for all future projects as well.
Next, we jump straight in to the creation of a new form. Right-click in the project window, select New and then Form. Gambas puts you into its form creation wizard. All you need to do now is give the form a name—call it frmBugTracker. (Don't leave it as Form1. That's very bad practice).
Now, you can start adding the elements to the form—and, the first one to add is a Close button. Why do this first? Quite simply, you always want to be able to close a form, or an application, for that matter, cleanly and easily, so get into this habit as quickly as possible. To create the button, click on its icon in the toolbox (the icon is a box with OK on it), and then use the left-mouse button to draw it onto the form. By default, the button is called Button1, but exactly like the form, we rename it. Click on the button, and press F4 to display the Properties box. Change its name to btnClose and its text to Close.
The button won't do anything yet—we have to add some code to it, which is really, really easy. If you double-click on the button, Gambas takes you to the code window, and you'll find an empty btnClose_Click subroutine. Modify it so that it says:
PUBLIC SUB btnClose_Click()

  ME.Close

END
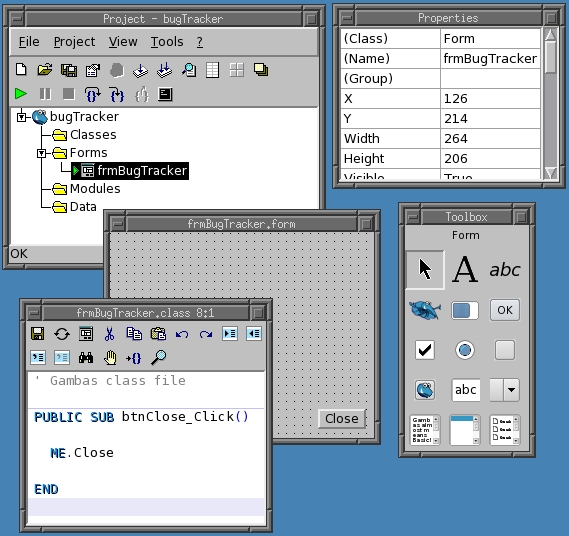
Figure 2. Designing a New Gambas Form
You should notice something as you type in the code—as soon as you put in the period, a drop-down menu appears, giving you all of the methods and parameters associated with the ME object—in this case, ME refers to the form, so ME.Close means close this form.
Suppose you want to see the results of your hard work now. Go to the Project window and click on the little green run button. And there you are—your first Gambas application. You even can close the form with your brand-new button.
Before building the application itself, we need to think about what we want the bug tracker to do. Then, we need to have a look at the data—how it is to be arranged, and what is going to be stored.
The bug tracker will have to do the following:
Have the details of new bugs entered.
Record who raised the bug.
Have a bug assigned to a programmer.
Update the status of the bug.
Record when the bug was raised.
Record the release for the bug fix.
Provide the ability to view new, working and complete bugs.
The data required is therefore:
Who raised the bug.
Who is fixing the bug.
Bug details.
Developer details: ID, first name, surname and user name.
Bug Details: ID, description, date created, ID of raiser, ID of developer, status, release number and application details.
From this, we can start building a database schema. Start by creating a file (such as database_schema.sql) that we will use to create the database:
/*
First you must create the database. The listing
table includes only the user ids for "raised by"
and "coder".
*/
create database bugtracker;

create table bugtracker.listing (
id int auto_increment primary key,
details longtext,
application_id int,
release float,
raised_by_id int,
coder_id int,
status_id int,
created datetime,
priority int,
status int);

/*
The coder table is simple but includes the user name.
*/

create table bugtracker.coder (
id int auto_increment primary key,
surname varchar(50),
firstname varchar(50),
username varchar(50));
/*
Finally you can create reference tables for storing
application names and status titles.
*/
create table bugtracker.application (
id int auto_increment primary key,
name varchar(50));

create table bugtracker.status (
id int auto_increment primary key,
title varchar(50));

/*
With the tables created you can add a user account to
the database for the bugTracker application to log
on to.
*/
GRANT select,insert,delete,update ON bugtracker.*
TO bugtracker@localhost IDENTIFIED BY 'mypassword';

/*
Next you can start loading the data that will make
the application work. The key information is the coder data.
*/

insert into bugtracker.coder (username,surname,firstname)
values ('bainm','bain','mark');
/*
Finally add some dummy data so that you can see
the application working as soon as possible
*/
insert into bugtracker.application (name)
  values ('bugtracker');
insert into bugtracker.status (title)
  values ('new');
insert into bugtracker.status (title)
  values ('worked on');
insert into bugtracker.status (title)
  values ('rejected');
insert into bugtracker.status (title)
  values ('completed');
Create the database by typing:
mysql -uroot -p<root password> mysql < database_schema.sql
So, with the database in place, it's time to go back to Gambas to do some actual programming.
Now that we've built and loaded data into the database, the first thing to do is to connect to it so we can start communicating with it. Gambas makes this very, very easy for us. It comes with components, and all we have to do is tell the application to use the appropriate component for connecting to databases. We will have to do a little coding as well, but that is easy too.
Go to the Project window, click on Project and then Properties. The Properties screen appears—click on the Components tab, and then check gb.db (Figure 3).
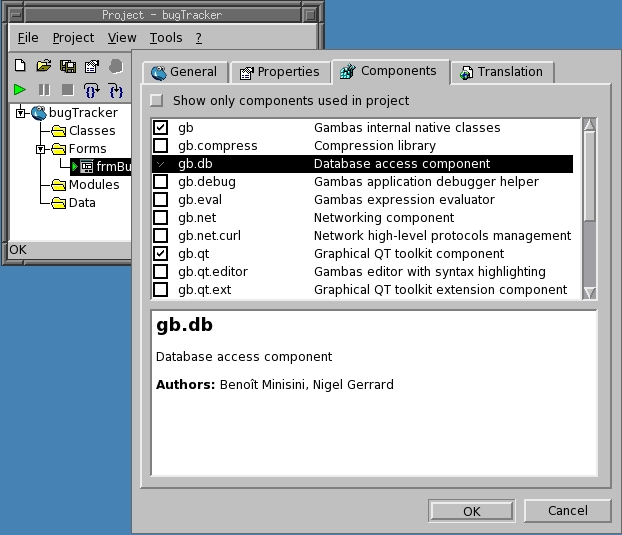
Figure 3. Enabling the Data Access Component
Gambas now can use the component to communicate with the database. All we have to do is add a little bit of code, and we do this in a module, which is a file for storing code so that it is usable by an application in general and not just a single form. For instance, the Close function we already created was only for the one form. We want to create code that is accessible for any forms that we create.
Right-click on the Project screen, click New and then Module. Gambas shows the Module Creation wizard. Just like the form and the button we made earlier, don't leave the module name as Module1. Call it something useful. In this case, call it Data. Once you create it, you can start adding code to it. Create the variables that will be used for database access:
PRIVATE myDB AS NEW Connection PUBLIC tmpRec AS Result
If you've used VB, you'll be happy with the format. If you're new to this, just take note that the PUBLIC statement makes the variable global—accessible to the whole application. If you don't want it to be available to the whole application, define it as PRIVATE.
The next (public) function makes the connection:
PUBLIC FUNCTION connect2db() AS Boolean
  WITH myDB
    .Type = "mysql"
    .Host = "localhost"
    .Login = "bugtracker"
    .Password = "mypassword"
    .Name = "bugtracker"
  END WITH
  TRY myDB.Open
  IF ERROR THEN
    Message ("Cannot Open bugtracker:" & Error.Text)
    RETURN FALSE
  END IF
  RETURN TRUE
END

PUBLIC FUNCTION Exec(sql AS String) AS Result
   RETURN myDB.Exec(sql)
END
We can call these functions from any form that we create. In this case, we call them from frmBugTracker. Double-click on frmBugTracker in the Project window, and then double-click anywhere on the form itself. This takes you into the code window, and you should see:
PUBLIC SUB Form_Open()

END
Now we add code to tell the form to connect to the database, and we also add a function to carry out a simple security check:
PUBLIC SUB Form_Open()

  Data.connect2db

  IF (check_id() = FALSE) THEN
    message ("Unable to log on as " & system.user)
    ME.close
  END IF
END

PRIVATE FUNCTION check_id () AS Boolean
   data.Exec("select id" &
             " from coder" &
             " where username='" & system.user & "'")
  IF (data.tmpRec.Available ) THEN
    RETURN TRUE
  ELSE
    RETURN FALSE
  END IF
END
If you run the project now, little will have changed, apart from the fact that it will take a little longer to load—it now has to connect to the database. However, the form will check the user's Linux user ID against the list of coders on the database using the function check_id. It displays a message and then closes the form if the ID is missing.
Next (keeping it simple), we create a pair of combo-boxes. One (cmdBugId) displays the list of bug IDs assigned to the current user. The other (cmdStatus) displays a list of the possible statuses. We then add a subroute (loadCombos) to fill in the details of the combo-boxes. Once you have added the combo-boxes from the toolkit write the required subroutines:
Add this to the Data module:
PUBLIC SUB loadCombo (combo AS ComboBox,
                      sql AS String)
  combo.Clear
  tmpRec = myDB.Exec(sql)
  FOR EACH tmpRec
    combo.Add (tmpRec[0])
  NEXT
END
Add this to frmBugTracker:
PRIVATE SUB loadCombos ()

  data.loadCombo(cmbBugid,"select l.id" &
             " from listing l, coder c" &
             " where l.coder_id=c.id" &
             " AND c.username='" & system.User & "'")

   data.loadCombo(cmbStatus,"select title from status")
END
For the code to run, we must change Form_Open:
  IF (check_id() = FALSE) THEN
    message ("Unable to log on as " & system.user)
    ME.close
  ELSE
    loadCombos
  END IF
Now we can click on the combo-box to select the required bug ID, and use this to run another query in order to view the particular details. To do this, we need a text area (txtDetails) and some text boxes (txtCreated and txtRaisedby, txtPriority, txtApplication and txtVersion).
Double-click on cmbBugId, go into code edit mode, and edit the code so that it reads:
PUBLIC SUB cmbBugid_Click()

 data.Exec ("SELECT l.priority,l.created, " &
        "l.details,l.release," &
        "s.title, c.username, a.name" &
        " from listing l,coder" &
        " c,status s,application a" &
        " where l.id=" & cmbBugid.Text &
        " AND l.status=s.id" &
        " AND l.raised_by_id=c.id"
        " and l.application_id = a.id")

  txtDetails.Text = data.tmpRec!details
  txtCreated.Text = data.tmpRec!created
  txtRaisedby.Text = data.tmpRec!username
  txtPriority.Text = data.tmpRec!priority
  txtApplication.Text = data.tmpRec!name
  txtVersion.Text =  data.tmpRec!release
  cmbStatus.Text = data.tmpRec!title
END

Figure 4. Viewing the Details of a Bug
The next stage is to be able to log a new bug. We need to create a new form (frmAddBug), and we add an extra button to frmBugChecker—calling it btnAddBug and change the text to Add Bug. Don't forget to add a Close button before doing anything else. Next, add a text area (txtDetails), a text box (txtPriority) and a combo-box (cmbApplication). You also will need another button (btnSave):
PUBLIC SUB Form_Open()
  loadCombos
END

PRIVATE SUB loadCombos()
   data.loadCombo(cmbApplication,"select name from application")
END
Our third form will view all bugs. Create a new form (frmViewAll), and then go to frmBugManager, copy all of the elements and paste them into frmViewAll. You need to change the order of the objects so that the status combo-box is at the top of the form. Also add another text box (txtCoder). Finally, select the new Add Bug button, change the name to btnAccept and change the text to Accept.
For this form, we need some code to load cmbStatus first, because this will drive the others:
PUBLIC SUB Form_Open()
  loadCombos
  cmbStatus_Click
END

PRIVATE SUB loadCombos()
   data.loadCombo(cmbStatus,
                  "select title from status")
END

PUBLIC SUB cmbStatus_Click()
  data.loadCombo(cmbBugid,"select l.id" &
          " from listing l, status s" &
          " where l.status = s.id" &
          " and s.title = '" & cmbStatus.Text & "'")
  cmbBugid_Click
  IF (cmbStatus.Text =  "new") THEN
    btnAccept.Enabled = TRUE
  ELSE
    btnAccept.Enabled = FALSE
  END IF
END

PUBLIC SUB cmbBugid_Click()
  txtDetails.Text = ""
  txtCreated.Text = ""
  txtRaisedby.Text = ""
  txtCoder.Text= ""
  txtPriority.Text = ""
  txtApplication.Text = ""
  txtVersion.Text =  ""
  IF ( cmbBugid.Text <> "" ) THEN
    data.Exec ("SELECT l.priority,l.created," &
      " l.details,l.release," &
      " s.title, r.username," &
      " c.username coder,a.name" &
      " from listing l,coder" &
      " r,status s,application a" &
      " left join coder c on l.coder_id=c.id" &
      " where l.id=" & cmbBugid.Text &
      " AND l.status=s.id" &
      " AND l.raised_by_id=r.id" &
      " and l.application_id = a.id")
    txtDetails.Text = data.tmpRec!details
    txtCreated.Text = data.tmpRec!created
    txtRaisedby.Text = data.tmpRec!username
    txtCoder.Text = data.tmpRec!coder
    txtPriority.Text = data.tmpRec!priority
    txtApplication.Text = data.tmpRec!name
    txtVersion.Text =  data.tmpRec!release
   END IF
END

PUBLIC SUB btnAccept_Click()
  data.runSQL("update listing" &
        " set coder_id = " & data.coder_id(system.User) &
        ",status=2" &
        " where id = " & cmbBugid.Text)
  Form_Open
END
The last thing you need is for status change code in frmBugTracker:
PUBLIC SUB cmbStatus_Click()
  DIM version AS String
  version = txtVersion.Text
  IF (version="") THEN
    version = "Null"
  END IF

  data.runSQL(" update listing" &
        " set status = " & data.get_id("status","title", cmbStatus.Text) &
        " ,release = " & version &
        " where id = " & cmbBugid.Text)

END
This has been a very brief look at Gambas, but hopefully, it has shown just how easy it is to use to create a real working application.

Figure 5. The Final Application
Resources for this article: /article/8951.
Mark Alexander Bain learned his trade working at Vodafone for nearly 20 years—using UNIX and Oracle. More recently, he has worked as a lecturer at a University in the UK and as a freelance writer. You can find his work at www.markbain-writer.co.uk.
