
Make Stunning Schenker Graphs with GNU Lilypond
In the early twentieth century, Heinrich Schenker developed a method of analyzing tonal music that ties a piece's melody, harmony and form to a simple underlying musical idea. To illustrate his theory, he created a notational system that clearly depicts these relationships. Schenkerian Analysis, as it is called today, is a staple of music theory, but it is notoriously difficult to notate using the industry-standard, proprietary music notation applications Finale and Sibelius.
The Open Source world, however, has an excellent music typesetter in GNU Lilypond, which now runs natively on Linux, Mac OS X and Microsoft Windows. Lilypond not only produces beautiful sheet music, it also puts a great deal of control at the user's fingertips. Additionally, its text-to-music rendering method makes it easier for a typesetter to control hidden elements. This makes Lilypond a powerful tool for creating Schenkerian notation graphs, which—by their nature—require extreme control of positioning, as well as the masking and hiding of notational elements.
In this article, I cover the creation of a Schenkerian graph that contains all of the most common Schenkerian notational elements, with explanations of what each element signifies and the code required to produce it. I assume that the reader has at least a basic knowledge of Lilypond, and thus give instructions only for the nonstandard code used for Schenker graphs. I also assume that the user is using Lilypond 2.6, though most of the tools I cover are valid for any 2.x version of Lilypond. Armed with a working knowledge of Lilypond and with the techniques explained in this article, any user should be able to produce beautiful Schenker graphs—and some other forms of advanced musical notation—in less time, with less effort and difficulty than when using a graphical music notation application.
There are a few simple steps to understanding a Schenker graph and how it represents an analysis of a piece. Two cardinal principles of tonal music form the foundation of Schenker's theory as an intrinsic part of the way we hear and perceive music. The first principle is the supremacy of the tonic (I) chord and the dominant (V) chord in the harmonic structure. That is, the chords built on the first and fifth notes of the scale. In the key of C major, this would be the C-major chord (I) and the G-major chord (V). The second principle is that the melodic structure is built upon a descending line, which ends on tonic (the first note of the scale).
A Schenkerian graph notates the structure of a piece in two main ways. First, rhythmic values are used to denote the structural importance of a note, not the length for which it should be played. Second, various musical markings—such as slurs, ties, beams and lines—are used to show the relationship of notes that have little structural importance to those that have greater structural significance. Schenkerian graphs also typically contain analytical markings such as Roman numerals for the harmony, scale-degree numbers and occasionally figured bass and analysis brackets.
As an example, let's use an excerpt of an analysis of J.S. Bach's Organ Chorale Prelude Wenn wir in hoechsten Noten sein, from Gene Biringer's book Schenkerian Theory and Analysis: A Bridge from Traditional Harmony, Counterpoint, and Form to Advanced Studies in the Analysis of Tonal Music (unpublished, Lawrence University Conservatory of Music). I chose this example because it clearly illustrates many of the standard Schenkerian notation elements, and I have made a few slight modifications to the graph to demonstrate the notation more completely. For the complete Lilypond file for this graph, see the on-line Resources.
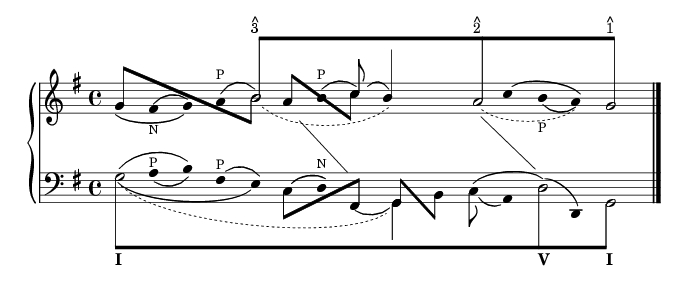
Figure 1. J.S. Bach: Organ Chorale Prelude Wenn wir in hoechsten Noten sein
In this example, note the use of different rhythmic values—half notes, quarter notes and eighth notes. In this case, as in most Schenker graphs, the half notes are the notes of the fundamental structure, and they are also beamed together to highlight the structure most clearly. Next, observe the use of ties, beams and slur marks in the graph. Slurs are used to connect notes of lesser structural significance with the fundamental structure. In the above example, the second and third notes in the upper staff are slurred showing that the F-sharp is a neighbor tone (marked by N) to the more structurally important G. The tie between the two Gs surrounding that F-sharp shows that the second G is a prolongation of the first G. Dotted slurs and ties are also used by some theorists to show extended prolongation of a note. In Figure 1, three dotted slurs or ties show extended prolongations of notes with other forms of embellishment between.
Lastly, observe the diagonal lines between the two staves. These lines are used to connect a melodic note and a bass note that coincide structurally, but they are not performed simultaneously in the piece. When examining the graph in Figure 1, one can see that every note in the example can be connected via slurs, ties or beams to the fundamental structure of the piece, thus showing the role of every note in the structure of the piece.
Setting up a Lilypond file for a Schenker graph is fairly straightforward. A typical graph contains one or more grand staves, or piano staves, so one will likely begin with a piano template. To modify a piano template for a Schenker graph, add a few lines of code. Inside the PianoStaff brackets, but outside the individual Staff context brackets, add these lines:
\set Score.timing = ##f
\set PianoStaff.followVoice = ##t
The first line creates an unmetered score, with no barlines—typical for Schenker graphs. The second line is explained later.
Inside each Staff context, and inside \relative brackets if you use them, insert:
\override Staff.NoteCollision
  #'merge-differently-headed = ##t
This allows you to combine several layers of hidden voices—an important tool—without altering the note spacing.
The last global element is adding raggedright = ##t to the \layout section. I think this just looks better, but it also ensures consistency of measurement if you make significant edits to the graph after you've begun working on spacing. The piano template is now ready to be used for a Schenkerian graph. For an example template built upon a single grand staff, see the Resources.
The first and most important part of the process of building a Schenkerian graph is to sketch the final graph by hand. The more complex the notation, the more valuable this will be. And even though Lilypond makes it easier than Finale or Sibelius to edit graphs after they have been created, you will still save much time and effort by sketching the complete graph by hand before typesetting it. It is also a good idea to mark off the beats that will be used. Because almost every voice in the Lilypond file will contain a number of skipped beats, it is essential to know the number and layout of beats ahead of time. One quarter-note beat for each notehead should suffice.
The next step is to typeset the fundamental structure, the half notes connected by an eighth-note beam. I chose to use two voices for each staff when creating this. One voice contains eighth notes with invisible noteheads, and the other contains half notes with invisible stems. The fundamental structure for the upper staff of the Bach graph looks like this:
<<
  {
    \override Beam  #'positions = #'(8 . 8)
    \override NoteHead #'transparent = ##t
    s1 b8[ s4. s1 a8 s4. s2 g8] s4.
    \revert Beam #'positions
    \revert NoteHead #'transparent
    }
\\
  {
    \override Stem #'transparent = ##t
    s1 b2 s1 a2 s2 g2
    \revert Stem #'transparent
    }
>>

Figure 2. The fundamental structure uses half notes connected by an eighth-note beam.
Notice first that I override the beam positions, to make it level and out of the way of any notes and stems that may be placed under it. Also notice the use of the transparent property, one of your best friends when creating a Schenker graph in Lilypond. And of course, notice that the beats correspond exactly, with an eighth note and dotted-quarter skip in voice one, corresponding to each half note in voice two.
If you want to put scale-degree marks on each note, as in the Bach graph, Lilypond 2.6 now makes it possible without using LaTeX. You simply mark up the note like this:
b8[^\markup { \override #'(baseline-skip . 0.5)
\column { \small {^ 3} } }
The baseline-skip override should align the carat tightly over the numeral.
You also may notice that I chose to create multiple voices with brackets and back-slashes, rather than \voiceOne, \voiceTwo and so on. In my experience, the brackets are quicker, they make it easier to insert and delete voices, and they are less likely to cause alignment problems between voices.
Once the fundamental structure has been created in each staff, next comes the surrounding notes. I typically begin with plain noteheads in one voice—separate from the two voices already created—and add beams, stems, slurs and additional voices as I continue. This helps me better organize my code. To create a voice with plain noteheads, begin the voice with the code:
\override Stem #'transparent = ##t
\override Stem #'length = #0
and follow with all quarter notes or quarter-note skips, never rests. The second line becomes useful when adding slurs. Because slurs attach to the stem if the stem and slur are on the same side of the note, you can use this line to cause all slurs to attach only to noteheads. Just remember to cancel it out when you add a visible stem. When you reach the end of the voice, remember to \revert anything you \override.
Once the notes are added, you can begin adding the necessary slurs, beams and other appropriate marks. Multiple layers of slurs are intrinsic to Schenkerian notation, but they can be cumbersome in Lilypond code. There are two ways to accomplish it. The first is to use the phrasing slur tool. This allows you to create a lower layer of slurs with ( and ) and an upper layer with \( and \). This allows for only two layers of slurs, but it does let you keep both layers in the same voice. If two layers of slurs are all you need, this may help you keep your code cleaner and save you a little work.
If you need more than two layers—note the four layers of slurs on the first note in the Bach example—you must create multiple voices. If you require three layers of slurs, create three voices. In the first voice, begin with:
\override Stem #'transparent = ##t
\override Stem #'length = #0
as before, and follow this with all the notes in the line (and the skips and \revert commands). Insert the first (lower) layer of slurs in this voice.
In the second voice, begin with:
\override NoteHead #'transparent = ##t
\override Stem #'transparent = ##t
\override Stem #'length = #0
and follow with all the notes and the second layer of slurs. This attaches each slur to an invisible note in the same place as the visible notehead from voice one. If you want, you can replace the unneeded notes in this voice with skips, but it is unnecessary. The third voice will look like the second voice, but it will include only the third layer of slurs.
After making a few minor spacing adjustments, your code may look something like this (a variation of the beginning of the lower staff of the Bach example):
<<
  {
    \override Stem #'transparent = ##t
    \override Stem #'length = #0
    \once \override TextScript #'extra-offset =
      #'(-11 . -2.5)
    g4 a( b) fis( e)
    \revert Stem #'transparent
    \revert Stem #'length
    }
\\
  {
    \override NoteHead #'transparent = ##t
    \override Stem #'transparent = ##t
    \override Stem #'length = #0
    \once \override Slur #'extra-offset =
      #'(0.5 . 0.75)
    \once \override Slur #'height-limit = #1.5
    g4( a b) fis e
    \revert NoteHead #'transparent
    \revert Stem #'transparent
    \revert Stem #'length
    }
\\
  {
    \override NoteHead #'transparent = ##t
    \override Stem #'transparent = ##t
    \override Stem #'length = #0
    \slurDown
    \once \override Slur #'extra-offset =
      #'(-1.25 . 0)
    \once \override Slur #'height-limit = #2.75
    g4( a b fis e)
    \revert NoteHead #'transparent
    \revert Stem #'transparent
    \revert Stem #'length
    }
>>

Figure 3. Using layers of slurs helps you organize your code clearly.
Even when using only two layers of slurs, I prefer this method rather than using slurs and phrasing slurs combined. It gives me the same method in every graph, it organizes my code more clearly and when I edit slur properties, I always use the same commands for any layer. Otherwise, I would alternate between overriding slur properties and phrasing slur properties.
When using slurs in Schenker graphs—especially when using multiple layers—you likely will need to edit some of the slur properties in your graph. The simplest edits are \slurUp and \slurDown, which cause the following slur to be created above or below the notes, respectively, and \slurDashed, a new tool in Lilypond 2.6, which creates a dashed slur.
Another common tweak I find useful is:
\once \override Staff.Slur #'height-limit = #x
This allows me to specify how deep or shallow the slur should be drawn (represented by the value x), and it is especially helpful for layered slurs or for slurs under and over text. Occasionally, I have to specify the entire set of coordinates for a slur manually. This lets you create some funky slurs, which some Schenkerian theorists love to use. For that, use the following code, where x and y are horizontal and vertical distances, measured in staff lines:
\once \override Slur #'control-points =
  #'((x . y) (x . y) (x . y) (x . y))
And, as with just about any notational element in Lilypond, you can alter a slur's extra-offset property, moving the entire slur without altering the shape:
\once \override Slur #'extra-offset = #'(x . y)
See the example of slur layers in Figure 3 to observe extra-offset and height-limit in action.
Occasionally, a melodic note corresponds to a bass note harmonically, but they are not sounded simultaneously and thus are not aligned vertically in the score. In Schenkerian notation, a simple diagonal line connecting the notes suffices to make this connection. Unfortunately, such a line is not as easy to create in Lilypond as in a graphical editor. However, it can be done rather painlessly with \change Staff. When creating our template, we added the line:
\set PianoStaff.followVoice = ##t
to our file. That line combined with \change Staff=LH or \change Staff=RH creates a diagonal line that follows the voice from one staff to the other. Thus, if you create a new voice in the upper staff with the following code:
\override Stem #'transparent = ##t
\override NoteHead #'transparent = ##t
\override Stem #'length = #0
s1 s4 e4 s
\change Staff=LH
fis,4 s2
\revert Stem #'transparent
\revert NoteHead #'transparent
\revert Stem #'length
you will get the first diagonal line in the Bach example, descending from the upper staff to the lower staff. The transparent noteheads and stems cause Lilypond to render only the diagonal line. Using invisible notes also allows you to alter the pitch of the start and end notes to adjust the height of each end of the line. Though this may seem to be overkill, the entire block of code easily can be cut and pasted to another voice or file, with the necessary adjustments being only height and beat placement, making this an easy solution. (If you really want to click and drag the line onto the graph, open the finished graph in an image editor and add the line there.)

Figure 4. The unfolding symbol shows a harmonic connection between two notes in a melody.
The last Schenkerian idiom I cover here is the unfolding symbol. Briefly, this symbol signifies a harmonic connection between two notes in a melody. They typically occur in pairs, showing the use of two concurrent harmonic voices in one melodic line. They are surprisingly easy to create. When two simultaneous notes in a line are to be connected with the unfolding symbol (as in the lower staff of the Bach example), one simply needs two notes connected by beaming brackets, with the commands \stemUp and \stemDown in the appropriate locations. Of course, one must remember to remove stem transparency before creating the unfolding symbol and insert eighth-note skips appropriately to preserve vertical alignment:
\override Beam #'positions = #'(1 . -4)
\stemUp
g8[ s
\stemDown
b8] s
Notice the use of beam positions to adjust the height of the stems and the beam angle. When other notes occur between the two notes to be connected with an unfolding symbol, as in the upper staff of the Bach example, put the unfolding notes in one voice and the independent noteheads in another, with appropriate skips in each voice. For example, if the first voice contains:
\override Beam #'positions = #'(3 . -2.5)
\stemUp
a8[ s s2
\stemDown
d8] s
\revert Beam #'positions
the end result will turn out like Figure 5.

Figure 5. Other notes can appear between two notes connected with an unfolding symbol.
Creating Schenkerian graphs in a graphical editor like Finale or Sibelius is enough to make many theorists revert to pencil and paper. The process is long and difficult, making changes to finished graphs is nearly impossible and you must do the same things to each graph every time you create a new one. However, with GNU Lilypond and the above tools, any musician can create beautiful Schenker graphs with minimal headaches and maximum control. Lilypond's text-to-music method makes it easy to edit hidden elements, modify finished graphs, and cut and paste code to future projects. Though the methods take time to learn, in the long run Lilypond saves time, energy and frustration, all the while creating stunning output. The tools and examples in this article should put you well on your way to creating beautiful Schenker graphs and some other forms of advanced musical notation with this great application.
Resources for this article: /article/8583.
Kris Shaffer lives in New Haven, Connecticut, where he is pursuing a PhD in Music Theory at Yale University. An open-source enthusiast as well, he has written for Linux.com, NewsForge.com and OSNews.com. Kris is also co-founder of www.AmSteg.org, an on-line community for composers and music theorists, which is making its debut in Fall 2005. His personal Web site is www.shaffermusic.com.

