
Cooking with Linux - Wherefore Art Thou, Oh Access Point?
Yes, François. The access point by the fireplace is much better for you to connect to. The ESSID? It's cmfireplace. You'll see it in the list if you scan for it. Quoi? Mon Dieu, François, you aren't actually editing a script, are you? Although I admire your desire to get comfortable with the shell, it would be much easier for you to select the scan for the access point, select, click and go.
Ah, I see! The Linux driver for your card doesn't support scanning. Yes, I had a similar problem with mine, but I have a solution. I'll show you in a little while, but time is short and our guests will be here any moment. To the wine cellar, François. Head to the South wing of the cellar and bring back the 1983 Batard Montrachet. Vite!
Welcome, mes amis, to Chez Marcel, home of exceptional Linux fare, fine wines and wonderful guests, of course. Before you arrived, my faithful waiter and I were discussing some problems we have experienced with our wireless cards. My own notebook's wireless card worked fine on my home network, but it worked only so well. The standard Linux Orinoco driver that supported the card didn't allow for things such as scanning. Every month, I went down to the TV studio to record a show, and every month I had to ask which wireless router I could use, because I had to enter the information manually into the network configuration file, ifcfg-eth2.
Of course, the Windows driver for the wireless network card supported these features, and as sometimes happens, manufacturers aren't 100% forthcoming with information or specifications to make full Linux support easy. I truly admire the incredible talent and energy of Linux developers who provide Linux with excellent drivers while working in a vendor black hole. Nevertheless, this lack of information was the impetus for the NdisWrapper Project, which makes it possible to use Windows Ndis drivers by way of a loadable Linux kernel module.
Here's how it works. First, you'll need to get a copy of NdisWrapper from the project's Web site (see the on-line Resources) to guarantee you use the latest version. That said, if you have a recent Linux distribution, check your CDs first. You may find you already have the software. Second, you need the Windows drivers that came with your card, specifically the INF file for that card.
Here's an example from my own Presario notebook, which came with a built-in LanExpress card. Under Linux, connectivity was supported by the Orinoco driver, but as I mentioned, scanning did not work. Because I never actually installed Windows on my notebook—it was there, but I put in a Linux CD before I ever booted the unit, so I never had Windows working on it—I went to the HP Web site and downloaded the driver file in a self-extracting EXE file. I used CrossOver Office to extract the package and then navigated to the folder where the package was located. Using NdisWrapper, I installed the driver by way of its INF file; this must be done as the root user:
ndiswrapper -i NetWlan.INF
Installing netwlan
Looking at the output above, it doesn't look like a lot has happened. By using the -l option, we can find out what drivers have been loaded and the status of those drivers:
ndiswrapper -l
Installed ndis drivers:
netwlan driver present, hardware present
The next step is to load the driver into the running kernel, which is done by loading NdisWrapper itself:
modprobe ndiswrapper
The net result of this can be seen by looking at the output of the dmesg command:
ndiswrapper version 1.2rc1 loaded (preempt=no,smp=no)
ndiswrapper: driver netwlan (LAN-Express,01/18/2002,1.07.29.20118) loaded
ACPI: PCI interrupt 0000:00:09.0[A] -> GSI 10 (level, low) -> IRQ 10
ndiswrapper: using irq 10
wlan0: ndiswrapper ethernet device 00:02:8a:a9:e6:eb using driver netwlan,
configuration file 1260:3873.5.conf
ndiswrapper (set_auth_mode:584): setting auth mode failed (C0010015)
wlan0: encryption modes supported: WEP
Excellent, we now have the Windows driver loaded into our Linux system and are ready to go. To have all this happen magically at boot time, I added the steps, minus the dmesg, to my rc.local file.
Now, you could get a list of wireless access points near you by using the iwlist command with the scan option. Assuming a wireless interface at eth2, the command would be iwlist eth2 scan. I then could use the iwconfig command to attach to my network of choice, assign an IP address and so on. However, it also would be nice for the whole desktop experience to have a graphical alternative, one that could scan for networks, report on the quality of the signal and then offer a means of connecting to the service you choose. The notebook, after all, also is a desktop tool.
One of the best such tools I've found is Pawel Nawrocki's Wireless Assistant. This is a great-looking little program that lets you scan for available wireless networks and then connect to them with a single click. Each identified network is identified by factors such as link quality and encryption. The application can be configured to handle WEP keys automatically, ignore various types of networks (ad hoc or encrypted), automatically run a script upon connection and more. Figure 1 shows the application in action.
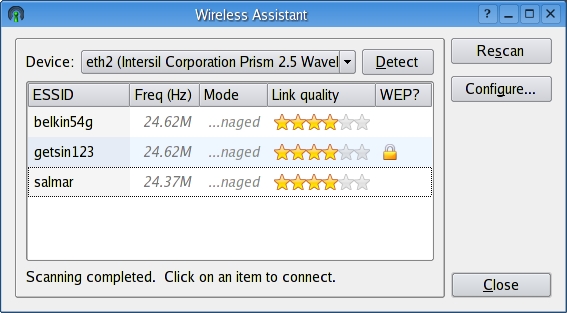
Figure 1. Wireless Assistant is a tool to scan for and attach to wireless networks.
The Wireless Assistant Web site (see Resources) has source code available as well as binary packages for several distributions. By the way, I must mention right now that the SourceForge site has only code available. If you want to track discussions on the package, the KDE-Apps.org (see Resources) site is the better place to look for that information. Building the application from source is a classic extract-and-build five-step:
tar -xjvf wlassistant-0.3.9.tar.bz2
cd wlassistant-0.3.9
./configure --prefix=/usr
make
su -c "make install"
The actual program name is wlassistant. When the package first starts, it automatically checks for your active network device. If it doesn't, click the Detect button. If you still are having problems, it is possible that the path to the wireless tools hasn't been set properly. Click the Configure button and a configuration dialog appears. In the left-hand sidebar, categories of options are listed while the actual changes take place in the larger right-hand window. Click the Paths button to confirm the pathnames to the wireless tools commands (Figure 2). You can either enter them manually or click the Detect button.

Figure 2. Use Wireless Assistant's configuration dialog to set the pathnames to the wireless tools.
While you are in the configuration dialog, take some time to examine the other options at your disposal. When you are happy with the settings, click OK to return to the main Wireless Assistant window. If you haven't already done so, click Rescan to locate your available access points (Figure 1). As you can see from the image, a handful of networks are available for me to choose from. The display also shows whether an access point uses WEP encryption; this is always a good idea unless you actually want to provide open access to whomever comes your way.
Click the entry of your choice and a box appears so you can enter the root password (Figure 3). Your connection now is established. That's all there is to it.

Figure 3. Before switching your network settings, you need to provide the root password.
When I was visiting clients and tying into a variety of networks, I created a little script that copied ifcfg-ethX and network back and forth, depending on the site I was visiting that day. It worked, but it wasn't the most elegant solution. In the world of wireless connections, this hasn't changed. If you are moving from access point to access point, office to office and then back home, you're going to want some kind of help in maintaining all those different profiles. This is true whether you are dealing with wireless or one of those old-fashioned wired connections, non?
This is the idea behind Per Johansson's netGo (Figure 4). netGo is a great little application that lets you create network profiles of all kinds and then switch between them with a single click. When not in use, the application docks into your system tray. The program itself is a Qt application, but it works equally well with KDE or GNOME and others.
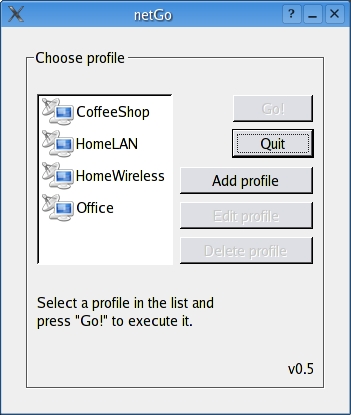
Figure 4. netGo makes it easy to set up and maintain a number of network profiles.
To get your copy, head to the netGo Web site (see Resources). If you choose to build from source, this is your basic extract-and-build five-step, so nothing too scary here. To run the application, run the command netgo. You are asked to provide the root password at this point so that you can make network address changes later.
At first, the main window doesn't contain any profiles. To start the process, click the Add profile button and a new window appears (Figure 5). At the top, enter the profile name, for example, HomeLAN or CoffeeShop, and then choose an interface card; many notebooks have a built-in 10/100 Ethernet card in addition to the wireless card. For connections that require a static IP address, fill in the information in each of the fields for IP address, Netmask and so on.
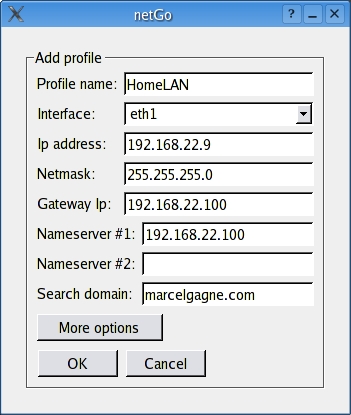
Figure 5. Entering connection details for a netGo profile.
When you are done, click the OK button to save your profile. If the connection you are setting up is wireless, click on the More options button. There, you can enter the network mode—ad hoc, managed, none—the ESSID and the WEP key. Notice also the Custom script field. This provides a means of automatically executing a series of commands, such as a custom firewall script, when bringing up the interface. Click the Back button to return to the main configuration screen.
Continue adding as many profiles as you need in the same manner. To activate a profile and apply your network settings, click on the profile name and then click the button labeled Go! to apply the changes. A status window then appears displaying the new settings (Figure 6).

Figure 6. netGo reports back on the changes that were made as the profile executes.
The only real drawback I've found to netGo is it doesn't currently provide for taking down your second interface, so this still needs to be done manually if needed. But according to Per's Web site, this feature is in the works as I write this column.
It would appear, mes amis, that closing time has arrived, if that clock on the wall is to be believed. Nevertheless, I'm sure that François won't mind if we keep the doors open a little longer; time enough to refill your glasses one last time. We even can bring out a little of that double-butter Brie to accompany the wine. As we all are running wireless tonight, perhaps everyone can carry their notebooks outside to the patio where we can enjoy the evening before we all head home. Please raise your glasses, mes amis, and let us all drink to one another's health. A votre santé Bon appétit!
Resources for this article: /article/8398.
Marcel Gagné is an award-winning writer living in Mississauga, Ontario. He is the author of Moving to the Linux Business Desktop (ISBN 0-131-42192-1), his third book from Addison Wesley. He also makes regular television appearances as Call for Help's Linux guy. Marcel also is a pilot and a past Top-40 disc jockey. He writes science fiction and fantasy and folds a mean Origami T-Rex. He can be reached via e-mail at mggagne@salmar.com. You can discover a lot of other things (including great Wine links) from his Web site at www.marcelgagne.com.

