
Cooking with Linux - The Ultimate in Small Linux
Honestly, François, why does ultimate always have to mean bigger, faster and more resource-intensive? Mon Dieu, sometimes all this speeding up just seems to make things work more slowly. Although I think your idea of building a supercomputer cluster in the restaurant would be a wonderful idea for this month's Ultimate Linux Box issue, there simply isn't room. The wine cellar? Non, François, the wine cellar is for wine and I would like to keep it that way, and I'm sure our guests would agree. Speaking of which, they will be here any moment.
Ah, François, they are already here. Welcome, everyone, to Chez Marcel, home of the world's greatest wine cellar and of course, the best in fine Linux fare. Your tables are ready. Please sit and make yourselves comfortable. François, to the wine cellar! Please bring back the 2003 Auslese Riesling from Germany. Vite!
While my faithful waiter fetches the wine, let's take a look at another definition of what constitutes the ultimate Linux box. François suggested a supercomputer. I was thinking of something much smaller, but nevertheless extremely useful—something small enough to fit in my pocket. On more than one occasion, I've been saved by having a copy of Linux with me. Actually, the person saved was usually a user of another OS who had the kind of trouble that only a Linux system could help them out of. The mini-distributions I carried with me tended to be single-diskette (sometimes two or three) distributions with basic text-based tools. Today, I want to introduce you to a couple of excellent ways to take Linux with you wherever you go. These mini-distributions are no longer stripped-down sets of text-based tools, but fully graphical, fully networked distributions that still can fit in your pocket or wallet. Best of all, they can run entirely from a live mini-CD or USB key.
The first item on the menu is one of my personal favorites, the cleverly named Damn Small Linux (DSL). DSL is a Debian-based distribution built using live CD technology. The whole thing is less than 50MB and can fit on a business-card-sized CD, which you can get at your local computer or office store. Download your ISO image (see the on-line Resources), burn it to a CD (it easily can be a standard CD as well as the business-card size), and reboot your PC.
DSL is extremely light and fast. It uses Fluxbox for a window manager. You can run it on modest hardware with very little memory—as little as 16MB. DSL comes with a number of desktop applications, all of which are designed to be equally light and fast. There are Dillo and Firefox Web browsers, Sylpheed for e-mail, an instant messaging and IRC client called Naim, XMMS for music, Xpaint for graphical editing and screenshots, FLwriter for word processing, Siag for spreadsheets and a host of others. Check out Figure 1 to see DSL in action.
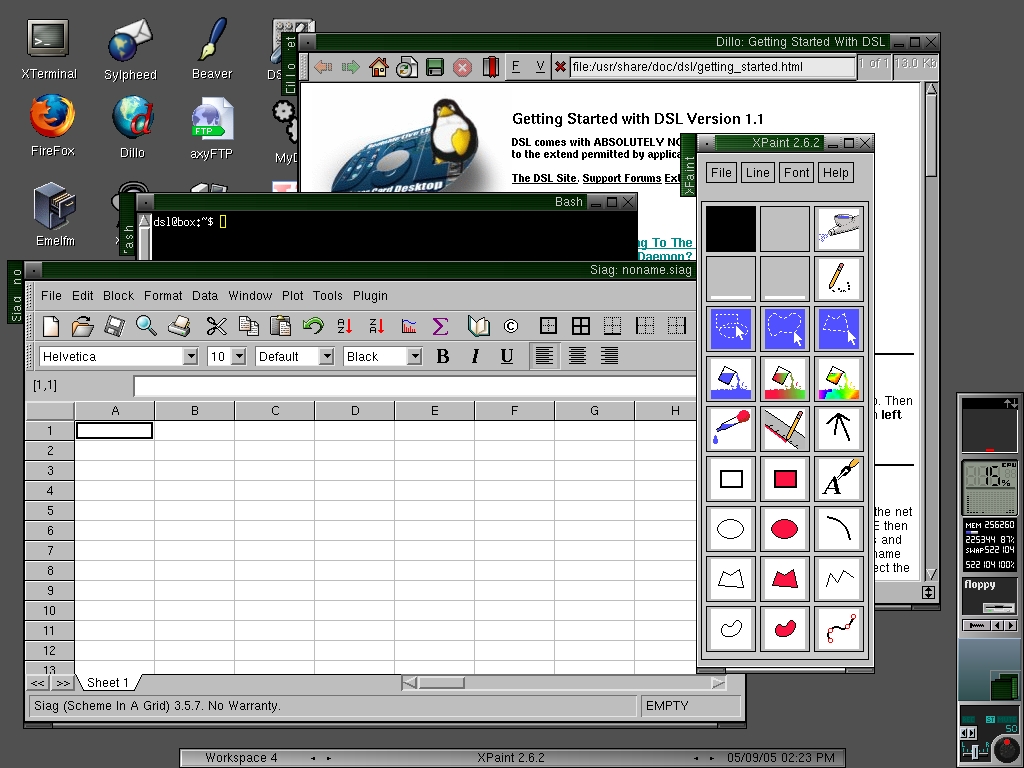
Figure 1. DSL provides a rich but resource-lean desktop experience.
There is no program starter button in the lower left-hand corner with this distribution. To bring up the menu, right-click anywhere on the desktop and the top-level application menu appears offering you several submenus covering everything DSL has to offer. To banish the menu, left-click on a blank portion of the desktop.
One of the first things you probably want to do is set up networking. Right-click to bring up the menu, select System, then Net Setup. The options there include dial-up, network card configuration, DSL (the other DSL) and some wireless support as well. ndiswrapper is included for those cards that support only Microsoft drivers. All of these network choices are menu-driven; simply fill in the blanks.
Speaking of the System menu, look under Daemons and you'll discover another rather amazing aspect of DSL. An SSH server, NFS, a Web server and an FTP server are there as well. Printer dæmon support also is available using classic LPD.
In all of this, DSL still manages to include some desktop eye-candy. From the Desktop menu, navigate over to Styles and you can choose from a small handful of alternate looks.
Before I move on to the next item on today's menu, let me direct you to the Tools menu under Apps. Look near the bottom and you'll see an option to install DSL to a hard drive, which can be pretty tiny, as well as one to install it to a USB pen drive so you can carry it with you. There are also menu items to enable apt and Synaptic so you easily can install other packages. The usefulness of this is obvious if you install to disk, but look back to the top of the Tools menu for another reason.
The option is labeled Make myDSL CD remaster, and with it you can create your own custom-DSL distribution. When you click on this option, another window appears with instructions on how to change to runlevel 2 to remaster. In effect, you need to reboot and type dsl toram 2 at the boot prompt. Then, when the shell prompt appears, type mkmydsl. This process is somewhat beyond the space I have alloted, but I direct you to www.damnsmalllinux.org/talk/node/113 if you want to roll your own DSL.
Another tiny graphical Linux you might want to look at is Puppy Linux. This fully networked distribution also comes with a bevy of applications. In terms of networking, Puppy comes with Mozilla for Web browsing as well as sending and receiving e-mail with Sylpheed, SSH for remote administration, Gphone for VoIP calls, VNC and rdesktop clients to control remote desktops and much more. AbiWord is included for word processing, as is the Scribus desktop publishing application. There are file managers, graphic editors, HTML editors, a spreadsheet program, a personal finance application and more.
There's also a small handful of games. Bubbles, somewhat reminiscent of Frozen Bubble, is a lot of fun, as is gtkfish. That last one is a strange little game were you go fishing with a tissue-paper net. If the fish move too fast when you catch them, they break the net. Click the left mouse button to drop the net below the water and go for the slow-moving fish. Release the mouse button to catch the fish. It's very strange and yet strangely addictive.
For a copy of Puppy Linux, go to the Web site and download the latest ISO image (see Resources). Use your favorite CD burning tool (I tend to like K3b) and create your CD. When you have your freshly burned CD in hand, pop it in to the drive and reboot your system.
When Puppy Linux starts up, the first thing you'll see is a keyboard selection screen. I scrolled down to us qwerty and pressed Enter. It then asks for your mouse type. In all likelihood, you simply can accept the default choice made for you, in my case, ps/2. The program then asks if you have a scroll wheel. Immediately after this, the graphical desktop starts, offering you a chance to select the video mode you want to use whether it be 648x480, 800x600 and so on. The resolution will change on the fly and you can lock it in by clicking OK at any time. That's it. Your Puppy Linux system is up and running (Figure 2). You even can remove the CD at this point.
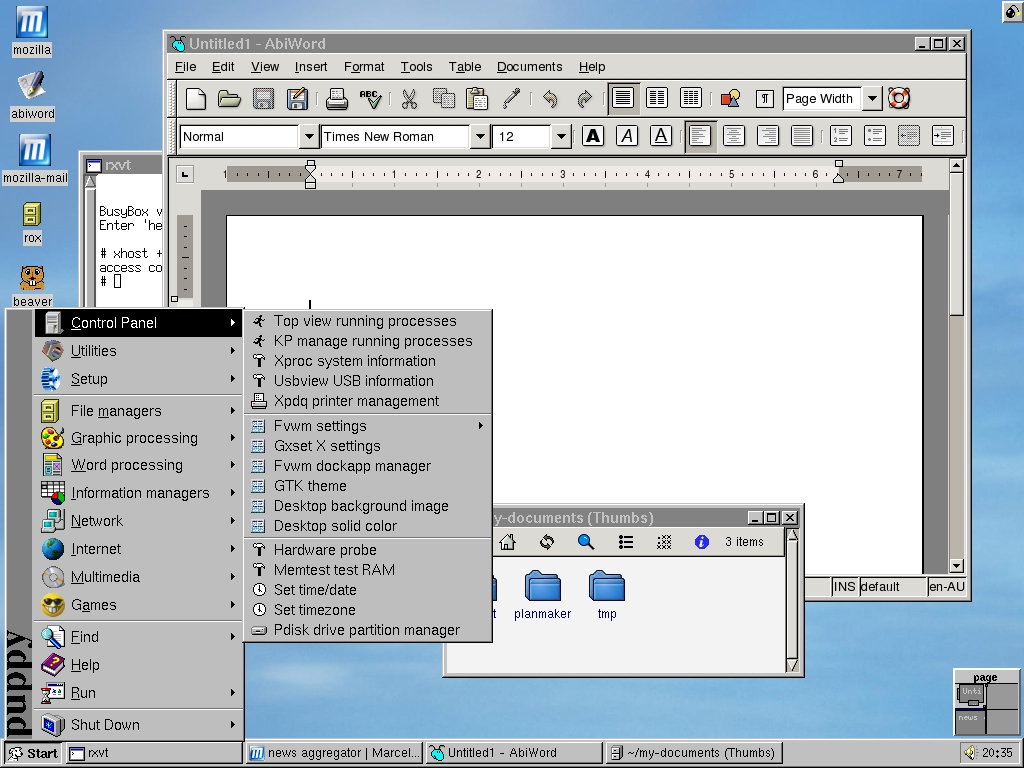
Figure 2. Haven't you always wanted a Puppy—Linux, that is?
On the Puppy Linux page, there's a statement that effectively says you can install Puppy to anything whether it be a hard drive, a Zip disk, on a network (to boot a thin client) or a USB key, much like DSL. That's the one that really got me excited. I kind of like the idea of carrying a fully graphical Linux system in my pocket. Besides, Puppy, in its default configuration, is too big to fit on a 50MB business card without some tweaking (more on that).
Click the Start button then head to the Setup menu. Under that heading and near the bottom, you'll find some rather interesting options, one of which is to install Puppy to USB card. Choosing this brings up a dialog that takes you through the various steps from plugging in your USB key to selecting a drive (if you have more than one plugged in), choosing a partition and finally copying the files. The copy itself can take place from local files on the hard disk or the live Puppy CD that you booted from.
The next step takes a few minutes while various files are copied (vmlinuz, image.gz and usr_cram.fs). After the copy is complete, you are asked to choose a default keyboard language. I chose us and pressed Enter. You have one more choice to make after this point and that's to decide how the Puppy filesystem is stored. The first choice is a vfat partition mounted as /root with no other changes. The second creates a small ext2 filesystem on the partition. This is the preferred choice and a more efficient one. The first option does have the advantage, however, that its files can be seen under Windows. I chose option 2 and pressed Enter.
Now that Puppy is installed to your USB key, you can edit the boot-up script to provide a password to an encrypted filesystem. This is an excellent idea if you want an additional level of protection in case your USB key is ever lost or stolen. Finally, your USB drive is made bootable and you are ready to take your Puppy for a walk (Figure 3).
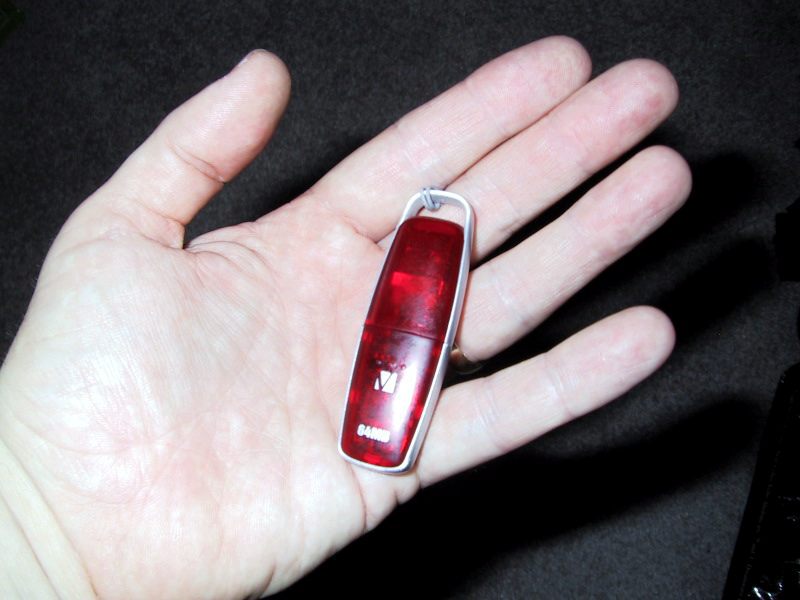
Figure 3. The definition of take-anywhere Linux: Puppy Linux on a USB key.
A word of caution though—not every PC knows how to boot from a USB drive, although you may be able to change the boot device settings in your BIOS if it doesn't work immediately. If your PC still doesn't support a USB drive boot, there is still hope, assuming you have a diskette drive. On the Puppy site, there is a boot image (called boot2pup.img.gz) that you can copy to a diskette. Uncompress the image, then copy it:
gunzip boot2pup.img.gz
dd if=boot2pup.img of=/dev/fd0
Now, just make sure you carry this diskette with you as well.
Before I wrap up this exploration of Puppy Linux, I want to tell you about another great little feature. Under that Setup menu is an option labeled Remaster Puppy live-CD. This is a simple script that takes you through the various steps necessary to copy your existing CD into RAM (so you need at least 256MB for this), edit the filesystem, recreate the image and finally, burn it to a CD.
It takes a couple of tries to get the hang of it, but all in all, it's not a bad process. One strange step asks you to confirm your CD burner and reader. It is at this point that Puppy will reboot (yes, I know it sounds strange for a live CD) in order to turn on SCSI emulation. When the system is back up, return to the Setup menu and restart the remaster program. It should jump immediately to step three where you'll be asked to insert the CD into whichever device you identified as the reader. What follows is a question-and-answer session that lets you define exactly how you would like your next version of Puppy to appear.
As I mentioned, it can take a little time to get the hang of this, but treat it as a hobby project, and you'll be a pro in no time. When you have finished creating the new ISO image, Puppy launches the Gcombust CD burning program to let you finish the job.
Mon Dieu! Is it that time already? The clock seems to be telling us that closing time has arrived. No need to rush though. Relax a little longer as I am sure François would be more than happy to refill your glasses. Grab one of those business-card CD blanks and cook yourself up a little Linux to take home with you. Please raise your glasses, mes amis, and let us all drink to one another's health. A votre santé Bon appétit!
Resources for this article: /article/8326.
Marcel Gagné is an award-winning writer living in Mississauga, Ontario. He is the author of Moving to the Linux Business Desktop (ISBN 0-131-42192-1), his third book from Addison Wesley. He also makes regular television appearances as Call for Help's Linux guy. Marcel also is a pilot, was a Top-40 disc jockey, writes science fiction and fantasy and folds a mean Origami T-Rex. He can be reached by e-mail at mggagne@salmar.com. You can discover a lot of other things (including great wine links) from his Web Site at www.marcelgagne.com.

