
A Motherboard Upgrade HOWTO
Back in February 2005, I wrote an article for the Linux Journal Web site about re-mastering Knoppix. In that article, I noted that everything passed to/from a support box. During this process, I found myself regularly bumping into the limitations of my support box. So I started to look at the issues involved with replacing the motherboard in the support box.
When considering a motherboard upgrade, the first question to ask is if the upgrade makes financial sense. If you made a list of what goes into a local dealer's white box PC clone and then priced out what those component parts cost on their own, you usually would discover that the individual parts cost significantly more that the clone PC. If your PC has a lot of issues that need to be addressed and you aren't happy with much in your current PC, you may be better off buying a basic PC clone. Then, you simply could move the parts you consider to be of value over to the new system.
Another point to consider is that many name brand PCs--Dell, HP and others--are infamous for using not quite standard cases and/or power supplies. So, even if you are happy with your current case and/or power supply, you may need to replace them as part of a motherboard upgrade.
In my case, I got an excellent deal on a 160GB hard drive in early 2005. Although it's not the pinnacle of storage solutions, 160GB is much better than the 8GB drive I had been using. This left me with the problem of how to use the 160GB drive, because my support box's BIOS did not support hard drives that large--and the BIOS could not be upgraded. Promise Technology Inc. helped out here with its Ultra133 TX2 card that allows old PCs to support large hard drives. The card would not accelerate my slow CPU chip, however, and the card cost is a large percentage of upgrade I had in mind. So for me the card option did not make sense.
Going into this project, I had many components that I was happy with and could use in the upgrade--a hard disk, a CD-ROM burner, a video card, an ATX-style case, a power supply, a monitor, a keyboard and a mouse. This left only the CPU, motherboard and memory to be replaced, the later driven by the fact that current-generation CPU chips do not support memory as slow as the memory in my current system. At this point, it was time to go shopping.
The first choice to be made concerned the CPU chip. Current motherboards are keyed to certain CPUs, so you cannot use an Intel CPU in a motherboard designed for an AMD CPU and vice versa. That explains why I picked the CPU first. Because of the things I wanted to re-use, I decided to go with an x86-compatible CPU. The current AMD CPUs seem to be offering slightly better bang-for-the-buck than the Intel CPUs, so I focused on AMD. When it comes to CPU speed, keep in mind that, as of this writing, the latest AMD Athlon CPU costs about seven times as much as the cheapest current AMD Sempron CPU. In the Intel world, the latest Pentium 4 costs about four times as much as the slowest current Celeron. The question here is, will you get a machine that is 7 or 4 times faster for your money? The answer is no. On most benchmarks, you are likely to see less than a doubling of speed. Although it's nice to have bragging rights at the local user group, you are paying an absurd premium for extra performance that isn't worth the money in any normal situation. Having settled on a low-end Sempron 2400+ CPU chip, which came with a heat sink and fan, I now was ready to look at motherboards.
I wanted a motherboard that didn't have on-board video. It may seem odd that I was willing to pay a little bit more not to get a certain feature in a motherboard. And, yes, a separate video card does add a few dollars to the total cost of the system, but it also bypasses some hassles. In my experience, on-board video motherboards tend to cut too many corners, resulting in lousy X performance and/or trouble with support under X. I ended up going with an Asus model A7V8X-X motherboard. It was about the least expensive motherboard that had everything I wanted--AGP slot and six expansion slots--and none of the stuff I didn't want--on-board video. The only small oddity with this Asus motherboard is the audio, which was not supported until the 2.6 series Linux kernels. This would be an issue, however, only if I planned to install an old Linux distribution.
Once the CPU and motherboard were decided, I was able to decide on the memory, which is a choice that depends on the CPU and motherboard components.
In French cooking there is a term, mise en place, that refers to the practice of having all the ingredients you will need while preparing a recipe prepared and measured before you start. By doing all the prep work ahead of time, you can stay focused on cooking once you start and not be distracted by needing to chop a bell pepper while in process. There may not be a comparable term in motherboard upgrading, but the idea is an excellent one. Have all the parts and tools set out beforehand, so once you start the upgrade process you do not have to stop to find, say, the right kind of screwdriver.
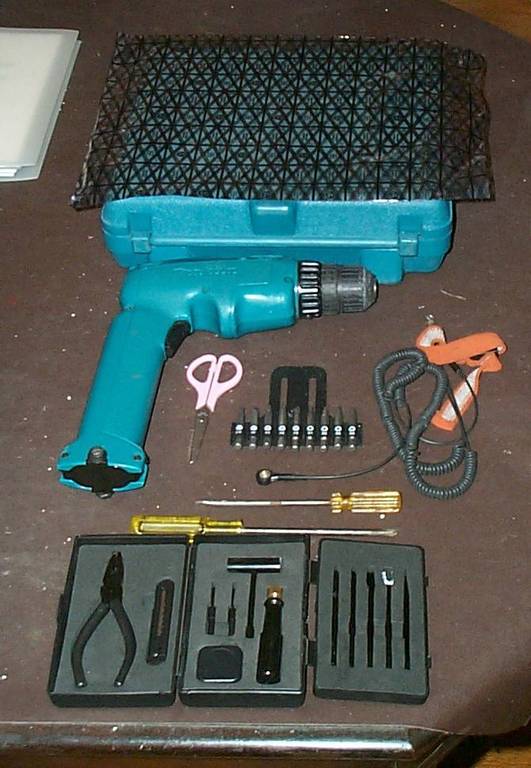
Figure 1. Tools laid out for the upgrade: the screwdrivers--manual and power--small pliers, grounding strap, scissors and large anti-static bag.
When it comes to tools, your first pick should be a simple, old-fashioned Phillips #2 hand screwdriver--it looks like a plus sign--as this is the screwdriver of choice for almost all PC makers except Compaq. A pair of scissors to open up packaging is a necessity, as is a flat screwdriver to use as a small pry. You also may need a small pair of pliers to use on difficult to remove screws. There always seems to be a few screws in a PC that a rechargeable power screwdriver cannot reach, so the power screwdriver should be seen as a nice supplement to but not a replacement for the manual screwdriver. You want to pay attention to grounding, so a grounding strap is desirable. You also should have a large anti-static bag on which you can lay the parts you remove from the PC. If you are taking parts off a Compaq PC, you also need to have a Torx T-15 screwdriver.
The first precaution you need to take is to keep pets and/or children away from the area in which you perform the upgrade. To avoid producing static electricity, you should avoid wearing synthetic fabrics, fur or wool during the upgrade process. In addition, the air should be humid enough that static electricity is not an issue but not so humid that water is condensing, so a humidifier/dehumidifier may be needed. Next, find a comfortable, well-lit, uncarpeted space with room to set out your tools and your computer. If you cannot avoid working on a carpeted space, anti-static carpet sprays are available and should be considered. In my case, I was able to work on the uncarpeted wood floor in my dining room, away from my cat. I pushed the dining room table to one side of the room, and the setup was nearly perfect. Next, I set out the tools I would need on one side of the table. The parts went on the middle of the table, along with a box with small parts from past upgrades, a set of Linux install CDs and my home network notebook, in which I keep track of how I have set things up in the past. I placed the old support box at the end of the table.
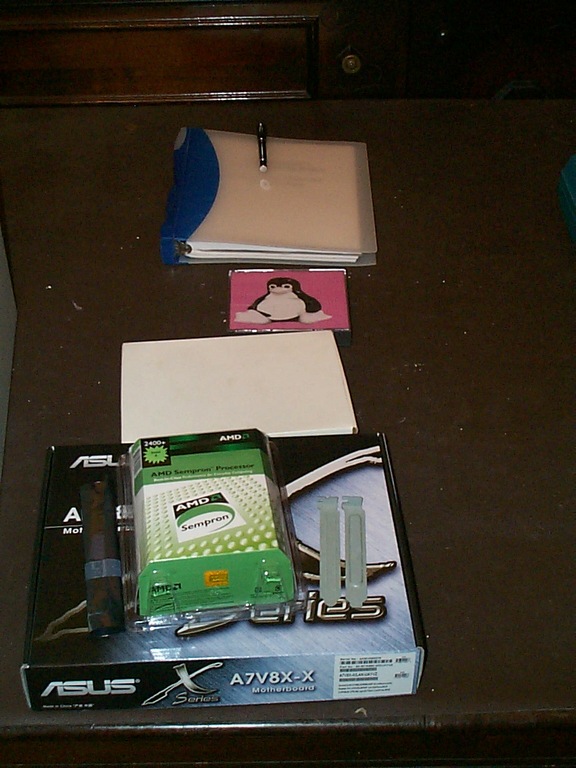
Figure 2. Parts for the upgrade laid out: the CPU, motherboard, memory, expansion slot cover, extra screws, Linux install disks and notebook.
Most manufacturers normally are good about building parts so that they work smoothly with other firm's parts. This means that if two parts do not want to go together, odds are you are doing something wrong, and it is time to take a break and sit back to figure out what you are doing wrong. Review the documentation that came with you CPU and motherboard; you may be surprised at some of what you read. I was surprised, for example, by how AMD suggested attaching the CPU heat sink to the motherboard.
When you are ready to do the upgrade, make sure the computer is unplugged from everything external--power, video, sound, everything. The next steps revolve around opening up the case. As there seem to be 1,001 different case designs out there, I cannot offer specifics here, only some general suggestions. For most cases, though, you should find the screws holding the case closed to be on the back of the machine. I have seen some cases, however, that had the screws hidden behind a snap-on front cover.
Once the cover is off, start unplugging the wires that go to the motherboard. You should a latch on the side of the power supply connector that must be pressed as you pull off the connector. Similarly, many but not all of the CD-ROM audio cables have a latch the must be pressed while you pull to disconnect the audio cable.
My case has the motherboard on a drawer-type arrangement, so once I had the cables disconnected, I could undo one screw and slide the motherboard out of the case. With some cases, you must remove all of the expansion cards before you can remove the motherboard and the metal back plate that supports the motherboard. Regardless of their order, you need to remove the expansion card(s) and the motherboard on its back plate from the computer.
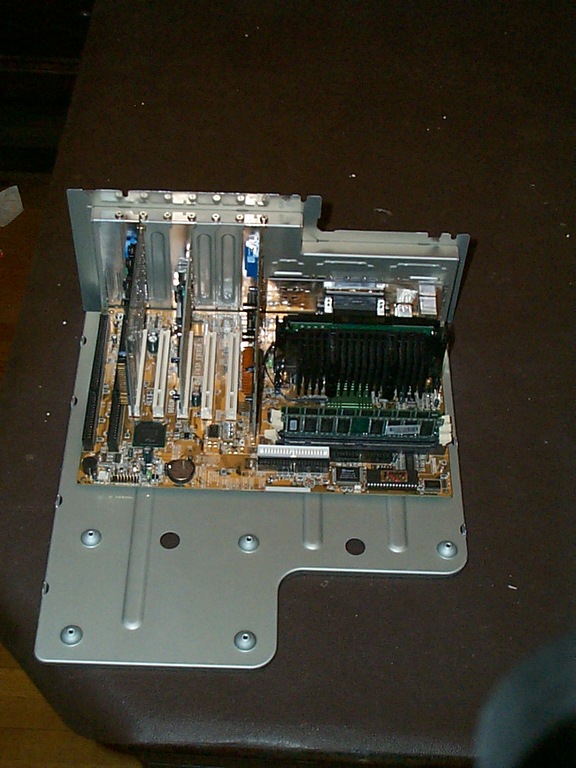
Figure 3. The old motherboard after having been slid out of the PC.
Once I pulled the motherboard on its little drawer out of the case, I hooked up and wore the grounding strap, which meant the chances of creating a part-destroying static electric shock was reduced greatly. As you remove parts from the system, set them aside on the anti-static bag. This reduces the chances of damaging any of the parts you plan to re-use. As for the working parts you're not interested in reusing now, they should be preserved because they could be of use to some charities and/or schools.
The place where the keyboard connector, USB connectors and so on stick out of the case is called the I/O shield. Most motherboards have a slightly different layout of connectors on the back, so there are different I/O shields. You need to replace the current I/O shield with the one included with the new motherboard. In my case, the old I/O shield would not come out without a nudge with the flat bladed screwdriver. The new I/O shield simply snapped into place; pay attention here to the orientation of the keyboard connectors. Above a few of the connectors are little grounding tabs that need to be bent far enough out of the way that you can slide the motherboard under them. But you do not want these tabs bent so far that the motherboard does not make a good connection; a bend of about 45 degrees should be good.
Slide the motherboard into place on the back plate, being careful to make sure the keyboard and other ports line up with the I/O shield. Make sure the grounding tabs are sitting on top of the keyboard/mouse PS2 ports instead of blocking them. Then, screw the motherboard into place using the screws you saved when you took out the old motherboard. Because I was using fewer expansion cards with this motherboard, I filled in the empty expansion slots with blank plates at this point. If you have the motherboard on a drawer, you may want to inset the video card now, as it is nice to see the card properly seated in its expansion slot. The problem with inserting the video card at this point, however, is some connectors, including the internal audio port, may be hard to access.
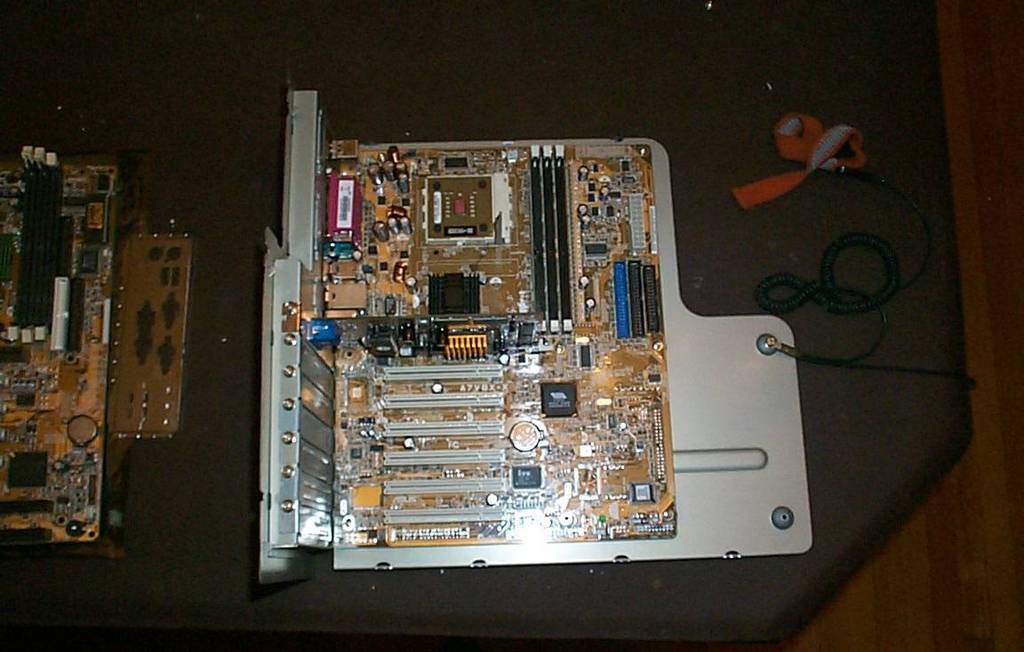
Figure 4. The new motherboard with the video card in place, the CPU in place but not latched and the heat sink not yet installed.
The memory card has an off-center notch that should line up with a tab sticking up from the memory slot. I tend to favour the memory slot furthest away from the CPU as my first pick for memory.
Now we are ready to insert the CPU chip; be sure to read the instructions included with the motherboard and CPU. Do pay attention to the orientation of the CPU chip relative to the socket, as a mistake here could cost you the motherboard and the CPU chip. Once the CPU chip is in place, it is time to attach the heat sink and fan to the motherboard. I was somewhat surprised to see AMD's recommendation to use a flat-blade screwdriver to push and pry the latch designed to hold the heat sink into place. I followed AMD's recommendation, though, and the heat sink went on quickly and perfectly the first time. Finally, connect the fan on the heat sink to a power connector on the motherboard.
You can remove the grounding strap at this point. Now, slide the new motherboard with its back plate into the case and screw it into place. The power connector is keyed so that it does not fit if positioned the wrong way, and any attempt to connect the power connector the wrong way is met with a lot of resistance. Now, connect the motherboard to the power supply. Run the audio cable from the CD-ROM drive to the audio connector on the motherboard. If you have not done so already, put in the video card.

Figure 5. The motherboard returned to the case. The round hard drive cables are visible in the lower right-hand side of the photo.
Two kinds of hard drive and floppy drive cables are available, keyed and unkeyed. The keyed cables have a little tab that sticks out on one side of the connector, and they cannot be plugged into their motherboard plugs the wrong way. The unkeyed cables can be plugged in the wrong way, with potentially disastrous results. If you have an unkeyed cable, you should see that one of the wires in the cable is a different color from the other wires--this is pin 1. Check your motherboard documentation to see which end of the connector is pin 1, and make sure the pin 1 side of the cable goes into that side of the plug. This trouble with cables explains why I favour the round hard drive cables--they are keyed so you cannot plug them in the wrong way, they are easy to snake around things and they look good.
Last to be connected are the wires to the front panel and speaker. At the end of each connector is some sort of label, for example POWER SW for the power switch. Getting these wires wrong is not likely to cause damage to the components, but they will not work. For the speaker, simply connect the black wire to the speaker pin on the motherboard. For the other connectors, the normal rule is each pair of wires has one white wire and one wire of some other color. The white wire should connect to whichever pin is listed as - on the motherboard, and the non-white wire should go to the +.
We're almost done. It's time now to double check all the connectors in the system. In my case, I found that the connector on the floppy drive had come loose and needed to be pushed back into place.
Now, without putting the cover back on, plug in the keyboard, mouse, VGA video and power cables; we can wait for the LAN and audio. Turn on the monitor, wait a few moments and then turn on the computer. If you get a message describing the video card followed by a message describing the BIOS, congratulations--you're almost there. If these messages don't come up, immediately turn off the power and start troubleshooting. Begin by double checking the cables and the power connectors and work out from there. If things did power up correctly, shut the machine down and then connect the network cable and the audio cable. Finally, screw on the case cover.
At this point you may want to decorate your case. AMD includes an AMD Sempron sticker that you may want to attach. I put a Tux case badge on my case in that 1" hole on the front; I bought the badge from ScotGold.com.
You now can turn on the system and start tweaking some BIOS settings. The motherboard manual notes how to get into the BIOS setup screen, but in most systems it is a matter of holding down the Delete key right after you turn on the system. Things you need to tweak include setting the system time and adjusting the CPU clock speed. Most if not all of the other BIOS settings should be fine.
If you want to take your updated system out for an immediate spin, drop a Knoppix disk into the CD-ROM drive, tell the BIOS to boot from the CD-ROM drive and go. Otherwise, either use the Linux install on an already-installed hard drive or start installing Linux via your favourite method--CD-ROM, across the network or otherwise.
At the end of all this, was it worth the effort it took to replace my computer's motherboard? The answer is yes. I got a much better machine for somewhat less than I would have paid to have someone else do the work; I got a mix of features I am happy with;, and I didn't have to deal with stuff I didn't want.
Colin McGregor (colin@mcgregor.org) works for a Toronto area charity, does consulting on the side and has served as President of the Toronto Free-Net. He also has been a guest speaker at Toronto Linux User Group meetings.
