
At the Sounding Edge: Introducing KeyKit
At the end of last month's column, I promised we'd look at some GUI-based tools for algorithmic and experimental MIDI music composition. Due to the vagaries of obsolete dependencies and software development time, I can focus on only KeyKit in this article. I hope you'll agree that this focus is well deserved.
KeyKit is a powerful MIDI composition and processing environment that includes an abundance of features and tools designed for conventional MIDI music-making--for example, MIDI sequencers and virtual drum machines--as well as for unconventional MIDI music-making. Indeed, for the Linux musician who wants to explore some exotic and unusual ways of composing with MIDI, KeyKit is required software.
KeyKit is available in source and compiled forms. Visit its Web site, read the latest news and then decide if you want to download the program. You must register to download KeyKit, but the registration procedure is painless and free. Download the Linux package, unpack it in your home directory and read the README.linux file. Then, become root and install the software with make linux_install.
After installing KeyKit, you should set two important KeyKit environment variables. KeyKit supports both ALSA (currently only MIDI Out) and OSS/Free devices, but you need to set the particular devices through these variables. Here are my own settings for KeyKit devices, kept in my ~/.bashrc file to define them at log-in:
export ALSA_RAWMIDI_DEVICE=hw:1,0

export MIDIDEVICE=/dev/midi00
Thus, when in ALSA mode, KeyKit sends MIDI data through my first virtual MIDI device (hw:1,0). When in OSS/Free mode, data is sent to the hardware port of my SBLive (hw:0,0 in ALSA). For audio output under ALSA, I connect the virtual MIDI port to a Linux softsynth or a VSTi plugin. Under OSS/Free, the device connects to only my external synthesizer hardware.
Please note that MIDI input is broken in the version of KeyKit, key73d, tested for this article. However, KeyKit does load and save standard MIDI files, so if you can record and save material as MIDI files, you can use them with KeyKit. It's not the best solution, but it's a workaround until direct MIDI input is fixed. KeyKit's MIDI output is fine for ALSA or OSS/Free.
Enter key at an xterm prompt, and KeyKit opens with a single main window that contains a large blank area and a window with a command prompt, KeyKit's language command console. KeyKit's interface is based directly on unadorned X11 graphics; that is, it is not based on a standard GUI toolkit such as GTK or QT. You have to learn some of its unique actions and controls before you can get too far with the program, but the interface can be learned easily and mastered quickly.
When KeyKit starts, the GUI is empty except for the console command window. The space outside the console window has no special name in KeyKit documentation, so I refer to it here as the main window. Left-click anywhere in the main window and KeyKit's main menu appears. The main menu groups include items for window management, Delete, Move, Resize; music functions, the Tools submenus; miscellaneous functions; page management; and window actions. Left-click to select an item from a menu or open a submenu. Click and drag a menu handle--the strip at the top of a menu window--to relocate the menu in the main window, and click the close button--the X in the top right corner--to close the menu window. Figure 1 shows KeyKit's default appearance after startup, with the main menu and a Tools menu open for inspection.
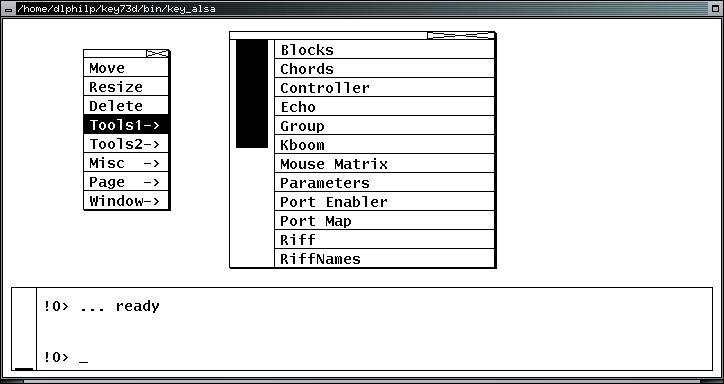
Figure 1. Default KeyKit with Menus
It's plain stuff indeed. Fortunately, you can redefine KeyKit's appearance in some useful ways. You can set basic colors with the Hues utility from the Tools2 menu. You also can "pull off" menu items to copy and relocate them anywhere in the main window for more convenient access. Figure 2 shows off a colorized KeyKit page running the Kboom tool with some menu items pulled off, a resized console window and two other items from the Tools menus made available for permanent access. Page layouts, including multipage configurations, can be saved and reloaded by using the Page submenu in KeyKit's main popup menu.
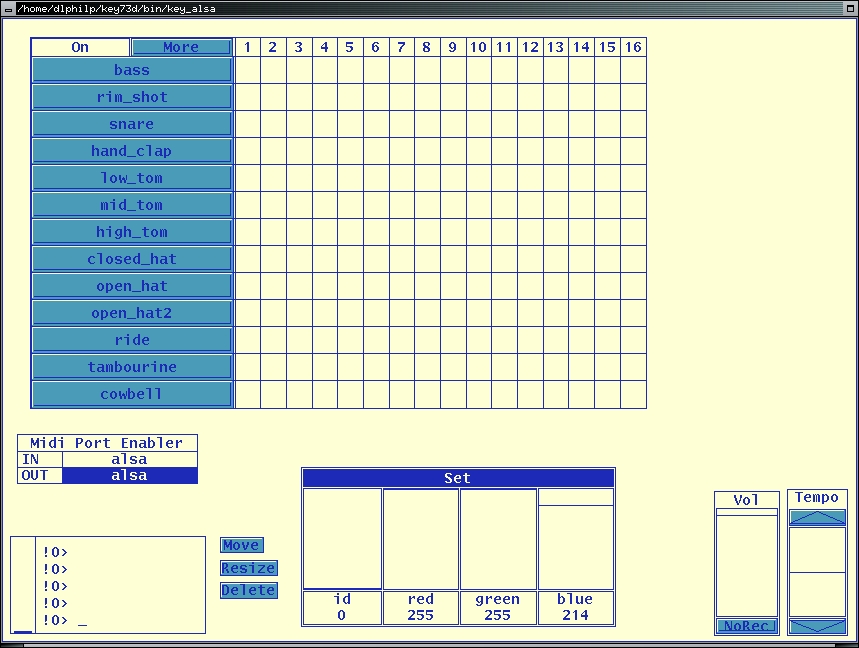
Figure 2. A Custom KeyKit Page
Check the default settings for the Port Enabler in the Tools1 submenu. In Figure 2, the Port Enabler is set up to send MIDI output through the ALSA device defined by the ALSA_RAWMIDI_DEVICE variable. Selecting the input device may freeze the application, so it has been left unselected for this example. After enabling the appropriate output port, KeyKit is ready to roll.
First, we are going to run two simple tests to become familiar with some more KeyKit interface conventions. Open KeyKit's main menu again and then open the Tools1 submenu. When the menu seen in Figure 1 appears, select the Riff item. The menus vanish now, and the normal cursor becomes what is called a sweep cursor. Click and drag the sweep cursor to define and size the Riff window and release the mouse key. The area outlined by the cursor now is filled with the contents of the Riff tool. Open the tool's More menu and select Load From File to load a standard MIDI file into Riff. The results should look something like Figure 3. The Riff data display window is similar to the typical piano-roll display found in many MIDI sequencers, with pitch represented by the vertical axis and duration represented along the horizontal. Toggle playback with the On button or start play by left-clicking anywhere within the data display. Right-click anywhere within the display to stop playback. KeyKit has many other playback options, but we are going to confine this simple example to the simplest methods.
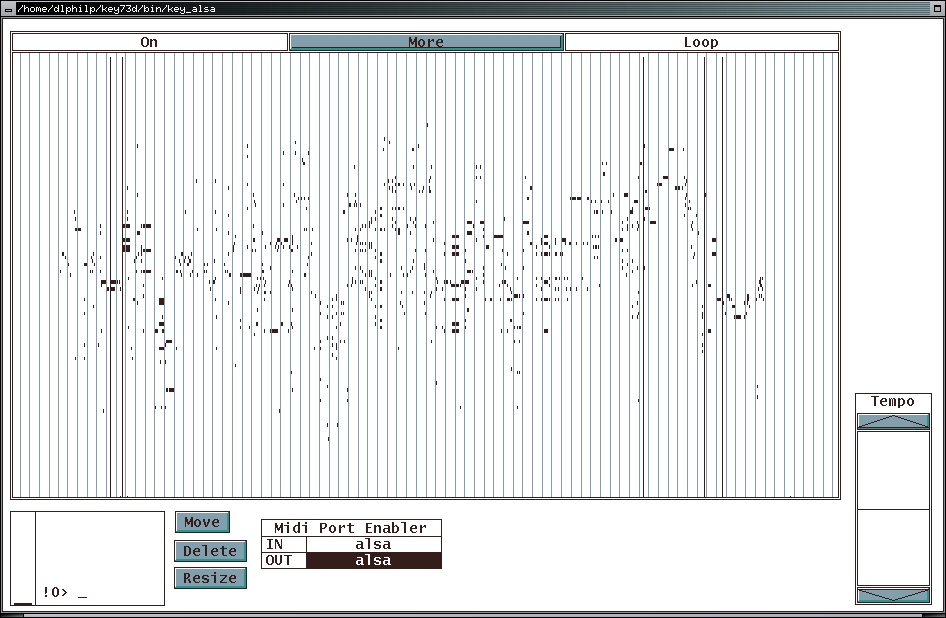
Figure 3. The Riff Tool
So KeyKit can load and play a MIDI file; that's nice. Now, let's look at something more substantial. Delete the Riff tool and then open and size the Kboom tool from the Tools1 menu. Kboom looks like a typical virtual drum machine (Figure 4), but its modest appearance conceals an interesting and useful set of tools within its More menu. As with most software rhythm programmers, Kboom lets you add and remove beats from the grid by clicking on a grid point. You could select, however, one of the Random items from the More menu and let Kboom program itself. This feature is handy for those of us who like to sculpt patterns from randomly generated parts. Kboom's other musically useful features include Shift and Transpose functions, but you'll have to check them out yourself. It's time to move to a more advanced KeyKit example.

Figure 4. The Kboom Tool
The Group tool from the Tools1 menu looks much like a track-oriented MIDI sequence editor. After loading a MIDI file into Group, you can view and edit its data in merged and per-track displays (Figure 4). But Group soon begins to lose its similarity to conventional MIDI sequencers, especially in its Edit functions. Scrolling through Group's Edit menu reveals some unusual functions and processes, such as BeatStep, Chordize, Evolve, Permutate and Stutter, along with more familiar sequence editing tools, such as Flip (invert), Reverse and Scale. Many tools have nested submenus for finer control over their processes. Figure 4 shows the Group tool at work with its Edit/Randomization menu unfolded to the detail level of its white noise generator.
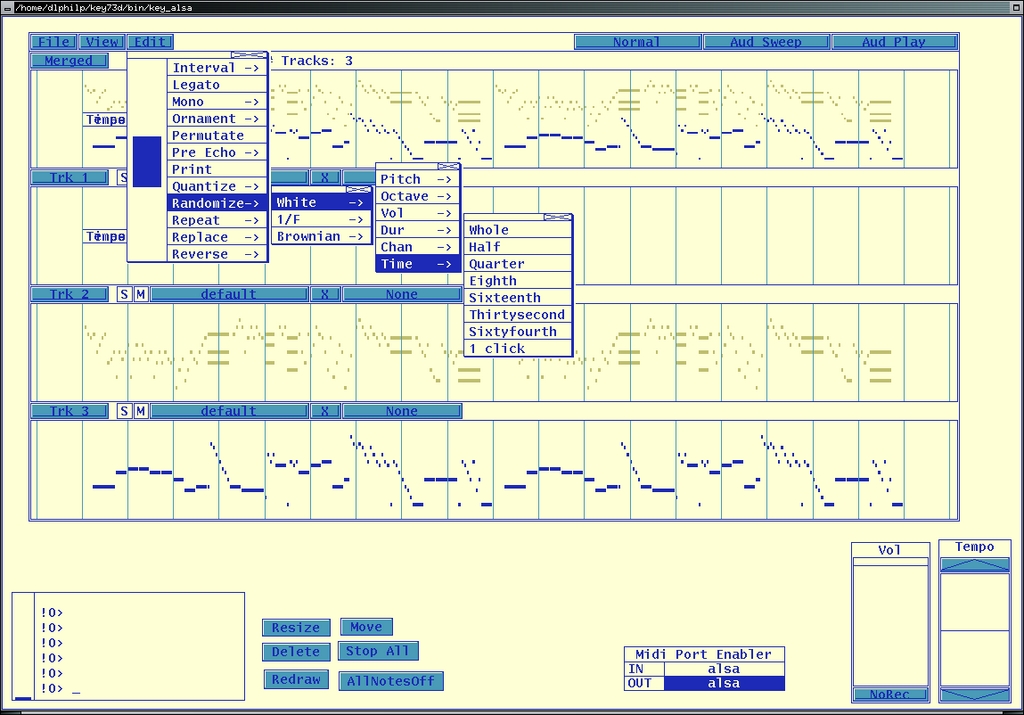
Figure 5. KeyKit's Group Tool
The lighter-colored events in the Merged and Trk 2 displays were selected with the Pick function in the Trk 2 menu. To pick something in KeyKit isn't merely a process of simple selection. Trk 2's Pick menu includes items for selecting by various event characteristics, including duration, volume and channel; by opposite state, such as making unselected events become selected and vice versa; and even for random selection.
Group is a powerful tool. Events can be selected variously per track, and an edit or series of edits can be performed on the picked events. Then, you can flip the pick status for all events and perform another edit or edits on the newly picked events. At any point in this process, you can save your work as a standard MIDI file, and you can save your page layout as a snapshot from the Page submenu.
You also can snarf the outcome of your edit session at any time. Snarfing is KeyKit's term for pasting a tool's MIDI data to a global data clipboard, making the snarfed data available to any other tool--you can run multiple tools. In the Group tool, snarfing is selected from each track's label menu, the buttons labeled Merged, Trk 1, Trk 2 and so on. Notice that you can choose to snarf all or only the picked events within a track.
KeyKit's Markov Maker (in the Tools2 menu) processes a MIDI file's data through a set of constrained variations known as a Markov process. This tool analyzes input and formulates output according to user-defined values called Set Sim and Make Sim. The Sim here stands for similar. Markov processes yield results that are closely related variants of the original input, making them especially useful for composers wanting to retain more-or-less strong identities between variations.
Click on the Orig button to access the Set Sim parameters. These values determine the analysis window size and temporal increment, the interval at which the window moves through the data. Click on the Sim button to set the Make Sim value; higher values yields longer sims. The Sim data display then fills with the results from the combination of input/output values (Figure 6). Toggle playback with the mouse buttons as described above, and remember to save your work.
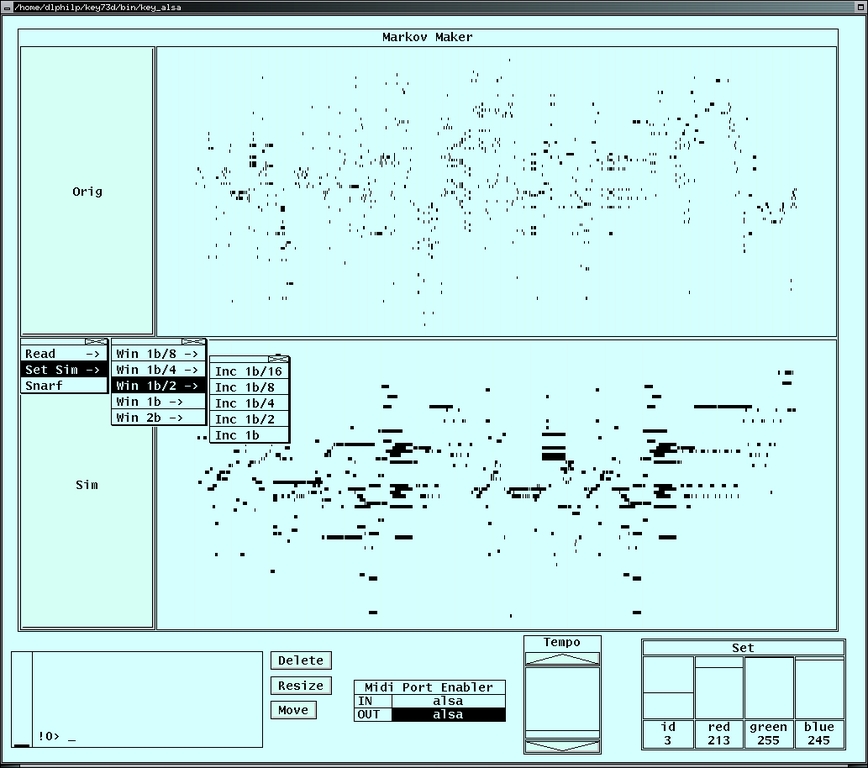
Figure 6. The Markov Maker
No experimental music toolkit would be complete without an image-to-sound converter, and KeyKit's PictSweep tool completes the kit here. PictSweep is another apparently simple tool that includes a respectable set of useful editing functions. Its More menu includes choices for scale selection, setting the key, thinning the color conversion and other musically useful processes. Alas, PictSweep's acceptable image type is restricted to PPM files, but those can be created easily with standard Linux graphics tools.
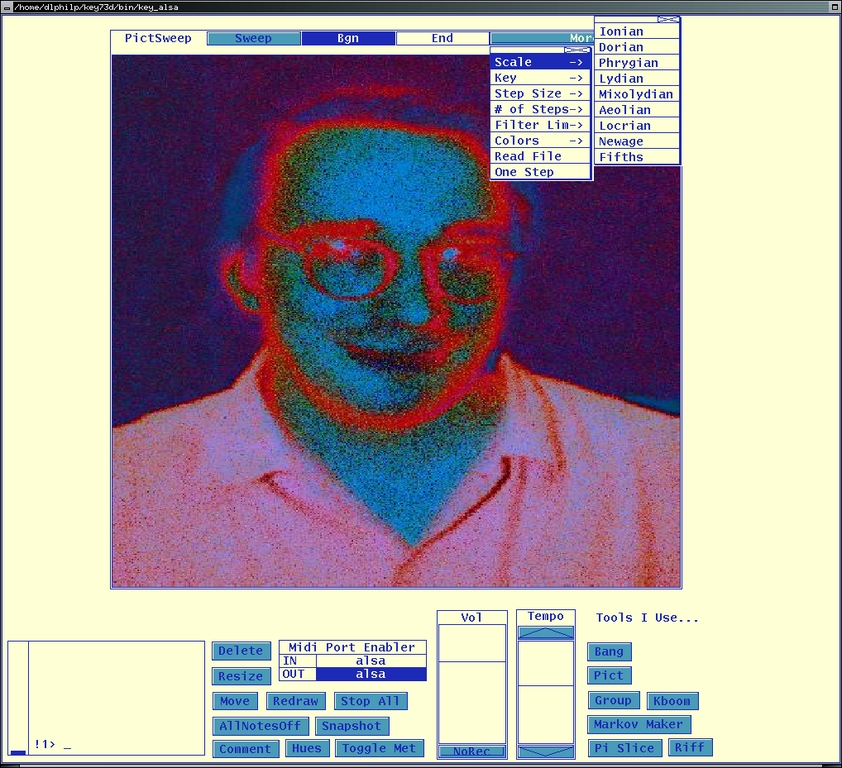
Figure 7. The PictSweep Image-to-Sound Processor
The KeyKit environment also includes a powerful object-oriented command language with support for real-time MIDI output. The following trivial example sends a Cmaj7 chord to the MIDI output device:
realtime('c e g b')
Unfortunately, I'm out of time here, so I leave the investigation of the KeyKit language to the interested reader. See the files named example*.k in the KeyKit lib directory for a good introduction to its details.
KeyKit's documentation exists in a collection of HTML pages in the docs directory of the source tree. A tutorial is provided for basic interaction with the program, but you'll simply have to experiment with the many undocumented tools to learn their uses and functions. Fortunately that's more fun than labor, and KeyKit is designed for hands-on experimentation.
A KeyKit mail list also is available. Participation is low volume but steady, and the developer always is ready to help with any KeyKit problems you encounter.
KeyKit is developer Tim Thompson's gift to computer musicians who want to try things a bit different, maybe even a lot different. It has some bumps and it needs much better ALSA support, but its MIDI output is excellent and MIDI file load/save works. Besides, how can anyone resist a program with a toolkit that includes components named boomix, grab bag, snarf box and offset walker?
I love working with KeyKit; it provides an incredible amount of fun, but it's also a powerful application for serious music production. If you're a Linux musician looking for a different way of working with MIDI, you should check out KeyKit.
By the way, this installment completes my "brief" look at MIDI software for Linux. I hope you've enjoyed the view. Next month, I'll show off a bit of what's happening with Csound5, but right now I'm back to the hack. See you next month!
Dave Phillips is a musician, teacher and writer living in Findlay, Ohio. He has been an active member of the Linux Audio community since his first contact with Linux in 1995. He is the author of The Book of Linux Music & Sound, as well as numerous articles in Linux Journal.
