
Programming Tools: Refactoring
Refactoring is the process of modifying code without affecting either its input or output; that is, the code's interface remains the same. How do we know that refactoring works? The only objective way to find the answer is by testing the code before and after refactoring occurs. The results should match exactly. This makes testing an integral part of any refactoring effort--you cannot successfully separate the two.
Some confusion exists between what it means to refactor code as opposed to reworking it. Refactoring is a subset of reworking. If you are making no changes to the interface of a program, you are refactoring. If you add or change the interface, you are rewriting the code. Strictly speaking, when you do both together, you are rewriting. However, for political reasons, you still might want to call it refactoring.
When it comes to methodology, refactoring usually is done in small steps. After each step, you run those unit tests originally written for the existing code. Repeat these two steps as needed. Also, a number of refactoring patterns can be followed. Martin Fowler's book (see Resources) contains some basic ones, and Joshua Kerievsky's more recent text (see Resources) contains some more advanced ones. As a side issue, it is interesting to note that most books and products dealing with refactoring use Java as the language of choice. Is that because Java is the most appropriate language, or does Java code need more refactoring?
All the refactoring tools I have seen so far require heavy human intervention. They don't do pattern recognition, so they aren't able to see commonality in code or design.
As noted above, a lot of refactoring tools are out there, especially for Java. Open-source tools are available, some of which are listed in Resources. Commercial refactoring products can be found in the usual way. In this article, I discuss two open-source tools, Eclipse and Bicycle Repair Man. Eclipse is designed for use with Java, while Bicycle Repair Man is designed to be used with Python.
Let's start with Eclipse and Java. Eclipse offers an impressive set of refactoring facilities, including support for:
Copying and moving Java elements
Extracting a method
Extracting a local variable
Extracting a constant
Renaming a package
Renaming a compilation unit
Renaming a class or interface
Renaming a method
Renaming a field
Renaming a local variable
Renaming method parameters
Changing method signature
Inlining a local variable
Inlining a method
Inlining a constant
Self encapsulating a field
Replacing a local variable with a query
Pulling members up to superclass
Pushing members down to subclasses
Moving static members between types
Moving an instance method to a component
Converting a local variable to a field
Converting an anonymous inner class to a nested class
Converting a nested type to a top level type
Extracting an interface from a type
Replacing references to a type with references to one of its subtypes
To give you some idea of what Eclipse's refactoring can do, I chose at random the Java program shown in Listing 1. It outputs an About dialog box.
Listing 1. Random Java Program
package junit.awtui;

import java.awt.*;
import java.awt.event.*;

import junit.runner.Version;

class AboutDialog extends Dialog {
    public AboutDialog(Frame parent) {
        super(parent);

        setResizable(false);
        setLayout(new GridBagLayout());
        setSize(330, 138);
        setTitle("About");

        Button button= new Button("Close");
        button.addActionListener(
            new ActionListener() {
                public void actionPerformed(ActionEvent e) {
                    dispose();
                }
            }
        );

        Label label1= new Label("JUnit");
        label1.setFont(new Font("dialog", Font.PLAIN, 36));

        Label label2= new Label("JUnit "+
                                Version.id()+
                                " by Kent Beck and Erich Gamma");
        label2.setFont(new Font("dialog", Font.PLAIN, 14));

        Logo logo= new Logo();

        GridBagConstraints constraintsLabel1= new GridBagConstraints();
        constraintsLabel1.gridx = 3; constraintsLabel1.gridy = 0;
        constraintsLabel1.gridwidth = 1; constraintsLabel1.gridheight = 1;
        constraintsLabel1.anchor = GridBagConstraints.CENTER;
        add(label1, constraintsLabel1);

        GridBagConstraints constraintsLabel2= new GridBagConstraints();
        constraintsLabel2.gridx = 2; constraintsLabel2.gridy = 1;
        constraintsLabel2.gridwidth = 2; constraintsLabel2.gridheight = 1;
        constraintsLabel2.anchor = GridBagConstraints.CENTER;
        add(label2, constraintsLabel2);

        GridBagConstraints constraintsButton1= new GridBagConstraints();
        constraintsButton1.gridx = 2; constraintsButton1.gridy = 2;
        constraintsButton1.gridwidth = 2; constraintsButton1.gridheight = 1;
        constraintsButton1.anchor = GridBagConstraints.CENTER;
        constraintsButton1.insets= new Insets(8, 0, 8, 0);
        add(button, constraintsButton1);

        GridBagConstraints constraintsLogo1= new GridBagConstraints();
        constraintsLogo1.gridx = 2; constraintsLogo1.gridy = 0;
        constraintsLogo1.gridwidth = 1; constraintsLogo1.gridheight = 1;
        constraintsLogo1.anchor = GridBagConstraints.CENTER;
        add(logo, constraintsLogo1);

        addWindowListener(
            new WindowAdapter() {
                public void windowClosing(WindowEvent e) {
                    dispose();
                }
            }
        );
    }
}
First, I scanned the code and saw that two similar fragments of code dealt with labels. Second, I manually brought together all the code to do with labels. Using similar logic, I brought together the code dealing with the button and the logo. This step is shown in Listing 2.
Listing 2. Rearranging the Code
package junit.awtui;

import java.awt.*;
import java.awt.event.*;

import junit.runner.Version;

class AboutDialog extends Dialog {
    public AboutDialog(Frame parent) {
        super(parent);

        setResizable(false);
        setLayout(new GridBagLayout());
        setSize(330, 138);
        setTitle("About");

        Label label1= new Label("JUnit");
        label1.setFont(new Font("dialog", Font.PLAIN, 36));

        Label label2= new Label("JUnit "+
                    Version.id()+
                    " by Kent Beck and Erich Gamma");
        label2.setFont(new Font("dialog", Font.PLAIN, 14));

        Logo logo= new Logo();

        GridBagConstraints constraintsLabel1= new GridBagConstraints();
        constraintsLabel1.gridx = 3;
        constraintsLabel1.gridy = 0;
        constraintsLabel1.gridwidth = 1;
        constraintsLabel1.gridheight = 1;
        constraintsLabel1.anchor = GridBagConstraints.CENTER;
        add(label1, constraintsLabel1);

        GridBagConstraints constraintsLabel2= new GridBagConstraints();
        constraintsLabel2.gridx = 2;
        constraintsLabel2.gridy = 1;
        constraintsLabel2.gridwidth = 2;
        constraintsLabel2.gridheight = 1;
        constraintsLabel2.anchor = GridBagConstraints.CENTER;
        add(label2, constraintsLabel2);

        Button button= new Button("Close");
        button.addActionListener(
            new ActionListener() {
                public void actionPerformed(ActionEvent e) {
                    dispose();
                }
            }
        );
        GridBagConstraints constraintsButton1=new GridBagConstraints();
        constraintsButton1.gridx = 2;
        constraintsButton1.gridy = 2;
        constraintsButton1.gridwidth = 2;
        constraintsButton1.gridheight = 1;
        constraintsButton1.anchor = GridBagConstraints.CENTER;
        constraintsButton1.insets= new Insets(8, 0, 8, 0);
        add(button, constraintsButton1);

        GridBagConstraints constraintsLogo1= new GridBagConstraints();
        constraintsLogo1.gridx = 2;
        constraintsLogo1.gridy = 0;
        constraintsLogo1.gridwidth = 1;
        constraintsLogo1.gridheight = 1;
        constraintsLogo1.anchor = GridBagConstraints.CENTER;
        add(logo, constraintsLogo1);

        addWindowListener(
            new WindowAdapter() {
                public void windowClosing(WindowEvent e) {
                    dispose();
                }
            }
        );
    }
}
Next, I extracted each method by first highlighting each method and then selecting Refactor | Extract Method. The dialog box is shown below.

The resulting code is shown in Listing 3.
Listing 3. Refactored Code
package junit.awtui;

import java.awt.*;
import java.awt.event.*;

import junit.runner.Version;

class AboutDialog extends Dialog {
    public AboutDialog(Frame parent) {
        super(parent);

        setResizable(false);
        setLayout(new GridBagLayout());
        setSize(330, 138);
        setTitle("About");


        gbLabel1();
        gbLabel2();
        gbButton();
        gbLogo();

        addWindowListener(
            new WindowAdapter() {
                public void windowClosing(WindowEvent e) {
                    dispose();
                }
            }
        );
    }

        /**
         *
         */
        private void gbLogo() {
            Logo logo= new Logo();
            GridBagConstraints constraintsLogo1= new GridBagConstraints();
            constraintsLogo1.gridx = 2;
            constraintsLogo1.gridy = 0;
            constraintsLogo1.gridwidth = 1;
            constraintsLogo1.gridheight = 1;
            constraintsLogo1.anchor = GridBagConstraints.CENTER;
            add(logo, constraintsLogo1);
        }

        /**
         *
         */
        private void gbButton() {
            Button button= new Button("Close");
            button.addActionListener(
                new ActionListener() {
                    public void actionPerformed(ActionEvent e) {
                        dispose();
                    }
                }
            );
            GridBagConstraints constraintsButton1= new GridBagConstraints();
            constraintsButton1.gridx = 2;
            constraintsButton1.gridy = 2;
            constraintsButton1.gridwidth = 2;
            constraintsButton1.gridheight = 1;
            constraintsButton1.anchor = GridBagConstraints.CENTER;
            constraintsButton1.insets= new Insets(8, 0, 8, 0);
            add(button, constraintsButton1);
        }

        /**
         *
         */
        private void gbLabel2() {
            Label label2= new Label("JUnit "+
                                    Version.id()+
                                    " by Kent Beck and Erich Gamma");
            label2.setFont(new Font("dialog", Font.PLAIN, 14));
            GridBagConstraints constraintsLabel2= new GridBagConstraints();
            constraintsLabel2.gridx = 2;
            constraintsLabel2.gridy = 1;
            constraintsLabel2.gridwidth = 2;
            constraintsLabel2.gridheight = 1;
            constraintsLabel2.anchor = GridBagConstraints.CENTER;
            add(label2, constraintsLabel2);
        }

        /**
         *
         */
        private void gbLabel1() {
            Label label1= new Label("JUnit");
            label1.setFont(new Font("dialog", Font.PLAIN, 36));
            GridBagConstraints constraintsLabel1= new GridBagConstraints();
            constraintsLabel1.gridx = 3;
            constraintsLabel1.gridy = 0;
            constraintsLabel1.gridwidth = 1;
            constraintsLabel1.gridheight = 1;
            constraintsLabel1.anchor = GridBagConstraints.CENTER;
            add(label1, constraintsLabel1);
        }
}
Looking at the code again, it seems that gbLabel1 and gbLabel2 share the same logic, but the values of some of the variables differ slightly. Manually comparing the two, I tried to create a new method based on gbLabel1 that had parameters on those variable values that differed between gbLabel1 and gbLabel2. I did this by using the Introduce Parameter refactoring wizard. Listing 4 shows the result of using this wizard to replace the label's text and font values with method parameters.
Listing 4. Replacing Values with Parameters
package junit.awtui;

import java.awt.*;
import java.awt.event.*;

import junit.runner.Version;

class AboutDialog extends Dialog {
    public AboutDialog(Frame parent) {
        super(parent);

        setResizable(false);
        setLayout(new GridBagLayout());
        setSize(330, 138);
        setTitle("About");

        gbLabel1(new Label("JUnit"),new Font("dialog",Font.PLAIN, 36));
        gbLabel2();
        gbButton();
        gbLogo();

        addWindowListener(
            new WindowAdapter() {
                public void windowClosing(WindowEvent e) {
                    dispose();
                }
            }
        );
    }

        /**
         *
         */
        private void gbLogo() {
            Logo logo= new Logo();
            GridBagConstraints constraintsLogo1= new GridBagConstraints();
            constraintsLogo1.gridx = 2;
            constraintsLogo1.gridy = 0;
            constraintsLogo1.gridwidth = 1;
            constraintsLogo1.gridheight = 1;
            constraintsLogo1.anchor = GridBagConstraints.CENTER;
            add(logo, constraintsLogo1);
        }

        /**
         *
         */
        private void gbButton() {
            Button button= new Button("Close");
            button.addActionListener(
                new ActionListener() {
                    public void actionPerformed(ActionEvent e) {
                        dispose();
                    }
                }
            );
            GridBagConstraints constraintsButton1= new GridBagConstraints();
            constraintsButton1.gridx = 2;
            constraintsButton1.gridy = 2;
            constraintsButton1.gridwidth = 2;
            constraintsButton1.gridheight = 1;
            constraintsButton1.anchor = GridBagConstraints.CENTER;
            constraintsButton1.insets= new Insets(8, 0, 8, 0);
            add(button, constraintsButton1);
        }

        /**
         *
         */
        private void gbLabel2() {
            Label label2= new Label("JUnit "+
                                    Version.id()+
                                    " by Kent Beck and Erich Gamma");
            label2.setFont(new Font("dialog", Font.PLAIN, 14));
            GridBagConstraints constraintsLabel2= new GridBagConstraints();
            constraintsLabel2.gridx = 2;
            constraintsLabel2.gridy = 1;
            constraintsLabel2.gridwidth = 2;
            constraintsLabel2.gridheight = 1;
            constraintsLabel2.anchor = GridBagConstraints.CENTER;
            add(label2, constraintsLabel2);
        }

        /**
         * @param lblText TODO
         * @param lblFont TODO
         *
         */
        private void gbLabel1(Label lblText, Font lblFont) {
            Label label1= lblText;
            label1.setFont(lblFont);
            GridBagConstraints constraintsLabel1= new GridBagConstraints();
            constraintsLabel1.gridx = 3;
            constraintsLabel1.gridy = 0;
            constraintsLabel1.gridwidth = 1;
            constraintsLabel1.gridheight = 1;
            constraintsLabel1.anchor = GridBagConstraints.CENTER;
            add(label1, constraintsLabel1);
        }
}
Two things in Listing 4 are worth noting. First, in the comments before the newly modified method, TODOs remind you to comment on the meaning of the parameters. Second, in both gbLabel1 and gbLabel2 the placement of the label is specified using a rectangle with its upper-left corner and height and width values. Eclipse cannot recognize these as attributes of a rectangle; it must be done manually. I used the Change Method Signature wizard to introduce the Rectangle parameter.
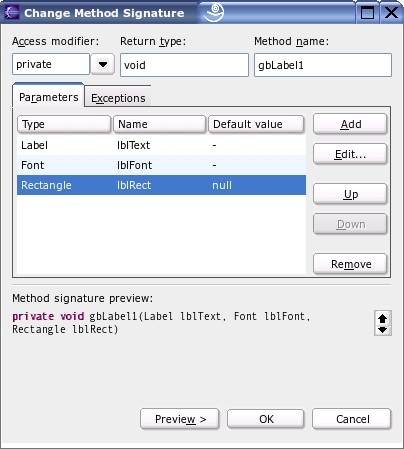
Besides changing the method signature, I also needed to change manually the code where gbLabel1 is invoked. Listing 5 shows the results with some minor formatting changes being added.
Listing 5. Changing gbLabel1 Invocation Code
package junit.awtui;

import java.awt.*;
import java.awt.event.*;

import junit.runner.Version;

class AboutDialog extends Dialog {
    public AboutDialog(Frame parent) {
        super(parent);

        setResizable(false);
        setLayout(new GridBagLayout());
        setSize(330, 138);
        setTitle("About");


        gbLabel1(new Label("JUnit"),
             new Font("dialog", Font.PLAIN, 36),
             new Rectangle(3,0,1,1));
        gbLabel2();
        gbButton();
        gbLogo();

        addWindowListener(
            new WindowAdapter() {
                public void windowClosing(WindowEvent e) {
                    dispose();
                }
            }
        );
    }

        /**
         *
         */
        private void gbLogo() {
            Logo logo= new Logo();
            GridBagConstraints constraintsLogo1= new GridBagConstraints();
            constraintsLogo1.gridx = 2;
            constraintsLogo1.gridy = 0;
            constraintsLogo1.gridwidth = 1;
            constraintsLogo1.gridheight = 1;
            constraintsLogo1.anchor = GridBagConstraints.CENTER;
            add(logo, constraintsLogo1);
        }

        /**
         *
         */
        private void gbButton() {
            Button button= new Button("Close");
            button.addActionListener(
                new ActionListener() {
                    public void actionPerformed(ActionEvent e) {
                        dispose();
                    }
                }
            );
            GridBagConstraints constraintsButton1= new GridBagConstraints();
            constraintsButton1.gridx = 2;
            constraintsButton1.gridy = 2;
            constraintsButton1.gridwidth = 2;
            constraintsButton1.gridheight = 1;
            constraintsButton1.anchor = GridBagConstraints.CENTER;
            constraintsButton1.insets= new Insets(8, 0, 8, 0);
            add(button, constraintsButton1);
        }

        /**
         *
         */
        private void gbLabel2() {
            Label label2= new Label("JUnit "+
                                    Version.id()+
                                    " by Kent Beck and Erich Gamma");
            label2.setFont(new Font("dialog", Font.PLAIN, 14));
            GridBagConstraints constraintsLabel2= new GridBagConstraints();
            constraintsLabel2.gridx = 2;
            constraintsLabel2.gridy = 1;
            constraintsLabel2.gridwidth = 2;
            constraintsLabel2.gridheight = 1;
            constraintsLabel2.anchor = GridBagConstraints.CENTER;
            add(label2, constraintsLabel2);
        }

        /**
         * @param lblText Text to appear in label
         * @param lblFont Font to use in showing text
         * @param lblRect the size and position of the label
         *
         */
        private void gbLabel1(Label lblText, Font lblFont, Rectangle lblRect) {
            Label label1= lblText;
            label1.setFont(lblFont);
            GridBagConstraints constraintsLabel1= new GridBagConstraints();
            constraintsLabel1.gridx = lblRect.x;
            constraintsLabel1.gridy = lblRect.y;
            constraintsLabel1.gridwidth = lblRect.width;
            constraintsLabel1.gridheight = lblRect.height;
            constraintsLabel1.anchor = GridBagConstraints.CENTER;
            add(label1, constraintsLabel1);
        }
}
Next, I noticed that the variable label1 could be replaced by label, because only one variable of this type is in this method. To do this, I used the Rename... wizard. I highlighted the name to be changed and invoked the wizard, as shown below.

Because the gbLabel1 method now has become quite generic, we also can change its name simply to gbLabel. We start by highlighting an instance of its name and invoking the Rename... wizard. Next, we replace the call to gbLabel2 with an equivalent call to gbLabel. Again, this must be done manually. Also, because gbLabel2 is no longer needed, we should delete it. Listing 6 shows the result of all this.
Listing 6. Cleaning Up the Code
package junit.awtui;

import java.awt.*;
import java.awt.event.*;

import junit.runner.Version;

class AboutDialog extends Dialog {
    public AboutDialog(Frame parent) {
        super(parent);

        setResizable(false);
        setLayout(new GridBagLayout());
        setSize(330, 138);
        setTitle("About");

        gbLabel(new Label("JUnit"),
            new Font("dialog", Font.PLAIN, 36),
            new Rectangle(3,0,1,1));
        gbLabel(new Label("JUnit "+
                          Version.id()+
                          " by Kent Beck and Erich Gamma"),
            new Font("dialog", Font.PLAIN, 14),
            new Rectangle(2,1,2,1));
        gbButton();
        gbLogo();

        addWindowListener(
            new WindowAdapter() {
                public void windowClosing(WindowEvent e) {
                    dispose();
                }
            }
        );
    }

        /**
         *
         */
        private void gbLogo() {
            Logo logo= new Logo();
            GridBagConstraints constraintsLogo1= new GridBagConstraints();
            constraintsLogo1.gridx = 2;
            constraintsLogo1.gridy = 0;
            constraintsLogo1.gridwidth = 1;
            constraintsLogo1.gridheight = 1;
            constraintsLogo1.anchor = GridBagConstraints.CENTER;
            add(logo, constraintsLogo1);
        }

        /**
         *
         */
        private void gbButton() {
            Button button= new Button("Close");
            button.addActionListener(
                new ActionListener() {
                    public void actionPerformed(ActionEvent e) {
                        dispose();
                    }
                }
            );
            GridBagConstraints constraintsButton1= new GridBagConstraints();
            constraintsButton1.gridx = 2;
            constraintsButton1.gridy = 2;
            constraintsButton1.gridwidth = 2;
            constraintsButton1.gridheight = 1;
            constraintsButton1.anchor = GridBagConstraints.CENTER;
            constraintsButton1.insets= new Insets(8, 0, 8, 0);
            add(button, constraintsButton1);
        }

        /**
         * @param lblText Text to appear in label
         * @param lblFont Font to use in showing text
         * @param lblRect the size and position of the label
         *
         */
        private void gbLabel(Label lblText, Font lblFont, Rectangle lblRect) {
            Label lbl= lblText;
            lbl.setFont(lblFont);
            GridBagConstraints constraintsLabel1= new GridBagConstraints();
            constraintsLabel1.gridx = lblRect.x;
            constraintsLabel1.gridy = lblRect.y;
            constraintsLabel1.gridwidth = lblRect.width;
            constraintsLabel1.gridheight = lblRect.height;
            constraintsLabel1.anchor = GridBagConstraints.CENTER;
            add(lbl, constraintsLabel1);
        }
}
If you wish, you can continue on the same track with both the button and logo related methods. However, it is more of the same, so I won't bore you further on using refactoring with Eclipse and Java.
The standard refactoring tool for Python is Bicycle Repair Man (BRM). Its feature set is more limited and less mature than Eclipse's set, in part because of the language differences and in part because of the number of developers working on them. Bicycle Repair Man's current refactoring wizards are Rename, Extract method, Inline variable, Extract variable, Move class and Move function.
For this test, I chose a program I knew something about--the token handler for PyMetrics. Last month I wrote about code metrics and PyMetrics. I did not like how I coded the PyMetrics routine shown below, and its McCabe metric of 52 for the __call__ method gave me reason to refactor and rework the code. Recall that the McCabe Cyclomatic metric measures the number of paths through your function or procedure. At 52, this method is considered extremely high risk and untestable. Listing 7 shows the __call__ method that I wanted refactored.
Listing 7. PyMetric __call__ Method
""" TokenHandler readies tokens to passing to metric routines.

  $Id: tokenhandler.py,v 1.2 2005/01/19 06:13:33 rcharney Exp $
"""
__version__ = "$Revision: 1.2 $"[11:-2]

#import token
from globals import *

class TokenHandler( object ):
  """ Class to handle processing of tokens."""
  def __call__( self, tokCount, tok ):
    """ Common code for handling tokens."""
    tokCount += 1
    self.metrics['tokenCount'] = tokCount
    if not tok.type in [WS,INDENT,DEDENT,EMPTY,ENDMARKER]:
      prevTok = self.saveTok
      self.saveTok = tok
    self.context['blockNum'] = self.metrics.get('blockCount',0)
    self.context['blockDepth'] = self.metrics.get('blockDepth',0)
    self.context['parenDepth'] = self.parenDepth
    self.context['bracketDepth'] = self.bracketDepth
    self.context['braceDepth'] = self.braceDepth

    self.classDepth += self.classDepthIncr
    self.context['classDepth'] = self.classDepth
    self.classDepthIncr = 0

    self.fcnDepth += self.fcnDepthIncr    # incr at start of fcn body
    self.context['fcnDepth'] = self.fcnDepth
    self.fcnDepthIncr = 0

    # start testing for types that change in context

    if self.docString and tok.type == token.STRING:
      self.docString = False
      tok.semtype = DOCSTRING
      if self.checkForModuleDocString:  # found the module's doc string
        self.metrics['numModuleDocStrings'] += 1
        self.checkForModuleDocString = False
      self.__postToken( tok )
      return
    if tok.type == COMMENT:
      # compensate for older tokenize including newline
      # obals......in token when only thing on line is comment
      # this patch makes all connents consistent
      self.metrics['numComments'] += 1
      if tok.text[-1] == '\n':
        tok.text = tok.text[:-1]
      if prevTok and prevTok.type != NEWLINE and prevTok.type != EMPTY:
        tok.semtype = INLINE
        self.metrics['numCommentsInline'] += 1
      self.__postToken( tok )
      return

    if self.defFunction:
      if tok.type == NAME:
        self.__incr( 'numFunctions')
        self.fqnName.append( tok.text )
        self.currentFcn = self.__genFQN( self.fqnName )
        self.fqnFunction.append( (self.currentFcn,self.blockDepth,FCNNAME) )
        self.defFunction = False
        self.findFcnHdrEnd = True
        if self.pa.verbose > 0: print "fqnFunction=%s" % self.fqnFunction
        self.__postToken( tok )
        return
      elif tok.type == ERRORTOKEN:
        # we must compensate for the simple scanner mishandling errors
        self.findFcnHdrEnd = True
        self.invalidToken = mytoken.MyToken(type=NAME,
                                            semtype=FCNNAME,
                                            text=tok.text,
                                            row=tok.row,
                                            col=tok.col,
                                            line=tok.line)
        self.skipUntil = '(:\n'
        return
    elif self.defClass and tok.type == NAME:
      self.__incr( 'numClasses' )
      self.fqnName.append( tok.text )
      self.currentClass = self.__genFQN( self.fqnName )
      self.fqnClass.append( (self.currentClass,self.blockDepth,CLASSNAME) )
      self.defClass = False
      self.findClassHdrEnd = True
      if self.pa.verbose > 0: print "fqnClass=%s" % self.fqnClass
      self.__postToken( tok )
      return

    # return with types that don't change in context

    self.__postToken( tok )
    if tok.type == EMPTY:
      self.endOfStmt()
      return
    if tok.type == WS:
      return
    if tok.type == NEWLINE:
      self.endOfStmt()
      return

    # at this point, we have encountered a non-white space token
    # if a module doc string has not been found yet, it never will be.
    numModDocStrings = self.metrics['numModuleDocStrings']
    if self.checkForModuleDocString and numModDocStrings == 0:
      self.checkForModuleDocString = False
      msg = ( "Module %s is missing a module doc string. Detected at line %d"
               % (self.context['inFile'],tok.row) )
      if not self.pa.quietSw:
        sys.stderr.writelines( msg )

    if tok.type == OP and tok.text == ':':
      if self.findFcnHdrEnd:
        self.findFcnHdrEnd = False
        self.docString = True
        self.fcnDepthIncr = 1
        return
      elif self.findClassHdrEnd:
        self.findClassHdrEnd = False
        self.docString = True
        self.classDepthIncr = 1
        return
    if tok.type == OP:
      if tok.text == '(':
        self.parenDepth += 1
      elif tok.text == ')':
        self.parenDepth -= 1
      elif tok.text == '[':
        self.bracketDepth += 1
      elif tok.text == ']':
        self.bracketDepth -= 1
      elif tok.text == '{':
        self.braceDepth += 1
      elif tok.text == '}':
        self.braceDepth -= 1
      return

    if tok.type == INDENT:
      self.__incr( 'blockCount')
      self.blockDepth += 1
      self.metrics['blockDepth'] = self.blockDepth
      if self.metrics.get('maxBlockDepth',0) < self.blockDepth:
        self.metrics['maxBlockDepth'] = self.blockDepth
      return
    elif tok.type == DEDENT:
      assert self.fcnDepth == len( self.fqnFunction )
      self.blockDepth -= 1
      self.metrics['blockDepth'] = self.blockDepth
      while len(self.fqnFunction) and self.blockDepth<=self.fqnFunction[-1][1]:
        msg = self.endOfFunction( self.fcnExits )
        if msg and not self.pa.quietSw:
          print msg
        if self.pa.verbose > 0:
          print "Removing function %s" % self.__extractFQN( self.fqnFunction )
        del self.fqnFunction[-1]
        del self.fqnName[-1]
        self.fcnDepth -= 1
      assert self.fcnDepth == len( self.fqnFunction )
      if len( self.fqnFunction ) > 0:
        self.currentFcn = self.fqnFunction[-1][0]
      else:
        self.currentFcn = None
      while len(self.fqnClass) and self.blockDepth <= self.fqnClass[-1][1]:
        self.endOfClass()
        self.classDepth -= 1
        if self.pa.verbose > 0:
          print "Removing class %s" % self.__extractFQN( self.fqnClass )
        del self.fqnClass[-1]
        del self.fqnName[-1]
      if len( self.fqnClass ) > 0:
        self.currentClass = self.fqnClass[-1][0]
      else:
        self.currentClass = None
      return

    self.docString = False
    if tok.semtype == KEYWORD:
      self.__incr( 'numKeywords')
      if tok.text == 'def':
        self.defFunction = True
      elif tok.text == 'class':
        self.defClass = True
      elif tok.text == 'return':
        assert self.fcnDepth == len( self.fqnFunction )
        if self.fcnDepth == 0:     # then we are not in any function
          if not self.pa.quietSw:  # then report on these types of errors
            msg = ("Module %s contains the return statement" +
                   " at line %d that is outside any function" %
                   (self.context['inFile'],tok.row) )
            print msg
        if prevTok.text == ':':
          # this return on same line as conditional,
          # so it must be an extra return
          self.fcnExits.append( tok.row )
        elif self.blockDepth > 1:
          # Let fcnBlockDepth be the block depth of the function body.
          # We are trying to count the number of return statements
          # in this function. Only one is allowed at the fcnBlockDepth for the
          # function. If the self.blockDepth is greater than fcnBlockDepth,
          # then this is a conditional return - i.e., an additional return
          fcnBlockDepth = self.fqnFunction[-1][1] + 1
          if self.blockDepth > fcnBlockDepth:
            self.fcnExits.append( tok.row )

    return
To produce Listing 8, I first highlighted lines 35-54 in Listing 7 and then used the Extract Method wizard to move them into the doString() method.

Listing 8. Moving Code with the Extract Method Wizard
""" TokenHandler readies tokens to passing to metric routines.

  $Id: tokenhandler.py,v 1.2 2005/01/19 06:13:33 rcharney Exp $
"""
__version__ = "$Revision: 1.2 $"[11:-2]

#import token
from globals import *

class TokenHandler( object ):
  """ Class to handle processing of tokens."""
  def __call__( self, tokCount, tok ):
    """ Common code for handling tokens."""
    tokCount += 1
    self.metrics['tokenCount'] = tokCount
    if not tok.type in [WS,INDENT,DEDENT,EMPTY,ENDMARKER]:
      prevTok = self.saveTok
      self.saveTok = tok
    self.context['blockNum'] = self.metrics.get('blockCount',0)
    self.context['blockDepth'] = self.metrics.get('blockDepth',0)
    self.context['parenDepth'] = self.parenDepth
    self.context['bracketDepth'] = self.bracketDepth
    self.context['braceDepth'] = self.braceDepth

    self.classDepth += self.classDepthIncr
    self.context['classDepth'] = self.classDepth
    self.classDepthIncr = 0

    self.fcnDepth += self.fcnDepthIncr    # incr at start of fcn body
    self.context['fcnDepth'] = self.fcnDepth
    self.fcnDepthIncr = 0

    # start testing for types that change in context

    self.doStrings(tok, prevTok)

    if self.defFunction:
      if tok.type == NAME:
        self.__incr( 'numFunctions')
        self.fqnName.append( tok.text )
        self.currentFcn = self.__genFQN( self.fqnName )
        self.fqnFunction.append( (self.currentFcn,self.blockDepth,FCNNAME) )
        self.defFunction = False
        self.findFcnHdrEnd = True
        if self.pa.verbose > 0: print "fqnFunction=%s" % self.fqnFunction
        self.__postToken( tok )
        return
      elif tok.type == ERRORTOKEN:
        # we must compensate for the simple scanner mishandling errors
        self.findFcnHdrEnd = True
        self.invalidToken = mytoken.MyToken(type=NAME,
                                            semtype=FCNNAME,
                                            text=tok.text,
                                            row=tok.row,
                                            col=tok.col,
                                            line=tok.line)
        self.skipUntil = '(:\n'
        return
    elif self.defClass and tok.type == NAME:
      self.__incr( 'numClasses' )
      self.fqnName.append( tok.text )
      self.currentClass = self.__genFQN( self.fqnName )
      self.fqnClass.append( (self.currentClass,self.blockDepth,CLASSNAME) )
      self.defClass = False
      self.findClassHdrEnd = True
      if self.pa.verbose > 0: print "fqnClass=%s" % self.fqnClass
      self.__postToken( tok )
      return

    # return with types that don't change in context

    self.__postToken( tok )
    if tok.type == EMPTY:
      self.endOfStmt()
      return
    if tok.type == WS:
      return
    if tok.type == NEWLINE:
      self.endOfStmt()
      return

    # at this point, we have encountered a non-white space token
    # if a module doc string has not been found yet, it never will be.
    numModDocStrings = self.metrics['numModuleDocStrings']
    if self.checkForModuleDocString and numModDocStrings == 0:
      self.checkForModuleDocString = False
      msg = ( "Module %s is missing a module doc string. Detected at line %d"
              % (self.context['inFile'],tok.row) )
      if not self.pa.quietSw:
        sys.stderr.writelines( msg )

    if tok.type == OP and tok.text == ':':
      if self.findFcnHdrEnd:
        self.findFcnHdrEnd = False
        self.docString = True
        self.fcnDepthIncr = 1
        return
      elif self.findClassHdrEnd:
        self.findClassHdrEnd = False
        self.docString = True
        self.classDepthIncr = 1
        return
    if tok.type == OP:
      if tok.text == '(':
        self.parenDepth += 1
      elif tok.text == ')':
        self.parenDepth -= 1
      elif tok.text == '[':
        self.bracketDepth += 1
      elif tok.text == ']':
        self.bracketDepth -= 1
      elif tok.text == '{':
        self.braceDepth += 1
      elif tok.text == '}':
        self.braceDepth -= 1
      return

    if tok.type == INDENT:
      self.__incr( 'blockCount')
      self.blockDepth += 1
      self.metrics['blockDepth'] = self.blockDepth
      if self.metrics.get('maxBlockDepth',0) < self.blockDepth:
        self.metrics['maxBlockDepth'] = self.blockDepth
      return
    elif tok.type == DEDENT:
      assert self.fcnDepth == len( self.fqnFunction )
      self.blockDepth -= 1
      self.metrics['blockDepth'] = self.blockDepth
      while len(self.fqnFunction) and self.blockDepth<=self.fqnFunction[-1][1]:
        msg = self.endOfFunction( self.fcnExits )
        if msg and not self.pa.quietSw:
          print msg
        if self.pa.verbose > 0:
          print "Removing function %s" % self.__extractFQN( self.fqnFunction )
        del self.fqnFunction[-1]
        del self.fqnName[-1]
        self.fcnDepth -= 1
      assert self.fcnDepth == len( self.fqnFunction )
      if len( self.fqnFunction ) > 0:
        self.currentFcn = self.fqnFunction[-1][0]
      else:
        self.currentFcn = None
      while len(self.fqnClass) and self.blockDepth <= self.fqnClass[-1][1]:
        self.endOfClass()
        self.classDepth -= 1
        if self.pa.verbose > 0:
          print "Removing class %s" % self.__extractFQN( self.fqnClass )
        del self.fqnClass[-1]
        del self.fqnName[-1]
      if len( self.fqnClass ) > 0:
        self.currentClass = self.fqnClass[-1][0]
      else:
        self.currentClass = None
      return

    self.docString = False
    if tok.semtype == KEYWORD:
      self.__incr( 'numKeywords')
      if tok.text == 'def':
        self.defFunction = True
      elif tok.text == 'class':
        self.defClass = True
      elif tok.text == 'return':
        assert self.fcnDepth == len( self.fqnFunction )
        if self.fcnDepth == 0:     # then we are not in any function
          if not self.pa.quietSw:  # then report on these types of errors
            msg = ( "Module %s contains the return statement at line %d " +
                    "that is outside any function"
                    % (self.context['inFile'],tok.row) )
        if prevTok.text == ':':
          # this return on same line as conditional,
          # so it must be an extra return
          self.fcnExits.append( tok.row )
        elif self.blockDepth > 1:
          # Let fcnBlockDepth be the block depth of the function body.
          # We are trying to count the number of return statements
          # in this function. Only one is allowed at the fcnBlockDepth for the
          # function. If the self.blockDepth is greater than fcnBlockDepth,
          # then this is a conditional return - i.e., an additional return
          fcnBlockDepth = self.fqnFunction[-1][1] + 1
          if self.blockDepth > fcnBlockDepth:
            self.fcnExits.append( tok.row )

    return

  def doStrings(self, tok, prevTok):
    if self.docString and tok.type == token.STRING:
      self.docString = False
      tok.semtype = DOCSTRING
      if self.checkForModuleDocString:  # we have found the module's doc string
        self.metrics['numModuleDocStrings'] += 1
        self.checkForModuleDocString = False
      self.__postToken( tok )
      return
    if tok.type == COMMENT:
      # compensate for older tokenize including newline
      # obals......in token when only thing on line is comment
      # this patch makes all connents consistent
      self.metrics['numComments'] += 1
      if tok.text[-1] == '\n':
        tok.text = tok.text[:-1]
      if prevTok and prevTok.type != NEWLINE and prevTok.type != EMPTY:
        tok.semtype = INLINE
        self.metrics['numCommentsInline'] += 1
      self.__postToken( tok )
      return
Notice that BRM is not as clever as Eclipse. It did not detect the use of return statements; it simply moved them into the extracted method. This would cause a problem when running, because the return would be returning from the extracted method--not from the original __call__ method. I fixed this manually by modifying the new method to return True if one of its returns was used; otherwise, it returned False. The __call__ method then tested the return value and exited itself if True. I also realized that the method name doStrings was a slight misnomer because the method also handled comments. So, I changed the method name to doStringsOrComments using BRM's Rename feature. Listing 9 shows these changes.
Listing 9. Renaming with BRM's Rename Feature
""" TokenHandler readies tokens to passing to metric routines.

  $Id: tokenhandler.py,v 1.2 2005/01/19 06:13:33 rcharney Exp $
"""
__version__ = "$Revision: 1.2 $"[11:-2]

#import token
from globals import *

class TokenHandler( object ):
  """ Class to handle processing of tokens."""
  def __call__( self, tokCount, tok ):
    """ Common code for handling tokens."""
    tokCount += 1
    self.metrics['tokenCount'] = tokCount
    if not tok.type in [WS,INDENT,DEDENT,EMPTY,ENDMARKER]:
      prevTok = self.saveTok
      self.saveTok = tok
    self.context['blockNum'] = self.metrics.get('blockCount',0)
    self.context['blockDepth'] = self.metrics.get('blockDepth',0)
    self.context['parenDepth'] = self.parenDepth
    self.context['bracketDepth'] = self.bracketDepth
    self.context['braceDepth'] = self.braceDepth

    self.classDepth += self.classDepthIncr
    self.context['classDepth'] = self.classDepth
    self.classDepthIncr = 0

    self.fcnDepth += self.fcnDepthIncr    # incr at start of fcn body
    self.context['fcnDepth'] = self.fcnDepth
    self.fcnDepthIncr = 0

    # start testing for types that change in context

    if self.doStringsOrComments(tok, prevTok):
      return

    if self.doFunctionName(tok):
      return
    elif self.doClassName(tok):
      return

    # return with types that don't change in context

    self.__postToken( tok )
    if tok.type == EMPTY:
      self.endOfStmt()
      return
    if tok.type == WS:
      return
    if tok.type == NEWLINE:
      self.endOfStmt()
      return

    # at this point, we have encountered a non-white space token
    # if a module doc string has not been found yet, it never will be.
    numModDocStrings = self.metrics['numModuleDocStrings']
    if self.checkForModuleDocString and numModDocStrings == 0:
      self.checkForModuleDocString = False
      msg = ( "Module %s is missing a module doc string. Detected at line %d"
              % (self.context['inFile'],tok.row) )
      print msg
      if not self.pa.quietSw:
        sys.stderr.writelines( msg )

    if tok.type == OP and tok.text == ':':
      if self.findFcnHdrEnd:
        self.findFcnHdrEnd = False
        self.docString = True
        self.fcnDepthIncr = 1
        return
      elif self.findClassHdrEnd:
        self.findClassHdrEnd = False
        self.docString = True
        self.classDepthIncr = 1
        return
    if tok.type == OP:
      if tok.text == '(':
        self.parenDepth += 1
      elif tok.text == ')':
        self.parenDepth -= 1
      elif tok.text == '[':
        self.bracketDepth += 1
      elif tok.text == ']':
        self.bracketDepth -= 1
      elif tok.text == '{':
        self.braceDepth += 1
      elif tok.text == '}':
        self.braceDepth -= 1
      return

    if tok.type == INDENT:
      self.__incr( 'blockCount')
      self.blockDepth += 1
      self.metrics['blockDepth'] = self.blockDepth
      if self.metrics.get('maxBlockDepth',0) < self.blockDepth:
        self.metrics['maxBlockDepth'] = self.blockDepth
      return
    elif tok.type == DEDENT:
      assert self.fcnDepth == len( self.fqnFunction )
      self.blockDepth -= 1
      self.metrics['blockDepth'] = self.blockDepth
      while len(self.fqnFunction) and self.blockDepth<=self.fqnFunction[-1][1]:
        msg = self.endOfFunction( self.fcnExits )
        if msg and not self.pa.quietSw:
          print msg
        if self.pa.verbose > 0:
          print "Removing function %s" % self.__extractFQN( self.fqnFunction )
        del self.fqnFunction[-1]
        del self.fqnName[-1]
        self.fcnDepth -= 1
      assert self.fcnDepth == len( self.fqnFunction )
      if len( self.fqnFunction ) > 0:
        self.currentFcn = self.fqnFunction[-1][0]
      else:
        self.currentFcn = None
      while len(self.fqnClass) and self.blockDepth <= self.fqnClass[-1][1]:
        self.endOfClass()
        self.classDepth -= 1
        if self.pa.verbose > 0:
          print "Removing class %s" % self.__extractFQN( self.fqnClass )
        del self.fqnClass[-1]
        del self.fqnName[-1]
      if len( self.fqnClass ) > 0:
        self.currentClass = self.fqnClass[-1][0]
      else:
        self.currentClass = None
      return

    self.docString = False
    if tok.semtype == KEYWORD:
      self.__incr( 'numKeywords')
      if tok.text == 'def':
        self.defFunction = True
      elif tok.text == 'class':
        self.defClass = True
      elif tok.text == 'return':
        assert self.fcnDepth == len( self.fqnFunction )
        if self.fcnDepth == 0:     # then we are not in any function
          if not self.pa.quietSw:  # then report on these types of errors
            msg = ( "Module %s contains the return statement at line %d " +
                    "that is outside any function" %
                    (self.context['inFile'],tok.row) )
        if prevTok.text == ':':
          # this return on same line as conditional,
          # so it must be an extra return
          self.fcnExits.append( tok.row )
        elif self.blockDepth > 1:
          # Let fcnBlockDepth be the block depth of the function body.
          # We are trying to count the number of return statements
          # in this function. Only one is allowed at the fcnBlockDepth for the
          # function. If the self.blockDepth is greater than fcnBlockDepth,
          # then this is a conditional return - i.e., an additional return
          fcnBlockDepth = self.fqnFunction[-1][1] + 1
          if self.blockDepth > fcnBlockDepth:
            self.fcnExits.append( tok.row )

    return

  def doClassName(self, tok):
    """ Return True if current token is class name."""
    if self.defClass and tok.type == NAME:
      self.__incr( 'numClasses' )
      self.fqnName.append( tok.text )
      self.currentClass = self.__genFQN( self.fqnName )
      self.fqnClass.append( (self.currentClass,self.blockDepth,CLASSNAME) )
      self.defClass = False
      self.findClassHdrEnd = True
      if self.pa.verbose > 0: print "fqnClass=%s" % self.fqnClass
      self.__postToken( tok )
      return True
    return False

  def doFunctionName(self, tok):
    """ Return True if this is a function name."""
    if self.defFunction:
      if tok.type == NAME:
        self.__incr( 'numFunctions')
        self.fqnName.append( tok.text )
        self.currentFcn = self.__genFQN( self.fqnName )
        self.fqnFunction.append( (self.currentFcn,self.blockDepth,FCNNAME) )
        self.defFunction = False
        self.findFcnHdrEnd = True
        if self.pa.verbose > 0: print "fqnFunction=%s" % self.fqnFunction
        self.__postToken( tok )
        return True
      elif tok.type == ERRORTOKEN:
        # we must compensate for the simple scanner mishandling errors
        self.findFcnHdrEnd = True
        self.invalidToken = mytoken.MyToken(type=NAME,
                                            semtype=FCNNAME,
                                            text=tok.text,
                                            row=tok.row,
                                            col=tok.col,
                                            line=tok.line)
        self.skipUntil = '(:\n'
        return True
      return False

  def doStringsOrComments(self, tok, prevTok):
    """ Return True if this is a docstring or comment."""
    if self.docString and tok.type == token.STRING:
      self.docString = False
      tok.semtype = DOCSTRING
      if self.checkForModuleDocString:  # we have found the module's doc string
        self.metrics['numModuleDocStrings'] += 1
        self.checkForModuleDocString = False
      self.__postToken( tok )
      return True
    if tok.type == COMMENT:
      # compensate for older tokenize including newline
      # obals......in token when only thing on line is comment
      # this patch makes all connents consistent
      self.metrics['numComments'] += 1
      if tok.text[-1] == '\n':
        tok.text = tok.text[:-1]
      if prevTok and prevTok.type != NEWLINE and prevTok.type != EMPTY:
        tok.semtype = INLINE
        self.metrics['numCommentsInline'] += 1
      self.__postToken( tok )
      return True
    return False
An early refactoring program, BRM has a number of other issues of which you should be aware. They include:
If a variable is used before an extracted method and later is redefined in the extracted method, the variable is passed as an argument to the extracted method, even when the passed value is never used.
If an argument is a simple variable and it is modified in the extracted method, the name in the extracted method is rebound to a different object. (For example, the simple parameter is passed as if it were a value.) This leaves unchanged the variable passed into the extracted method when the method returns.
Far more refactoring can be done on both the Java and Python code samples. But, I believe I have given you a brief overview of what current refactoring tools can do.
The benefits of using tools to do code refactoring include:
They take a fair amount of drudgery out of refactoring code.
They calculate which variables need to appear in the parameter list of the extracted methods, barring the problem above.
They make renaming variables/classes/functions/methods almost painless.
I realize I haven't discussed why you should refactor your code, or anyone else's for that matter. Often, there are both technical and managerial reasons to do refactoring. Using prototypes for production purposes is one of the bugaboos of programming, and we know the problems this causes. However, refactoring may be a way out of this cul-de-sac. Perhaps, you can use the benefits of refactoring to justify a rewrite to management.
I am puzzled by the differences in the interest between refactoring and metrics. I have found no objective way of measuring the effect of code refactoring. It seems that we simply know that the refactored code is "better".
I am also bothered by my response to one comment on last month's column. The writer mentioned that Function Points are an accepted metric for measuring complexity. They also provide good, consistent metrics for estimating project costs. I made an error of omission in not mentioning function points. On further reflection, I still don't see them as effective code metrics. Function points most often are used during specification and design of systems. They also are labor-intensive. I know of no product out there that can do a proper function point analysis on an existing code base. Please correct me if I am wrong.
Sources for Information about Refactoring
An Older Java Refactoring Tool
Refactoring: Improving the Design of Existing Code by Martin Fowler, Don Roberts, John Brant, William Opdyke (ISBN 0-201-48567-2), Addison-Wesley.
Refactoring to Patterns by Joshua Kerievsky, ISBN 0-321-21335-1, Addison-Wesley
