
OOo Off the Wall: My Objects All Sublime
All of the contents in an OpenOffice.org Writer document is one of three things: text characters, fields or objects. Objects is a large category that includes formulas, drawing objects and so-called OLE Objects, but it is represented most often by graphics. All objects are added to Writer using a frame, and most of the time, it is the frame that you are editing. The object itself sits sublimely above your changes, its appearance in the document altering but not the object itself.
Many settings for displaying objects can be preset using frame styles. In fact, most of Writer's default frame styles are ones that the program uses automatically whenever an object is added. The preset options include text wraps, borders, backgrounds and the macros that run when an object is selected in an on-line document. These options are discussed in "Getting in the Frame".
Other options can be set only when a graphic is added to the document. They include:
linking or embedding a graphic
scanning graphics
adjusting the display size
cropping the display
anchoring objects
arranging objects
adding captions
adding an image map
hiding graphics
Many of these actions can be performed by right-clicking on an object and making a selection from the pop-up menu. The most useful selection is Graphics or Object, which opens a tabbed window of options. Other options are available elsewhere in the editing window.
Objects are added from Writer's Insert menu. Depending on the type of object, you either can create a new object of a type listed or add an object from an existing file, such as a graphic or a pre-existing OOo file.
Graphics, the most common type of objects, can be either embedded or linked. The decision comes down to whether the Link box is checked when you select Insert -> Graphics -> From File, but the choice has a great affect on how you work.
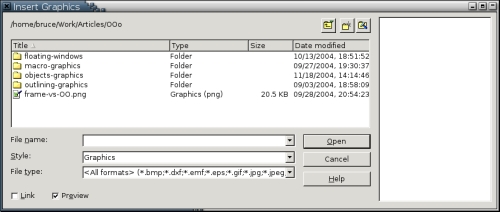
Figure 1. The Insert Graphics Window
An embedded graphic becomes part of the document and is added to its file size. By contrast, a linked graphic remains separate from the document. Only a small pointer is added to the file, indicating the path to the document. Whether a graphic is embedded or linked, it can be viewed in the document. On slower machines, though, you may notice a delay before a linked graphic is visible when you are scrolling. Both types of graphics also are listed on the Navigator, with no distinction made between them. Unless you specifically check the Link box on the Insert Graphics screen, graphics are embedded by default in Writer. Once the Link box is checked, all graphics are linked until the box is de-selected.
Both embedding and linking graphics have advantages and disadvantages. To help you decide which to use, here's a list of the advantages and disadvantages of both methods:
| Embedding | Linking |
|---|---|
| Makes for larger file sizes. On older machines or ones with less memory, larger file sizes may slow reaction time or even cause OpenOffice.org to crash. | Keeps document sizes small. Only the path to the graphic is added to the document. Easier to handle on older machines or ones with less memory. |
| More work to update a graphic. Graphics must be added one at a time, with the document open. | Easy to update. If you replace a graphic with another of the same name, and then the new graphic is used the next time you open the document that uses the graphic. Using a file manager, you can replace multiple graphics at the same time. |
| Can move or send the document without worrying about a lot of different files. | Graphics must be moved with the document or they do not display. Usually, this is easiest if graphics are stored in a sub-directory of the directory where the document is. |
| Can be stored or backed up easily. If the document is not used for a long time, there is no need to remember where the graphics are, or to move them to the correct location. | Care must be taken when backing up to include the graphics. If the document is not used for a long time, you may have forgotten where the graphics are or need to move them to the correct location. |
| Converting to linked graphics must be done manually. | Converting to embedded graphics is easy. Select Edit -> Links, highlighting all the links, and then click the Break Link button. |
For other objects, users have no choice. OLE Objects, by definition, are linked. Other objects, such as drawing objects, formulas or scanned objects, are embedded.
If your system already is configured for a USB or SCSI scanner, Writer detects it automatically. Settings for a scan are available from Insert -> Graphics -> Scan -> Select Source. The exact commands available depend on the scanner, but they generally include the resolution, scan modes and a preview window. The settings you choose become the defaults until you change them.
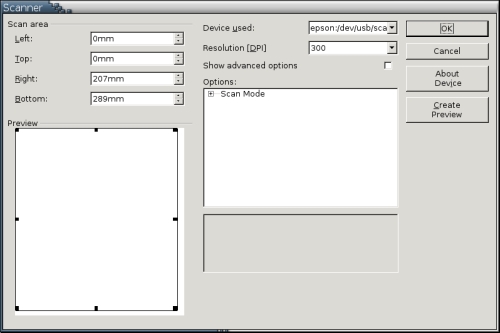
Figure 2. The Scanner Window. The exact contents of this window depends on your scanner.
When you are ready to do the scan, select Insert -> Graphics -> Scan -> Request. After a few seconds' delay, the scan begins. The result is embedded at the mouse cursor.
The separation of controls for settings and starting a scan is awkward at times, and it's a mystery why scanning isn't available from Draw, the OOo application in which it would be most useful. Yet, despite these drawbacks, Writer's scan tools are one of the easiest ways to use a scanner under Linux. They have all the features of xsane, but the complexity is tucked away and less alarming to non-technical users. If you want to save a scan done with Writer, you always can copy and paste it into a new Draw document and then export it to any standard graphic format.
Two of the most irritating quirks of Writer are found in its method of inserting graphics. First, if a graphic cannot fit within the margins of a Writer document, it is resized to fit. Second, if a graphic's height is taller than the free space available on the page, its display automatically is shrunk to fit the available space. In theory, these quirks are there to help users. In practice, they require endless adjustments. Other objects, mercifully, are free of such automatic resizing.
Fortunately, Writer provides all the controls necessary for fine-tuning the size of graphics. By selecting Graphics -> Tab from the right-click menu, you can use the Original Size button to display a graphic or object at its actual size or set the display to the size you actually want, using actual dimensions or a percentage of the original size. On the Crop tab, you not only can do similar scaling, but you also can change the amount of the object that displays from the left, right, top and bottom. Cropping is especially useful when inserting a Draw file, which has no way to crop except by adjusting the page size, which often consequently leads to large amounts of white space.
These adjustments can change a high resolution image to a lower one, however, causing problems in printing to either paper or PDF. In the end, you may want to open up The GIMP and resize the actual object rather than the display to avoid these problems. However, if changing the display size serves your purpose, the last step you always should make is to select Options -> Protect -> Size. Otherwise, if you add material before the object in the document, you may run into the second quirk of the default display, to the detriment of your blood pressure and general quality of life.
Selecting Graphics -> Crop from a graphic's right-click menu displays some of the same options as does Graphics -> Type. However, the Crop tab also has other uses. A crop can be set from each of the four margins. If you select Keep Scale, the cropped display keeps the same dimensions as it did in the original picture. If you select Keep Image Size, the cropped display is the same size as the original display--an option only worth selecting for high-resolution graphics, because otherwise the results are blurred.
The Cropping tab, incidentally, may explain why Draw has no convenient cropping tool. In Draw, the only way to crop is to group all the objects in a file, move them to the upper left corner and then adjust the page size. Adjusting the page size crops from the right and bottom margins, which is why you want to move the contents, but it is a trial-and-error process. Perhaps, though, the assumption is that Draw files are going to be displayed only in other OOo applications, where the display can be cropped as needed.
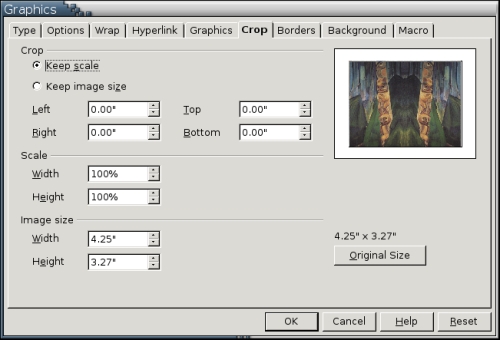
Figure 3. The Cropping tab adjusts how much of each graphic is displayed in a Writer document.
All objects are positioned in relation to another part of the document. You can choose which part to use for an anchor by selecting Graphics -> Type or Anchor from the right-click menu. The default for most objects is To paragraph, but you also can choose To page or To character. In each of these cases, if the anchor is moved--say by adding text before it--then the object moves with it.
Alternatively, you can choose As Character. This setting treats the object as though it were a text character, adjusting the spacing of the line it is on as necessary. Because objects and text mix poorly, this choice is used best when adding an object as a paragraph of its own. This is by far the simplest way to arrange an object, as editing the document does not affect its display. Moreover, if you give the object the same paragraph style as the paragraph above, the object's relation to the paragraph is indicated visually.
Whatever anchor you choose, select Options -> Protect -> Position to minimize the chances that editing will reposition the object.
The Arrange option in an object's right-click menu sets its position in a stack of overlapping objects. For example, if you had two rectangles, you could arrange the rectangles so that one or the other was visible where they overlapped. The rectangle that is visible is at the front of the stack, and the one that is invisible is at the back. Objects in a stack can be sent to the front or the back or moved forward or back one position in the stack. Whether arrange has any effect, of course, depends entirely on the objects involved.

Figure 4. An example of arranging. In this image, the red rectangle is at the front of the image stack. In other words, where the rectangles overlap, you see the red one, not the blue one.
The Captions option in the right-click menu adds a caption inside an object's frame. This positioning has the advantage of keeping the caption with the object. By default, captions are added with one of four prefixes: Drawing, Illustration, Table and Text (that is, Text Frame). If you are using Outline Numbering, the previous outline level's numbering also is added to the prefix. If you want automatic prefixes, as well as more categories of prefixes, you can set them using Tools -> Options -> Text Document -> General -> Caption. Either way, the prefixes can be useful if you want to create a table of objects. If you want the captions but not the prefixes, you manually can delete the prefixes after adding them.
A Position field is included in the Captions window but is grayed out. In OOo's current version, the only place that you can add captions automatically is below the object.

Figure 5. The Captions window adds captions within the frame of the object. That way, the object and its caption stay together.
In on-line documents, you can create an image map from a graphic by selecting ImageMap from the right-click menu. An image map provides hot spots that are linked to URLs. The Image Map window in Writer is one of the better designed parts of its GUI, offering a variety of choices for the shape of the hot spot, including a free-form polygon. Fields for adding the link, substitute text and the frame in which the link opens rounds out this handy little tool.

Figure 6. The Image Map window is used for setting up hot spots for hyperlinks.
With a large file or a slow computer, objects can make a noticeable difference in the time it takes to open, save or scroll through a file. Rather than enduring patiently, you can choose to display a standard placeholder instead of the object. Graphics can be turned on and off using the Graphics On/Off button on the left side of the editing window, and other objects can be turned on and off by making selections in Tools -> Object -> Text Document -> Display.
The placeholder shows the dimensions of the object's frame, and the URL or object name. The previews of the object in tools continues to display the object normally, and so does File -> Page Preview.
Writer's interfaces for formatting objects have only a rough consistency. However, the available tools remain largely the same. Although only graphics inserted from files give you the choice of linking or embedding or of creating an image map, most objects can be aligned, arranged or hidden or have a caption added within their frame. You can ignore these options and accept the default formattings, but if you want to give your documents a professional and individual style, learn to tweak them to your own needs and tastes.
