
An Introduction to Embedded Linux Development, Part 2
In Part 1 of this series, we indicated that we would use, as our SBC, the LBox with uClinux from Engineering Technologies Canada Ltd.. Recall that it features the Motorola Coldfire MCF5272 processor, Flash memory, a serial port, a fiber port and up to three 10/100 Ethernet ports. It's ready to go without needing to be built into something else--simply power it up with any suitable power supply in the 5-12 volt range. Although we are using a specific SBC for this project, the activities we undertake here correspond to similar activities on any typical SBC. That said, significant specific differences exist at the more detailed level from one SBC to another.
I purchased about 12 of these systems for our computer science department. If not purchased in quantity, the basic board goes for about $250. Then, you add whatever else you need.
Following along with this series while using an actual LBox SBC would be optimal. Nevertheless, I have organized this series of articles so a reader can glean useful information without purchasing the board. Yet another option would be to use some other SBC and parallel our activities.
To avoid putting forth too much nitty gritty detail here, I refer you to information posted in the FAQ section of the Engineering Technologies Web site.
The goals and subsequent sections for the current article are:
Power up the LBox.
Establish serial communication between LBox and workstation, including what to do if your workstation has no serial port.
Connect via Ethernet.
Install the cross compiling tool chains.
Carry out NFS mounting.
Write a program for the LBox and run it.
The last two sections are quite general and apply to most embedded Linux systems.
My particular setup consists of:
the LBox SBC (from Engtech)
a power supply (from Engtech)
a serial header-to-DB9 cable (from Engtech)
a CD with all needed software (from Engtech)
my laptop (the workstation) with Libranet 2.81, updated to the 2.4.27 kernel
a Belkin F5U409 USB-to-DB9 adapter because my laptop has no external RS-232 DB9 port but does have USB ports
I configured the laptop to use the widely available, tried and true Minicom terminal emulator for the serial connection. It comes with most Linux distributions, and for connecting to SBCs with serial ports, Minicom is a common choice. The Belkin F5U409 uses the mct_u232 driver, which is available with the kernel source. It didn't work properly for me with the 2.4.24 kernel, however, hence the update to 2.4.27.
Before applying power, I connected an Ethernet cable and the serial cable. The Ethernet ports provided on the LBox, when populated, have the expected RJ45 female sockets. The serial port header allows connection of the serial header-to-DB9 cable, which I connected to my laptop via the Belkin F5U409. At this point, everything seemed ready, so I applied power by plugging in the power adapter.
I used Minicom on my laptop to establish the serial connection to the LBox. The details can be found in this FAQ. Once Minicom was configured properly, I reset the LBox using the reset button, located near the board edge, kitty corner from the serial port header. Then, the Minicom window on my laptop spewed out the LBox startup messages. These could be useful subsequently, so I pasted them to an editor on the laptop for subsequent printout.
When the startup messages were finished, I was presented with the command prompt. I then investigated the system to determine what's available. For example, examining /bin showed both Busybox and Tinylogin were present. That suggested a small project to update Busybox to the recent 1.0 version, which has incorporated the Tinylogin functionality. Other things worth noting:
the result from uname -a was
uClinux lbox 2.4.20-uc0 #176 Mon Aug 16 11:25:42 ADT 2004 m68knommu unknown
the result from df was
Filesystem      1k-blocks      Used   Available  Use%     Mounted on
rootfs            1113         1113         0      100%     /
/dev/root         1113         1113         0      100%     /
/dev/ram1          115            7       108        6%     /var
/dev/mtdblock3    3008          336      2672       11%     /etc/config
from ls /bin, one could see that a version of Vi was present, and so on.
If connected to the Internet when booted, the LBox dhcpcd daemon should negotiate an IP address. If this doesn't occur--check by entering ifconfig in the Minicom window--we either can assign it manually or try again from the LBox command line by entering dhcpcd -p -a eth0 &.
The LBox supports telnet, so I now could telnet into the LBox from a shell on the laptop--if I configured the laptop for telnet. As shipped, the LBox does not support SSH. However, it does have an HTTP daemon, so I could access it with a browser. A Web page already was set up on the LBox (see Figure 1) that allows one to turn on, turn off or toggle an LED on the LBox board; it also provides links to the source code. This nicely demonstrated that you could interact with the LBox through a Web interface.
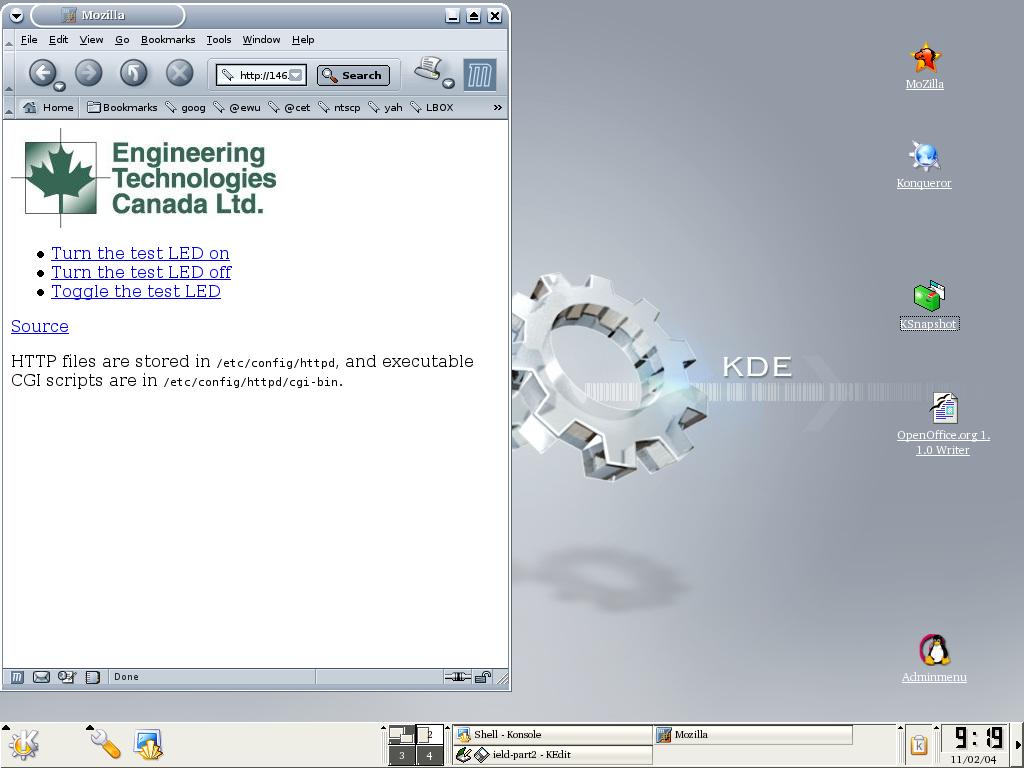
Figure 1. LBox Web Page
For any SBC, the vendor either supplies the tool chains or tell users from where to download them. Explicit directions should be provided and followed for installing the chains. These directions vary from vendor to vendor.
In our case, the tool chains were available on the CD provided with the LBox. Other software packages are included on the CD, including the uClinux source hierarchy, but we'll deal with those later and keep to the task at hand. The CD also provides an INSTALL file containing directions for installing the tool chains. These are quite simple. In particular, there is a shell script to execute that carries out the installation.
This subsection is not particularly LBox specific and is of general interest. Compared to a workstation, the LBox has limited resources--no hard drive. It is convenient for the developer to create a workspace on the workstation hard drive and then (NFS) mount that workspace as part of the LBox hierarchy. Once mounted, this workspace can be accessed from both the workstation and the LBox. Because the workspace exists on the workstation, it is easy to create periodic archival backups, for example, on CD-ROM. And because the workspace also is mounted on the LBox, we can test code developed in the workspace by running it on the LBox without using the limited file storage capabilities of the LBox.
There are two methods we can use to create the workspace. The first presumes that both the LBox and workstation are connected to the Internet; we then can mount a workstation directory on the LBox. The second method presumes that the LBox and workstation are not connected to the Internet but are connected directly to each other with an Ethernet cable. We discuss the second method here. The first is discussed (along with telnet connection) in this FAQ.
Connecting from the LBOX directly to the workstation by way of an Ethernet cable isolates us from the wider Internet, which might be of interest for security reasons or when we don't have access to the Internet, for example, while on the road in a remote setting. That's what we describe here.
Our assumptions here are that the NFS server is up and running on the workstation, the LBox is connected directly to the workstation with an Ethernet cable and the LBox is connected to the workstation with a serial cable. In my case, some firewall rules got in the way, so I turned the firewall off--the system was isolated from the Internet anyway.
We proceeded as follows:
Reset the LBox
Start Minicom on the workstation so the Minicom window emulates a terminal for the LBox
Configure eth0 for the LBox (in the Minicom window) with these commands:
ifconfig eth0 192.168.1.1 netmask 255.255.255.0 broadcast 192.168.1.255
Configure eth0 for the workstation using a workstation shell, as follows:
ifconfig eth0 192.168.1.2 netmask 255.255.255.0 broadcast 192.168.1.255
Test each by pinging the other--from a workstation shell try ping 192.168.1.1 and from the Minicom window try ping 192.168.1.2
Assuming all worked fine, now establish the file on the workstation you want to mount on the LBox; that is, on the workstation create a new directory for your LBox stuff; let's say it's /home/fredsmith/lbox_stuff
Create a file /etc/exports on your workstation containing the line /home/fredsmith/lbox_stuff *(rw,insecure). Take care not to include spaces in the parenthetical options list.
So that the new /etc/exports is scanned, restart the NFS server daemon on your workstation. For my Debian-based workstation, I would enter /etc/init.d/nfs-kernel-server restart. Some years ago, I did run into Red Hat-based systems on which I needed to stop and then start the daemon because restart wasn't quite equivalent.
Use the Minicom window to make a mount point: mkdir /var/nfs.
Now try the NFS mount command from the Minicom window as follows:
mount -t nfs -o nolock 192.168.1.2:/home/fredsmith/lbox_stuff /var/nfs
Investigate whether the mount was successful by examining the contents of /var/nfs in the Minicom window.
With the tool chains available and with the NFS mount still active, I can work in the NFS mounted directory, write a standalone program and cross compile it. I then can run it with Minicom while it resides in the NFS mounted directory.
Let's try that. Start by working on the workstation as follows:
Using a shell window on the workstation, enter a simple program in the /home/fredsmith/lbox_stuff directory:
  /* bye.c
  */
  int main() {
    printf("Lbox says goodbye.\n");
    exit(0);
  }
Compile the program with the cross compiler:
m68k-elf-gcc -m5200 -msep-data -Wl,-elf2flt -o bye bye.c -lc
Make sure the LBox can execute the result by entering chmod 755 bye.
Next, we work on the LBox by way of the Minicom window.
Navigate in the NFS mounted directory to wherever the executable is. For example, if it's at the top of the mounted hierarchy, enter cd /var/nfs.
Enter ls -l to assure that you are in the directory containing bye, and check that it's executable.
Execute the program by entering ./bye, and you should see as output: Lbox says goodbye.
In the next installment of this series, we will recompile an LBox kernel and install it on the LBox, along with a root filesystem. This gives you the option to tailor the kernel and root filesystem for your specific needs.

