
Cooking with Linux - Eye-Popping Panels
François? You look a little green. What is wrong? Ah, you were playing with the 3-D desktop switcher and got a little motion sickness. Perhaps with your delicate condition, we should stick to the more classic desktop pagers. Not at all, mon ami, I am not making fun of you. You are more of a down-to-earth kind of waiter, and things zooming through space, toward you or away from you, are obviously not for meant for one such as yourself. Get yourself together, François. We certainly don't want you dropping the wine on our guests when you serve it. Speaking of our guests, they have just arrived.
Welcome, mes amis to Chez Marcel, the world's finest Linux French restaurant and the home of the greatest wine cellar in the world. Please sit and make yourselves comfortable. I'll have my faithful waiter run down to the wine cellar immediately. Steady, François. Let me see...the 2003 Casillero del Diablo Chilean Chardonnay would be excellent with this menu—fresh pear and green apple flavors and exactly the right acidity, mes amis. Ordinarily, François, I would tell you to hurry, but take it easy on the way up!
Despite using a model we've come to think of as normal, many programmers and users are looking for alternatives to the standard panel, pager and system tray. What's interesting is that much of the hard work being done on these panel replacements (or enhancements) involves some kind of eye-popping, 3-D effects, the kind that has made François a bit unsteady on his feet.
One of these alternative panels is Stephano's KXDocker Project, which owes some inspiration to the Mac OS X Docker, but as Stephano explains is “more powerful”. The effect created leaves your system with a collection of icons representing various applications (including your program launcher menus) running along the bottom. Running your mouse across these icons in sequence creates an effect much like an icon wave making its way along the bottom (Figure 1).

Figure 1. This KDE panel does the wave with your icons.
The first step to getting KXDocker working is to pick up a copy from the official project Web site (see the on-line Resources). The Web site provides precompiled packages for an impressive number of the major distributions. Source also is available if your system isn't listed. A resources package is available on the download page. This isn't necessary with the latest builds, but it does include some additional theme support so you may want to install it as well (simply run the install.sh script). Building from source is a fairly straightforward extract-and-build five step:
tar -xjvf kxdocker-0.23.tar.bz2
cd kxdocker-0.23
./configure --prefix=/usr
make
su -c "make install"
I included a prefix to the standard ./configure step, because you'll want to install the KXDocker program into the same hierarchy as your current KDE installation.
To use KXDocker, simply run kxdocker. The dock appears at the bottom of your screen. It's probably a good idea to move the KDE Kicker panel out of the way (drag it to the top for now). Although KXDocker is designed as a replacement for the default KDE kicker, it works happily in conjunction with it. In fact, KXDocker even disappears into your system tray where it can be activated with a single click on its icon.
To change the default operation, included icons, themes and so on, right-click on the panel and select Configurator (this also can be done by right-clicking the system tray icon). The configurator is a tabbed dialog from which you can modify a number of items to make the dock work the way you want. One setting you might want to change right away is listed in the Window tab as Auto send to background, so that the dock isn't obscured automatically by running application windows, such as a word processor. Once a change has been made, click the Save icon and assign a name to this configuration. When asked whether you want it loaded automatically when you restart KXDocker, click Accept.
If the idea of improving your panel experience is starting to sound interesting, mes amis, don't stop there. Another project well worth investigating is the KSmoothDock Team's KSmoothDock. KSmoothDock works in two different zooming modes. The default is called the normal zooming mode. As you move across each icon in the new panel, the icons zoom to offer a larger view (Figure 2).

Figure 2. KSmoothDock in Normal Zoom Mode
This is only the beginning and the most basic of KSmoothDock's settings. I discuss the others shortly, but to make KSmoothDock work, you need a copy. Although the official hosting site for KSmoothDock is SourceForge, your best bet for the latest and greatest on the project is the KDE-Look Web site (see Resources). From there, you can get precompiled binaries for a few different releases. Source also is available and can be installed on any system running KDE 3.2 or later. The process, once again, is the classic extract-and-build five step:
tar -xzvf ksmoothdock-3.5.1.tar.gz
cd ksmoothdock-3.5.1
./configure --prefix=/usr
make
su -c "make install"
Start the program by running ksmoothdock. A window appears suggesting that KDE's default Kicker panel should be moved to the top, out of the way. The dialog offers to do it for you at this time. When the ksmoothdock program is running, everything becomes iconified, except the pager for the virtual desktops, including running tasks. The icons are the default icons for the applications.
The second mode is called parabolic zooming mode and is more like the effect created by KXDocker. In the normal mode, virtual desktops are represented by numbered squares representing the workspaces, but they do not zoom. This changes in the parabolic mode as shown in Figure 3.

Figure 3. Mac OS X users will find this look familiar.
To switch to parabolic mode, right-click on the dock's program launcher (far left) and select Switch to Parabolic Zooming Mode (Figure 4). Changing modes like this does, however, require that you then exit the program and restart it for the changes to take effect. This is true for switching back to normal mode if you find this one too dizzying.

Figure 4. Right-Click to Switch Zooming Modes
The menu shown in Figure 4 has two other interesting items. The topmost item lets you change the Quick Launch menu, which are the four default icons to the right of the virtual desktops. Doing so opens a Konqueror window from which you can create links to applications. The second is a Preferences dialog. In the Preferences menu, you can select which components are visible in the dock, such as the clock, and whether the taskbar icons are to be included. Another interesting option is the level of opacity, which lets you define how much of your wallpaper is visible through the dock.
In all of these cases, the one thing that stays more or less the same is your pager and its virtual desktops—nothing really fancy there other than some simple representative icon zooming. To address this, I'm going to offer you a rather rich dessert and pull out all the stops on system performance with some of the best eye candy I've seen in a long time. I'm talking about Brad Wasson's 3D-Desktop, an OpenGL program that gives you a slick way of switching from one virtual desktop to another. You definitely need a 3-D accelerated video card for this one.
When the program starts, your screen shifts to 3-D mode. Your current virtual desktop appears to drop away, and the whole thing zooms out so that all all your screens are seen floating in space. It's an amazingly cool effect that you definitely have to try. By default, the 3D-Desktop default view is a carousel with all of your virtual desktops assembled in a circular presentation (Figure 5). Left and right cursor keys let you move from one desktop to the other. When you have the virtual desktop you want, press the spacebar or the Enter key. The virtual desktop you've chosen zooms back in and the screen shifts to normal view. It's cool. It's fun. And it's useful too.
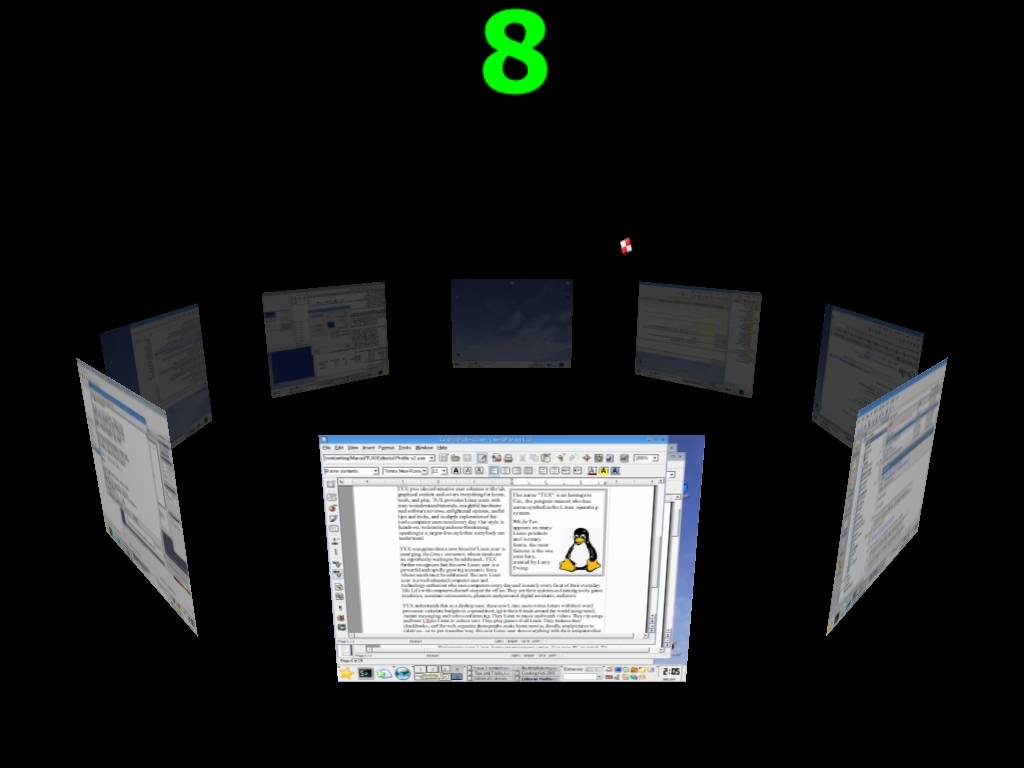
Figure 5. The 3D-Desktop default is a carousel.
To experience 3D-Desktop, you need to get it on your system, so head on over to SourceForge and pick up a copy (see Resources). Source packages are available from the site along with a couple of different binary packages (SuSE and Red Hat) as well as a source RPM. You also are likely to find it on the contrib site for your particular distribution, but if you need to build from source, it isn't difficult. You need the Mesa GLU and Imlib2 development libraries, but aside from that, this is another example of the classic extract-and-build five step:
tar -xzvf 3ddesktop-0.2.7.tar.gz
cd 3ddesktop-0.2.7
./configure
make
su -c "make install"
Running the program is a matter of typing 3ddesk. However, the first time, you should run the program with the --acquire option. Starting the program this way serves two purposes. The first is to see whether the server portion of the program (3ddeskd) is running and to start it if it isn't. The second is literally to acquire images of all of your current virtual desktops. A lot of people tend to run four virtual desktops. I run eight. This process takes only a second or two. Immediately after that, the magic happens and your 3-D switcher is running.
Once you have chosen a virtual desktop and returned to your work, you'll find yourself having to run 3ddesk again next time. To get around that, map an unused function key to run the program. I used F2 in KDE so that pressing F2 switches me to the 3D-Desktop view with a single touch. Different desktop environments do it differently, but this is how it is done with KDE (the 3D-Desktop Web site has suggestions for other environments).
Right-click on the big K (application launcher) and select Menu Editor. When the menu edit window pops up, navigate down the side to your application of choice (you may need to add a 3D-Desktop menu item by clicking File followed by New Item on the menu bar). Click on the entry for 3D-Desktop and look down on the right-hand side near the bottom of that window. See the Current shortcut key button? It probably says None. Next, click that button. A window appears waiting for you to enter a keystroke. Press F2 (or whatever sequence amuses you), and then press Apply. You now can close the menu editor.
You may want to play with some of the command-line switches. Although the default carousel view is my personal favorite, other interesting modes include linear, flip and more. For a taste of childhood nostalgia, try the viewmaster mode by typing 3ddesk --mode=viewmaster. Type 3ddesk --help for more examples.
It appears, mes amis, that closing time has once again snuck up on us. I'm sure, however, that I can convince François to top up our guests' glasses one more time. Merci, François. I must confess that this wine is particularly good. It's making me think that a plain, flat, real desktop is really what we need at this time—a good solid surface for resting our wineglasses, non? Until next time, mes amis, let us all drink to one another's health. A votre santé Bon appétit!
Resources for this article: www.linuxjournal.com/article/7921.
Marcel Gagné (mggagne@salmar.com) lives in Mississauga, Ontario. He is the author of Moving to the Linux Business Desktop (ISBN 0-131-42192-1), his third book from Addison-Wesley. In real life, he is president of Salmar Consulting, Inc., a systems integration and network consulting firm. He is also a pilot, writes science fiction and fantasy, and folds a mean origami T-Rex.

